Beautiful knitted hat
Added: 13.12.2015 в 20:53 Views: 182511
Beautiful knitted hatKlubokhttp://klubok.work/1/1/6020/Klubokhttps://klubok.work/css/image/top-logo-en.png 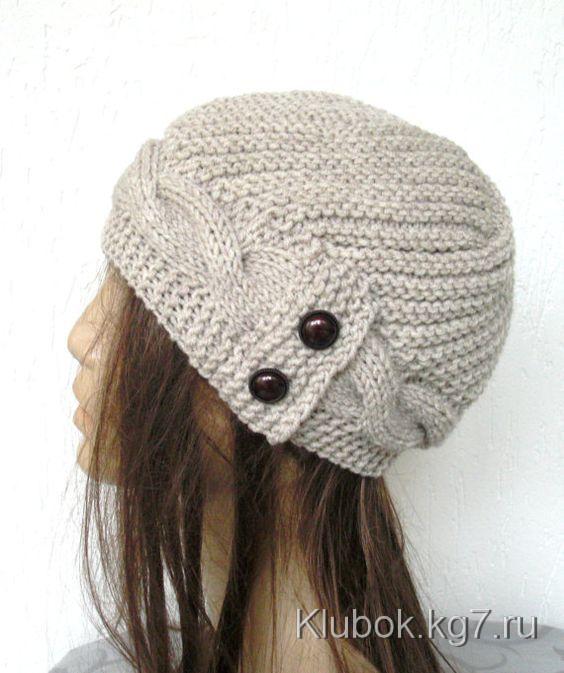


I don't have a ready scheme, but I know how to do it, so I prepared something like a master class, and so we begin.
How to knit the headband for this hat, I hope everyone knows, it's just a strip with a braid equal to the head circumference, we won't dwell on it.
The bottom of this hat can be knitted in two patterns
1 — ribbing in 3 rows
Row 1 — knit stitches
Row 2 — purl stitches
starting from row 3, the sequence is 3 rows — all stitches knit, 1 row — all stitches purl
this results in an alternation of three knit and three purl rows. I'm not sure, but I think this is called transverse ribbing 3x3
2 — ribbing in 2 rows
Row 1 — all stitches knit
from the second row there is a repetition — 2 rows — all stitches purl, 2 rows — all stitches knit.
This results in an alternation of two knit and two purl rows, and accordingly this is transverse ribbing 2x2
In my sample, I have 3x3 ribbing, in the picture there is 2x2 ribbing. The bottom of the hat is knitted diagonally and consists of 5 trapezoids. The knitting starts from the short side of the trapezoid, on the hat in the picture, 14 or 16 stitches are cast on for the first row (this is approximate), then we knit in the chosen way in each odd row adding 1 stitch on both sides starting from the first row, after the edge stitch we make a yarn over, knit all the stitches of the row and before the last edge stitch, we make another yarn over. In the next row, these yarn overs are knitted twisted as knit or purl stitches depending on the main row. We continue knitting like this until the desired height of the hat (the picture shows 28 rows).
In the knit row, we either close or knit and move the stitches to an additional needle so that the same number of stitches remains on the left needle as during the initial cast on, and we knit the next trapezoid, repeating all this until the desired size is reached, it should look like this tree of trapezoids
Attached images