


Fingerless mitts with flap by Ysolda Teague.
Added: 13.11.2014 в 00:53 Views: 40908
Fingerless mitts with flap by Ysolda Teague.Klubokhttp://klubok.work/1/135/5467/Klubokhttps://klubok.work/css/image/top-logo-en.png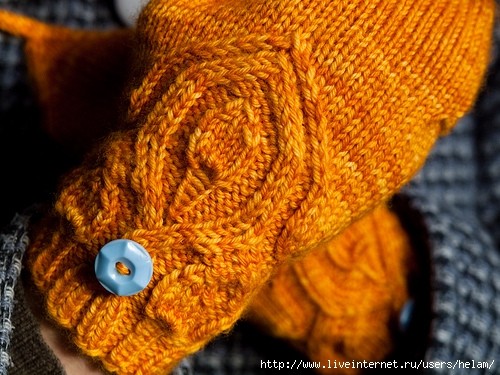
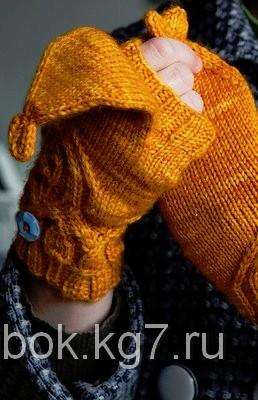
Interesting and quite practical fingerless mitts with a flap were created by designer Ysolda. She named her creation "Lion's Yawn." They are not only warm and comfortable, but also decorated with an intricate pattern.
The description for knitting these mittens with a foldable top (they can be called that) is translated from Ysolda Teague's book “Whimsical Little Knits”.
Size:
Hand circumference 18-22 cm. The length can be adjusted. The description indicates where this adjustment can be made.
Materials and tools:
Madelinetosh Worsted yarn (100% wool, 206 m / 100 g) – 1 skein, set of double-pointed needles No. 4, scraps of contrasting color yarn.
Knitting gauge:
20 stitches and 28 rows = 10 cm.
Cuffs (the same for both mittens):
Cast on 44 stitches. Join the round and distribute the stitches on 4 needles. Mark the beginning of the round.
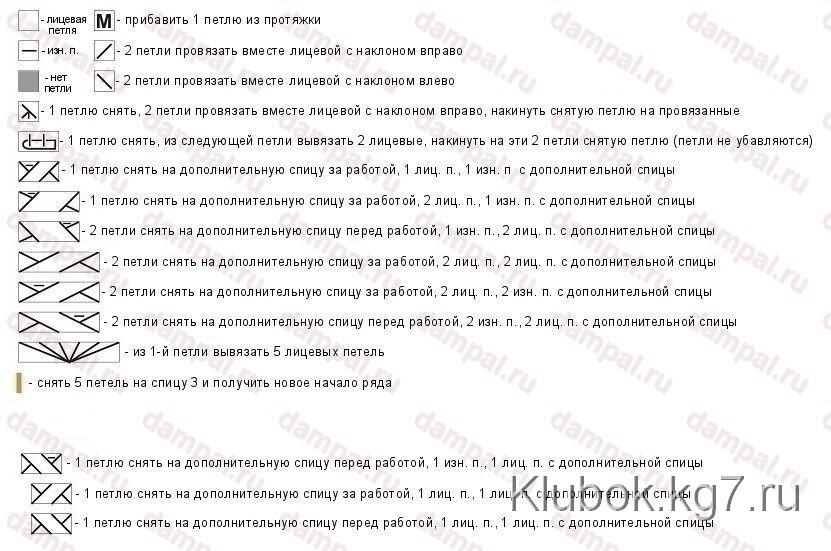
Knit 40 rounds following the pattern. Repeat the stitches in the pattern marked with a pink frame twice.
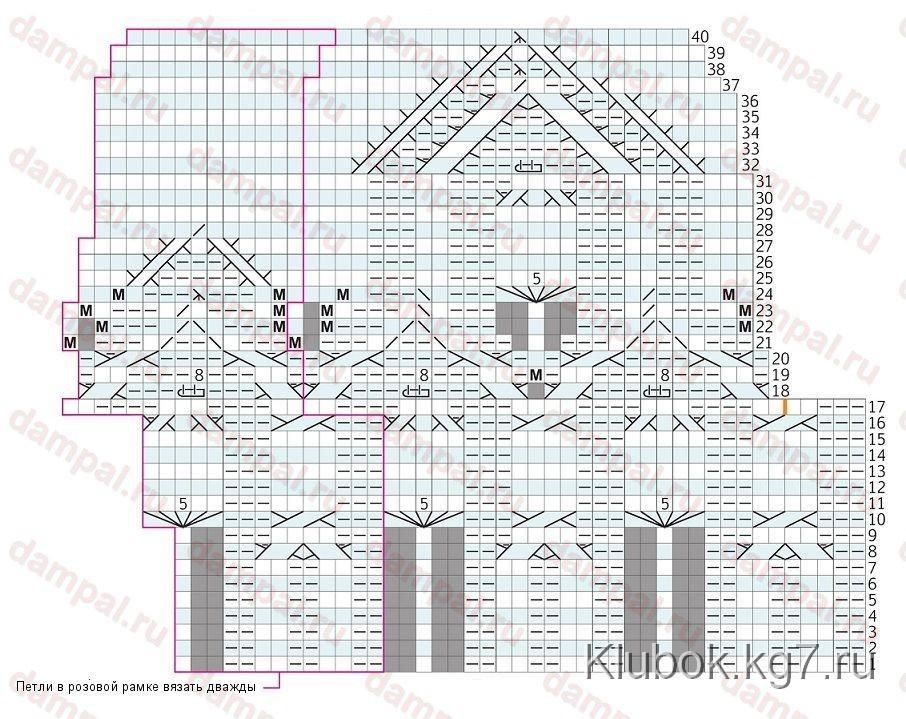
Right mitten:
Knit one round in knit stitches.
Next round: 19 knit stitches, slip the next 10 stitches onto a scrap of contrasting color yarn (stitches for the thumb), cast on 2 stitches, knit stitches to the end of the round.
Left mitten:
Knit knit stitches until the last 8 stitches before the end of the round, slip the next 10 stitches onto a scrap of contrasting color yarn (stitches for the thumb), place a marker for the new beginning of the round at this point, cast on 2 stitches, knit stitches to the end of the round.
For both mittens:
Knit 7 rounds in knit stitches.
Knit 8 rounds in ribbing 2x2 (2 knit stitches, 2 purl stitches).
Bind off all stitches, cut the yarn.
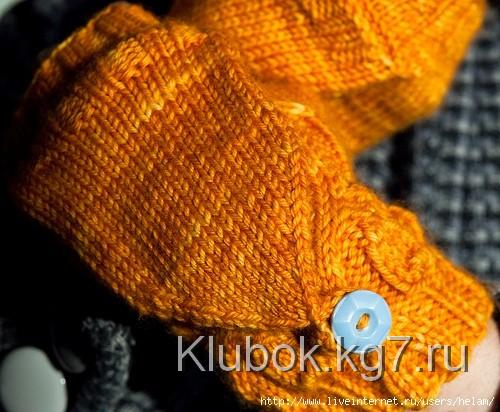
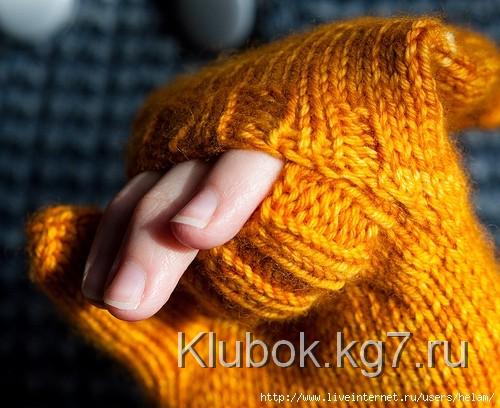
Foldable top:
On the back side of the mitten, orienting by the position of the 2 cast-on stitches for the thumb, cast on 22 stitches as shown in the picture. These stitches are in the third row from the 2 cast-on stitches.
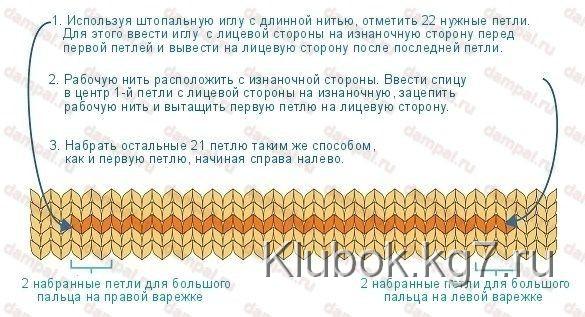
After casting on 22 stitches, pull the working yarn to the front long enough to finish the mitten. Cast on another 16 stitches with this yarn and distribute them on two needles. There should be a total of 38 stitches. Join all stitches in the round.
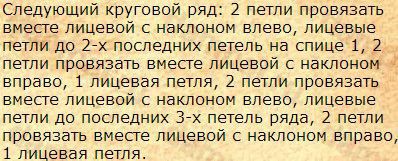
For the next 6 rounds: 23 knit stitches, [2 purl stitches, 2 knit stitches] – until the last 3 stitches of the round, 2 purl stitches, 1 knit stitch.
Knit 19 rounds in knit stitches. At this point, the length of the mitten should be 4 cm shorter than the desired total length. This is where you can adjust the length.
Move 2 stitches from needle 1 (where there are 22 stitches) to needle 3, and also move the last 2 stitches from needle 1 to needle 2. Thus, there will be 18 stitches on needle 1, and 10 stitches on needles 2 and 3 each.
Next round: knit stitches.
Repeat the last two rounds until 10 stitches remain on the needles.

Transfer the remaining 6 stitches to needle 1 so that the 1st stitch of the round is the rightmost on the needle.
Next round: knit 2 stitches together with a right-leaning decrease – 3 times.
For the remaining 3 stitches, knit an i-cord: *2 knit stitches, slide the stitches to the other end of the double-pointed needle without turning the work; repeat from * for 14 rounds. Bind off the stitches.
Thumb:
Transfer the 10 stitches that were set aside on a scrap yarn for the thumb to a needle. Join the yarn and cast on another 4 stitches from the 2 previously cast on. Distribute the resulting 14 stitches over three needles.
Knit 16 rounds in knit stitches. The length of the knitted thumb should be 1 cm shorter than the desired total length.
Next round: [2 knit stitches, knit 2 together with a right-leaning decrease] – 3 times, 2 knit stitches.
Next round: [1 knit stitch, knit 2 together with a right-leaning decrease] – 3 times, 2 knit stitches.
Next round: knit 2 stitches together with a right-leaning decrease across the whole round.
Cut the yarn and thread it through the remaining stitches. Pull tightly and weave in the end on the wrong side.
Finishing:
Sew the end of the i-cord to its beginning, forming a loop. Sew a button on the cuff for this loop.
Fingerless mitts with a flap are very convenient when you need to, for example, attach a leash to a dog in the winter cold. Dog owners, like many others, will appreciate these mitts.