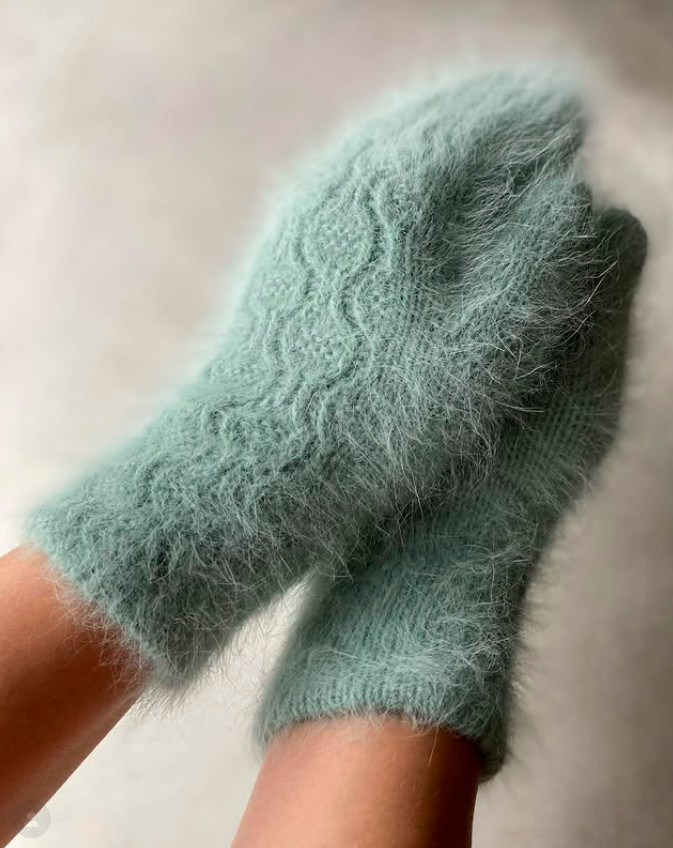
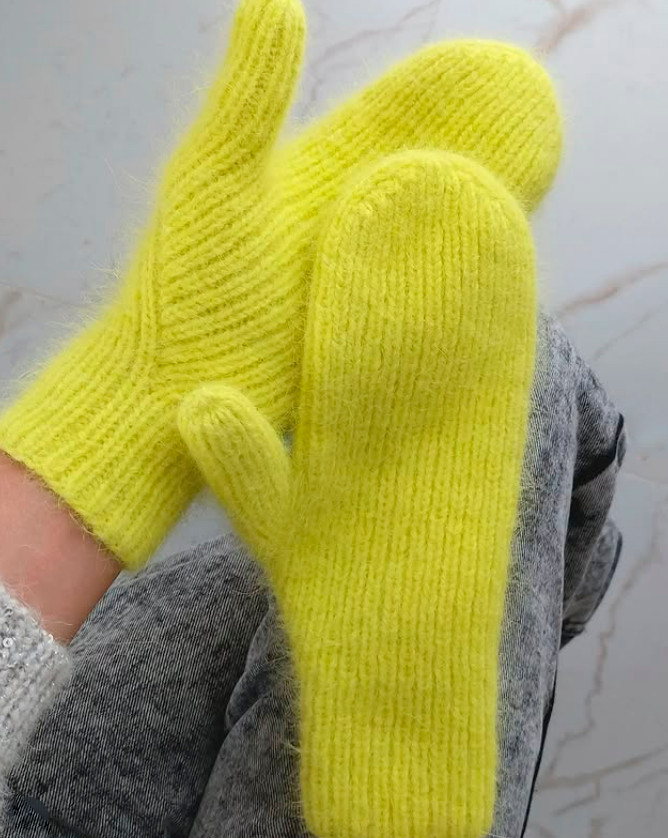
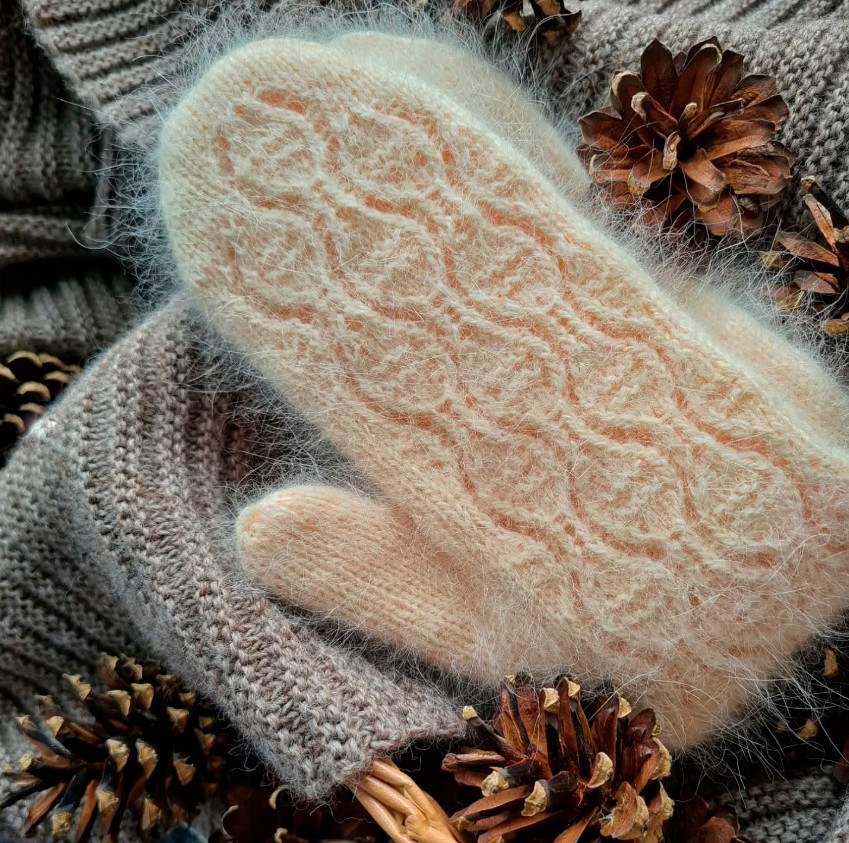
Mittens with a knitted pattern
Added: 07.11.2025 в 18:52 Views: 366
Mittens with a knitted patternKlubokhttp://klubok.work/1/135/9284/Klubokhttps://klubok.work/css/image/top-logo-en.png
REQUIRED MATERIALS AND TOOLS
-yarn 380-1500 m/100 g (you will need about 80 grams of yarn)
-circular needles with a cable length of 80-100 cm, diameter 2.5 mm for the cuff and 3 mm for the hand and thumb (you may need needles of smaller or larger diameter)
-knitting needle
-marker (optional)
-hook 2-2.5 mm
-waste yarn for temporary auxiliary cast-on stitches and for picking up the stitches of the thumb
YARN OPTIONS
Outer layer:
-Cardiff Cashmere Classic (100% cashmere), 112 m/25 g, 2 skeins
-Fonty Gengiskhan 3 (100% yak down), 200 m/50 g, 1 skein
-Fonty Coeur D’Angora (80% angora, 20% merino), 108 m/25 g, 2 skeins
-Cardiff Cashmere Cammello (100% camel hair), 112 m/25 g, 2 skeins
-Casagrande Angora 80 (80% angora, 20% PA), 112 m/25 g, 2 skeins
-Bobbin 100% cashmere Loro Piana, Cariaggi, etc. 1350-1500 m/100 g in three plies; about 40-50 g needed
-Long-pile mink, 350 m/50 g, 2 skeins
Inner layer:
-Infinity Magic (80% merino, 20% polyamide), 210 m/50 g, 1 skein
-Grundl Hot Socks Pearl (75% merino, 20% polyamide, 5% cashmere), 200 m/50 g, 1 skein
-Regia Premium Merino Yak (58% merino, 28% polyamide, 14% yak), 400 m/100 g, you will need about 40 g
-also for the inner part of the mittens you can use the yarn from which the outer part is knitted
INTRODUCTION
Knitting of our two-layer mittens will begin with the outer part using an open cast-on edge. Then with circular needles using the “magic loop” method, knit the cuff to the required height. Next, begin knitting the thumb gusset with a shifted starting point. Slip the thumb stitches onto waste yarn. After knitting the palm to the required height, knit the toe of the mitten and close the stitches with a knitted seam. Finally, knit the thumb and reinforce the eyelets.
Next we proceed to the inner part of the mitten. Unravel the provisional cast-on edge, pick up the live stitches, and begin knitting the inner layer of the mitten in stockinette stitch in mirror image.
MITTEN SIZES
Fig. 1
| Palm circumference | Number of stitches | Knitting chart |
|---|---|---|
| 17–18 cm S | 46 stitches | No.1; No.1.1; No.1.2; No.2.1; No.2.2 |
| 19–20 cm M | 50 stitches | No.2; No.1.3; No.1.4; No.2.3; No.2.4 |
Before starting, measure the circumference of your hand as shown in Fig. 1 and determine your mitten size.
The calculations in the description are for size S; the numbers in parentheses are for size M.
Gauge: 10×10 cm = 30 stitches × 40 rows
START OF WORK
Outer layer of mitten
We begin knitting the mitten with the outer knit side. On circular needles of 2.5 mm diameter, using a waste yarn in a contrasting color and a crochet hook, cast on 46(50) stitches with an open cast-on. Then take the main yarn and knit the first establishment row in knit stitches. Join the knitting in the round. Distribute the stitches onto two needles: 1st needle (outer side of the hand) — 24(26) stitches, 2nd needle (inner side of the hand) — 22(24) stitches.
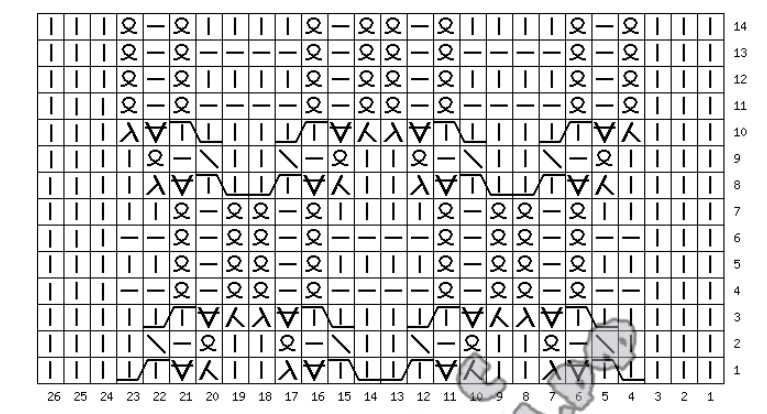
Knit 4 rounds in stockinette. Then on the 1st needle knit according to chart No.1(No.2); the stitches of the second needle are knitted in stockinette.
Knit the cuff to a height of 2 full repeat sections and another 4 rows of charts No.1(No.2); total 36 rows after the first establishing row. This is about 6–8 cm.
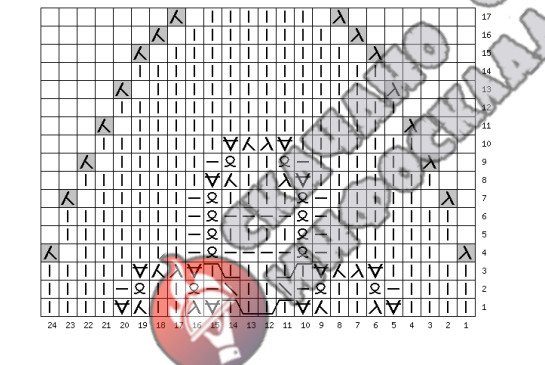
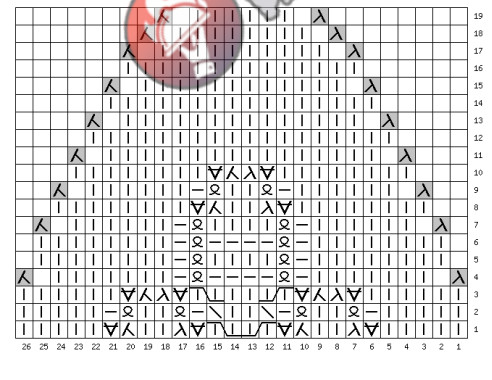
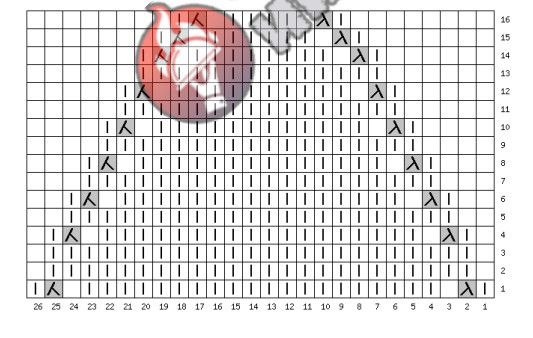
Chart No.1 (size S)
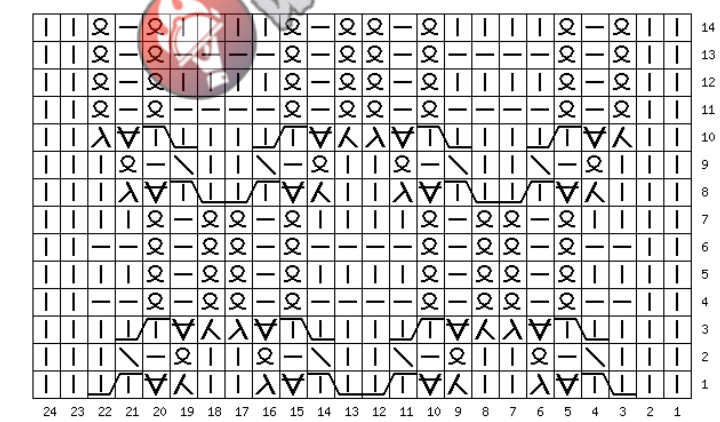
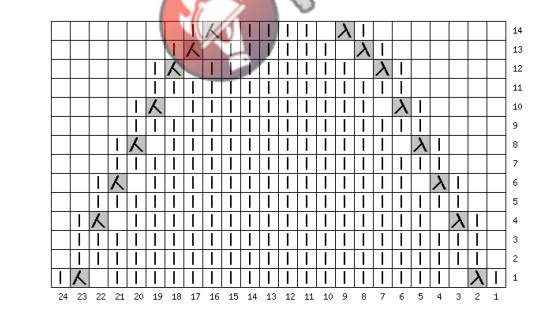
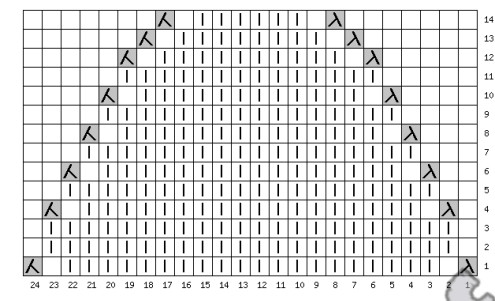
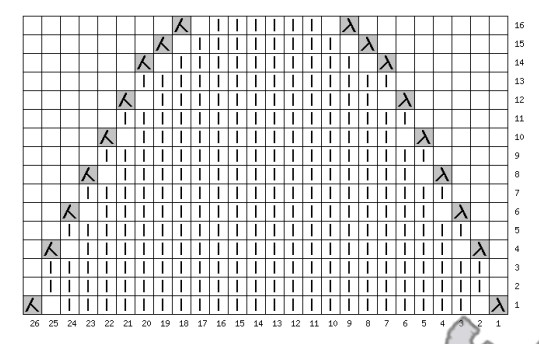
Chart for size M
LEGEND
![]() — Knit stitch.
— Knit stitch.
![]() — Purl stitch.
— Purl stitch.
![]() — Crossed knit stitch.
— Crossed knit stitch.
![]()
— Knit two stitches together with a left-leaning decrease.
![]() — Knit two stitches together with a right-leaning decrease.
— Knit two stitches together with a right-leaning decrease.
![]() — Make a one-stitch increase by purling from the previous row.
— Make a one-stitch increase by purling from the previous row.
![]() — Slip a stitch without knitting, yarn at the back.
— Slip a stitch without knitting, yarn at the back.
![]() — Cross two knit stitches to the left.
— Cross two knit stitches to the left.
⟞ — Cross two knit stitches to the right.
![]()
in the gray square — Two stitches together one knit with a left-leaning decrease
(used in shaping the toe).
![]() in the gray square — Two stitches together one knit with a right-leaning decrease
in the gray square — Two stitches together one knit with a right-leaning decrease
(used in shaping the toe).
□ — Empty cell, no stitch. Used in toe charts for clarity; not knitted.
THUMB GUSSET
After knitting the cuff, proceed to form the thumb gusset.
Change needles to 3 mm. Since the thumb is not located directly at the edge of the hand,
but shifted toward the palm, the gusset will be offset by 3(4) stitches from the edge of the needle.
Outer layer of the mitten:
-
On the left mitten, begin knitting the gusset on the 2nd needle, 3(4) stitches from the end of the row.
-
On the right mitten, begin knitting the gusset on the 2nd needle after 3(4) stitches from the start of the needle.
-
Left mitten.
1st row:
1st needle — knit according to chart No.1(No.2).
2nd needle — after 3(4) stitches from the end of the needle, make an increase from an elongated slipped stitch with a right-leaning twist.
2nd row:
1st needle — knit according to chart No.1(No.2).
2nd needle — all stitches knitted.Repeat rows 1 and 2 another 14(15) times.
After knitting the thumb gusset on the 2nd needle there are 37(40) stitches.Right mitten.
1st row:
1st needle — knit according to chart No.1(No.2).
2nd needle — after 3(4) stitches from the start of knitting, make an increase from an elongated slipped stitch with a left-leaning twist.2nd row:
1st needle — knit according to chart No.1(No.2).
2nd needle — all stitches knitted.Repeat rows 1 and 2 another 14(15) times.
After knitting the thumb gusset on the 2nd needle there are 37(40) stitches.
THUMB STITCH SEPARATION
After all the rows of the thumb gusset are finished, we will transfer the gusset stitches to waste yarn and perform an air (provisional) cast-on.
Left mitten.
1st needle (outer side of the palm) — knit the stitches according to chart No.1(No.2).
2nd needle (inner side of the palm) — knit 19(20) stitches,
slip 15(16) stitches onto a waste yarn of contrasting color
(these stitches can be closed with this yarn), cast on 2 stitches using an air cast-on method, 3(4) knit stitches. -
Right mitten.
1st needle (outer side of the palm) — knit the stitches according to chart No.1(No.2).
2nd needle (inner side of the palm) — knit 3(4) stitches,
slip 15(16) stitches onto a waste yarn of contrasting color
(these stitches can be closed with this yarn), cast on 2 stitches using an air cast-on method, 19(20) stitches.
Check: on each needle, after separating the thumb stitches, we have 24(26) stitches.
Next we knit the palm to the height until the pinky closes.
At the same time, on the outer layer of the mittens on the 1st needle, begin
a gradual finishing of the pattern motifs.Regardless of size, knit exactly 7 pattern repeats from the start of knitting the mitten (No.1/No.2).
Then knit according to charts No.1.1–1.4, gradually turning the pattern into stockinette stitch,
while simultaneously shaping the mitten’s toe. -
MITT TOE
We begin the toe shaping stage of the mitten.
Together with the pattern's gradual completion, we start making decreases
from each edge of the needles, according to charts No.1.1–1.4.
Exactly at this level the pinky will be closed.You may start toe decreases 3–4 rows higher or lower than indicated in the charts.
It all depends on the height of your hand.
Left and Right Mittens (Size S)
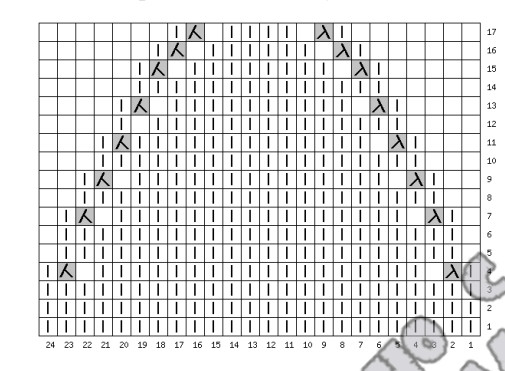
First needle (outer side of the palm)
Chart No.1.1
On the 1st needle, decrease at the beginning and at the end of the row.

Left and Right Mittens (Size S)
Second needle (inner side of the palm)
Chart No.1.2
-
-
On the 2nd needle, make decreases at the beginning and at the end of the row,
leaving one stitch from each edge of the needle.
Left and Right Mittens (Size M)
First Needle (Outer side of the palm)
Chart No. 1.3
-
Left and Right Mittens (Size M)
Second Needle (Inner side of the palm)
Chart No. 1.4
-
 After the toe is knitted, the remaining stitches on the needles are seamed with a stockinette stitch.
BIG THUMB
We transfer the thumb stitches from the waste yarn onto the needles and divide them into two parts.
The same for outer and inner layers, and the same for left and right mittens.
1st needle — 8(8) stitches,
2nd needle — 7(8) stitches.We thread a new yarn through the gap between the two stitches cast on, using an air method when separating the thumb stitches.
Pick up one stitch from this gap.
Then pick up 2 stitches from the palm fabric.Knit 8(8) stitches on the 1st needle in knit stitches.
Then 7(8) stitches on the 2nd needle in knit stitches.
Pick up 2 stitches from the palm fabric.
Join the knitting in the round.The needles now hold:
1st needle — 11(11) stitches,
2nd needle — 9(10) stitches.The start of the round is where the new yarn was introduced.
Knit the thumb stitches in the round until there are about 5 mm left to the end of the thumb.
Size S
Row 1:
1st needle — 2PVP (2 stitches knit together with a right-leaning), 1 knit,
2PVP, 1 knit, 2PVP, 1 knit, 2PVP.
2nd needle — 1 knit, 2PVP, 1 knit, 2PVP, 1 knit, 2PVP.Row 2: all stitches knit.
Row 3:
1st needle — 1 knit, 2PVP, 1 knit, 2PVP, 1 knit.
2nd needle — 1 knit, 2PVP, 1 knit, 2PVP.Row 4:
1st needle — 2PVP, 1 knit, 2PVP.
2nd needle — 1 knit, 2PVP, 1 knit.There are 6 stitches left on the needles; bind them off.
-
Left mitten.
Row 1:
1st needle — make an increase from a wrapped stitch 3(4) stitches from the start of knitting with a left-leaning twist.
2nd needle — all stitches knit.Row 2:
1st and 2nd needles — all stitches knit.Repeat Rows 1 and 2 another 14(15) times.
After shaping the thumb gusset, the 1st needle has 37(40) stitches.
Right mitten.
Row 1:
1st needle — increase from the last 3(4) stitches to the end of the needle using a twisted knit with a right-leaning twist.
2nd needle — all stitches knit.Row 2:
1st and 2nd needles — all stitches knit.Repeat Rows 1 and 2 another 14(15) times.
After shaping the thumb gusset, the 1st needle has 37(40) stitches. -
SEPARATION OF THUMB STITCHES
Left mitten.
1st needle (inner side of the palm) — knit 3(4) knit stitches,
slip 15(16) stitches onto a waste yarn of a contrasting color
(these stitches can be bound off with that yarn),
pick up 2 stitches with the crochet method, 19(20) knit stitches.2nd needle (outer side of the palm) — all stitches knit.
Right mitten.
1st needle (inner side of the palm) — knit 19(20) knit stitches,
slip 15(16) stitches onto a waste yarn of a contrasting color
(these stitches can be bound off with that yarn),
pick up 2 stitches with the crochet method, 3(4) knit stitches.2nd needle (outer side of the palm) — all stitches knit.
Check: on each needle after separating the thumb stitches we have 24(26) stitches.
Next, knit the palm of the inner layer with knit stitches the same number of rows as were knitted on the outer layer before starting the toe.
Note.
When knitting the inner layer of mittens, before starting to shape the toe, I recommend setting aside the palm stitches and begin knitting the thumb.
This will make it easier to tighten the holes from the wrong side and hide the yarn end.The thumb of the inner layer mittens is knitted the same way as for the outer layer (pages 11–13).
MITTENS TOE
Beginning the toe of the inner layer mittens. Knit according to charts No. 2.1–2.4.
Left and Right Mittens (Size S)
Scheme No. 2.1
On the first needle, make decreases at the beginning and end of the row,
offset by one stitch from each edge of the needle. -
 Left and right mitten (size S)
Scheme No. 2.2
On the second needle, make decreases at the beginning and end of the row. -
-
Second needle
Left and right mitten (size M)
Scheme No. 2.3
-
-
First needle
-
Left and right mitten (size M)
Scheme No. 2.4
-
-
Second needle
After the toe is knitted, sew the remaining stitches on the needles with a stockinette stitch, and weave in the yarn tail.
FINISHING THE WORK AND THE SECOND
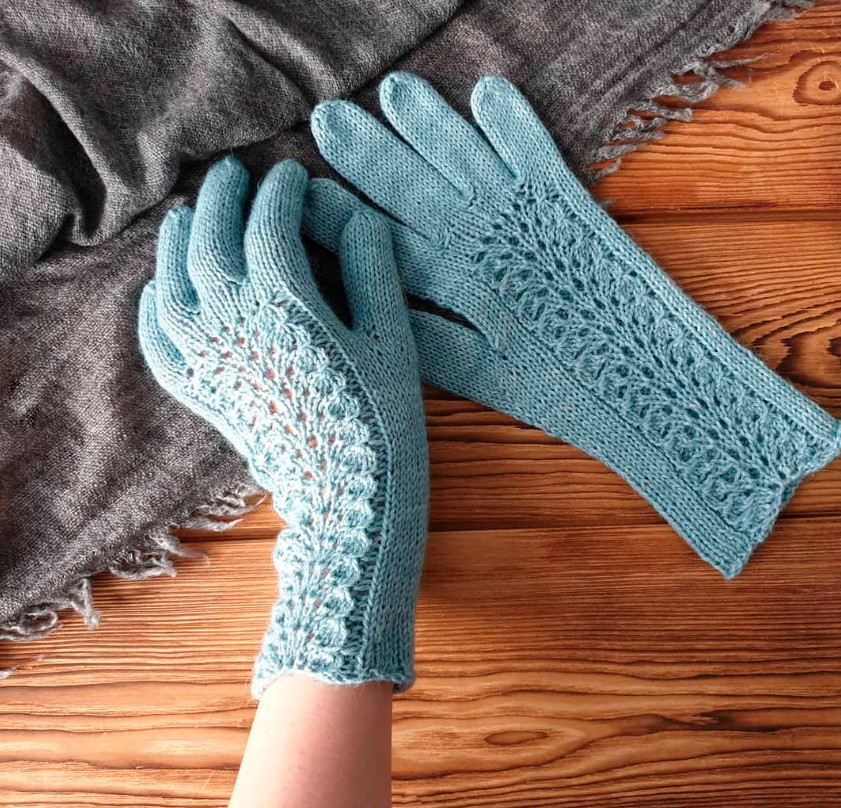
Our double-layer mittens are knitted.
Wash them laid flat in warm water,
using a special wool-wash product.Gently wring out, remove excess water,
wrapping the mittens in a towel.Dry them laid flat on a flat surface,
away from radiators and direct sunlight.You can use specialized blockers.
But before that, first align the outer and inner layers of the mitten.Dry away from direct sunlight.