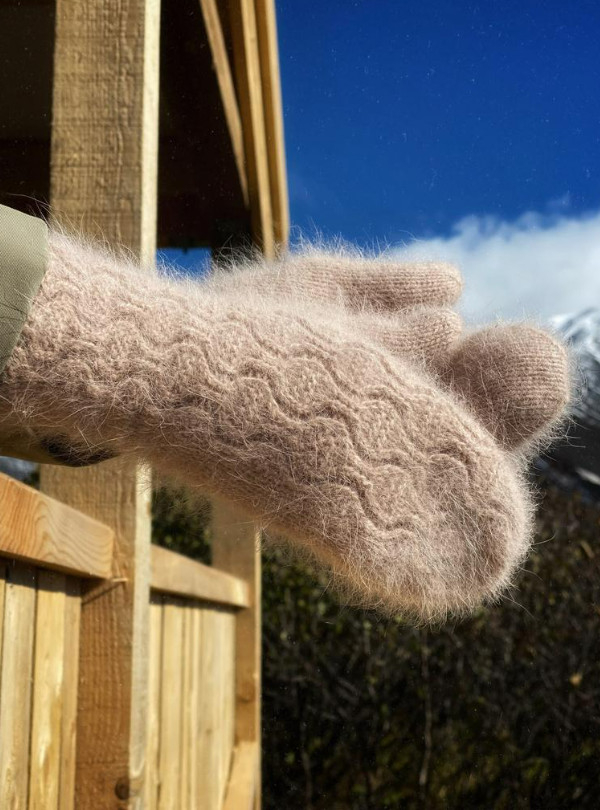
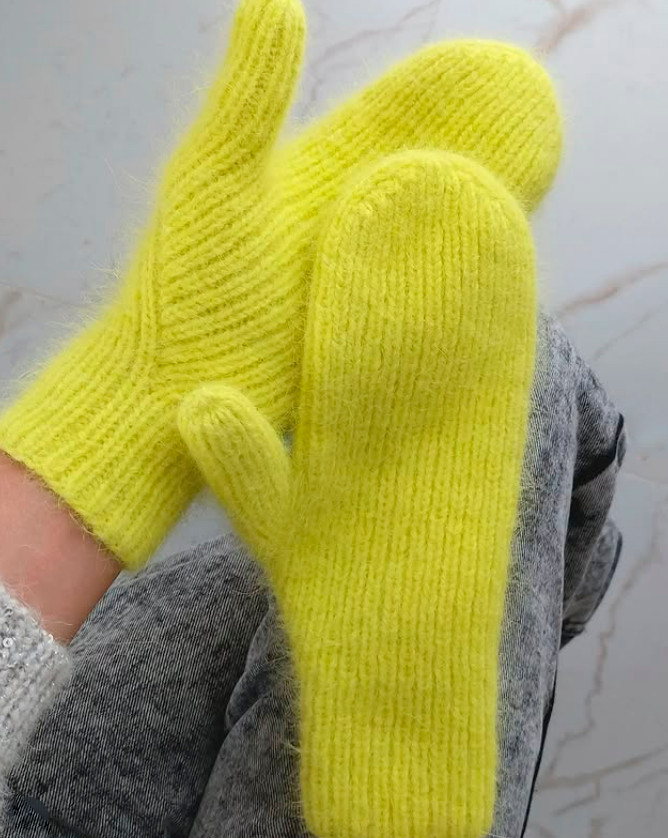
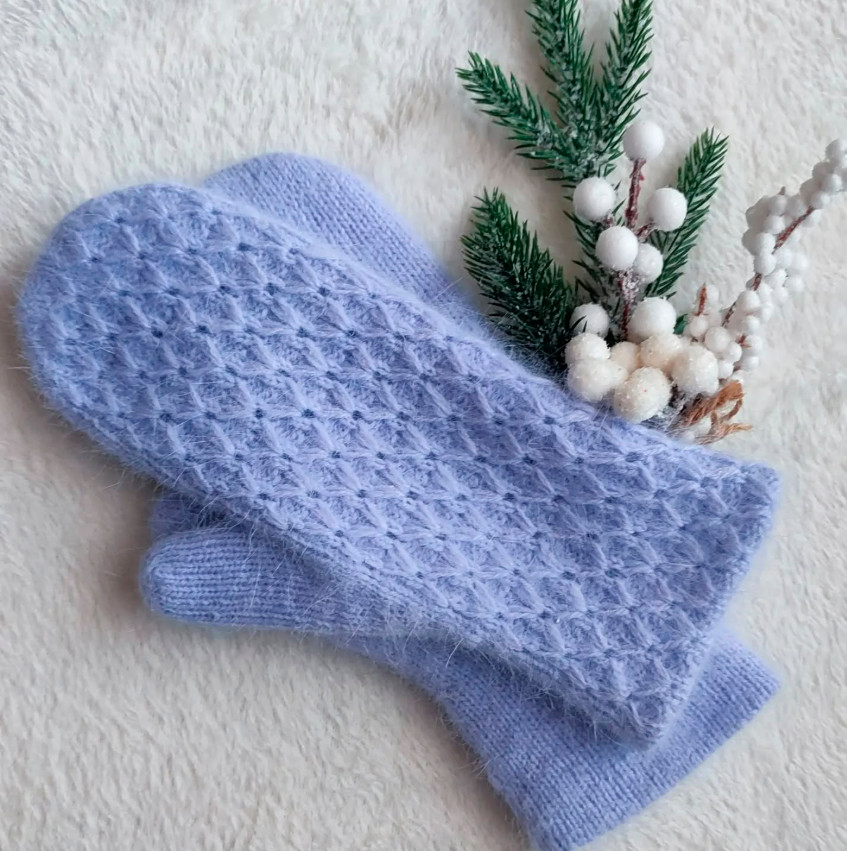
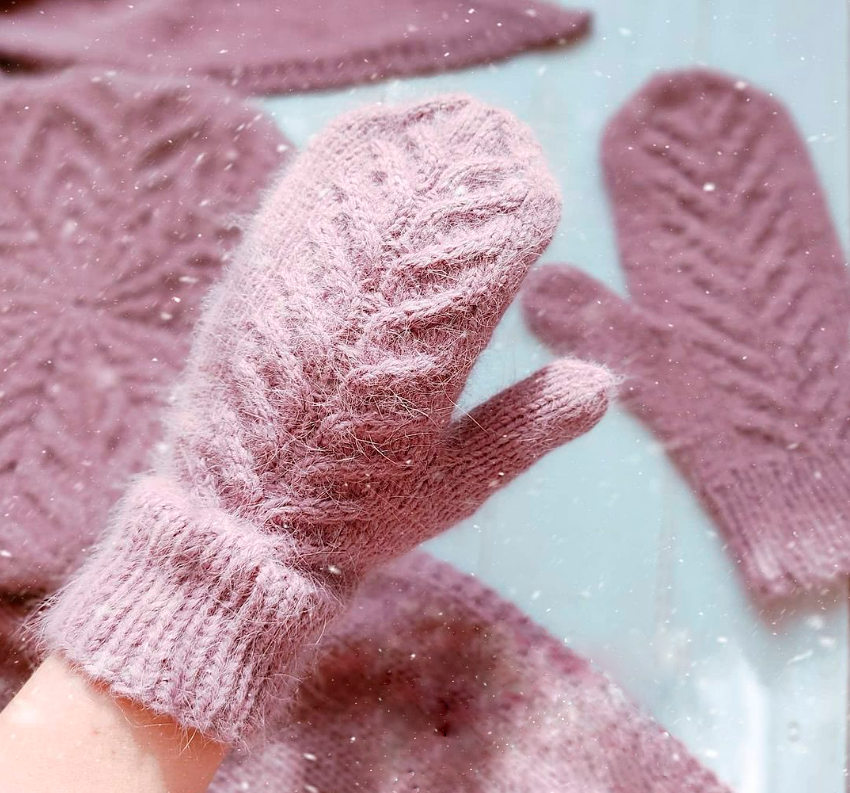
Knitted gloves
Added: 09.12.2025 в 20:12 Views: 224
Knitted glovesKlubokhttp://klubok.work/1/135/9328/Klubokhttps://klubok.work/css/image/top-logo-en.png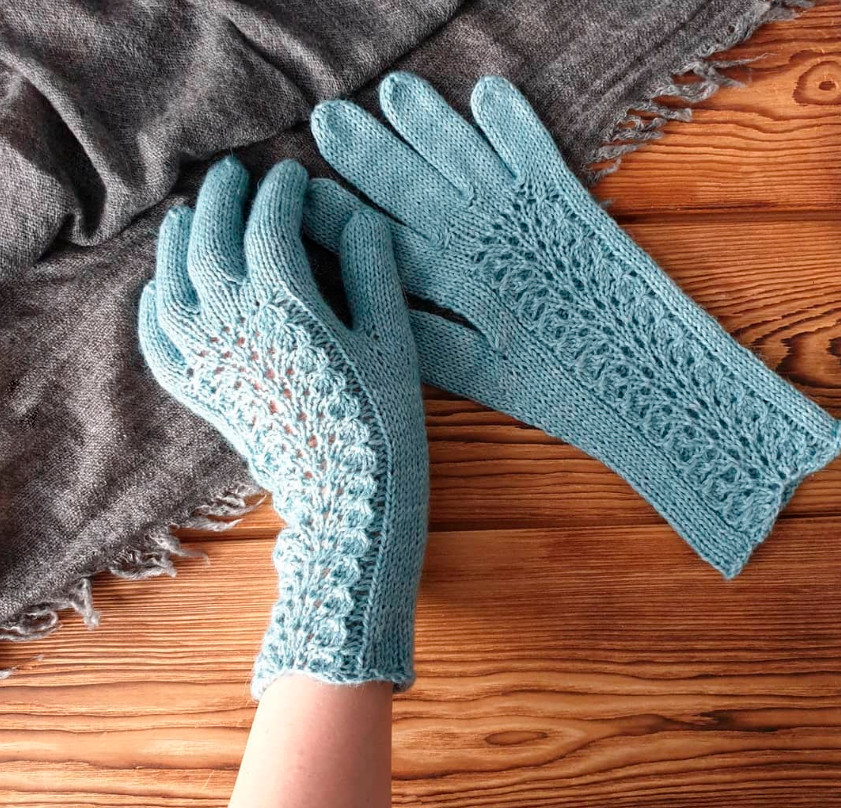
Sizes 16-17/18-19
Gauge: 30 stitches x 36 rows in stockinette stitch, 10 cm x 10 cm
You will need:
Yarn – in the original merino 100% (1500m/100g in 5 plies) – 50-60 g
Circular needles with cable 60-80 cm, 2.5-3.25 mm (depending on your knitting gauge)
Set of double-pointed needles 2.5–3.25 mm (depending on your knitting gauge)
Needle with a large eye
Pins or an extra thread for picking up stitches
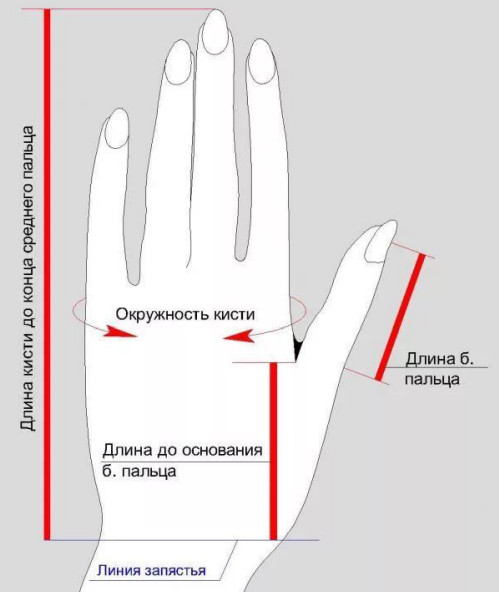
The picture shows which measurements you will need for knitting
Knitting methods and techniques:
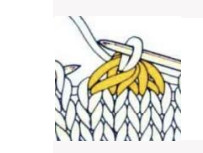
The glove body is knitted on circular needles using the Magic Loop method on the right side in a lace pattern per chart 1, the wrong side is stockinette. The fingers are knitted separately with double-pointed needles.
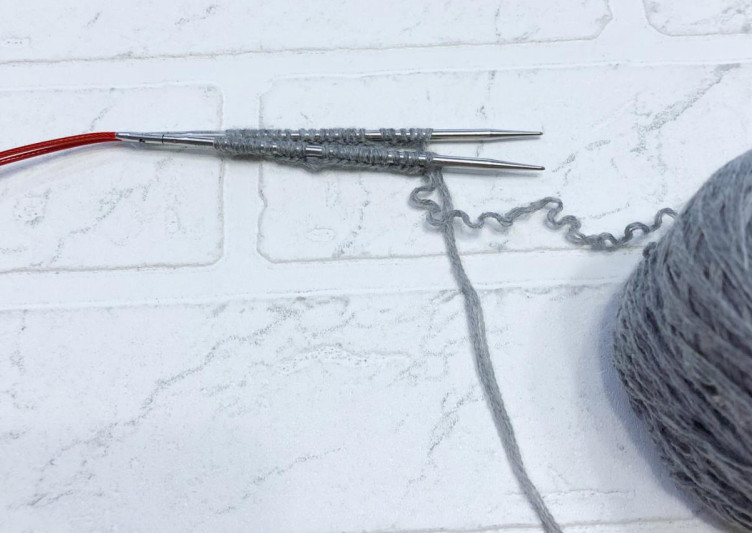
Magic Loop method or the Magic Loop with circular needles is a technique for knitting on circular needles, where instead of double-pointed needles you use a flexible cable. For this method needles of 60 cm or longer are used, and the extra cable is pulled out by the stitches that are not being knitted. Hence the name.
Tip 1
For knitting the gloves, use fine natural yarn; they will be warm and elegant. With thick yarn, the gloves look rather coarse.
So, let's begin the process.
Left glove
Cast on 44/48 sts on circular needles + 1 stitch for joining in the round. Join to work in the round.
Distribute stitches evenly on 2 needles.
Fold the cord so that half the stitches are on one side and half on the other. Pull the cord a little so that a loop of cord forms between the two groups of stitches. Pull the two groups of stitches toward the tips of the needles. Now you have half of your stitches on one end of the needles and half on the other.
Pull the farthest-from-you needle so that the stitches stay on the cord and the needle itself is free to work with.
Knit all the stitches of the first half in purl stitches very carefully so as not to twist the knitting. Now turn the knitting, pull the needle out of the stitches you just purled, and knit the second half in purl stitches similarly.
The first circular round is completed.
Starting from the second round, distribute the stitches:
1st needle – 4/5 knit stitches, 15 pattern stitches, 3/4 knit stitches,
2nd needle – 22/24 knit stitches
Chart 1 of the pattern:
Legend for the charts:
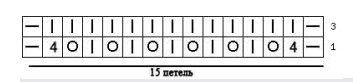
| knit
-
purl
O yarn over
4 stitches knit together (beginning of the row with a right-leaning decrease, end of the row with a left-leaning decrease)
4 stitches knit together with a left-leaning decrease
The pattern consists of 4 rows. The chart shows only right-side rows; the wrong-side rows are knitted according to the pattern, and yarn-overs are knitted.
Repeat the pattern from rows 1 to 4.

After several rounds you will start to see your round forming. Each time the yarn tail is on the right side of the stitches you begin a new round
Knit the required number of pattern repeats to the desired height of the cuff (the cuff ends at the base of the hand), finish with the 4th row.
Next, you need to perform increases to shape the thumb:
Knit the stitches on the first needle in lace pattern, knit the stitches on the second needle, not
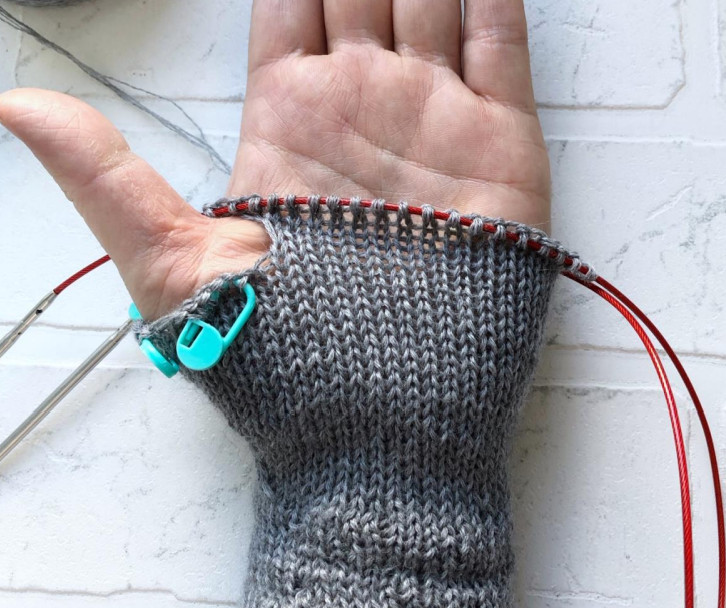
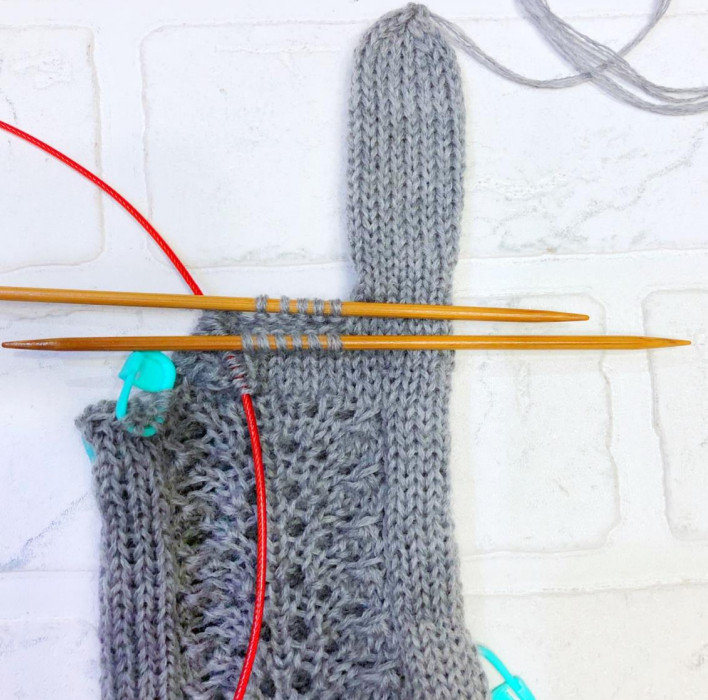
to reaching 3 stitches to the end, make an increase into the stitch from the previous row, or from a slip stitch, place a marker, knit 3 knit stitches. Do this increases in every second row another 10 times (knit knit stitches, increase, marker, 3 knit stitches). In total increased by 11 stitches. On the second needle now 33/35 stitches. Knit one more circular round in knit stitches. Now we need to separate the thumb stitches. To do this, knit 19/21 stitches, move onto a pin or an auxiliary thread 3 palm stitches + 11 added stitches. Cast on an additional 3 chain stitches and join the knitting in the round.
Knit to the desired height of the glove by repeating the pattern, and finish at the base of the little finger.
Calculating finger stitch counts:
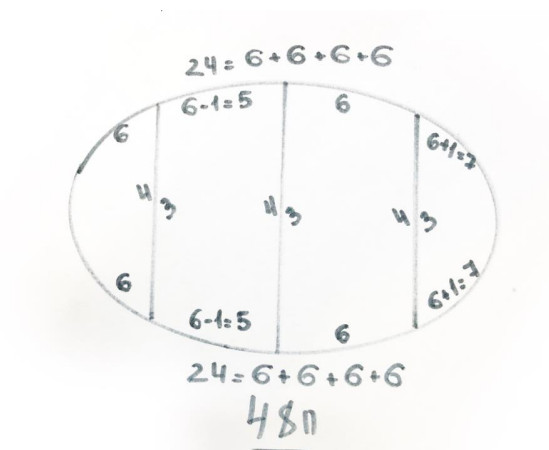
We have a total of 44/48 stitches, 22/24 stitches on the front and back of the glove.
For size 16/17, it comes out to about 4.5 stitches per finger and we will distribute them as follows:
Front side - pinky and index with 6 stitches each, 5 stitches for the ring and middle.
Back side - pinky and index with 5 stitches each, 6 on the ring and middle.
Because the index finger is thicker than the others, from the number of stitches of the ring finger we remove one stitch from each side and add them to the stitches of the index finger. This is how it looks schematically

For size 18/19, it’s easier: each finger has an equal number of stitches - 6 on each side of the finger.
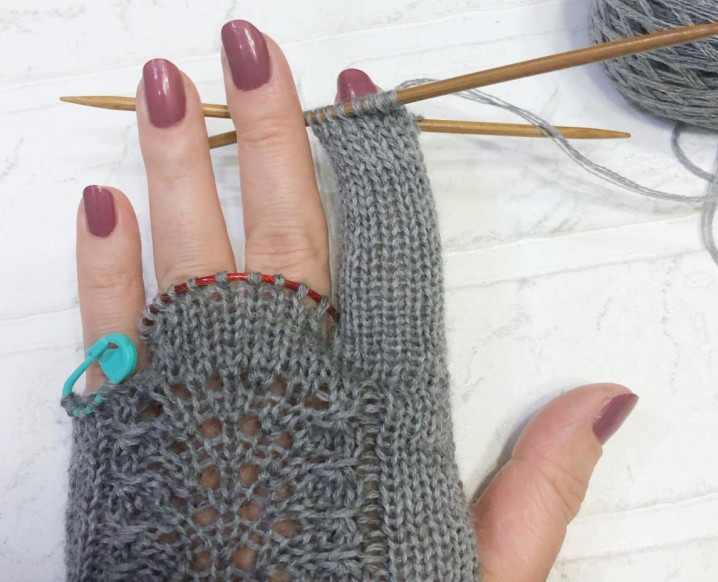
Separating the pinky stitches: We knit the stitches from the second needle, the stitches from the first needle with knit stitches (note that the lace pattern is no longer knitted!), not reaching the last 6 stitches. We move 6 stitches onto a pin or an extra needle, we also move the first 5 stitches from the second needle onto a pin, we additionally cast on 3 chain stitches for the bridge between the pinky and ring fingers, join the knitting in the round and knit 3 rounds in knit stitches. These rows are needed so that the glove sits well on the hand, since the pinky is positioned one level lower than the other fingers. Here ends the base of the glove and we move on to knitting the fingers with sock needles.
Tip 2
During knitting the fingers, try on the glove, pull the fingers straight up to the base of the finger, because the glove in the finished form may fit a little differently, the fingers will rise and it will be uncomfortable to wear. For the same reason, leave the end of the yarn longer after finishing the finger, so that in case the size is not right you could re-knit the finger.
Index finger.
We transfer the last 6 stitches from the second needle onto a sock needle, the first 7 stitches from the first needle knit onto the sock needle, add 3 chain stitches for the bridge between the index and middle fingers. In total there are 16 stitches. Distribute them evenly on 3 needles and knit in the round until the height of the finger reaches the middle of the nail. Distribute the stitches evenly on 2 needles and begin decreasing.
To get a nice rounded shape, shape the decreases as follows: 1st row: 1 knit stitch, 2 stitches together with a left slant, 2 knit stitches, 2 stitches together with a right slant, 1 knit stitch. 2nd row: knit similarly. 3rd row: 1 knit stitch, 2 stitches together with a left slant, 2 stitches together with a right slant, 1 knit stitch. 4th row: knit similarly. 5th row: 2 stitches together with a left slant, 2 stitches together with a right slant
6th row, knit similarly
Cut the yarn, thread it through the remaining 4 stitches, pull tight.
Middle finger.
We transfer 5 stitches from the first needle and 6 stitches from the second onto sock needles. Attach the yarn to the back of the hand, pick up 4 bridge stitches from the chain, knit the stitches from the first needle, pick up 3 additional chain stitches for the bridge between the middle and ring fingers, knit the stitches from the second needle. In total 18 stitches. Distribute them evenly on 3 needles and knit in the round until the height of the finger reaches the middle of the nail. Distribute the stitches evenly on 2 needles and begin decreasing.
dostignet srediny nogtya. Raspredelyayem petli porovnu na 2 spitsy i nachinaem delat' ubavki:
1-y rjad 1 l.p., 2 l.p. vmeste s naklonom vlevo, 3 l.p., 2 l.p. vmeste s naklonom vpravo, 1 l.p.
2-y rjad vjazhem analogichno
3-y rjad 1 l.p., 2 l.p. vmeste s naklonom vlevo, 1 l.p., 2 l.p. vmeste s naklonom vpravo, 1 l.p.
4-y rjad vjazhem analogichno
5-y rjad 2 l.p. vmeste s naklonom vlevo, 1 л.п., 2 л.п. vmeste s naklonom vpravo
6-й ряд вяжем аналогично
Cut the yarn, thread it through the remaining 6 stitches, pull tight.
Tip 3
To prevent holes from forming between the fingers while knitting, I pick up one extra stitch from the glove before picking up the bridge stitches and after; in the next row I knit them together with the stitches from the bridge (namely with the first and last),
pulling them a bit tighter.
Ring finger.
We transfer onto sock needles 4 stitches from the first needle, 3 already knitted stitches of the pinky finger and 5
stitches from the second needle. Attach the yarn from the back of the hand, pick up from the bridging loops 4 stitches, Total 16 stitches. Distribute them evenly on 3 needles and knit in the round, until the height of the finger reaches the middle of the nail. Distribute the stitches evenly on 2
needles and begin decreases:
Row 1: 1 knit stitch, 2 together with a left-leaning decrease, 2 knit stitches, 2 together with a right-leaning decrease, 1 knit.
Row 2 we knit similarly
Row 3: 1 knit, 2 together with a left-leaning decrease, 2 together with a right-leaning decrease, 1 knit.
Row 4 we knit similarly
Row 5: 2 stitches together with a left-leaning decrease, 2 stitches together with a right-leaning decrease
Row 6 we knit similarly
Cut the yarn, thread it through the remaining 4 stitches, pull tight.
Pinky finger
We transfer to sock needles that were previously placed on a pin 11 stitches. Attach the yarn to the back of the hand, pick up from the chain the bridge stitches 4 stitches, total 15 stitches.
Distribute them evenly on 3 needles and knit in the round until the height of the finger reaches the middle of the nail. Distribute the stitches on 2 needles (on the front side 8 stitches, on the back 7 stitches) and begin decreases:
Row 1: 1 knit, 2 together with a left-leaning decrease, 2 knit, 2 together with a right-leaning decrease, 1 knit.
Row 2: 1 knit, 2 together with a left-leaning decrease, 1 knit, 2 together with a right-leaning decrease, 1 knit.
Row 3: 1 knit, 2 together with a left-leaning decrease, 2 together with a right-leaning decrease, 1 knit.
Row 4: 2 stitches together with a left-leaning decrease, 1 knit, 2 stitches together with a right-leaning decrease
Row 5: 2 stitches together with a left-leaning decrease, 2 stitches together with a right-leaning decrease
6th row: knit 3 stitches.
Обрезать нить, продеть ее через оставшиеся 5 петель, стянуть.
Fingers for sizes 18-19 are knitted similarly, decreases follow the pattern:
Index finger - total 17 stitches, 9 stitches on the first needle, 8 on the second.
Row 1: 1 knit, 2 together with a left-leaning decrease, 3 knit, 2 together with a right-leaning decrease, 1 knit.
Row 2: 1 knit, 2 together with a left-leaning decrease, 2 knit, 2 together with a right-leaning decrease, 1 knit.
Row 3: 1 knit, 2 together with a left-leaning decrease, 2 together with a right-leaning decrease, 1 knit.
Row 4: 2 stitches together with a left-leaning decrease, 2 stitches together with a right-leaning decrease
Row 5: 2 stitches together left-leaning, 1 knit, 2 stitches together right-leaning
Row 6: 2 stitches.
Cut the yarn, thread it through the remaining 5 stitches, pull tight.
Middle finger - total 19 stitches, on the first needle 10 stitches, on the second 9.
Row 1: 1 knit, 2 together with a left-leaning decrease, 4 knits, 2 together with a right-leaning decrease, 1 knit.
Row 2: 1 knit, 2 together with a left-leaning decrease, 3 knits, 2 together with a right-leaning decrease, 1 knit.
Row 3: 1 knit, 2 together with a left-leaning decrease, 2 together with a right-leaning decrease, 1 knit.
Row 4: 1 knit, 2 together with a left-leaning decrease, 2 together with a right-leaning decrease, 1 knit.
Row 5: 2 stitches together with a left-leaning decrease, 1 knit, 2 stitches together with a right-leaning decrease
Row 6: 2 stitches together with a left-leaning decrease, 2 stitches together with a right-leaning decrease
Row 7: 2 stitches together with a left-leaning decrease, 2 stitches together with a right-leaning decrease
Row 8: 2 stitches.
Cut the yarn, thread it through the remaining 4 stitches and pull tight.
Ring finger - total 17 stitches, on the first needle 9 stitches, on the second 8 stitches.
Row 1: 1 knit, 2 together with a left-leaning decrease, 3 knits, 2 together with a right-leaning decrease, 1 knit.
Row 2: 1 knit, 2 together with a left-leaning decrease, 2 knits, 2 together with a right-leaning decrease, 1 knit.
Row 3: 1 knit, 2 together with a left-leaning decrease, 2 together with a right-leaning decrease, 1 knit.
Row 4: 2 stitches together with a left-leaning decrease, 2 stitches together with a right-leaning decrease
Row 5: 2 stitches together left-leaning, 1 knit, 2 stitches together right-leaning
Row 6: 2 stitches together with a left-leaning decrease, 2 stitches together with a right-leaning decrease
Row 7: 2 stitches together with a left-leaning decrease, 2 stitches together with a right-leaning decrease
Row 8: 2 knit stitches.
Cut the yarn, thread it through the remaining 4 stitches and pull tight.
6th row: knit similarly
Cut the yarn, thread it through the remaining 4 stitches, pull tight.
Tip 4
If during knitting you find that your fingers are too large/small, decrease/increase the stitches for
the bridges. Then don't forget to recalculate the decreases when rounding.
Thumb
We transfer to set-aside needles the stitches, pick up 4 more stitches from the mitten,
distribute on 3 needles and knit similarly to all other fingers. Decreases follow the pattern - total 15 stitches, 8 on the first needle, 7 on the second.
Row 1: 1 knit, 2 together with a left-leaning decrease, 2 knit, 2 together with a right-leaning decrease, 1 knit.
Row 2: 1 knit, 2 together with a left-leaning decrease, 1 knit, 2 together with a right-leaning decrease, 1 knit.
Row 3: 1 knit, 2 together with a left-leaning decrease, 2 together with a right-leaning decrease, 1 knit.
Row 4: 2 stitches together with a left-leaning decrease, 1 knit, 2 stitches together with a right-leaning decrease, 1 knit.
Row 5: 2 stitches together left, 2 stitches together right
Row 6: 3 knit stitches.
Cut the yarn, thread it through the remaining 4 stitches, pull tight.
That's all! All that's left is to tuck the thread ends on the fingers inside the glove.
Do the same with the end of the thread at the cuff.
Knit the right glove in the same way, in a mirrored image.
When your gloves are finished, wash them in warm water with the addition of a special detergent for delicate fabrics, gently wring them out, wrap in a terry towel, after about 2 hours
lay them out on a dry towel on a flat surface, let them dry and lightly steam them.
Enjoy wearing them!