How to calculate a raglan.
Added: 03.02.2016 в 02:01 Views: 53510
How to calculate a raglan.Klubokhttp://klubok.work/1/203/6171/Klubokhttps://klubok.work/css/image/top-logo-en.png
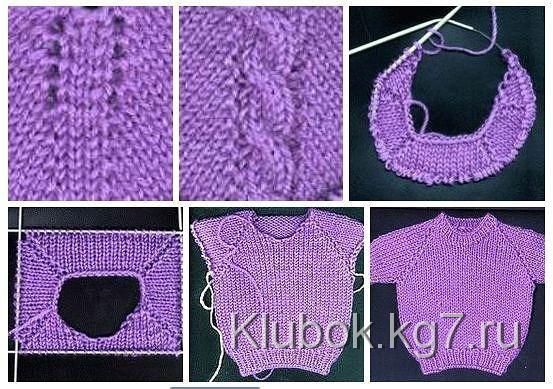
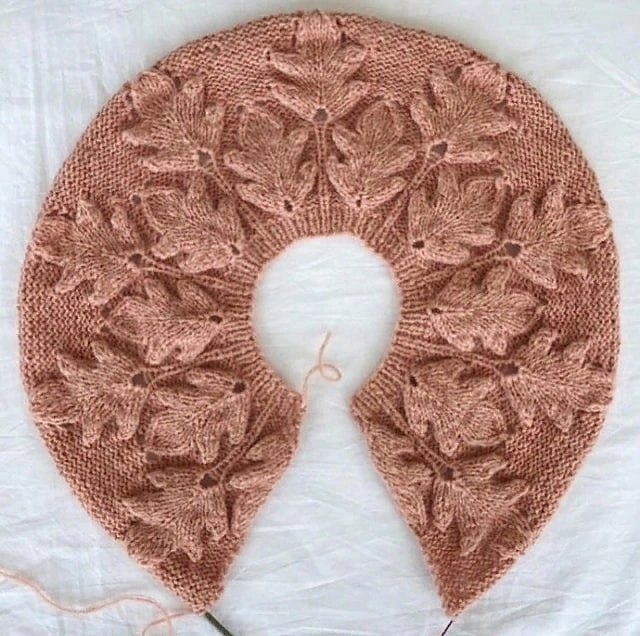
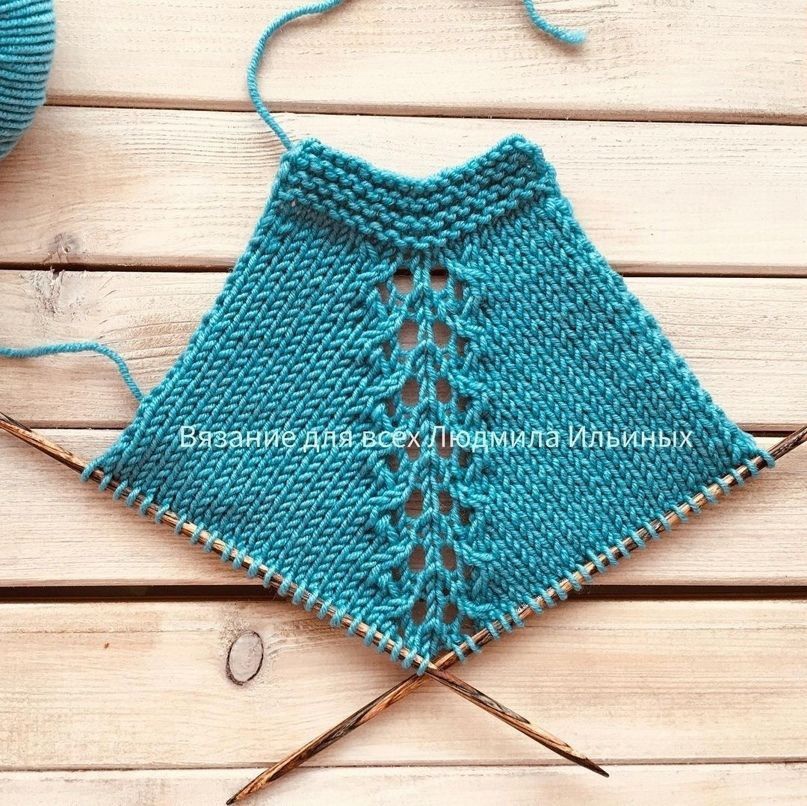
How to calculate a raglan. A detailed knitting guide Surely many craftswomen have wanted to or even knitted a raglan. But not everyone knows how to correctly calculate a raglan. Therefore, this detailed guide on calculating raglan knitting is for you)) The raglan line is the stitch or stitches (there can be any number) on both sides of which yarn overs are made to expand the knitted fabric. It can look different depending on the pattern you are knitting and the method of working the yarn overs. In this photo, the raglan line consists of one purl stitch, and the yarn overs are worked as twisted knit stitches. If the yarn overs are worked simply as purl or knit stitches, it results in an accentuated raglan line consisting of small holes; if worked as twisted purls or knits, the raglan line is barely visible (this is necessary if you are knitting the raglan line with a pattern, for example, braids), in the next row the yarn over stitches are included in the pattern used for the piece. Patterns for the raglan line: Look at the difference between the methods of working the yarn overs. The upper part shows yarn overs worked simply as purls (the very holes), the lower part shows twisted purls. Important: the expansion of the fabric when working with purls is faster than when working with twisted purls, keep this in mind. The raglan line can become a decoration of any piece if knitted with any pattern: for winter pullovers and jackets, the raglan line can be executed in various braid patterns; for summer—patterns with braids, lace, etc. It is best to execute your first project in stockinette stitch, with the raglan line consisting of 1 purl stitch, this way you won't get confused and won't miss the next increase. After some practice, you will be able to knit a pullover with more complex patterns. Step two: Calculation and distribution of stitches. To calculate stitches we need the following measurements: the density of the pullover pattern (pay attention to the pattern, not the ribbing) and the neck circumference. To determine the density, you must knit a sample of at least 15 x 15 cm (when you have enough samples, you can make a blanket or a light quilt in a patchwork style) and use a template to determine the number of stitches per centimeter. This is an important step—an error at this stage will lead to failure overall. Let's assume we have 2.5 stitches per centimeter, and the neck circumference is 18 cm. By multiplying these numbers (2.5 x 18 = 45), we get the total number of stitches for work. Next, we distribute the stitches into parts: for the back, front, sleeves, and raglan line. For this, we divide the total number of stitches into 3 equal parts: one part for the front, one part for the back, and one part for the sleeves—half for each: 45 ÷ 3 = 15 stitches each (in our example, the stitches divide evenly; if there is a remainder, we add it to the front stitches). Then, from the part for the sleeves, we subtract 4 stitches for the raglan line and divide the remainder (11 stitches) into 2 parts; the sleeve stitches do not divide evenly (there is 1 stitch left), so we add the remainder to the front stitches = 15 stitches for the back, 16 (15 + 1 leftover from the sleeves) stitches for the front, 5 stitches for the sleeves, and 4 stitches for the raglan line (one for each). Important: for jackets, the number of stitches for the front must always be even. In calculations for all sizes: divide the total number of stitches into 3 parts; then the part for the sleeves into 2, adding all remainders to the front stitches; raglan stitches are always taken from the sleeve stitches. We counted the stitches, now we take the needles in hand and cast on stitches for the pullover on short circular or a pair of double-pointed needles in the following sequence (this is very important; the order is specifically this): one stitch for the right part of the front, one stitch for the raglan line, 5 stitches for the right sleeve, one stitch for the raglan line, 15 stitches for the back, one stitch for the raglan line, 5 stitches for the left sleeve, one stitch for the raglan line, one stitch for the left part of the front. For all sizes: one stitch for the front parts; do not cast on edge stitches. Why only one stitch for the front parts? During the knitting process, we will gradually add stitches for the front using yarn overs, resulting in a deeper neckline for the front than for the back. Step three: Let’s start knitting. We knit step by step. Stitches cast on, now we knit in the following sequence (provided that the pullover is knitted in stockinette stitch and the raglan line consists of one purl stitch): 1 - 9 rows stockinette - one yarn over (see fig. a), one knit stitch for the right front (in the first row, in the subsequent rows, stitches for the front parts, back, and sleeves are 2 more), one yarn over, one purl stitch for the raglan line, one yarn over, 5 knit stitches for the right sleeve, one yarn over, one purl stitch for the raglan line, one yarn over, 15 knit stitches for the back, one yarn over, one purl stitch for the raglan line, one yarn over, 5 knit stitches for the right sleeve, one yarn over, one purl stitch for the raglan line, one yarn over, one knit stitch for the left front and add one more yarn over. Row 2 and all purl rows - yarn overs are treated as edge stitches, yarn overs are worked as purls or twisted purls (that is the difference, in the photo are twisted purls), and the stitches for the sleeves, front, and back are purls. Row 11 stockinette - we add two yarn overs on both sides and join the knitting in the round. On the needles, the total number of stitches for the front is 1 more than for the back. If you are knitting a pullover of a different size, you will have more or fewer stitches for the front, sleeves, and the number of rows in which yarn overs are added than described. We keep adding yarn overs until the total number of front and back stitches is equal. We continue to knit in the round the stitches for the front, back, and sleeves—knitting them as knit stitches, yarn overs as knit or twisted knit stitches, and raglan line stitches as purls, making yarn overs until we have cast on the stitches for the sleeves. Once we have cast on the sleeve stitches, we place them on a contrasting colored yarn and set them aside temporarily, joining the stitches for the front and back and continuing to knit in the round until they reach the length you desire (no more yarn overs). Switch to needles one size smaller and knit the ribbing; bind off the stitches, leaving a long tail of yarn. Next, we continue to knit the sleeves (a row counter may come in handy here): attach the yarn and distribute the stitches onto a set of 5 needles, join the knitting in the round, mark the place where the stitches connect with a special marker or pin, and knit, making decreases to shape the sleeve slope by knitting 2 stitches together at the marked stitches every sixth row as follows: knit 2 together, then knit the next stitch as a pass. After knitting the required length, bind off the stitches, leaving a longer tail of yarn. Now it’s time to finish the neckline. Cast on stitches along the neckline (one from each stitch) and knit a ribbing of 2 - 3 cm (or as much as you need), then bind off the stitches. That’s it; your seamless pullover is ready. Raglan calculation: Happy and enjoyable knitting!