reglan
Added: 22.08.2018 в 09:34 Views: 23823
reglanKlubokhttp://klubok.work/1/203/7388/Klubokhttps://klubok.work/css/image/top-logo-en.png
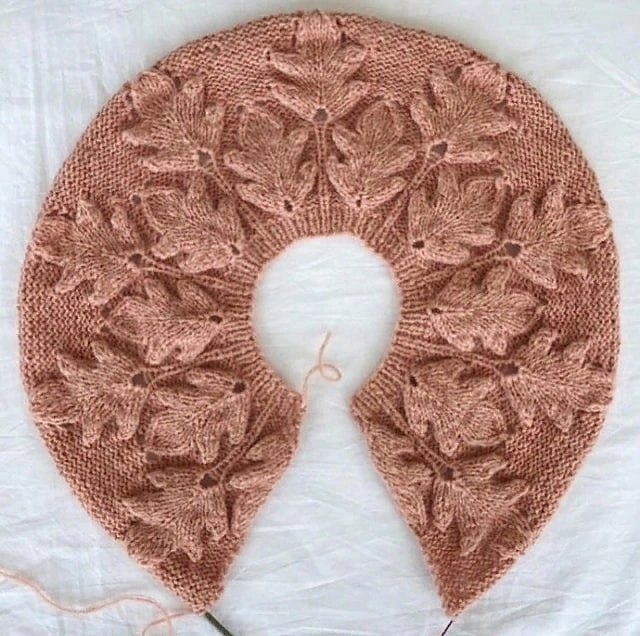
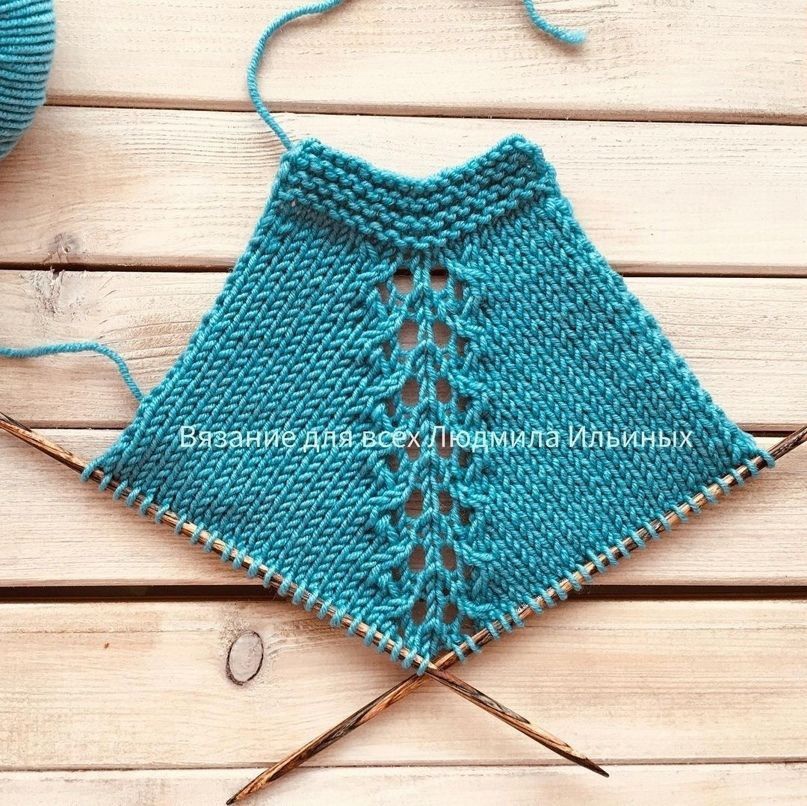
How to knit a top-down raglan sweater without seams Hello, my dear ones! In this detailed master class, I want to introduce you to one of the ways to knit a top-down raglan. As an example, we will consider knitting a children's sweater with raglan sleeves entirely without seams from the neckline. When knitting from the neckline down, you can try on the garment at any moment and adjust its size – the width and length of both the entire garment and the sleeves. You don’t need to worry about knitting the armhole and sleeve cap; the garment sits well on the shoulders and does not bunch up under the arms (as in models knitted straight – without an armhole line). It is also very convenient for knitting children's garments in that the item can "grow" with the child. After all, children grow very quickly, primarily in height. If the beautifully knitted children's sweater you made from quality yarn suddenly becomes short, or the sleeves become short – you can easily unravel the bound-off stitches at the bottom and simply knit more. And even if you have almost run out of the same yarn, you can come up with an option with multicolored stripes or a jacquard pattern. In this master class, for greater clarity, I specifically consider a model option knitted mainly in stockinette stitch, with a simple design for the raglan line. If you master this knitting technique, you will be able to apply it later for knitting a sweater of any size, with different patterns and different raglan lines. The raglan line The essence of the raglan line (hereafter I will write it as RL) consists of evenly adding stitches along it – from the neckline to the underarm line. Typically, one stitch should be added on each side along each of the four RLs every other row. In the method I will show in this MC, two stitches will be added every three rows (in every fourth row), which results in the same total number of added stitches. The method is as follows: in every fourth row on the right side of the work, you need to knit 5 stitches from 3 stitches (knit, yarn over, knit, yarn over, knit). These fans go in pairs, one on each side of the back, front, and sleeves, and touching each other form such an RL: Note: At the junction of the fans, small holes in the form of lace are formed. If you want to use the same RL but without lace, you can insert an additional stitch between the fans and knit it either in purl or stockinette stitch. Starting the work and the upper part of the item I will conduct the master class on a specific example of a simple model of a children's sweater and with a specific calculation of stitches. I will end up with a small sweater for a child approximately 1 year old. But I used thin yarn "Pehorka – Children's Caprice" and circular needles 2.5 mm. If you take thicker yarn and needles, you will get a larger item with the same number of stitches and rows. Focus on your measurements and knitting gauge. In this MC, I will not dwell in detail on how to calculate stitches for knitting raglan from the neckline, as this is a topic for a separate article, which is described in detail. Here, the goal is to show the process itself. So, we cast on 52 stitches, of which: 24 stitches for the back, 10 stitches for each sleeve (10 x 2 = 20 sts), and then, ATTENTION: we do not cast on stitches for the front, only the stitches for its two RLs – this is 3 x 2 = 6 stitches, +2 edge stitches. We do not cast on stitches for the front piece because we will gradually add them along the edges during the knitting process using chain stitches – to create a scoop for the neckline. If this is not done, the item will "pull" back and fit poorly! This is one of the mistakes knitters make when knitting raglan from the neckline. Now, let's go through the rows in detail: After knitting the first row, the stitches for the RL, back, and sleeves are distributed. Note: As you understood, from the number of stitches we have designated for the back and sleeves, we subtracted 6 stitches for the RL. The same should be done when executing other types of RL – the number of stitches needed for their knitting should be subtracted from the total number of stitches for the back or sleeve, and the remaining stitches should be knitted in the main pattern. You can change the number of stitches for the back and sleeves to fit your size. Row 2 (wrong side of the work): all stitches are purl, at the end of the row add 1 chain stitch. How to knit chain stitches (hereafter – CH), is shown in great detail in my lesson. Row 3: knit the chain stitch at the beginning of the row as a twisted knit stitch, then all stitches are knit. At the end of the row, add 1 CH. Row 4: knit the CH at the beginning of the row as a twisted purl stitch, then knit all stitches purl, and at the end of the row add 2 CH. Row 5: knit the 2 CH from the previous row as twisted knit stitches, 4 knit (stitches for the front), from 3 stitches knit 5 (2 times in a row), 8 knit (sleeve stitches), from 3 stitches knit 5 (2 times), 22 knit (back stitches), from 3 stitches knit 5 (2 times), 8 knit (sleeve stitches), from 3 stitches knit 5 (2 times), 4 knit (stitches for the front), at the end of the row 2 CH. This is how the knitting looks at the end of the 5th row. The outlines of the RL are already visible, and at the end of the row, you see 2 CH: Now you can do a control count of stitches. The number of stitches for the back and front should match. Now, after the 5th row, we have a total of 32 stitches for the back (including the RL stitches), and for the front pieces, we have 11 stitches each. Consequently, we need to add 5 stitches to the front pieces to get 16 stitches each, so that the front will have the same number of stitches as the back (16 x 2 = 32 sts). Therefore, we continue knitting: Row 6: knit the 2 CH at the beginning of the row as twisted purl stitches, then all stitches purl, at the end of the row 5 CH. Row 7: knit the 5 CH as twisted knit stitches, then all stitches knit, at the end of the row 5 CH. Row 8: knit the 5 CH as twisted purl stitches, then – all stitches purl. Now, the number of stitches for the back and front has matched, and there’s no need to add chain stitches. We continue to knit simply in stockinette stitch, simultaneously performing the RL as described above, and knitting the edge stitches to create a chain-like edge (the first is slipped, the last is purl). Important notes: If you will knit a larger item, then you need to add stitches for the front according to your size and the desired depth of the neckline. Thus, after adding 2 CH, in the following rows, you can add 3 or 4 CH, you can add 3 CH several times in a row, then a large number of stitches to match the number of stitches with the back – this all needs to be adjusted for each item and neckline individually. If you plan to knit a fully shaped placket for the closure, you need to additionally cast on chain stitches for the plackets – 5-6 stitches on each side, and knit them as plackets, making buttonholes on one of them. In my MC option, I suggest attaching the plackets separately later. If you plan to knit the item without a closure, like a sweater or pullover, then after the number of stitches for the front and back matches, you need to connect the ends of the row and continue knitting in the round. Continuing the knitting of the back and front We continue to knit, making increases in stitches using the RL, until we reach the underarm line. You can determine this by trying the item on the future owner or by following the measurements from the pattern – looking at the length of the RL (in my case, it is 16 cm), as well as the width of the back-front and sleeves. Then we proceed as follows. On the right side of the work, we knit the front stitches (left piece) including the RL stitches for the front with knit stitches (do not make the increases from 3 stitches to 5 anymore). Then we transfer the sleeve stitches including its RL stitches using a knitting needle onto a thick contrasting thread, tying the ends of the thread. We continue to knit the back stitches. Upon reaching the second sleeve, we also transfer its stitches onto the thread and then finish the row with the right piece stitches. Now we have only the back and front stitches on the needles: We continue to knit the main "body" of the sweater until you reach the desired length. As I mentioned at the beginning of the article, determining the length is now easy – just try on this, for now, sleeveless garment. Fortunately, both the circular needles with flexible cords and the fact that the sleeve stitches are gathered on an elastic thread make this easy to do. Well, if there is no one nearby to try it on – we compare with the measurements from the pattern.

Category: Useful tips