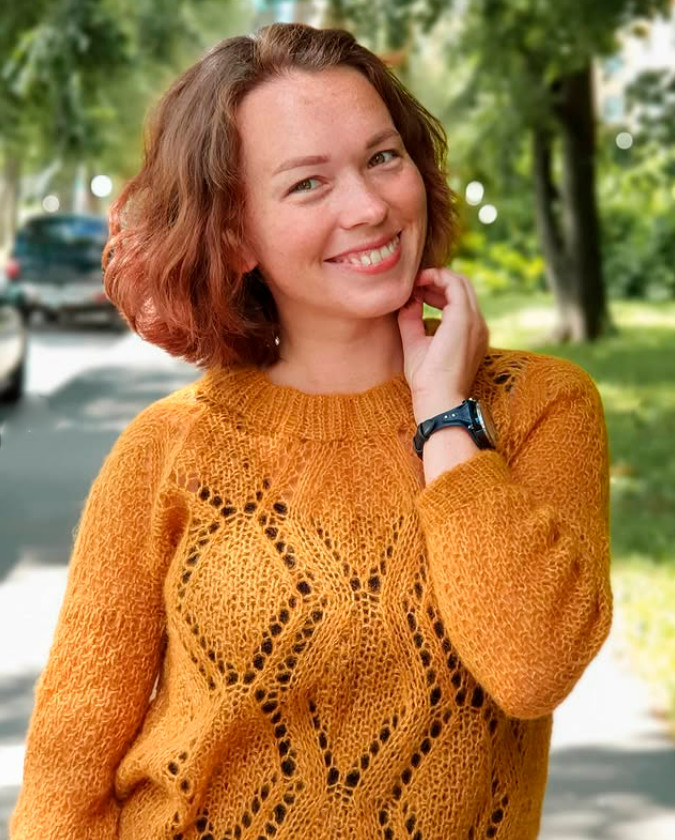
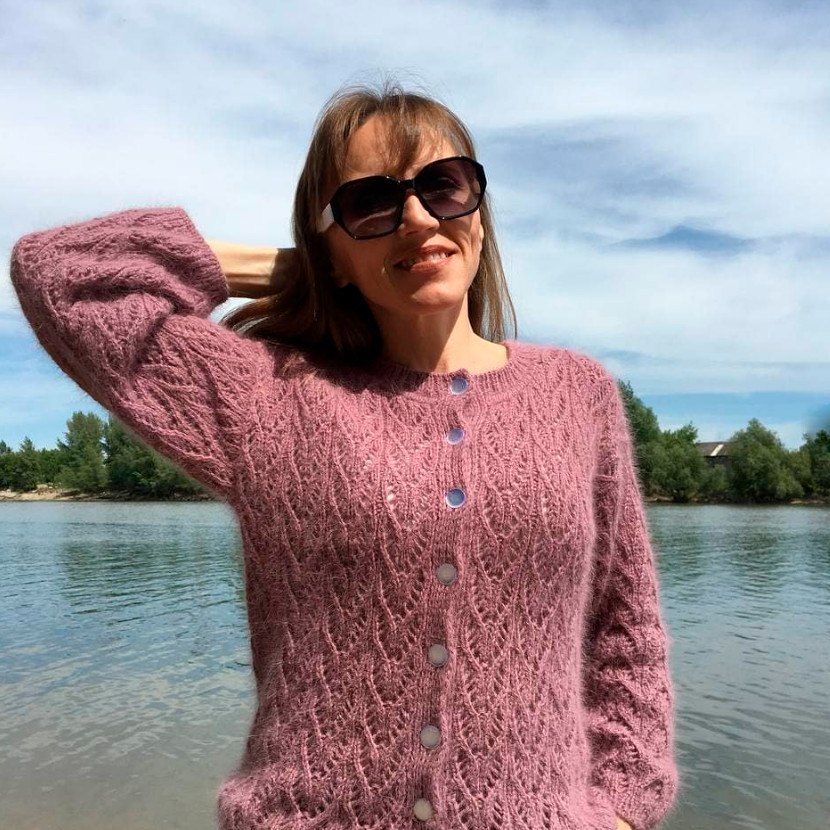
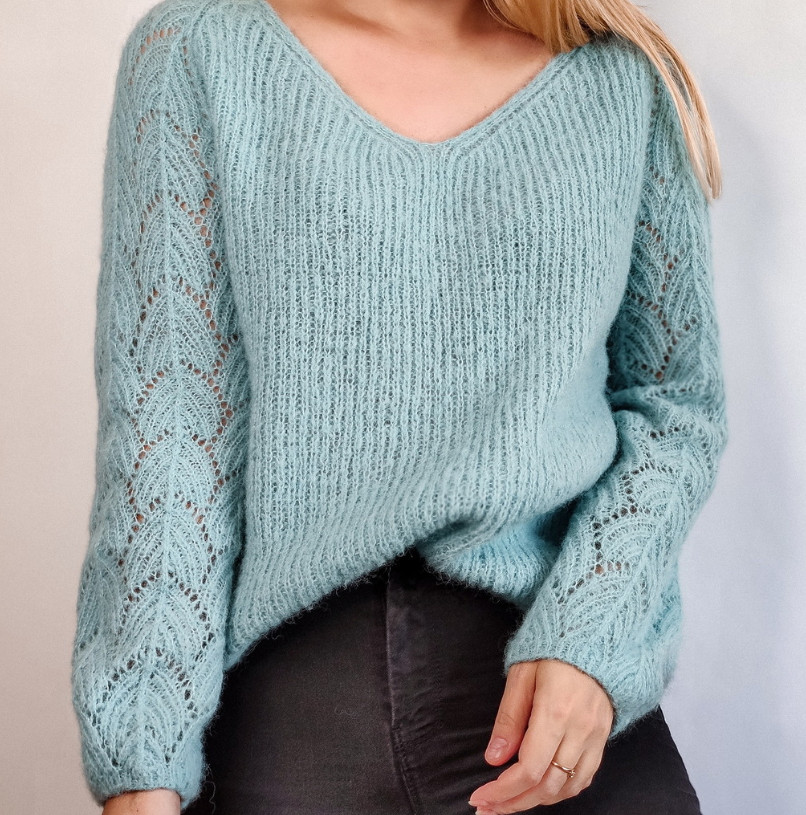
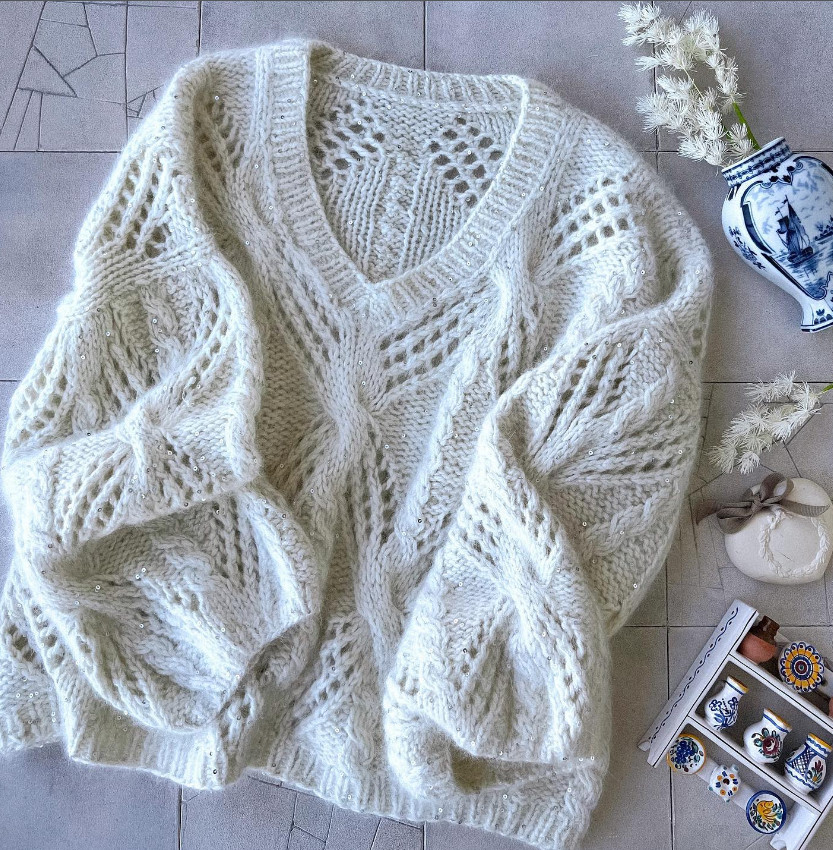
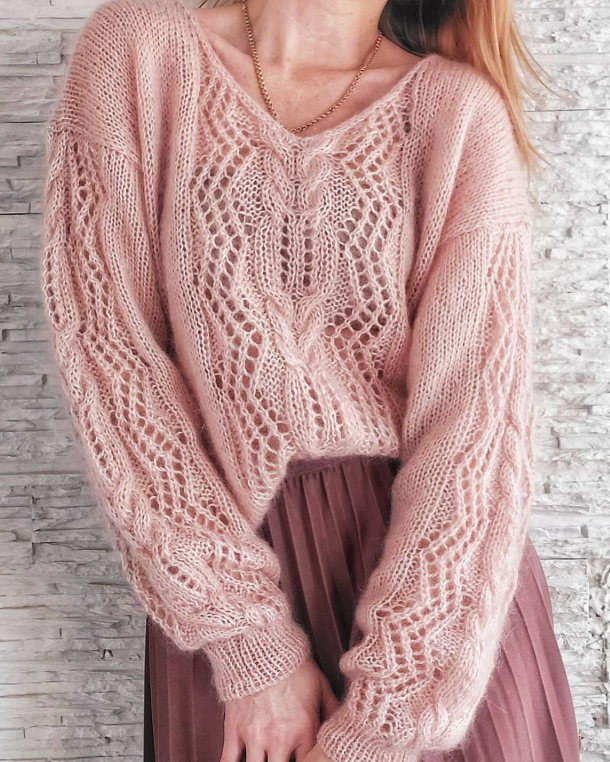
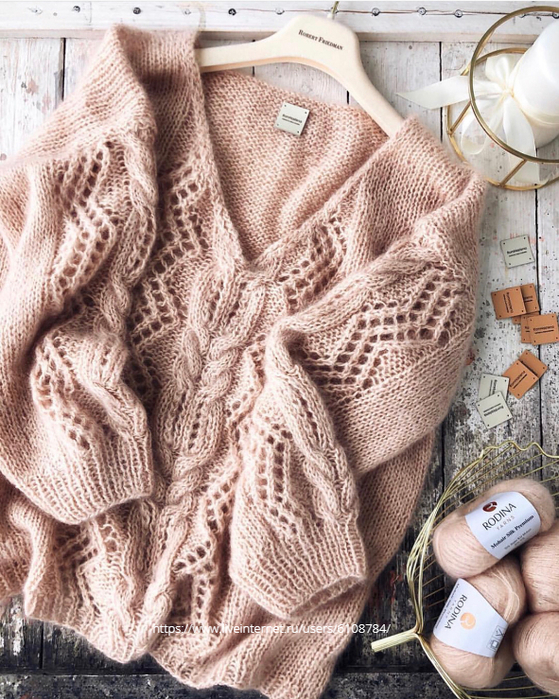
Fantasy pattern for yoke knitting
Added: 26.07.2025 в 22:28 Views: 4249
Fantasy pattern for yoke knittingKlubokhttp://klubok.work/1/3/8944/Klubokhttps://klubok.work/css/image/top-logo-en.png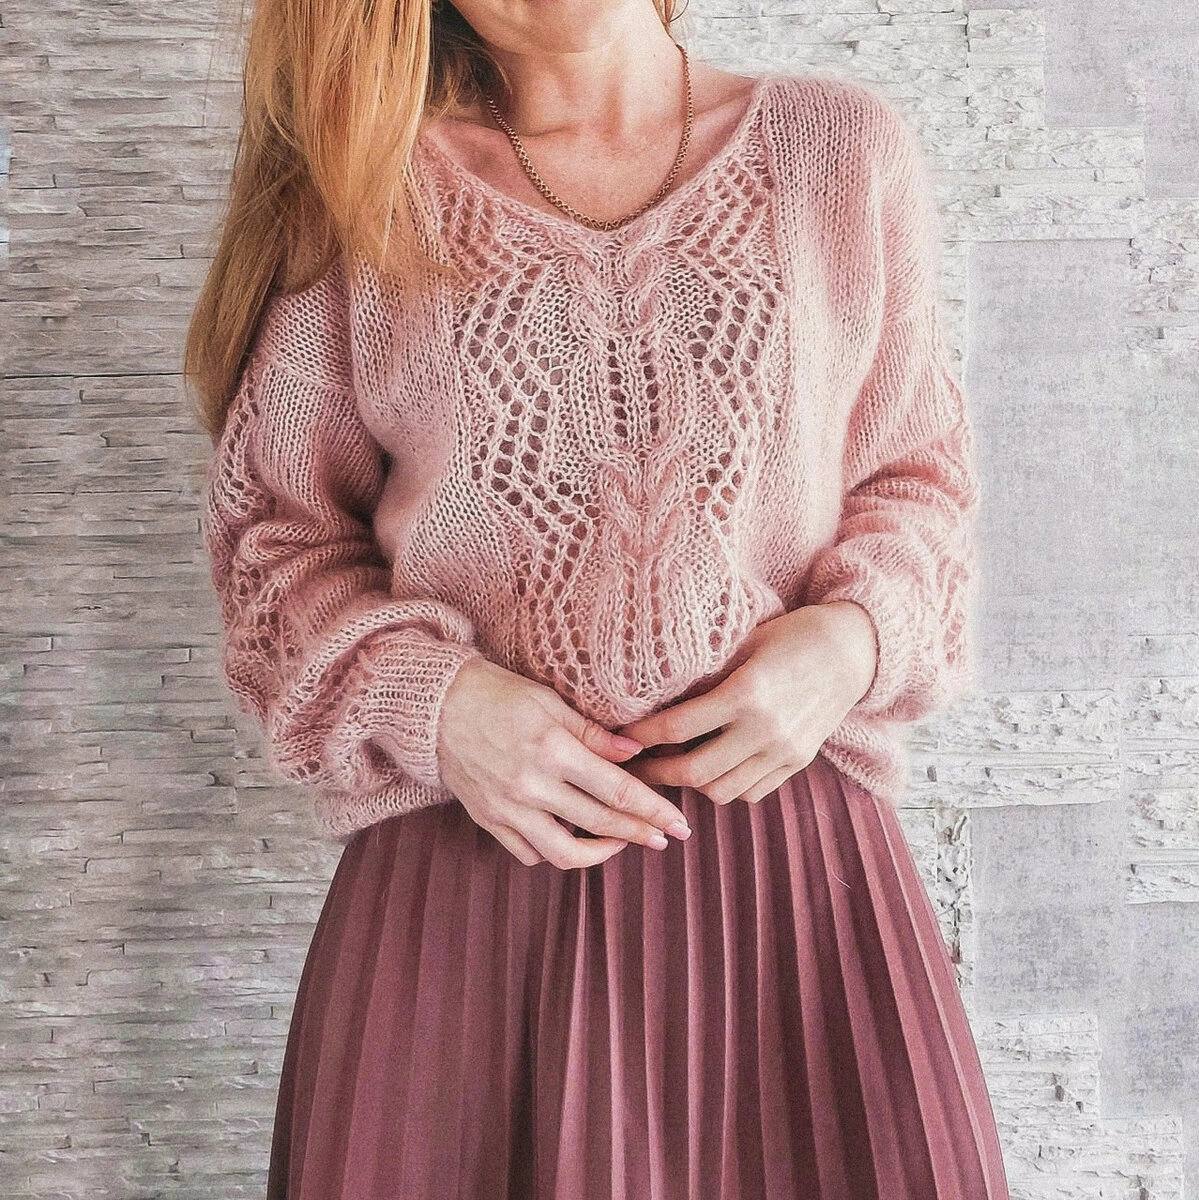
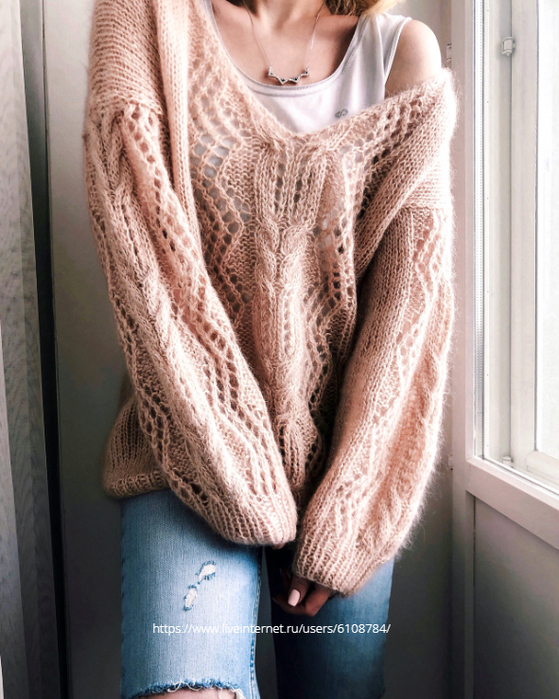
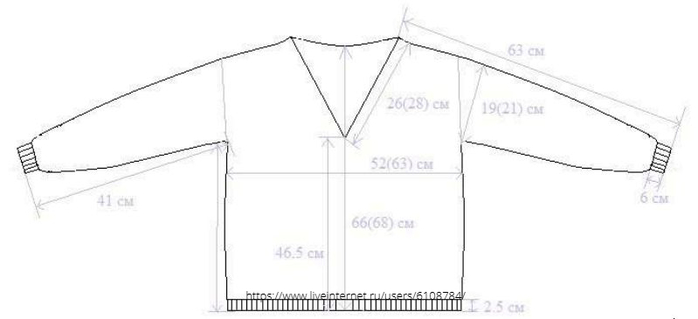
Sizes: oversize XS-M (L-XL)
The data for size L-XL is in parentheses. If only one number is indicated, it refers to all sizes.
Sizes in finished laid-out form after wet-heat treatment for XS-M:
Back length 66 cm
Chest circumference 104-106 cm
Sleeve length from the top of the neck 63 cm
Sleeve length from the armhole 41 cm
Sizes in finished laid-out form after wet-heat treatment for L-XL:
Back length 68 cm
Chest circumference 124-126 cm
Sleeve length from the top of the neck 63 cm
Sleeve length from the armhole 41 cm
MATERIALS:
•14 (18) skeins of Mohair Silk Premium Rodina Yarns 70% mohair, 30% silk (25 g per 210m),
•Circular needles 6.5 mm long 80 cm or needles of another thickness that allow achieving the required knitting density;
•Scissors;
•Tapestry needle.
Pattern “Stockinette stitch” in the round:
All round rows: knit.
Pattern “Stockinette stitch” in flat knitting:
1st knit row: knit;
2nd purl row: purl.
Knitting density of the sample pattern “Stockinette stitch” in the round after wet-heat treatment:
15 sts and 18 rows = 10x10 cm, needles 6.5 mm, in 4 strands of yarn!
Your knitting density may differ significantly from mine. I strongly recommend checking the knitting density on a sample, which should be washed and dried. Moreover, the knitting density in the round and in flat knitting may differ. Be sure to knit the sample in the round. If necessary, adjust the needle size for yourself.
Pattern “Ribbing” in the round (even number of stitches):
All round rows: *1 knit, 1 purl; repeat from * to the end of the round.
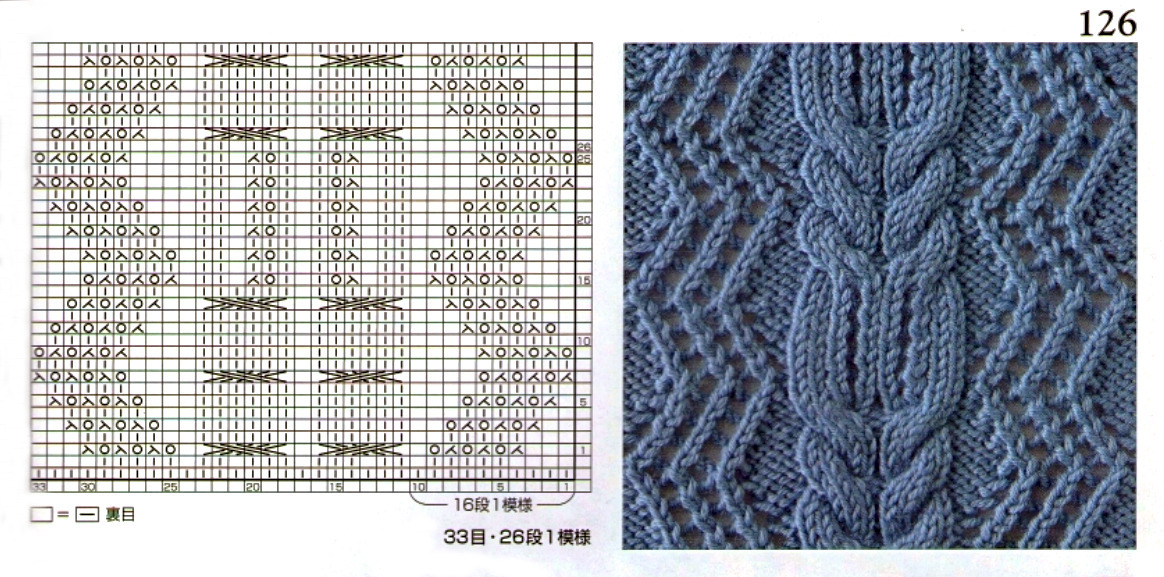
Pattern “Waves 1” for circular knitting (The rapport consists of 9 stitches and 16 rows):

Pattern “Waves 2” for circular knitting (The rapport consists of 9 stitches and 16 rows):
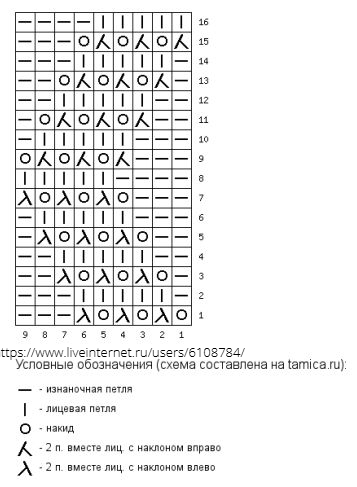
Pattern “Braids” for circular knitting (The rapport consists of 15 stitches and 26 rows):
Notation for the “Braids” pattern:
• 1st, 7th and 13th rows from 2nd to 7th stitches: cross 6 knit stitches to the right: slip 3 stitches onto a helper needle behind the work, knit the next 3 stitches, then knit 3 stitches from the helper needle)
• 1st, 7th and 13th rows from 9th to 14th stitch: cross 6 knit stitches to the left (slip 3 stitches onto a helper needle in front of the work, knit the next 3 stitches, then knit 3 stitches from the helper needle).
Note: The front and the back of the sweater are knitted separately in circular rows. Then the pieces are joined with a knitted seam.
FRONT AND BACK
On circular needles 6.5 mm, cast on 155 (191) stitches in 4 strands of yarn. Join the stitches into a circle by knitting the last and first stitches of the cast-on row together. This results in a closed ring of 154 (190) stitches.
Attach a marker at the beginning of the round. Knit 4 rounds or 2.5 cm in “ribbing” pattern. Continue knitting, counting for convenience the 1st round as follows:
Marker, 22 (31) knit, 9 stitches in “Waves 1” pattern, 15 stitches in “Braids” pattern, 9 stitches in “Waves 2” pattern, 22 (31) knit, Marker, 77 (95) knit.
Continue knitting straight, alternating the rapports of each pattern for 80 rows or 44 cm. Note that 80 rows is 3 full rapports and 2 rows of the fourth rapport of the “Braids” pattern, which is knitted in the Center Front.
Stop at the 80th row, not counting the ribbing.
Split the work into front and back
In the 81st row, knit the front and back separately in flat rows.
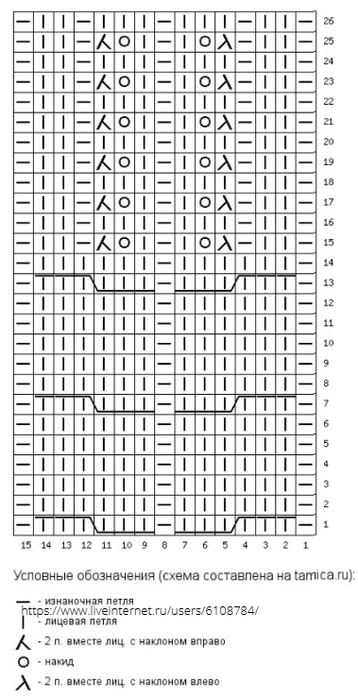
The group of central patterns should be executed according to the “Neckline” scheme, where all three patterns are described for flat knitting. The “Stockinette stitch” pattern should also be executed for flat knitting.
Edge stitches should be knitted as follows: slip the first stitch as knit without knitting, knit the last stitch as purl.
LEFT SIDE FRONT
From this same 81st knit row, start making decreases for the neckline in every 2nd row 16 (18) times. To do this, at the end of each knit row, knit 2 stitches together as knit with a left tilt before the edge stitch.
Note only for the left half of the front: when knitting the 81st knit row, in addition to the neckline decreases, also decrease the central purl stitch, for this knit the 38th stitch together with the next purl stitch (there should now be 37 stitches on the needles). Turn the work to the purl side and knit the left side of the front in flat rows.
81st knit row: 1 edge stitch, 21 (30) knit, 9 stitches in “Waves 1” pattern, 4 stitches in “Braids” pattern, knit 2 together as knit with a left tilt, knit 2 together as knit with a left tilt.
82nd purl row: as per pattern
And so on according to the “Neckline” pattern scheme
After completing all decreases for the neckline, when there are 22 (29) stitches left on the needles, stop at the 111th (115th) knit row and start shaping the shoulder slope.
To do this, in the next 112th (116th) purl row, do not knit the last 10 knit stitches. Turn the work to the knit side. WHEN TURNING THE WORK, wrap the working yarn around the last of the remaining stitches on the left to prevent a hole later.
113th (117th) knit row: 12 (19) knit.
114th (118th) purl row: 22 (29) purl, knitting the yarn over together with the stitch it was placed on.
Stop and place the left shoulder stitches onto a helper needle or scrap yarn.
RIGHT SIDE FRONT From this same 81st knit row, start making decreases for the neckline in every 2nd row 16 (18) times. To do this, at the beginning of each knit row, knit 2 stitches together as knit with a right tilt after the edge stitch.
Turn the work to the purl side and knit the right side of the front in flat rows.
81st knit row: 1 edge stitch, knit 2 together with a right tilt, 4 stitches in “Braids” pattern, 9 stitches in “Waves 2” pattern, 21 (30) knit, 1 edge stitch.
82nd purl row: as per pattern
And so on according to the “Neckline” pattern scheme
After completing 15 (17) decreases for the neckline, when there are 23 (30) stitches left on the needles, stop at the 110th (114th) purl row and start shaping the shoulder slope.
To do this, in the next 111th (115th) knit row, make the last decrease for the neckline at the beginning of the row and do not knit the last 10 knit stitches. Turn the work to the purl side. WHEN TURNING THE WORK, wrap the working yarn around the last of the remaining stitches on the left to prevent a hole later.
112th (116th) purl row: 12 (19) purl.
113th (117th) knit row: 22 (29) knit, knitting the yarn over together with the stitch it was placed on.
114th (118th) purl row: 22 (29) purl.
Stop and place the right shoulder stitches onto a helper needle or scrap yarn.
For convenience in making decreases for the neckline, knit according to the “Neckline” pattern scheme for both sides, where the 3rd row of the scheme equals the 81st total knit row.
All odd rows are knit rows, even rows are purl rows.
Empty square - no stitch.

BACK
Starting from the 81st knit row, knit the Back immediately after the right side of the front with knit stitches 77 (95) stitches, turn the work and knit the BACK in “Stockinette stitch” for flat knitting.
Knit this way for 30 (34) rows up to the 110th (114th) row inclusive. In the next 111th (115th) knit row, close the central 31 (35) stitches for the neckline and simultaneously start shaping the shoulder slopes.
To do this, knit 23 (30) knit stitches, close the central 31 (35) knit stitches in the usual way.
For the left shoulder, neckline, and shoulder slope continue knitting 13 (20) knit stitches, do not knit the last 10 knit stitches. Turn the work to the purl side. WHEN TURNING THE WORK, wrap the working yarn around the last of the remaining stitches on the left to prevent a hole later.
112th (116th) purl row: 13 (20) purl.
113th (117th) knit row: knit 2 together with a right tilt, 21 (28) knit, knitting the yarn over together with the stitch it was placed on.
114th (118th) purl row: 22 (29) purl.
Stop and leave the left shoulder stitches open, place them on a helper needle or scrap yarn.
For the right shoulder, neckline, and shoulder slope attach a new yarn at the beginning of the next 112th (116th) purl row of the right shoulder, as the knit row of the right shoulder has already been knitted before closing the central stitches of the neckline.
Knit this way in the 112th (116th) purl row 13 (20) purl stitches, do not knit the last 10 knit stitches. Turn the work to the knit side. WHEN TURNING THE WORK, wrap the working yarn around the last of the remaining stitches on the left to prevent a hole later.
113th (117th) knit row: 11 (18) knit, knit 2 together with a left tilt.
114th (118th) purl row: 22 (29) purl, knitting the yarn over together with the stitch it was placed on.
Stop and leave the left shoulder stitches open, place them on a helper needle or scrap yarn.
SLEEVES
On 6.5 mm double-pointed needles or 6.5 mm circular needles using the Magic Loop method, cast on 39 (43) stitches. Join the stitches into a circle by knitting the last and first stitches of the cast-on row together. This results in a closed ring of 38 (42) stitches. Attach a marker at the beginning of the round.
Knit 12 round rows or 6 cm in “ribbing” pattern. In the last round row, increase 19 (21) stitches every 2 stitches by making a lifted knit stitch. This results in 57 (63) stitches on the needles.
Continue knitting, counting for convenience the 1st round as follows:
Marker, 12 (15) knit, 9 stitches in “Waves 1” pattern, 15 stitches in “Braids” pattern, 9 stitches in “Waves 2” pattern, 12 (15) knit.
Continue knitting straight, alternating the rapports of each pattern for 66 rows or 35 cm. Note that 66 rows is 2.5 rapports of the “Braids” pattern, which is knitted in the Center of the Sleeve.
Stop at the 66th row, not counting the ribbing.
Leave the stitches open, place them on a helper needle or scrap yarn.
Similarly, knit the second sleeve as described for the first sleeve.
JOINING THE PARTS
SHOULDER SEAMS: Join the 22 (29) stitches of the right shoulder of the Front that were placed on a stitch holder with the open 22 (29) stitches of the right shoulder of the Back using a kitchener stitch. Do the same on the left side.
So,
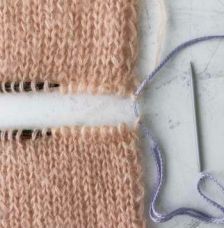
1. Insert the needle into the 1st stitch |
2. Again insert the needle into the 1st stitch of the |
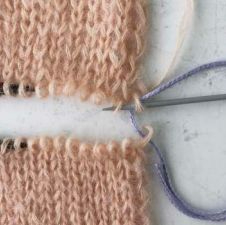
3. Proceed to insert the needle into the second |
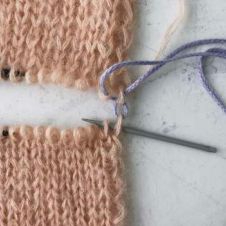
4. Insert the needle into the 1st stitch of the Front |
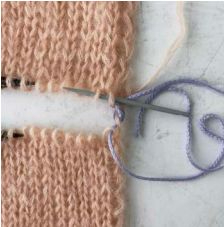
5. Again insert the needle into the second stitch |
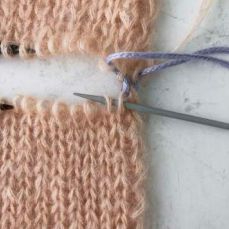
6. Again insert the needle into the third stitch |
Knit, repeating these steps until the end of the row. At the end, hide the yarn on the purl side.

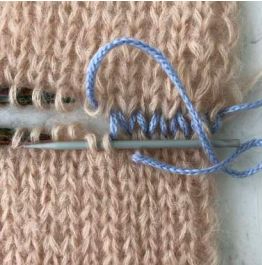
In fact, the needle should enter one stitch twice. Once from top to bottom or vice versa and the second time from bottom to top or vice versa. It depends on whether the resulting imitation should be of a purl row or a knit row. The photo above shows this seam more closely with contrasting yarn for clarity.
If this process is laborious for you or not to your liking, you can close the stitches in the usual way with a hook or needles and sew the pieces together in the classic way on the purl side. But in my opinion, the knitted seam looks very organic and beautiful.
SLEEVES SEAMS
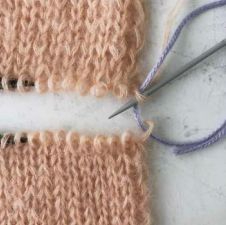
The open stitches of the sleeves can also be joined to the armholes of the sweater using the knitted seam. The principle of joining is the same as in the shoulder seams. This seam looks as shown in the photo on the right.
It is necessary to pick up the loop along the edge stitches on the body of the sweater and then enter FROM TOP TO BOTTOM (or from the front side inside) into the first open stitch of the sleeve and immediately into the second open stitch of the sleeve FROM BOTTOM TO TOP (or from the back side). Then pick up the next loop, and on the sleeve enter into the second stitch again FROM TOP TO BOTTOM, and into the third stitch already FROM BOTTOM TO TOP, and so on. This way a knit seam will be performed on the sleeve. You can also close the stitches of the sleeves in the usual way with a hook or needles and sew the pieces together in the classic way on the purl side.
NECKLINE
Using a size 5 hook, crochet the neckline of the sweater with slip stitches to form a braid. By adjusting the tension of the yarn, you can regulate the Neckline. If pulled tighter, it will become slightly smaller; if worked loosely, it will be as shown in the photo of the finished product.
You can crochet the neckline with ribbing at your discretion by picking up the stitches of the neckline. But I would not recommend pulling it too tightly or closing it. This is its charm.
WATER-THERMAL TREATMENT
I recommend washing the sweater by hand.
Fill a container with water, place a thermometer in it to ensure the correct temperature range of 30-40 degrees. The detergent should be added to the water before your item is in it. Keep it in the water for 15 minutes and start rinsing, checking the required water temperature each time. Squeeze the item in a towel, do not wring or pull;
•after washing and squeezing, take the item out of the washing container, lay it flat on a towel, giving it its original size using a measuring tape, “gathering” the stretched item, away from heating appliances;
•after 10-12 hours, turn the sweater to the other side;
•do not lift or try on the item until it is completely dry;
•do not iron the dried item with an iron. High temperatures destroy wool fibers. Enjoy your knitting!
![]() knit
knit
![]() knit
knit
![]() yarn over
yarn over
![]() decrease left (ssk)
decrease left (ssk)
![]() decrease right (k2tog)
decrease right (k2tog)