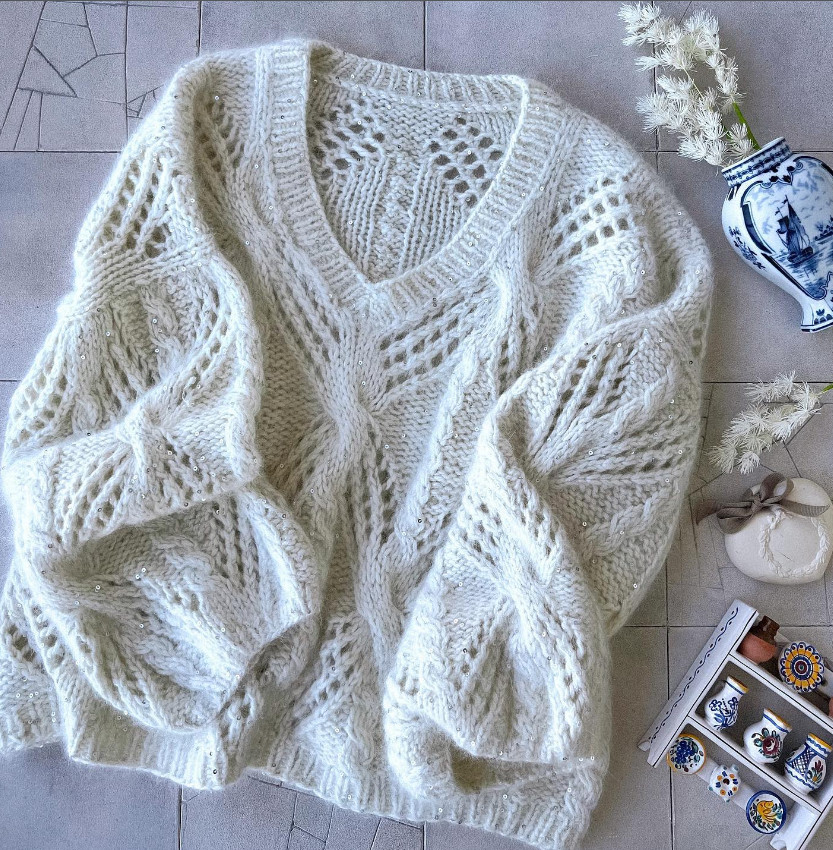
Mohair sweater
Added: 15.08.2025 в 09:38 Views: 522
Mohair sweaterKlubokhttp://klubok.work/1/3/9026/Klubokhttps://klubok.work/css/image/top-logo-en.png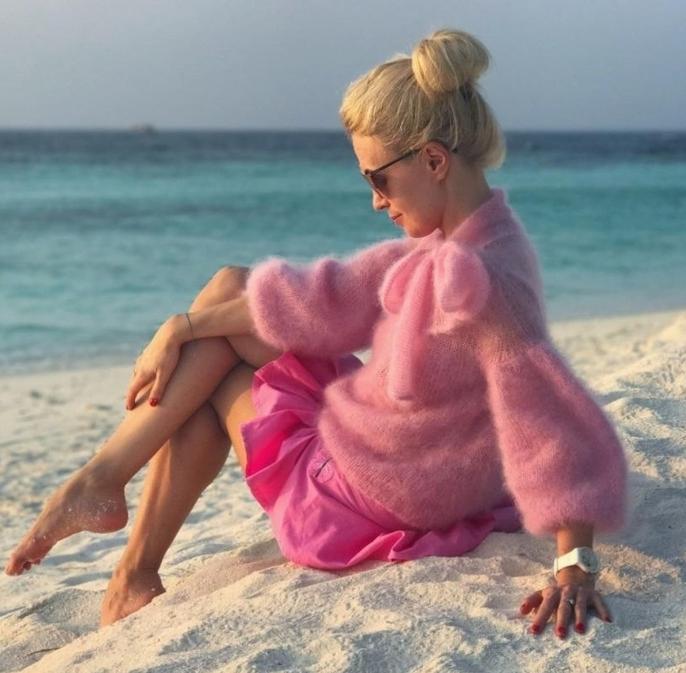
Sizes:
Size S (42-44), size M (44-46), size L (46-48).
Materials and tools:
1. Mohair on silk 70% kid mohair, 30% silk (about 210 meters/ 25 grams) 8 skeins for all sizes for knitting the version in two threads.
Theoretically, it is possible to fit into 7 skeins, but you will have to make more knots, which is not always beautiful in a mohair product!
You can also knit the product in one thread, but for that, it is better to choose slightly thicker mohair.
For example, Mohair Luxe Lang, 77% super kid mohair, 23% silk (175 meters/ 25 grams) – 5 skeins for sizes S and M, and 6 skeins for size L.
Important! Please note that in this case, the product will be more transparent, and you will likely need a silk tank top in tone! It is also better to knit the entire product with 5.5mm needles. Keep in mind that the sweater will turn out slightly smaller.
Therefore, it will be necessary to add additional rows.
2. Swarovski crystals (optional, can be omitted)
If you decide to decorate your product with Swarovski crystals, you will need 78 (80) 82 crystals 4mm for the sleeves and/or 54 crystals for the bow.
3. Needles 4mm (for ribbing), 5mm (for hollow cord), 5.5mm (for knitting details in one thread), 6mm (for knitting details in two threads).
4. Stitch markers.
5. Additional thread of contrasting color (about 2 meters).
6. Needle for sewing knit fabric.
7. Scissors.
8. Hook number 0.5-0.6 for stringing beads (if you decide to decorate the product with Swarovski crystals).
Recommendations for yarn selection:
In the test group, we tried to knit options from mohair of major manufacturers represented in the Russian market: Mohair Drops Kid-Silk (75% mohair, 25% silk, 200m/ 25 grams), Mohair BBB soft Dream (75% super kid mohair, 25% silk, 200m/ 25 grams), Mohair Silk Premium Rodina Yarns (70% super kid mohair, 30% silk, 210 meters/25 grams), Katia Conzept Mohair (70% super kid mohair, 30% silk, 200 meters/25 grams), Mohair Silkhair Lana Grossa (70% mohair, 30% silk, 210m/ 25 grams).
This classic composition (70% kid mohair, 30% silk (approx. 210 meters/ 25 grams) is also represented in many other brands.
However, mohair from one manufacturer can differ greatly from mohair from another: by the amount and height of the pile, the stiffness of the inner thread. This can affect the appearance of the product.
For knitting this product, it is desirable to use the specified yarn: kid mohair with a good tall pile, so the product does not look transparent. If, even when reaching the specified density, the product looks "more holey than desired", you should switch to smaller needles than specified and recalculate the product.
In most cases, crystals with effects have a stronger shine, cost a bit more, and are less predictable in color in photos.
Please also note that opal crystals are matte. They do not have a pronounced shine. If you want the crystals to shine, it is better to choose other crystals.
I also recommend buying crystals with a small margin (about 5%), as sometimes they can break during stringing or have a cutting edge that can damage the thread, in which case the crystal will have to be discarded.
Knitting density:
15 sts. on 21 rows = 10cm x 10cm – stockinette stitch in two threads, 6mm needles after blocking.
16 sts on 22 rows = 10cm x 10cm – stockinette stitch in one thread, 5.5mm needles after blocking.
Important! We all knit with different densities. If when knitting a sample you find that you do not fit the specified parameters, take larger or smaller needles accordingly!
Construction:
The product is knitted in separate parts (front, back, sleeves, bow).
The parts are later sewn together.
Abbreviations:
Edge. – edge stitch
F.p. – front stitch
B.p. – purl stitch
2 f.p.l - 2 stitches knit together with a left tilt
2 f.p.r - 2 stitches knit together with a right tilt
Necessary skills:
Front and purl stitches.
Kitting back and forth.
Cast on stitches using hollow cord.
Binding off stitches with hollow cord.
Cast on stitches with chain stitches.
Skill in stringing Swarovski crystals.
Decreasing stitches with a left tilt.
Decreasing stitches with a right tilt.
Careful reading.
Terms:
Edge stitch (sleeves, front, back): at the beginning of the row, slip without knitting, at the end of the row knit purl.
Edge stitch (bow): knit the first stitch frontwise through the back loop, pulling the thread back, knit the last stitch frontwise through the front loop.
Additions (front and back): chain stitches with one needle: hold the needle with the knitted stitches in your right hand. Hold the thread you are knitting in your left hand between your pinky and ring finger and then place it on your index finger. Insert the needle point towards yourself under the distant section of the thread on your index finger. Drop the formed stitch from the index finger and tighten it on the needle. Cast on all other stitches in the same way, trying to tighten them evenly.
Additions (sleeves): knit two front stitches from each stitch: through the front and the back wall.
Patterns:
Stockinette stitch: knit the front row with front stitches, knit the purl row with purl stitches.
Ribbing 1*1: Alternate one front, one purl stitch.
Hollow ribbing: Knit front stitches as front, slip purl stitches - thread in front of work.
Cast on stitches using the hollow cord method: Using one needle, cast on 3 stitches in a way you are used to.
If you are knitting with circular needles, without turning the work, move the cast-on stitches along the cord to another needle.
If you are knitting with straight needles, you should transfer these three stitches to the second needle.
Then from the first stitch, knit two stitches: one through the front wall, the second - through the back wall. Knit the remaining two stitches frontwise.
After that, transfer the first three stitches from the right needle to the left.
Pay attention to the density
And again knit two stitches from the first stitch on the left needle (one through the front, the second through the back wall), knit the remaining two stitches frontwise.
Transfer three stitches from the right needle to the left.
Continue to increase the number of stitches until you cast on the required number.
Italian cast on with elastic edge: Casting on stitches this way is done with one needle.


Start of knitting:
Scheme:
The sizes of the product are given in centimeters.
For size S (M) L respectively.

Sleeves
On 5.5mm needles, cast on 40 (41) 42 stitches using the hollow cord method.
Important! The stitches need to be cast on tightly, so that when knitting the next row they do not stretch. Pull the thread while casting on.
Turn the work and in the next row add 38 (39) 40 stitches respectively.
To do this, from each stitch, except for the edge ones, knit two front stitches: through the front and the back wall.
If you decide to decorate your product with crystals, then before knitting the stitches, use a hook to put a bead on it, carefully pull out the tip of the stitch and knit two front stitches from it: through the front and the back wall. Do this for all stitches, except for the edge ones.
Now there are 78 (80) 82 stitches on the needles.
Next, switch to 6mm needles.
Rows 1-60 from the additions knit in stockinette stitch.
Important! In this product, the sleeve is supposed to be 3/4 long. If you prefer a longer sleeve, knit the additional number of rows you need. It is also advisable to knit a few more rows if you are tall or have long arms!
Next, shape the sleeve cap using short rows.
There are many methods for short rows, we will use one of them - short rows using the boomerang stitch.
Important! If desired, you can use the short row method you are accustomed to.
Row 61: edge, 69 (71) 73 f.p., turn the work
Row 62: boomerang stitch, thread away from you, 61 (63) 65 b.p., turn the work
Row 63: boomerang stitch, thread towards you, 53 (55) 57 f.p., turn the work
Row 64: boomerang stitch, thread away from you, 45 (47) 49 b.p., turn the work
Row 65: boomerang stitch, thread towards you, 37 (39) 41 f.p., turn the work
Row 66: boomerang stitch, thread away from you, 29 (31) 33 b.p., turn the work
Row 67: boomerang stitch, thread towards you, 21 (23) 25 f.p., turn the work
Row 68: boomerang stitch, thread away from you, 13 (15) 17 b.p., turn the work
Execute a smoothing row for the boomerang stitches in the front row. For this:
Row 69: boomerang stitch, thread towards you, 12 (14) 16 f.p., knit the boomerang stitch frontwise, through both front walls, inserting the needle from left to right, 7 f.p., knit the second boomerang stitch similarly to the first, 7 f.p, knit the third boomerang stitch, 7 f.p., knit the fourth boomerang stitch, 7 f.p., edge.
Execute a smoothing row for the boomerang stitches in the purl row. For this:
Row 70: edge, 44 (46) 48 b.p., knit the boomerang stitch purlwise through both walls, inserting the needle from left to right behind the knitting, 7 b.p., knit the second boomerang stitch similarly to the first, 7 b.p., knit the third boomerang stitch, 7 b.p., knit the fourth boomerang stitch, 7 b.p., edge.
Row 71: bind off all stitches, knitting them frontwise.
It is advisable not to cut the threads, to have the option to change the sleeve length if desired.
Back and front (Size “S”)
On 4mm needles, cast on 73 stitches using the Italian cast on with an elastic edge, using two strands, starting with a purl (video).
Important! Please note that after casting on, it is advisable to leave a thread about a meter long, to subsequently make the side seam of the product. At the same time, roll it into a small ball so that it does not tangle and does not interfere with you while knitting.
Knit the first and second rows in hollow ribbing (video).
Knit the third and fourth rows in 1*1 ribbing according to the stitch pattern.
Next, switch to 6mm needles and knit 84 rows in stockinette stitch.
Rows 5-87: stockinette stitch.
Important! This number of rows looks good for height up to 165. If your height is higher, add a few rows so that the product does not look small.
Row 88: edge, 74 b.p., then set one thread aside, replace the needle with 5.5 (if you have circular interchangeable needles) and cast on 12 stitches using the “chain stitches” method.
There are 85 stitches on the needles.
Continue knitting in one thread, on 5.5mm needles.
Pay attention to the care of binding on the added stitches!
Important! Do not pull! Knit tightly!
Row 89: edge, 85 f.p., add 12 stitches using the “chain stitches” method.
There are 97 stitches on the needles.
Row 90: edge, 95 b.p., edge.
Row 91: edge, 95 f.p., edge.
Row 92: edge, 95 b.p., edge.
Row 93: edge, 95 f.p., edge.
Row 94: edge, 95 b.p., edge.
Start decreasing:
Row 95: edge, f.p., knit 2 stitches together with a left tilt (this will be denoted as 2 f.p.l), 2 f.p., 2 f.p.l, 2 f.p., 2 f.p.l, 73 f.p., knit 2 stitches together with a right tilt (this will be denoted as 2 f.p.r), 2 f.p., 2 f.p.r, 2 f.p., 2 f.p.r, 1 f.p., edge.
Row 96: edge, 89 b.p., edge.
Row 97: edge, 89 f.p., edge.
Row 98: edge, 89 b.p., edge.
Important! Please note that decreases will be made at different distances from the edge!
Row 99: edge, 2 f.p., 2 f.p.l, 2 f.p., 2 f.p.l., 2 f.p., 2 f.p.l., 65 f.p., 2 f.p.r., 2 f.p., 2 f.p.r., 2 f.p., 2 f.p.r., 2 f.p., edge.
Row 100: edge, 83 b.p., edge.
Row 101: edge, 83 f.p., edge.
Row 102: edge, 83 b.p., edge.
Row 103: edge, 3 f.p., 2 f.p.l, 2 f.p., 2 f.p.l, 2 f.p., 2 f.p.l., 57 f.p., 2 f.p.r, 2 f.p., 2 f.p.r, 2 f.p., 2 f.p.r, 3 f.p., edge.
Row 104: edge, 77 b.p., edge.
Row 105: edge, 77 f.p., edge.
Row 106: edge, 77 b.p., edge.
Row 107: edge, 4 f.p., 2 f.p.l, 2 f.p., 2 f.p.l, 2 f.p., 2 f.p.l., 49 f.p., 2 f.p.r, 2 f.p., 2 f.p.r, 2 f.p., 2 f.p.r, 4 f.p., edge.
Row 108: edge, 71 b.p., edge.
Row 109: edge, 71 f.p., edge.
Row 110: edge, 71 b.p., edge.
Row 111: edge, 2 f.p.l, 3 f.p., 2 f.p.l, 57 f.p., 2 f.p.r, 3 f.p., 2 f.p.r, edge.
There are 69 stitches on the needles.
Next, execute the shoulder slope using short rows with the boomerang stitch!
Or use another method of short rows you are familiar with.
Row 112: edge, 63 b.p., turn the work.
Row 113: slip the boomerang stitch, thread towards you, 58 f.p., turn the work.
Row 114: slip the boomerang stitch, thread away from you, 53 b.p., turn the work.
Row 115: slip the boomerang stitch, thread towards you, 48 f.p., turn the work.
Row 116: (smoothing purl row for boomerang stitches) slip the boomerang stitch, thread away from you, 47 b.p., knit the boomerang stitch, 4 b.p., knit the boomerang stitch, 4 b.p., edge.
Row 117: (smoothing front row for boomerang stitches) bind off 14 stitches of the right shoulder, 43 f.p., knit the boomerang stitch, 4 f.p., knit the boomerang stitch, 4 f.p., edge.
Important! Do not tighten the shoulder when binding off stitches!
Row 118: bind off 14 stitches of the left shoulder.
Leave enough thread to sew the shoulder seam.
Bind off 41 stitches of the neck with contrasting thread.
Back and front (Size “M”)
On 4mm needles, cast on 81 stitches using the Italian cast on with an elastic edge, using two strands, starting with a purl (video).
Important! Please note that after casting on, it is advisable to leave a thread about a meter long, to subsequently make the side seam of the product. At the same time, roll it into a small ball so that it does not tangle and does not interfere with you while knitting.
Knit the first and second rows in hollow ribbing (video).
Knit the third and fourth rows in 1*1 ribbing according to the stitch pattern.
Next, switch to 6mm needles and knit 84 rows in stockinette stitch.
Rows 5-87: stockinette stitch.
Important! This number of rows looks good for height up to 165. If your height is higher, add a few rows so that the product does not look small.
Row 88: edge, 82 b.p., then set one thread aside, replace the needle with 5.5 (if you have circular interchangeable needles) and cast on 13 stitches using the “chain stitches” method.
There are 94 stitches on the needles.
Continue knitting in one thread, on 5.5mm needles.
Pay attention to the care of binding on the added stitches!
Important! Do not pull! Knit tightly!
Row 89: edge, 94 f.p., add 13 stitches using the “chain stitches” method.
There are 107 stitches on the needles.
Row 90: edge, 105 b.p., edge.
Row 91: edge, 105 f.p., edge.
Row 92: edge, 105 b.p., edge.
Start decreasing:
Row 93: edge, f.p., knit 2 stitches together with a left tilt (this will be denoted as 2 f.p.l), 2 f.p., 2 f.p.l, 2 f.p., 2 f.p.l, 83 f.p., knit 2 stitches together with a right tilt (this will be denoted as 2 f.p.r), 2 f.p., 2 f.p.r, 2 f.p., 2 f.p.r, 1 f.p., edge.
Row 94: edge, 99 b.p., edge.
Row 95: edge, 99 f.p., edge.
Row 96: edge, 99 b.p., edge.
Important! Please note that decreases will be made at different distances from the edge!
Row 97: edge, 2 f.p., 2 f.p.l, 2 f.p., 2 f.p.l., 2 f.p., 2 f.p.l., 75 f.p., 2 f.p.r., 2 f.p., 2 f.p.r., 2 f.p., 2 f.p.r., 2 f.p., edge.
Row 98: edge, 93 b.p., edge.
Row 99: edge, 93 f.p., edge.
Row 100: edge, 93 b.p., edge.
Row 101: edge, 3 f.p., 2 f.p.l, 2 f.p., 2 f.p.l, 2 f.p., 2 f.p.l., 67 f.p., 2 f.p.r, 2 f.p., 2 f.p.r, 2 f.p., 2 f.p.r, 3 f.p., edge.
Row 102: edge, 87 b.p., edge.
Row 103: edge, 87 f.p., edge.
Row 104: edge, 87 b.p., edge.
Row 105: edge, 4 f.p., 2 f.p.l, 2 f.p., 2 f.p.l, 2 f.p., 2 f.p.l., 59 f.p., 2 f.p.r, 2 f.p., 2 f.p.r, 2 f.p., 2 f.p.r, 4 f.p., edge.
Row 106: edge, 81 b.p., edge.
Row 107: edge, 81 f.p., edge.
Row 108: edge, 81 b.p., edge.
Row 109: edge, 5 f.p., 2 f.p.l, 2 f.p., 2 f.p.l, 2 f.p., 2 f.p.l., 51 f.p., 2 f.p.r, 2 f.p., 2 f.p.r, 2 f.p., 2 f.p.r, 5 f.p., edge.
Row 110: edge, 75 b.p., edge.
Row 111: edge, 75 f.p., edge.
Row 112: edge, 75 b.p., edge.
Row 113: edge, 2 f.p.l, 4 f.p., 2 f.p.l, 59 f.p., 2 f.p.r, 4 f.p., 2 f.p.r, edge.
There are 73 stitches on the needles.
Next, execute the shoulder slope using short rows with the boomerang stitch!
Or use another method of short rows you are familiar with.
Row 114: edge, 67 b.p., turn the work.
Row 115: slip the boomerang stitch, thread towards you, 62 f.p., turn the work.
Row 116: slip the boomerang stitch, thread away from you, 57 b.p., turn the work.
Row 117: slip the boomerang stitch, thread towards you, 52 f.p., turn the work.
Row 118: (smoothing purl row for boomerang stitches) slip the boomerang stitch, thread away from you, 51 b.p., knit the boomerang stitch, 4 b.p., knit the boomerang stitch, 4 b.p., edge.
Row 119: (smoothing front row for boomerang stitches) bind off 15 stitches of the right shoulder, 46 f.p., knit the boomerang stitch, 4 f.p., knit the boomerang stitch, 4 f.p., edge.
Important! Do not tighten the shoulder when binding off stitches!
Row 120: bind off 15 stitches of the left shoulder.
Leave enough thread to sew the shoulder seam.
Bind off 43 stitches of the neck with contrasting thread.
Back and front (Size “L”)
On 4mm needles, cast on 89 stitches using the Italian cast on with an elastic edge, using two strands, starting with a purl (video).
Important! Please note that after casting on, it is advisable to leave a thread about a meter long, to subsequently make the side seam of the product. At the same time, roll it into a small ball so that it does not tangle and does not interfere with you while knitting.
Knit the first and second rows in hollow ribbing (video).
Knit the third and fourth rows in 1*1 ribbing according to the stitch pattern.
Next, switch to 6mm needles and knit 84 rows in stockinette stitch.
Rows 5-87: stockinette stitch.
Important! This number of rows looks good for height up to 165cm. If your height is higher, add a few rows so that the product does not look small.
Row 88: edge, 90 b.p., then set one thread aside, replace the needle with 5.5 (if you have circular interchangeable needles) and cast on 14 stitches using the “chain stitches” method.
There are 103 stitches on the needles.
Continue knitting in one thread, on 5.5mm needles.
Pay attention to the care of binding on the added stitches!
Important! Do not pull! Knit tightly!
Row 89: edge, 103 f.p., add 14 stitches using the “chain stitches” method.
There are 117 stitches on the needles.
Row 90: edge, 115 b.p., edge.
Row 91: edge, 115 f.p., edge.
Row 92: edge, 115 b.p., edge.
Start decreasing:
Row 93: edge, f.p., knit 2 stitches together with a left tilt (this will be denoted as 2 f.p.l), 2 f.p., 2 f.p.l, 2 f.p., 2 f.p.l, 93 f.p., knit 2 stitches together with a right tilt (this will be denoted as 2 f.p.r), 2 f.p., 2 f.p.r, 2 f.p., 2 f.p.r, 1 f.p., edge.
Row 94: edge, 109 b.p., edge.
Row 95: edge, 109 f.p., edge.
Row 96: edge, 109 b.p., edge.
Important! Please note that decreases will be made at different distances from the edge!
Row 97: edge, 2 f.p., 2 f.p.l, 2 f.p., 2 f.p.l., 2 f.p., 2 f.p.l., 85 f.p., 2 f.p.r., 2 f.p., 2 f.p.r., 2 f.p., 2 f.p.r., 2 f.p., edge.
Row 98: edge, 103 b.p., edge.
Row 99: edge, 103 f.p., edge.
Row 100: edge, 103 b.p., edge.
Row 101: edge, 3 f.p., 2 f.p.l, 2 f.p., 2 f.p.l, 2 f.p., 2 f.p.l., 77 f.p., 2 f.p.r, 2 f.p., 2 f.p.r, 2 f.p., 2 f.p.r, 3 f.p., edge.
Row 102: edge, 97 b.p., edge.
Row 103: edge, 97 f.p., edge.
Row 104: edge, 97 b.p., edge.
Row 105: edge, 4 f.p., 2 f.p.l, 2 f.p., 2 f.p.l, 2 f.p., 2 f.p.l., 69 f.p., 2 f.p.r, 2 f.p., 2 f.p.r, 2 f.p., 2 f.p.r, 4 f.p., edge.
Row 106: edge, 91 b.p., edge.
Row 107: edge, 91 f.p., edge.
Row 108: edge, 91 b.p., edge.
Row 109: edge, 5 f.p., 2 f.p.l, 2 f.p., 2 f.p.l, 2 f.p., 2 f.p.l., 61 f.p., 2 f.p.r, 2 f.p., 2 f.p.r, 2 f.p., 2 f.p.r, 5 f.p., edge.
Row 110: edge, 85 b.p., edge.
Row 111: edge, 85 f.p., edge.
Row 112: edge, 85 b.p., edge.
Row 113: edge, 6 f.p., 2 f.p.l, 2 f.p., 2 f.p.l, 2 f.p., 2 f.p.l., 53 f.p., 2 f.p.r, 2 f.p., 2 f.p.r, 2 f.p., 2 f.p.r, 6 f.p., edge.
Row 114: edge, 79 b.p., edge.
Row 115: edge, 2 f.p.l, 5 f.p., 2 f.p.l, 61 f.p., 2 f.p.r, 5 f.p., 2 f.p.r, edge.
There are 77 stitches on the needles.
Next, execute the shoulder slope using short rows with the boomerang stitch!
Or use another method of short rows you are familiar with.
Row 116: edge, 70 b.p., turn the work.
Row 117: slip the boomerang stitch, thread towards you, 64 f.p., turn the work.
Row 118: slip the boomerang stitch, thread away from you, 59 b.p., turn the work.
Row 119: slip the boomerang stitch, thread towards you, 54 f.p., turn the work.
Row 120: (smoothing for boomerang stitches in the purl row) slip the boomerang stitch, thread away from you, 53 b.p., knit the boomerang stitch, 4 b.p., knit the boomerang stitch, 5 b.p., edge.
Row 121: (smoothing for boomerang stitches in the front row) bind off 16 stitches of the right shoulder, 48 f.p., knit the boomerang stitch, 4 f.p., knit the boomerang stitch, 5 f.p., edge.
Important! Do not tighten the shoulder when binding off stitches!
Row 122: bind off 16 stitches of the left shoulder.
Leave enough thread to sew the shoulder seam.
Bind off 45 stitches of the neck with contrasting thread.
Bow:
Using two strands on 5mm needles, cast on 27 stitches using the hollow cord method, turn the work and continue knitting in one thread in stockinette stitch, starting with a purl row.
Cut the second thread, leaving enough length to tuck it into the hollow cord.
The length of the bow will be about 320 rows. You can make it slightly longer or shorter depending on your preferences.
Knit the last row with purl stitches.
Add the second thread and bind off the stitches in two threads using the hollow cord method.
If you want to make the bow more festive, you can decorate it with Swarovski beads. For this, you will need a hook #0.5 or #0.6 and 54 Swarovski crystals 4mm.
Using two strands on 5mm needles, cast on 25 stitches using the hollow cord method, turn the work.
Next, knit in one thread.
Take a bead, place it on the hook, slip a stitch from the left needle, pull the bead onto it, pull out part of the stitch and place it back on the left needle, then knit it frontwise.
Repeat until the end of the row.
Important! Please note that when casting on with hollow cord, do not stretch the stitches too much, so as not to form unsightly high floats later.
Pull the stitch just enough to knit with the tip of the needle!
Turn the work and continue knitting in stockinette stitch for about 320 rows.
Then bind off the stitches using two strands of yarn while simultaneously placing a Swarovski crystal on the knitted stitch!
Assembly:
1. Using the thread left from casting on, sew the side seams of the front and back with a mattress stitch, leaving about 16-18 rows unsewn.
2. Using the thread remaining from casting on the sleeve, sew the sleeve.
3. Sew the right shoulder seam. Pay special attention to the corner. When sewing it, it is advisable to smooth it slightly.
4. Pick up the open stitches on a 5mm needle, unraveling the contrasting threads with which the neck stitches of the front and back were bound off.
5. Bind off the neck stitches in two threads using the hollow cord method with two threads. For this, add another thread to the one left from binding off the front shoulder.
6. Sew the left shoulder seam.
7. Measure a thread about 1.5 meters long. Mark the middle of the upper row of the sleeve. In our case, this is between the 39th and 40th stitches (40 and 41) or 41 and 42, respectively. Fix the thread in this place, leaving equal lengths on each end.
8. Start sewing in the sleeve. For this, thread a double strand into the needle, secure it at the bottom of the shoulder seam and sew in the two halves of the sleeve symmetrically, gathering it. To do this, catch one stitch on the piece (where you made additions with chain stitches), one stitch on the sleeve, then catch the same stitch on the piece again, and the next stitch on the sleeve. That is, one stitch on the piece corresponds to two stitches on the sleeve. Continue until the beginning of the additions on the front or back. Then sew the sleeve stitches into the remaining unsewn side seam without gathering. Pay attention to the fact that the resulting armhole should not be narrow. It should not pull when moving your arms. Do the same with the second part of the sleeve.
9. Sew the remaining stitches of the side seams (if any remain after sewing in the sleeve).
10. Sew in the bow. For this, take a thread about 1.5 meters long and secure it at the middle of the long side of the bow. If it turned out to be about 320 rows, then between the 160th and 161st rows, respectively.
Determine the middle of the back neckline. Fold the bow and back together with the right sides facing each other, fix the thread that you secured at the middle of the bow. Next, sew the bow along the left and right sides of the neckline accordingly (the hollow cord to the body, the bow covers it).
Important! When you reach the shoulder seams, try on the product and tie the bow to understand if the seam length is sufficient or if you need to sew the bow along the neckline for an additional 2-4 cm so that the bow ties beautifully and the area of bare skin is not visible.
11. Remove all threads.
12. If desired, perform blocking.