Knitted Sweater
Added: 19.09.2025 в 19:22 Views: 3292
Knitted SweaterKlubokhttp://klubok.work/1/3/9131/Klubokhttps://klubok.work/css/image/top-logo-en.png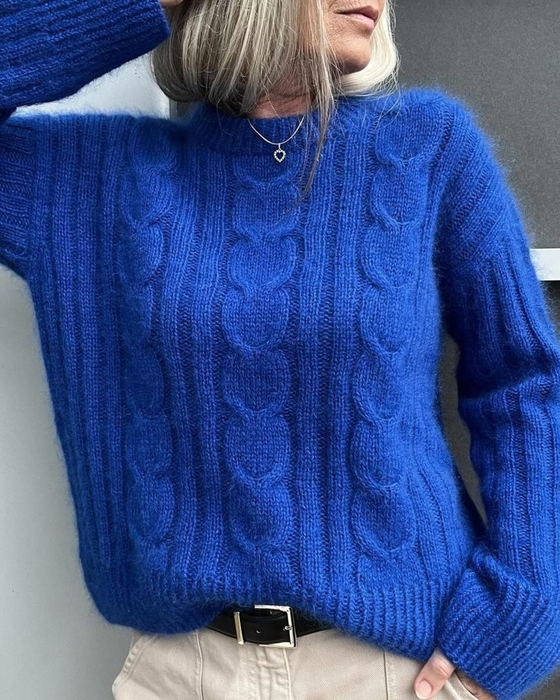
Sizes: XS (S) M (L) XL (XXL).
Final measurements of the sweater:
Chest circumference: 107 (113) 118 (124) 135 (143) cm.
Length (center back, excluding the height of the neckband): 52 (52) 53 (58) 59 (59) cm.
Recommended ease: 25 cm.
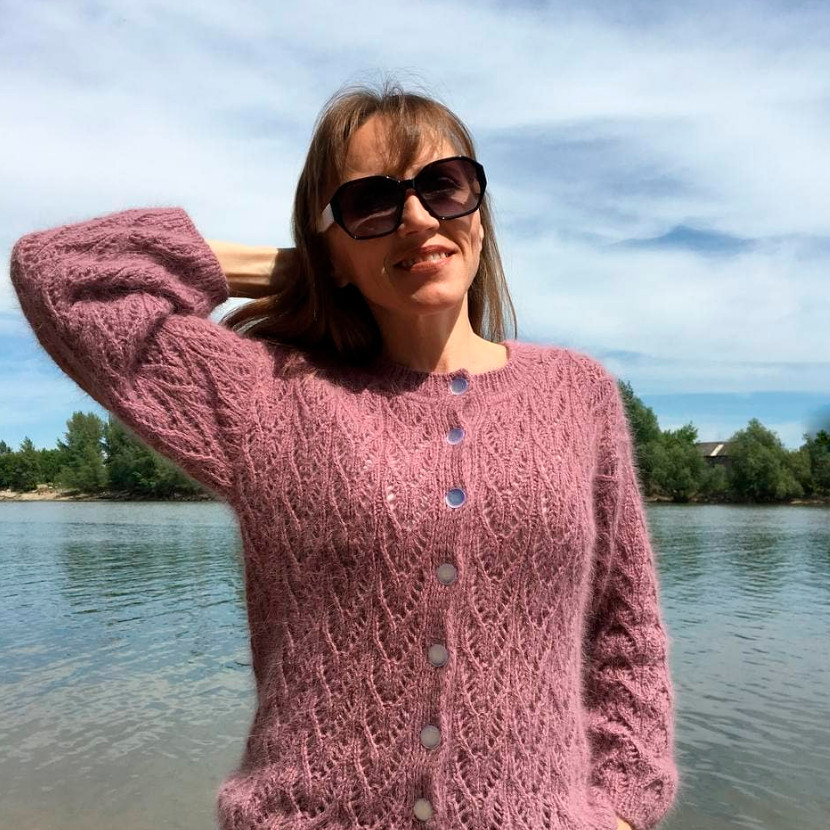
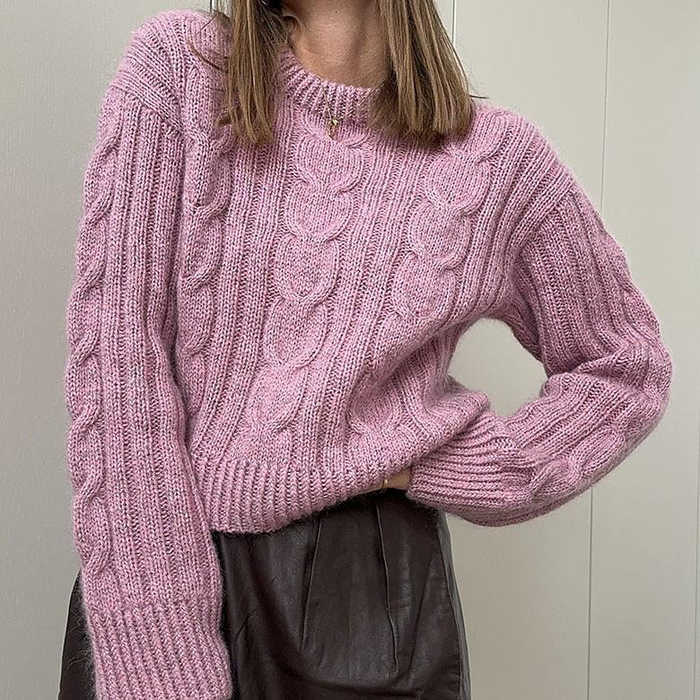
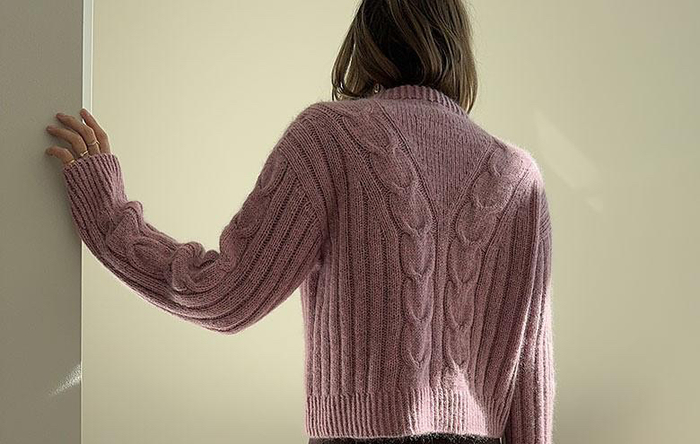
The pink sweater is knitted in size S with an ease of 27 cm and extended sleeves.
The light gray sweater is knitted in size M, with an ease of 32 cm.
Yarn.
1 strand of Jensen, Isager (100% merino wool; 125 m in 50 g) or 1 strand of Heavy Merino, Knitting for Olive (100% merino wool; 125 m in 50 g) or 1 strand of My Wool, Gepard (100% merino wool; 125 m in 50 g)
400 (450) 450 (500) 500 (550) g
Together with
1 strand of Silk Mohair, Isager (75% mohair, 25% silk; 212 m in 25 g) or 1 strand of Kid Seta, Gepard (70% mohair, 30% silk; 210 m in 25 g) or 1 strand of Soft Silk Mohair, Knitting for Olive (70% mohair, 30% silk; 225 m in 25 g)
125 (125) 150 (150) 175 (175) g
Or
2 strands of Tvinni, Isager (100% wool; 225 m in 50 g), 400 (450) 450 (500) 500 (550) g.
Together with
1 strand of Silk Mohair, Isager (75% mohair, 25% silk; 212 m in 25 g) or 1 strand of Kid Seta, Gepard (70% mohair, 30% silk; 210 m in 25 g) or 1 strand of Soft Silk Mohair, Knitting for Olive (70% mohair, 30% silk; 225 m in 25 g)
125 (125) 150 (150) 175 (175) g.
The pink sweater is knitted from Isager Tvinni in shade 27s together with Kid Seta in shade 488.
The light gray sweater is knitted from Isager Jensen in shade 0s together with Silk Mohair in shade 0.
Needles and other tools.
Circular needles 4.5 mm with a cable length of 40 cm and 80-100 cm.
Circular needles 4 mm with a cable length of 40 cm and 80-100 cm.
Set of double-pointed needles 4.5 mm and 4 mm (if not using the Magic Loop method).
A helper needle, markers, stitch holders, or waste yarn.
Gauge.
18 sts x 28 rows = 10 cm in ribbing 3 x 2 (3 knit, 2 purl), with 4.5 mm needles, after washing and blocking the sample.
Be sure to knit a sample, and if necessary, choose needles of a different size to achieve the specified gauge.
Abbreviations and terms.
RS / WS = right side / wrong side
st. = stitch
knit / purl = knit st. / purl st.
marker / rnd marker = marker / beginning of round marker
pm = place marker
sm = slip marker from left needle to right
Rnd = round
turn = turn work
edge st. = edge stitch (knit the first and last stitches of the row as knit on RS and purl on WS)
sl-wy = slip stitch as purl with yarn in front
sl-wy = slip stitch as purl with yarn in back
Making increases.
Inc1L = increase 1 st. leaning left: lift the strand between stitches with the left needle, inserting the needle from the front, and knit it knitwise through the back loop.
Inc1R = increase 1 st. leaning right: lift the strand between stitches with the left needle, inserting the needle from the back, and knit it knitwise through the front loop.
Inc1Li = increase 1 st. leaning left purlwise: lift the strand between stitches with the left needle, inserting the needle from the front, and knit it purlwise through the back loop.
Inc1Ri = increase 1 st. leaning right purlwise: lift the strand between stitches with the left needle, inserting the needle from the back, and knit it purlwise through the front loop.
Making decreases.
2 tog knit = knit 2 stitches together. (1 st. decreased leaning right)
k2tog/wy = modified k2tog: slip 1 st. knitwise, slip the next st. purlwise, insert the tip of the left needle into the slipped stitches from left to right and knit them together knitwise through the back loop. (1 st. decreased leaning left)
2 tog purl = knit 2 stitches together purlwise (1 st. decreased leaning right)
Making a braid:
Transfer 3 sts. from the left needle to a helper needle in front of the work, knit 3 knit from the left needle, then 3 knit from the helper needle, then transfer 3 sts. from the left needle to a helper needle behind the work, knit 3 knit from the left needle, then 3 knit from the helper needle.
German short rows.
On RS: knit the number of stitches specified in the description, turn the work, bring the yarn forward, slip the first st. purlwise, bring the yarn over the needle to the back and pull (this creates a double stitch = DS). On WS: knit the number of stitches specified in the description, turn the work, bring the yarn forward, slip the first st. purlwise, bring the yarn over the needle to the back and pull (this creates a double stitch = DS).
Knit double stitches: when knitting a double stitch, count it as one st., knitting it knitwise through both legs of the DS in the knit round (kDS) or purlwise through both legs of the DS in the purl round (pDS).
A video tutorial on how to perform German short rows can be viewed at the link https://www.purlsoho.com/create/german-short-rows/
Work description.
Back.
The yoke of the back will be worked in short rows down to the bottom of the armholes, and the upper part of the back will be formed with short rows to create a slanted shoulder line.
You will knit the back, executing the textured pattern of ribbing and braids as specified (when the description indicates a braid, follow the braid instructions above.)
Cast on 91 (91) 101 (101) 111 (111) sts. on 4.5 mm needles.
Make a setup row for the textured pattern of ribbing and braids:
Setup Row (WS): edge st., *3 purl, 2 knit*, repeat *-* 2 (2) 3 (3) 4 (4) more times, 12 purl, 2 knit, 31 purl, 2 knit, 12 purl, *2 knit, 3 purl*, repeat *-* 2 (2) 3 (3) 4 (4) more times, edge st.
Cut the yarn
Slip the first 30 (30) 35 (35) 40 (40) sts. from the left needle to the right (without knitting them).
Join the new yarn, knit 31 sts. as instructed, turn.
Next, work German short rows. After each turn of the work, form the DS.
Knit the DS as one stitch (kDS or pDS). Work as follows:
Row 1 (WS): knit as instructed to the point of joining the new yarn, knit 5 more sts., turn.
Row 2 (RS): knit as instructed to the DS, knit the DS as one stitch, knit 5 more sts., turn.
Row 3 (WS): knit as instructed to the DS, knit the DS as one stitch, knit 5 more sts., turn.
Row 4 (RS): knit as instructed to the DS, knit the DS as one stitch, knit 5 more sts., turn.
Repeat Rows 3-4 3 (3) 4 (4) 5 (5) more times. After the final turn of the work, you will have 5 sts. left at the end of the row.
Knit the remainder of the row as instructed.
The section of short rows is completed. The height of the piece reaches approximately 4.5 (4.5) 5 (5) 5.5 (5.5) cm, measuring from the center back.
Next, work a total of 0 (0) 2 (2) 4 (4) full short rows.
Then you will knit the back in short rows, executing the textured pattern of ribbing and braids and forming a triangle at the center of the back through increases and decreases.
Place 4 markers as follows: pm after 11 (11) 16 (16) 21 (21) sts., pm after 20 sts., pm after 29 sts., pm after 20 sts. There will be 11 (11) 16 (16) 21 (21) sts. left until the end of the row.
Check that the number of stitches at each end of the row is symmetrical (in a mirror image).
Knit the back as follows:
Row 1 (RS): knit to the marker, inc1R, sm, knit to the marker, sm, k2tog, knit to 2 sts. before the marker, sl-wy, sm, knit to the marker, inc1L, knit to the end of the row.
Rows 2-4: knit as instructed.
Row 5 (RS): knit to the marker, inc1R, sm, knit to the marker, sm, k2tog, knit to 2 sts. before the marker, sl-wy, sm, knit to the marker, sm, inc1L, knit to the end of the row.
Rows 6-8: knit as instructed.
Row 9 (RS): knit to the marker, inc1R, sm, knit 5 sts., braid, knit to the marker, sm, k2tog, knit to 2 sts. before the marker, sl-wy, sm, knit 3 sts., braid, knit to the marker, sm, inc1L, knit to the end of the row.
Rows 10-12: knit as instructed.
Row 13 (RS): knit to the marker, inc1Ri, sm, knit to the marker, sm, k2tog, knit to 2 sts. before the marker, sl-wy, sm, knit to the marker, sm, inc1Li, knit to the end of the row.
Rows 14-16: knit as instructed to the end of the row.
Row 17 (RS): knit as Row 13.
Rows 18-20: knit as instructed to the end of the row.
Row 21 (RS): knit as Row 5.
Rows 22-24: knit as instructed to the end of the row.
Row 25 (RS): knit as Row 9.
Rows 26-28: knit as instructed to the end of the row.
Row 29 (RS): knit as Row 5.
Rows 30-32: knit as instructed to the end of the row.
Row 33 (RS): knit as Row 13.
Rows 34-36: knit as instructed to the end of the row.
Row 37 (RS): knit as Row 13.
Rows 38-40: knit as instructed to the end of the row.
Row 41 (RS): knit as Row 9.
Rows 42-44: knit as instructed to the end of the row.
Row 45 (RS): knit as Row 5.
Rows 46-48: knit as instructed to the end of the row.
Next, you will make increases to form the armholes. Work as follows:
Row 1 (RS): knit 4 sts., inc1L, knit to the marker, inc1R, sm, knit to the marker, sm, k2tog, knit to 2 sts. before the marker, sl-wy, sm, knit to the marker, sm, inc1L, knit to the last 4 sts., inc1R, knit 4 sts.
Row 2 (WS): knit to the end of the row.
Row 3 (RS): knit 4 sts., inc1L, knit to the last 4 sts., inc1R, knit 4 sts.
Row 4 (WS): knit to the end of the row.
Row 5 (RS): knit 4 sts., inc1L, knit to the marker, inc1Ri, sm, knit to 1 st. before the marker, slip the stitch to the right needle, remove the marker. Return the stitch back to the left needle, k2tog, knit 1 st. as instructed, slip the stitch to the right needle, remove the marker, return the stitch to the left needle, sl-wy, knit to the marker, sm, inc1Li, knit to the last 4 sts., inc1R, knit 4 sts.
Row 6 (WS): knit to the end of the row.
Row 7 (RS): knit 4 sts., inc1Li, knit to the last 4 sts., inc1Ri, knit 4 sts.
Row 8 (WS): knit to the end of the row.
Row 9 (RS): knit 4 sts., inc1Li, knit to the marker, inc1Ri, sm, knit 5 sts., braid, knit 7 sts., braid, knit to the marker, sm, inc1Li, knit to the last 4 sts., inc1Ri, knit 4 sts.
Row 10 (WS): knit to the end of the row.
You have completed 4 decreases and 16 increases.
= 103 (103) 113 (113) 123 (123) sts.
Remove the markers. Cut the yarn. Transfer the stitches to a stitch holder.
Left shoulder.
From the RS of the work, using 4.5 mm needles, pick up and knit a total of 31 (31) 36 (36) 41 (41) sts. along the edge of the left shoulder of the back, starting from the neckline and moving towards the armhole. The first stitch should be picked up from the knit stitch at the left corner of the triangle, then pick up all stitches from the edge of the shoulder of the back. (For a nicer result, pick up stitches from the stitches themselves, not from the gaps between them, which will form a nice transition between the back and the shoulder panel.)
Make a setup row from the WS of the work.
Setup Row (WS): edge st., *3 purl, 2 knit*, repeat *-* 2 (2) 3 (3) 4 (4) more times, 12 purl, 2 knit, edge st.
Check that the knit and purl stitches of the back match the pattern with the shoulder stitches.
Next, knit as instructed, performing German short rows to shape the shoulder. Work as follows:
Row 1 (RS): knit 5 sts., turn.
Row 2 (WS): knit to the end of the row.
Row 3 (RS): knit to the DS, knit the DS as one stitch, knit 5 more sts., turn.
Row 4 (WS): knit to the end of the row.
Repeat Rows 3-4 3 (3) 4 (4) 5 (5) times. After the final turn of the work, there will be 5 sts. left to the end of the row.
The section of short rows is complete.
Knit full rows as instructed, for a total of 2 (2) 4 (4) 6 (6) rows.
Next, you will make increases to form the neckline. Work as follows:
Row 1 (RS): edge st., inc1L, knit to the end of the row.
Row 2 (WS): knit to the end of the row.
Rows 3-6: repeat Rows 1-2 two times.
Row 7 (RS): edge st., inc1Li, knit 5 sts., braid, knit to the end of the row.
Row 8 (WS): knit to the end of the row.
Row 9 (RS): edge st., inc1Li, knit to the end of the row.
Row 10 (WS): knit to the end of the row.
You have completed 5 increases; = 36 (36) 41 (41) 46 (46) sts.
Cut the yarn. Transfer the stitches to a stitch holder.
Right shoulder.
Unwind enough yarn to lift the stitches.
From the RS of the work, using 4.5 mm needles and the unwound end of the yarn, pick up and knit 31 (31) 36 (36) 41 (41) sts. along the edge of the right shoulder of the sweater, moving from the armhole towards the neckline. Pick up and knit all stitches from the edge of the shoulder, then 1 st. from the knit st. at the right corner of the triangle. Pick up stitches from the actual edge stitches, not from the gaps between them, to create a nice transition from the back to the shoulder panel.
Move the stitches to the other end of the needle to perform the setup row again from the RS of the work.
Setup Row (RS): edge st., *3 knit, 2 purl*, repeat *-* 2 (2) 3 (3) 4 (4) times, 12 knit, 2 purl, edge st.
Ensure that the knit and purl stitches match the pattern with the back stitches.
Next, knit the short rows to create a slanted shoulder line:
Row 1 (WS): knit 5 sts., turn.
Row 2 (RS): knit to the end of the row.
Row 3 (WS): knit to the DS, knit the DS as one stitch, knit 5 more sts., turn.
Row 4 (RS): knit to the end of the row.
Repeat Rows 3-4 3 (3) 4 (4) 5 (5) times. After the final turn of the work, there will be 5 sts. left.
The section of short rows is complete.
Next, knit a total of 3 (3) 5 (5) 7 (7) rows.
Now you need to make increases to form the neckline. Work as follows:
Row 1 (RS): knit to the last st., inc1R, edge st.
Row 2 (WS): knit to the end of the row.
Rows 3-6: repeat Rows 1-2 two times.
Row 7 (RS): knit 16 (16) 21 (21) 26 (26) sts., braid, knit to the last st., inc1Ri, edge st.
Row 8 (WS): knit to the end of the row.
Row 9 (RS): knit to the last st., inc1Ri, edge st.
Row 10 (WS): knit to the end of the row.
You have completed 5 increases; = 36 (36) 41 (41) 46 (46) sts.
Do not cut the yarn.
Front.
Now you need to join the front sides, casting on new stitches for the center of the neckline.
Knit as instructed over the stitches of the right shoulder, cast on 20 (20) 20 (20) 20 (20) stitches using the Backwards Loop Cast On method, and knit as instructed over the stitches of the left shoulder.
= 92 (92) 102 (102) 112 (112) sts.
Next, knit the front in a textured pattern of ribbing and braids in short rows.
First, make a setup row WS, knitting the cast-on stitches for the center of the neckline as follows: 2 purl, 2 knit, 12 purl, 2 knit, 2 purl. Work the remaining stitches of the row as instructed.
Knit the front yoke, completing a total of 10 (10) 10 (10) 10 (10) short rows as follows:
Row 1 is completed with a braid (= RS Row): knit 16 (16) 21 (21) 26 (26) sts., braid, knit 12 p., braid, knit 12 p., braid, knit to the end of the row.
Next, knit as instructed for 15 (15) 15 (15) 15 (15) rows.
Complete 1 row with a braid (as instructed above).
Next, knit as instructed for 7 (7) 7 (7) 7 (7) rows.
Now you need to make increases to form the armholes. Work as follows:
Row 1 (RS): knit 4 sts., inc1L, knit to the last 4 sts., inc1R, knit 4 sts.
Row 2 (WS): knit to the end of the row.
Row 3 (RS): knit as Row 1.
Row 4 (WS): knit to the end of the row.
Row 5 (RS): knit as Row 1.
Row 6 (WS): knit to the end of the row.
Row 7 (RS): knit 4 sts., inc1Li, knit to the last 4 sts., inc1Ri, knit 4 sts.
Row 8 (WS): knit to the end of the row.
Row 9 (RS): knit as Row 7, and at the same time perform the braids (= 3 panels with braids).
Row 10 (WS): knit to the end of the row.
You have completed 10 increases; = 102 (102) 112 (112) 122 (122) sts.
Do not cut the yarn.
Body of the sweater.
You need to join the front and back to knit the body of the sweater as one piece in round rows.
Do the following:
Knit as instructed over the stitches of the front, cast on 0 (5) 0 (5) 5 (10) sts. in continuation of the row for the underarm. Knit as instructed over the stitches of the back, cast on 0 (4) 0 (4) 4 (4) sts. in continuation of the row, pm, cast on another 0 (1) 0 (1) 1 (6) sts.
= 205 (215) 225 (235) 255 (265) sts. in the body.
Knit 13 round rows in a textured pattern. The edge stitches now become stitches in ribbing 3 x 2.
Complete 1 round row with braids.
Continue to knit in a textured pattern, performing braids in every 16th round row.
Knit until a total of 6 (6) 6 (7) 7 (7) braids are completed at the center front. Then knit another 8 round rows. The length of the sweater will reach approximately 45 (45) 46 (51) 52 (52) cm, measuring from the center back.
Change to 4 mm needles. Knit the bottom of the body in crossed ribbing (1 knit through the back loop, 1 purl) to a height of 7 cm. In the first round row of ribbing, decrease the first two stitches of the round row (knit them as 2 tog knit through the back loop) to achieve an even number of stitches.
Then work 2 round rows in stockinette stitch:
Round Row 1: *1 knit through the back loop, 1 sl-wy*; repeat *-* until the end of the round row.
Round Row 2: *1 sl-wy, 1 purl*; repeat *-* until the end of the round row.
Bind off the stitches using the Italian method.
Neckline.
The neckband will be worked on 4 mm circular needles with a cable length of 40 cm.
From the RS of the work, using 4 mm needles, pick up and knit 98 (98) 104 (104) 112 (112) sts. along the edge of the neckline, starting from the left shoulder. Pick up all stitches along the edge.
Make 9 round rows in crossed ribbing 1 x 1 (1 knit through the back loop, 1 purl)
Then complete 2 round rows in stockinette stitch:
Round Row 1: *1 knit, 1 sl-wy*; repeat *-* until the end of the round row.
Round Row 2: *1 sl-wy, 1 purl*; repeat *-* until the end of the round row.
Then work another 8 round rows in crossed ribbing 1 x 1 (1 knit through the back loop, 1 purl).
Fold the band in half, WS in. Join the open stitches with the stitches from the row of picked-up stitches while closing them. Be sure that the stitches you will be joining are from the same column. Bind off the stitches loosely so that the neckline is not tight.
Do the following: *pick up 1 st. from the row of picked-up stitches, place it on the left needle and knit it together with the open stitch as 2 tog knit, then knit 1 knit, place the second stitch on the right needle over the one just knitted*; repeat *-* until the end of the round row.
Sleeves.
The sleeves will be worked in round rows on 4.5 mm needles with a cable length of 40 cm.
From the RS of the work, using 4.5 mm needles, pick up and knit the edge stitches of the armhole as follows: Place a marker at the top of the armhole. Starting from the corner of the underarm, pick up and knit 2 (3) 2 (3) 3 (2) sts. from the stitches of the ribbing of the underarm, then pick up and knit 41 (43) 41 (43) 48 (46) sts. along the edge of the armhole to the top marker, then another 41 (43) 41 (43) 48 (46) sts. along the edge of the armhole to the underarm.
= 84 (89) 84 (89) 99 (94) sts.
Sizes XS (-) M (-) - (XXL): Place 1 marker on each side of the 2 purl sts. of the underarm.
The right marker will be the rnd marker.
Work 1 round row as follows: *2 purl, 3 knit*; repeat *-* to 8 sts. before the top marker of the armhole, 2 purl, 12 knit (= for the braid panel), *2 purl, 3 knit*; repeat *-* to the rnd marker.
Sizes - (S) - (L) XL (-): Place 1 marker on each side of the 3 knit stitches of the underarm.
The right marker will be the rnd marker.
Work 1 round row as follows: *3 knit, 2 purl*; repeat *-* to 6 sts. before the top marker of the armhole, 12 knit (= for the braid panel), 2 purl, *3 knit, 2 purl*; repeat *-* to the rnd marker.
All sizes: Cut the yarn.
Next, you will perform a section of German short rows to form the upper part of the sleeve.
Slip the stitches from the left needle to the right until you reach 6 sts. before the top marker of the armhole (without knitting them). Join the new yarn and do the following:
Row 1 (RS): knit 12 sts., turn.
Row 2 (WS): knit up to the point of joining the yarn (including the stitch knitted with the new yarn), knit 5 more sts., turn.
Row 3 (RS): knit to the DS, knit the DS as one stitch, knit 5 more sts., turn.
Row 4 (WS): knit to the DS, knit the DS as one stitch, knit 5 more sts., turn.
Repeat Rows 3-4 3 (3) 3 (3) 4 (4) times. Then knit to the rnd marker.
The section of short rows is complete. Next, you will knit the sleeve in round rows. Remove the marker at the top of the sleeve.
Knit the sleeve in the textured pattern of ribbing and braids, making decreases on the inside of the sleeve.
Make the decreases knitwise or purlwise, depending on the stitches after the second marker or before the rnd marker as follows:
The first decrease of the round row (at the start of the row) should be made knitwise if the next stitch after the marker is knit, or purlwise if the next stitch after the marker is purl.
The second decrease of the round row (before the rnd marker) should be made knitwise if the second stitch before the rnd marker is knit, or purlwise if the second stitch before the rnd marker is purl.
Round Rows with decreases forming knit should be worked as follows: starting from the rnd marker, knit to the next marker, sm, k2tog, knit to 2 sts. before the rnd marker, sl-wy.
Round Rows with decreases forming purl should be worked as follows: starting from the rnd marker, knit to the next marker, sm, 2 tog purl, knit to 2 sts. before the rnd marker, 2 tog purl through the back loop.
Knit 3 round rows as instructed without decreases.
Make 1 round row with decreases as described above, and perform a braid on the central panel of the sleeve.
Continue to work round rows with decreases every 4th round row for another 9 (9) 4 (4) 9 (9) times, performing braids in every 16th round row.
You will have completed a total of 20 (20) 10 (10) 20 (20) decreases; = 64 (69) 74 (79) 79 (74) sts.
Continue to knit the sleeve in round rows until a total of 6 (6) 6 (6) 5 (5) braids are completed for the sleeve, then knit another 8 round rows.
The length of the sleeve will reach approximately 37 (37) 37 (37) 32 (32) cm, measuring from the underarm.
If you would like to knit an extended sleeve, knit to the next braid, perform the braid, and knit another 8 round rows.
Change to 4 mm needles. Knit the cuff of the sleeve in crossed ribbing (1 knit through the back loop, 1 purl) to a height of 9 cm. For sizes - (S) - (L) XL (XXL): In the first round row of ribbing, decrease the first two stitches of the round row to achieve an even number of stitches.
Then work 2 round rows in stockinette stitch:
Round Row 1: *1 knit through the back loop, 1 sl-wy*; repeat *-* until the end of the round row.
Round Row 2: *1 sl-wy, 1 purl*; repeat *-* until the end of the round row.
Bind off the stitches using the Italian method.
Finishing the work.
Weave in all yarn ends. Wash the sweater and block it to size.