Knitted Pullover
Added: 03.10.2025 в 18:28 Views: 754
Knitted PulloverKlubokhttp://klubok.work/1/3/9191/Klubokhttps://klubok.work/css/image/top-logo-en.png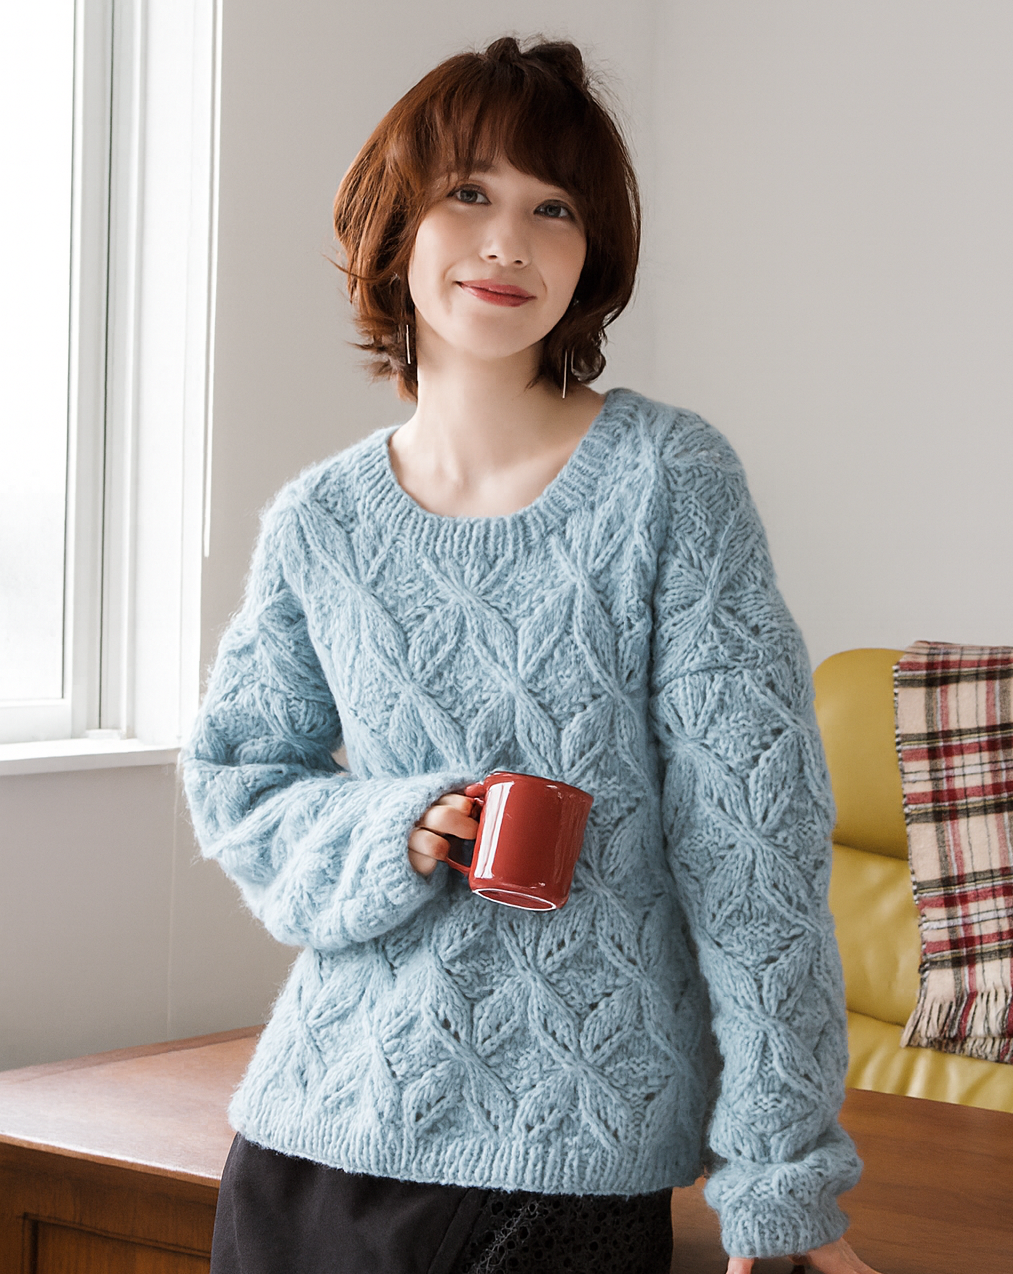
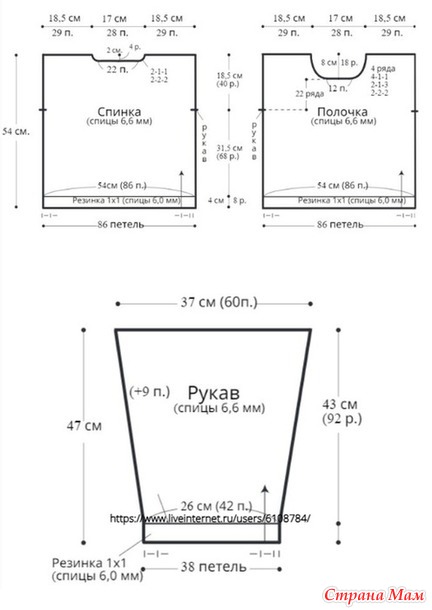
Size of the finished product
Chest circumference - 108 cm,
Length from the center of the back (7th cervical vertebra) along the arm to the end of the cuff - 74 cm,
Length along the back - 54 cm.
Sample and knitting density
The sample of 10 cm x 10 cm in the main pattern with needles of 6.6 mm diameter equals 16 stitches x 21.5 rows.
Materials
1. Straight needles of 6.6 mm diameter (main pattern), 6.0 mm (ribbing);
2. Circular needles or a set of double-pointed needles of 6.0 mm;
3. Yarn Pierrot Yarns Puno (68% baby alpaca, 22% nylon, 10% extra fine merino wool) 50g/110m - 385 grams.
A full replacement for the yarn specified in the original description is the yarn Geek (50g/116m) from Daruma.
Or you can knit this pullover in a summer version using Knitting Cotton yarn from Daruma (50g/100m)
1. 2 cable needles;
2. Markers;
3. Blunt needle for seaming.
Knitting description
1. For the back, cast on 86 stitches using 6.0 mm needles in any convenient way for you.
2. Knit ribbing 1x1 starting with two knit stitches for 8 rows (4 cm). At the end of the knitting, the width of the fabric should be 54 cm.
3. Change to 6.6 mm needles and knit the main pattern for 102 rows.
4. At the beginning and end of row 68, mark the places for the insertion of the sleeves with markers.
5. In row 103, bind off the central 22 stitches. Join a thread from another ball or the thread from the other end of the same ball and finish the row.
To round the neckline in row 104 (wrong side), decrease 2 stitches at the inner edge of the neckline on the right side (i.e., at the beginning of the row). In row 105, decrease 2 stitches at the inner edge of the neckline at the beginning of the row on the left side.
Knit row 106 without decreases on both halves of the neckline.
In row 107, decrease 1 stitch at the end of the row on the right half of the neckline and 1 stitch at the beginning of the row on the left half of the neckline.
Knit the wrong side row 108 and bind off the remaining 29 shoulder stitches.
Finish the second side of the neckline similarly. The width of the finished shoulders should be 18.5 cm, the neckline 17 cm (28 stitches). The depth of the neckline is 2 cm (4 rows).
Front
1. Similarly to the back.
2. Similarly to the back.
3. Change to 6.6 mm needles and knit the main pattern for 90 rows.
4. At the beginning and end of row 68, mark the places for the insertion of the sleeves with markers.
5. In row 91, bind off the central 22 stitches. Join a thread from another ball or the thread from the other end of the same ball and finish the row.
To round the neckline in row 92 (wrong side), decrease 2 stitches at the inner edge of the neckline on the right side (i.e., at the beginning of the row). In row 93, decrease 2 stitches at the inner edge of the neckline at the beginning of the row on the left side.
Similarly, decrease 2 stitches in rows 94 and 95.
Knit row 96 without decreases on both halves of the neckline.
In row 97, decrease 1 stitch at the end of the row on the right half of the neckline and 1 stitch at the beginning of the row on the left half of the neckline. Similarly, decrease stitches in the next two knit rows 99 and 101.
Knit rows 98, 100, 102, 103, and 104 without decreases on both halves of the neckline according to the pattern scheme.
In row 105, decrease 1 stitch at the end of the row on the right half of the neckline and 1 stitch at the beginning of the row on the left half of the neckline.
Knit the next three rows according to the pattern and bind off the remaining 29 shoulder stitches from each side of the neckline. The width of the finished shoulders should be 18.5 cm, the neckline 17 cm (28 stitches). The depth of the neckline is 8 cm (18 rows).
Sleeve
1. For the sleeve, cast on 38 stitches using 6.0 mm needles in any convenient way for you.
2. Knit ribbing 1x1 starting with two knit stitches for 8 rows (4 cm).
3. Change to 6.6 mm needles and evenly increase 4 stitches in the first row.
4. Knit the sleeve fabric according to the pattern scheme.
5. In row 11, after the first stitch and before the last on both sides, increase 1 stitch in any convenient way for you. Then repeat these increases every 10th row 5 times (i.e., in rows 21, 31, 41, 51, and 61).
Make similar increases of 1 stitch on both sides in rows 69, 77, and 85.
Knit the remaining 7 rows (the last row 92 is a wrong side) according to the pattern and bind off the sleeve stitches (60 stitches). The width of the set-in part should be 37 cm.
Assembly of the product
1. Align the front and back and join the shoulders using a slip stitch with a hook.
2. Using 6.0 mm needles, pick up 78 stitches along the edge of the neckline: 30 stitches on the back and 48 on the front. Knit for 3 cm (6 rows) in ribbing 1x1. Bind off the neckline stitches in a way convenient for you.
3. Set in the sleeves in the spaces marked with markers on the front and back, using a slip stitch with a hook.
4. Using a mattress stitch, join the side seams of the back and front while transitioning to the sleeve seam.
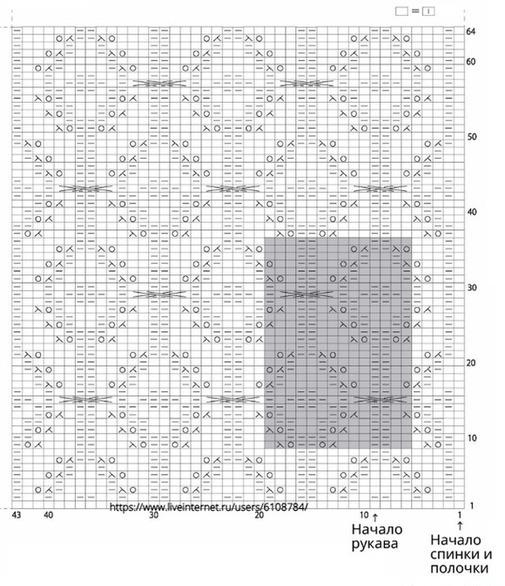
Patterns, designs, rapport
1. The pattern rapport includes 14 stitches in width and 28 rows in height.
2. There are no edge stitches in Japanese knitting! All stitches are knitted according to the pattern: the 1st row starts and ends with a knit stitch. The wrong side edge is knitted according to the pattern.
3. The knitting of the back and front starts with the 1st stitch of the 1st row of the scheme, for the sleeves start knitting with the 9th stitch of the 1st row of the scheme.
4. An empty cell in the scheme corresponds to a knit stitch. The knitting is turned, so the wrong side rows are read "backwards".
5. The crossover element of 6 stitches is executed as follows:
Remove the first two stitches from the left needle onto a helper needle and leave it in front of the work. Remove the next two stitches onto a helper needle and leave it behind the work. Knit the last two stitches from the six as knit stitches. Then knit the stitches from the helper needle that is BEHIND the work as purl stitches. Finally, knit the last two stitches from the helper needle that is IN FRONT of the work as knit stitches.

https://ww
Source: https://www.stranamam.ru/post/15313623/