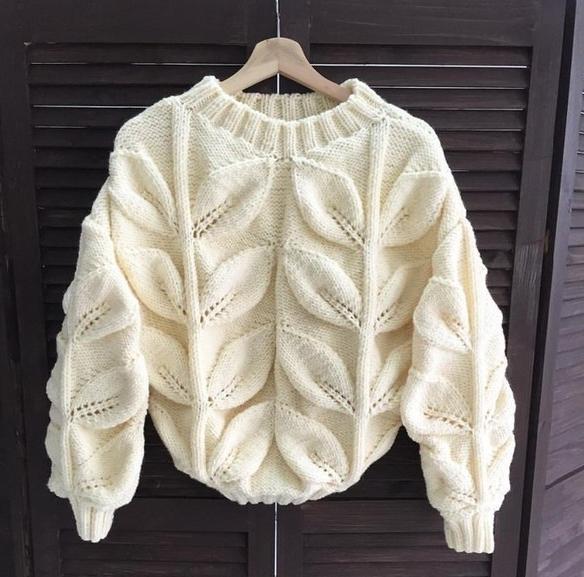
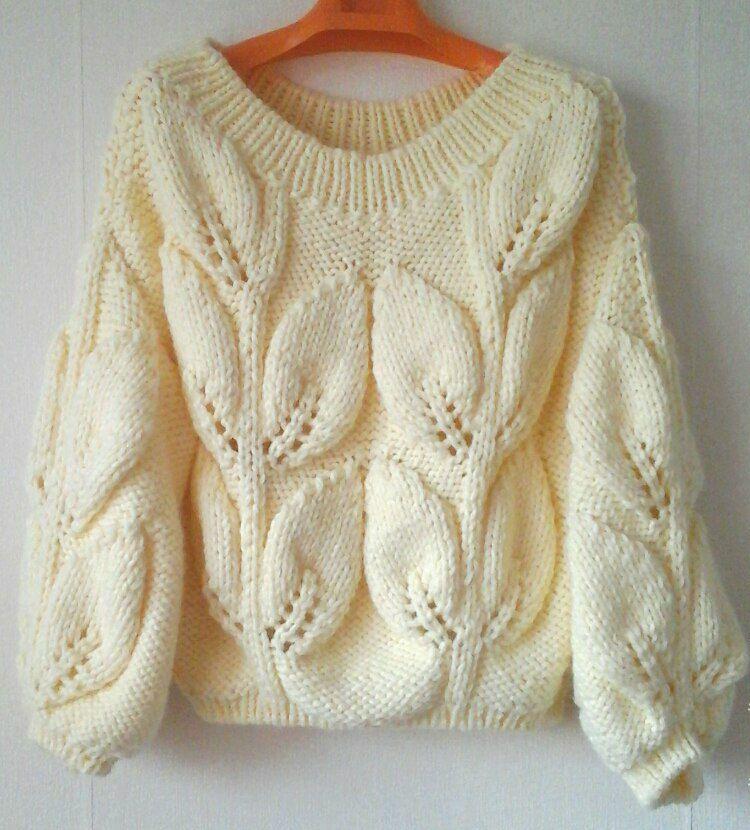
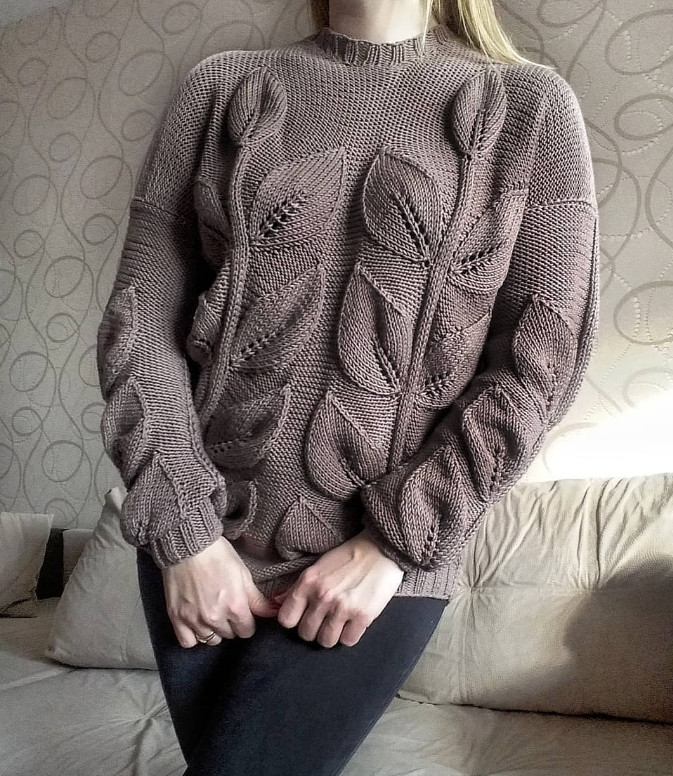
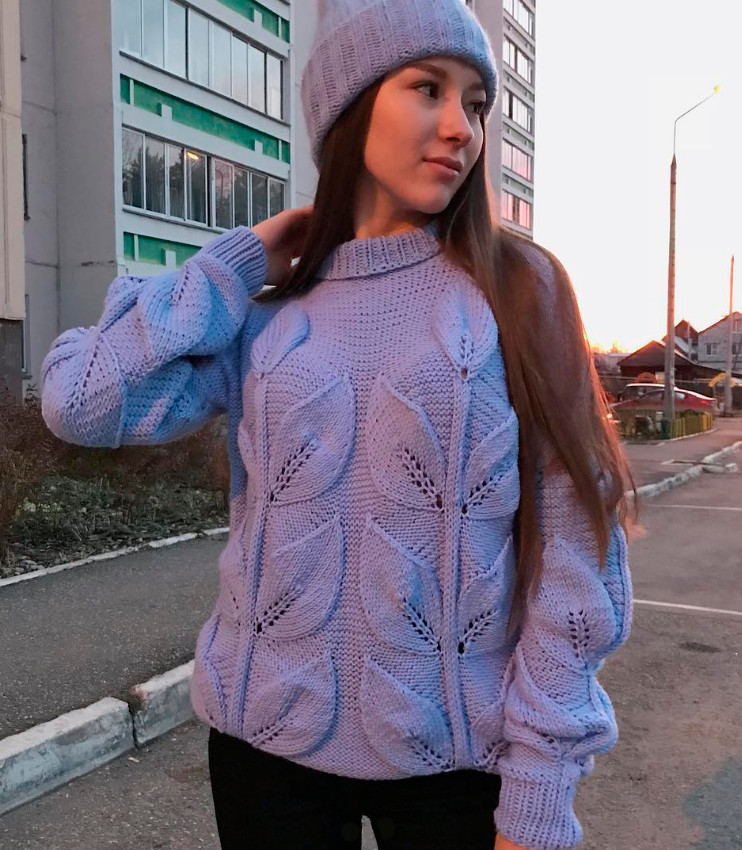
Patterned sweater
Added: 25.11.2025 в 18:18 Views: 3076
Patterned sweaterKlubokhttp://klubok.work/1/3/9320/Klubokhttps://klubok.work/css/image/top-logo-en.png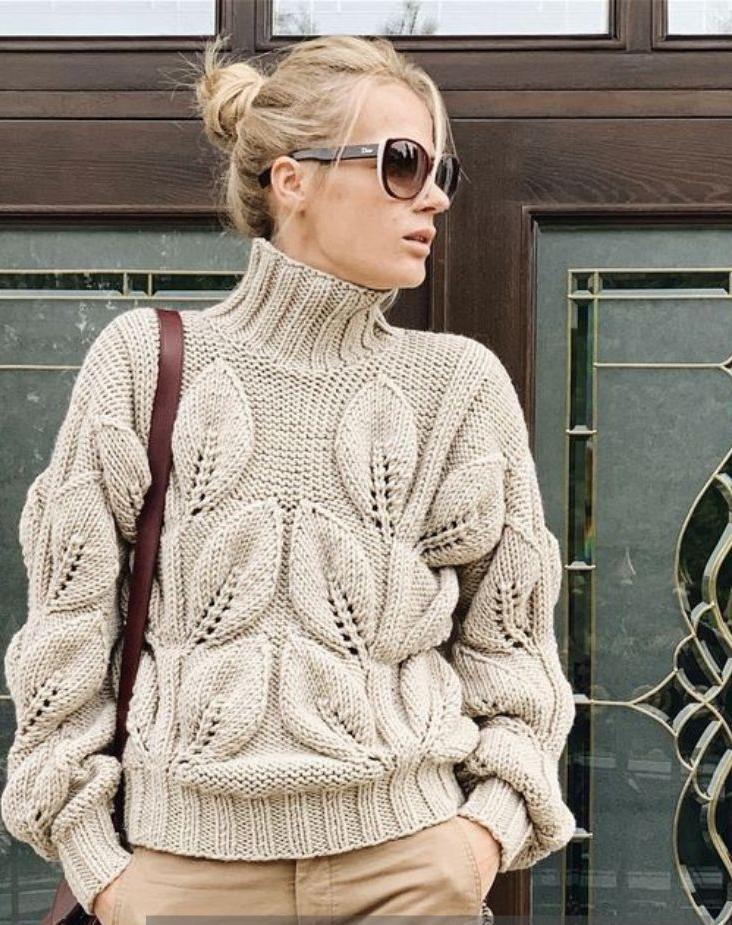
● Straight and circular knitting needles 3.75, 4, 4.5, 5, 5.5 (I used size 3.75)
● Any yarn will do (I am using AIR from DROPS, 50g/150m. Consumption 350g./
~1050m./ 7 skeins)
Size 42-46*
● Yarn length 50g/100m - consumption ~600g./~1200m./
12 skeins
● Yarn length 50g/ 90m -consumption ~650g./~1200m./
13 skeins
With the help of this description, the diagrams presented in it and the example, you can knit a sweater from absolutely any yarn and of any size.
Because of the features of the pattern (the number of stitches increases during knitting), to calculate the stitch count we will need the following measurements:
● Hip circumference (HC)
● Bust circumference (BC)
● Desired length (along the back)
● Arm length from the shoulder minus 5-7 cm (since the sleeve in this sweater model will be dropped)
Before starting to knit and determine the needed stitch count and the desired height, we need to knit two swatches and calculate our gauge.
SWATCHES
For calculating the cast-on, the first swatch is knitted in the pattern “rib” 2*2 (2 knit, 2 purl). This pattern will run at the beginning of our sweater and it is the ribbing that should sit well on the hips, according to our calculations. For calculation, the swatch needs to be slightly stretched
Important! If your bust circumference is larger than your hip circumference, then we will base the stitch count on the bust circumference.
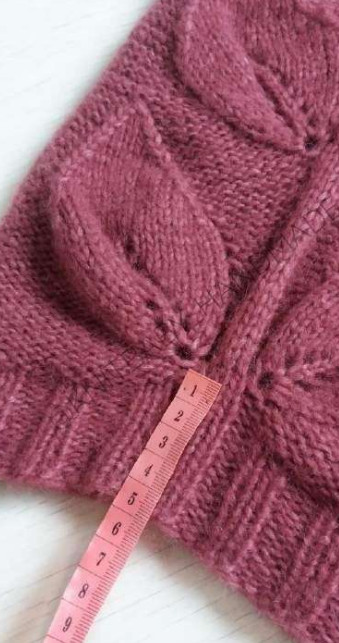
To calculate the required height of the sweater, knit the second swatch in our main pattern - "Leaves". The obtained swatches have been knit, blocked, and we proceed with calculations! My gauge in the (rib pattern) = 10 cm - 14 stitches = 1.4 stitches per cm.
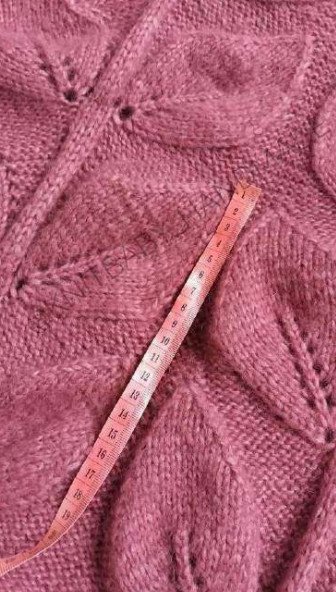
Height of the second swatch (leaf) - 10 cm. The height of the garment is 60 cm
Stitch calculation: HC (BC) × 1.4 = the required number of stitches to cast on for the rib.
To determine the number of the "leaves" on the garment (front/back/sleeves), we need to subtract from the desired garment height (60 cm) the height of the ribbing (5 cm), the height of the short rows (e.g., 3 cm). The resulting value divided by the height of the second swatch ("leaf"), 10 cm.
-
60-5-3= 52cm
-
52/10= 5.2
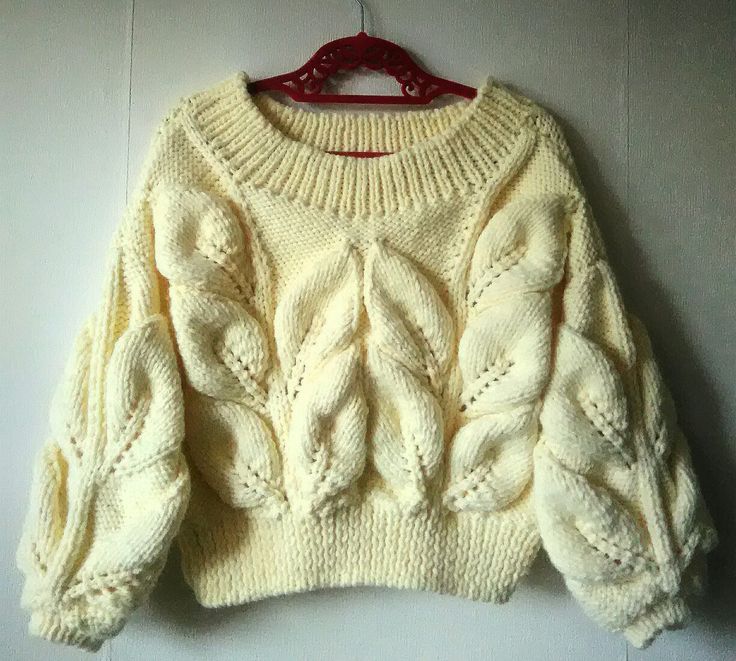
Thus, for the desired height of our sweater we need to knit 5 "leaves" (4 side leaves + 1 central leaf).
Calculations are done, let's begin!
Knit the front, back and sleeves as separate parts.
According to my calculations, for the sweater I need to
cast on 130 stitches. Divide this number between the front and
back. Leave a bit more for the front.
68 stitches — front, 62 stitches — back.
FRONT
Cast on the required number of stitches (for me this is 66 stitches + 2 edge stitches = 68 stitches) and knit in 2x2 rib for 14 rows.
Next, in every 7th row (1, 7, 14, 21, 28, 35, 42, 49, 56, 63, 70, 77, 84, 91, 98, 105, 112, 119) it is necessary to increase by 1 stitch at the edges of the work! In total there will be 18 increases, by 2 stitches each = 36 stitches. In the 15th knit row will be our first increases. Next we need to divide the pattern stitches so that our leaves are in the center. Knit the knit rows in purl stitches.
The main pattern consists of 27 stitches. Between the two leaf motifs there will be a division — 4 purl stitches, and the remaining stitches will be distributed to the sides (for me it's 5 stitches on the right and 5 stitches on the left).
Thus:
1st row after the ribbing (the 15th knit row) — 1 edge stitch, 1 increase, 4 purl, 27-stitch pattern, 4 purl, 27-stitch pattern, 4 purl, 1 increase, 1 edge = 68 stitches + 2 increases.
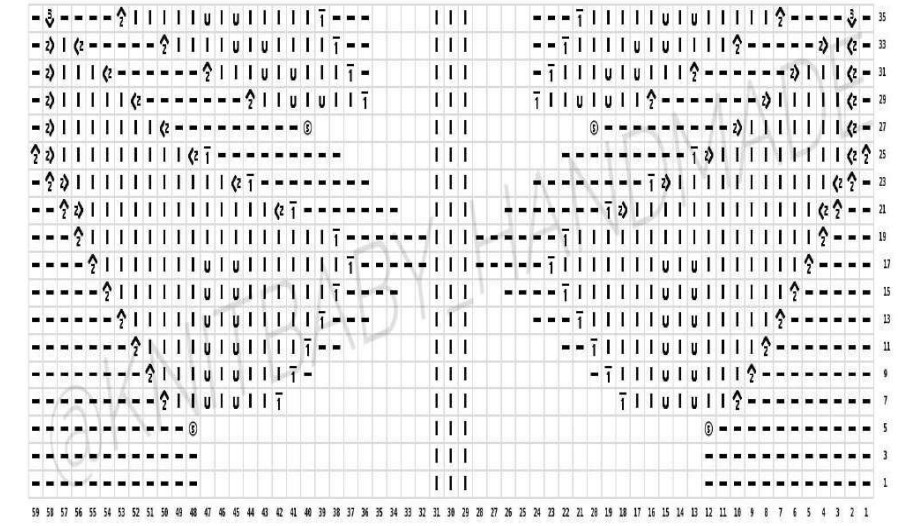
The chart shows only knit rows.
The purl row is knitted according to the pattern.
The repeat is 27 stitches. Repeat the pattern from rows 15 to 35.
Legend
-
 - no stitch
 -
 - knit
 -
 purl
purl -
 - purl 2 together
 -
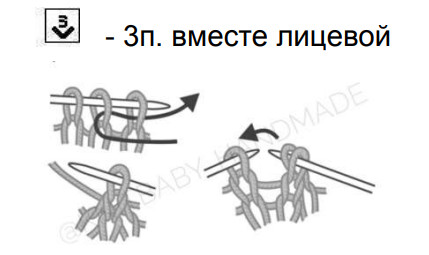
- knit 3 together


-
 - yarn over
 -
 - increase
 -
 - 2 stitches with a right-leaning increase
 -
 - 2 stitches with a left-leaning increase
 -
 - increase 5 stitches from one stitch


Row 1: 12 purl stitches, 3 knit, 12 purl
Row 2. And all even rows — knit according to the pattern.
Row 3: 12 purl, 3 knit, 12 purl.
Row 5: 11 purl, from one stitch knit 5 stitches, 3 knit, from one stitch knit 5 stitches, 11 purl.
Row 7: 9 purl, p2tog, 2 knit, yarn over, 1 knit, yarn over, 2 knit, 1 purl, increase, 3 knit, 1 purl, increase, 2 knit, yarn over, 1 knit, yarn over, 2 knit, p2tog, 9 purl.
9 rows: 8 purl stitches, 2 stitches together purlwise, 3 stitches knit, yarn over, 1 stitch knit, yarn over, 3 stitches knit, 1 stitch purl, increase by 1 purl stitch, 1 stitch purl, 3 stitches knit, 1 stitch purl, 1 purl increase, 3 stitches knit, yarn over, 1 stitch knit, yarn over, 3 stitches knit, 2 stitches together purlwise, 8 purl.
11 rows: 7 purl stitches, 2 stitches together purlwise, 4 knit stitches, yarn over, 1 knit stitch, yarn over, 4 knit stitches, 1 purl increase, 2 purl stitches, 3 knit stitches, 2 purl stitches, 1 purl increase, 4 knit stitches, yarn over, 1 knit stitch, yarn over, 4 knit stitches, 2 stitches together purlwise, 7 purl.
15 rows. 5 purl, 2 stitches together purlwise, 6 knit stitches, yarn over, 1 knit, yarn over, 6 knit, 1 purl increase, 4 purl, 3 knit, 4 purl, 1 purl increase, 6 knit, yarn over, 1 knit, yarn over, 6 knit, 2 stitches together purlwise, 5 purl.
17 rows: 4 purl, 2 stitches together purlwise, 7 knit, yarn over, 1 knit, yarn over, 7 knit, 1 purl increase, 5 purl, 3 knit, 5 purl, 1 purl increase, 7 knit, yarn over, 1 knit, yarn over, 7 knit, 2 stitches together purlwise, 4 purl.
19 rows: 3 purl, 2 stitches together purlwise, 17 knit, 1 purl increase, 6 purl, 3 knit, 6 purl, 1 purl increase, 17 knit, 2 stitches together purlwise, 3 purl.
21 rows: 2 purl, 2 stitches together purlwise, 2 stitches together knitwise with a left-leaning decrease, 13 knit, 2 stitches together with a right-leaning decrease, 1 purl increase, 7 purl, 3 knit, 7 purl, 1 purl increase, 2 stitches together with a left-leaning decrease, 13 knit, 2 stitches together with a right-leaning decrease, 2 stitches together purlwise, 2 purl.
23 rows: 1 purl, 2 stitches together purlwise, 2 stitches together knitwise with a left-leaning decrease, 11 knit, 2 stitches together with a right-leaning decrease, 1 purl increase, 8 purl, 3 knit, 8 purl, 1 purl increase, 2 stitches together with a left-leaning decrease, 11 knit, 2 stitches together with a right-leaning decrease, 2 stitches together purlwise, 2 purl.
25 rows: 2 stitches together purlwise, 2 stitches together knitwise with a left-leaning decrease, 9 knit, 2 stitches together with a right-leaning decrease, 1 purl increase, 9 purl, 3 knit, 9 purl, 1 purl increase, 2 stitches together with a left-leaning decrease, 9 knit, 2 stitches together with a right-leaning decrease, 2 stitches together purlwise.
27 rows: 1 purl, 2 stitches together knitwise with a left-leaning decrease, 7 knit, 2 stitches together with a right-leaning decrease, 9 purl, from one stitch pick up and knit 5 stitches, 3 knit, from one stitch pick up and knit 5 stitches, 9 purl, 2 stitches together with a left-leaning decrease, 7 knit, 2 stitches together with a right-leaning decrease, 1 purl.
29 rows: 1 purl, 2 stitches together knitwise with a left-leaning decrease, 5 knit, 2 stitches together with a right-leaning decrease, 7 purl, 2 stitches together purlwise, 2 knit, yarn over, 1 knit, yarn over, 2 knit, 1 purl increase, 3 knit, 1 purl increase, 2 knit, yarn over, 1 knit, yarn over, 2 knit, 2 stitches together purlwise, 7 purl, 2 stitches together with a left-leaning decrease, 5 knit, 2 stitches together with a right-leaning decrease, 1 purl.
31 rows: 1 purl, 2 stitches together knitwise with a left-leaning decrease, 3 knit, 2 stitches together with a right-leaning decrease, 6 purl, 2 stitches together purlwise, 3 knit, yarn over, 1 knit, yarn over, 3 knit, 1 purl increase, 1 purl, 3 knit, 1 purl increase, 3 knit, yarn over, 1 knit, yarn over, 3 knit, 2 stitches together purlwise, 6 purl, 2 stitches together with a left-leaning decrease, 3 knit, 2 stitches together with a right-leaning decrease, 1 purl.
33 rows: 1 purl, 2 stitches together knitwise with a left-leaning decrease, 1 knit, 2 stitches together with a right-leaning decrease, 5 purl, 2 stitches together purlwise, 4 knit, yarn over, 1 knit, yarn over, 4 knit, 1 purl increase, 2 purl, 3 knit, 2 purl, 1 purl increase, 4 knit, yarn over, 1 knit, yarn over, 4 knit, 2 stitches together purlwise, 5 purl, 2 stitches together with a left-leaning decrease, 1 knit, 2 stitches together with a right-leaning decrease, 1 purl.
35 rows: 1 purl, 3 stitches together knitwise, 4 purl, 2 stitches together purlwise, 5 knit, yarn over, 1 knit, yarn over, 5 knit, 5 purl, 1 purl increase, 3 purl, 3 knit, 3 purl, 1 purl increase, 5 knit, yarn over, 1 knit, yarn over, 5 knit, 2 stitches together purlwise, 4 purl, 3 stitches together knitwise, 1 purl.
Так мы вяжем до 92 ряда (включительно) нашего узора (без учета 14р. резинки).
93 ряд — это “tail” нашего 4-го листика (27 ряд узора), в котором мы должны будем вывести наш 5-й, центральный лист.
Ниже приведена схема, по которой мы будем вывязывать наш заключительный лист.
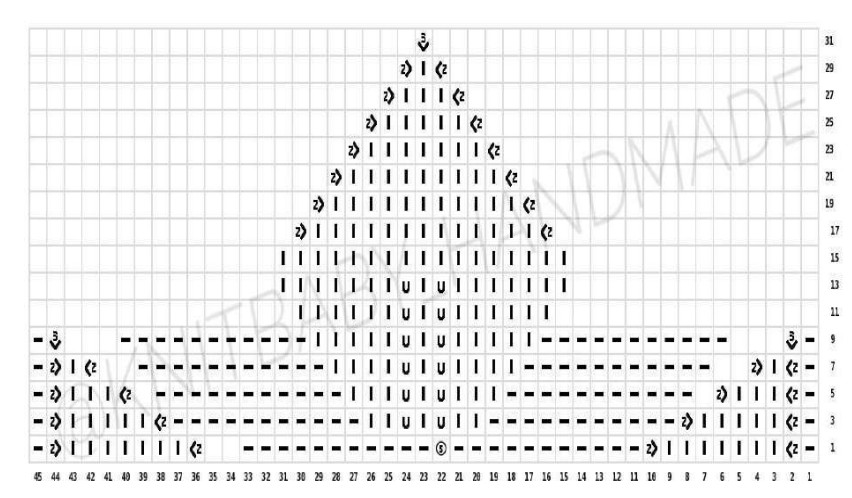
93 rows (27 rows of pattern) 1 purl, 2 stitches together with a left-leaning decrease, 7 knit, 2 stitches together with a right-leaning decrease, 11 purl, from one stitch knit 5 stitches, 11 purl, 2 stitches together with a left-leaning decrease, 7 knit, 2 stitches together with a right-leaning decrease, 1 purl.
95 rows (29 rows of pattern) 1 purl, 2 stitches together with a left-leaning decrease, 5 knit, 2 stitches together with a right-leaning decrease, 11 purl, 2 knit, yarn over, 1 knit, yarn over, 2 knit, 11 purl, 2 stitches together with a left-leaning decrease, 5 knit, 2 stitches together with a right-leaning decrease, 1 purl.
97 rows (31 rows of pattern) 1 purl, 2 stitches together with a left-leaning decrease, 3 knit, 2 stitches together with a right-leaning decrease, 11 purl, 3 knit, yarn over, 1 knit, yarn over, 3 knit, 11 purl, 2 stitches together with a left-leaning decrease, 3 knit, 2 stitches together with a right-leaning decrease, 1 purl.
99 rows (33 rows of pattern) 1 purl, 2 stitches together with a left-leaning decrease, 1 knit, 2 stitches together with a right-leaning decrease, 11 purl, 4 knit, yarn over, 1 knit, yarn over, 4 knit, 11 purl, 2 stitches together with a left-leaning decrease, 1 knit, 2 stitches together with a right-leaning decrease, 1 purl.
101 rows (35 rows of pattern) 1 purl, 3 stitches together knitwise, 11 purl, 5 knit, yarn over, 1 knit, yarn over, 5 knit, 11 purl, 3 stitches together knitwise, 1 purl.
103 rows: 6 knit stitches, yarn over, 1 knit, yarn over, 6 knit.
105 rows: 7 knit stitches, yarn over, 1 knit, yarn over, 7 knit.
107 rows: 17 knit stitches.
109 rows: 2 stitches together with a left-leaning decrease, 13 knit, 2 stitches together with a right-leaning decrease
111 rows: 2 stitches together with a left-leaning decrease, 11 knit, 2 stitches together with a right-leaning decrease
113 rows: 2 stitches together with a left-leaning decrease, 9 knit, 2 stitches together with a right-leaning decrease
115 rows: 2 stitches together with a left-leaning decrease, 7 knit, 2 stitches together with a right-leaning decrease
117 rows: 2 stitches together with a left-leaning decrease, 5 knit, 2 stitches together with a right-leaning decrease
119 rows (the last two increases (35th and 36th) at the edges) 2 stitches together with a left-leaning decrease, 3 knit, 2 stitches together with a right-leaning decrease
121 rows: 2 stitches together with a left-leaning decrease, 1 knit, 2 stitches together with a right-leaning decrease
123 rows: 3 stitches together knitwise.
124 rows: All stitches knit, following the pattern.
On the needles we should have 104 stitches = 68 + 36.
FORMING THE SHOOT
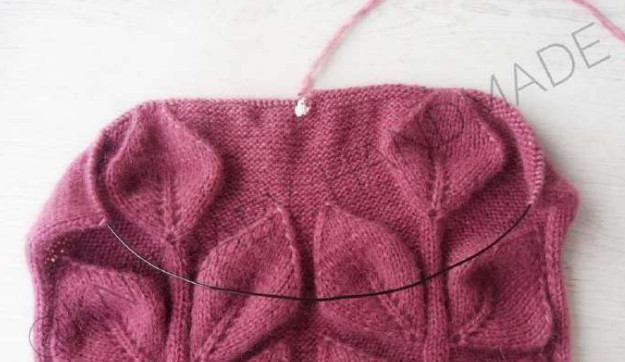
The shoot in this model will be 13 rows long. We know that the shoot is formed using short rows. You can do this in any method convenient for you.
Dividing the fabric for the shoot: 50 stitches on the right side / 4 stitches in the middle / 50 stitches on the left side.
Figure 1: 50 = 9 + 9 + 8 + 8 + 8 + 8
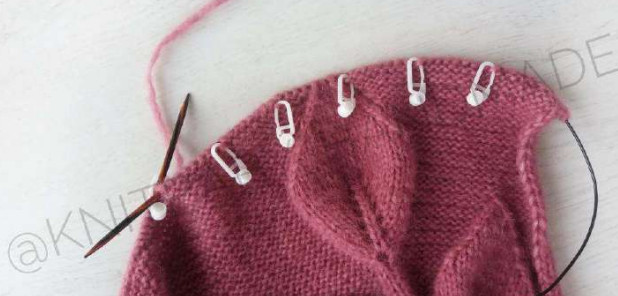
Figure 2.
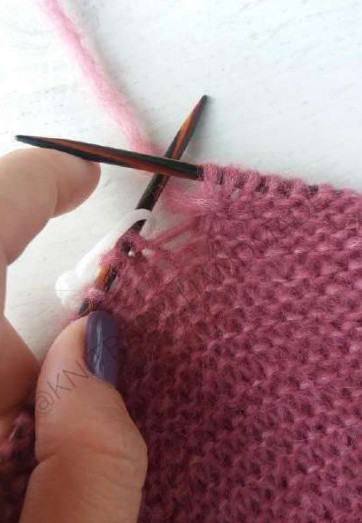
We begin forming the stalk from the RS (purl stitches).
Row 125. Purl 8 stitches, wrap the 9th stitch with the working yarn (Fig. 2). Turn the work.
Row 126. Purl row to the end.
Row 127. Purl 17 stitches, wrap the 18th stitch with the working yarn. Turn the work.
Row 128. Purl row to the end.
Row 129. Purl 25 stitches, wrap the 26th stitch with the working yarn. Turn the work.
Row 130. Purl row to the end.
Row 131. Purl 33 stitches, wrap the 34th stitch with the working yarn. Turn the work.
Row 132. Purl row to the end.
Row 133. Purl 41 stitches, wrap the 42nd stitch with the working yarn. Turn the work.
Row 134. Purl row to the end.
Row 135. Purl 49 stitches, wrap the 50th stitch with the working yarn. Turn the work.
Row 136. Purl row to the end.
Row 137. (which will also be the first row to the left of the stalk) On the RS, knit to the end and begin forming the stalk from the other side.
Here it begins from the purl row (knit stitches).
Row 125. Knit 8 stitches, wrap the 9th stitch with the working yarn. Turn the work.
Row 126. Knit row to the end.
Row 127. Knit 17 stitches, wrap the 18th stitch with the working yarn. Turn the work.
Row 128. Knit row to the end.
Row 129. Knit 25 stitches, wrap the 26th stitch with the working yarn. Turn the work.
Row 130. Knit row to the end.
Row 131. Knit 33 stitches, wrap the 34th stitch with the working yarn. Turn the work.
Row 132. Purl row to the end.
Row 133. Knit 41 stitches, wrap the 42nd stitch with the working yarn. Turn the work.
Row 134. Knit row to the end.
Row 135. Knit 49 stitches, wrap the 50th stitch with the working yarn. Turn the work.
Row 136. Knit row to the end.
Row 137. Purls. Knit to the end.
Do not bind off the stitches; transfer them to an extra thread or a pin. Proceed to knitting the back.
BACK
The back can be knitted in the "Leaves" pattern or simply in stockinette stitch, as you wish. In my sweater I knitted the back in the "Leaves" pattern. It is knitted the same as the front, with increases, only without the stalk. On the back we have a slightly smaller stitch count (for me 62 stitches) + 36 stitches of increases. At the end of the back, do not bind off the stitches.
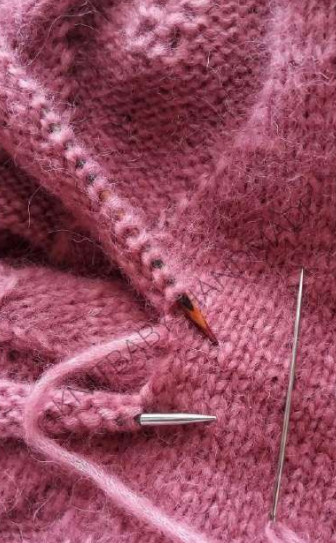
After we have knitted the front and back, we need to sew the two halves with a stockinette seam along the wrong side (knit stitches),
leaving stitches for the neckline. I ended up with 68 stitches for the neckline = 37 stitches of the front, 31 stitches of the back.
NECKLINE
The neckline can be knitted to any length comfortable for you, with a false garter edge or without. For the neckline I ended up with 68 stitches = 37 stitches in the front, 31 stitches in the back. Plus there will be 4 stitches that connected the two parts of the sweater when sewing with stockinette stitch. (= 72 stitches for the neckline)
False garter edge:
1st row — this will be our setup row where we adjust the stitch count and prepare to begin knitting the neckline.
2nd row — all stitches are purled.
3rd row — knit.
4th row: make increases from the stitch of the previous row. (=144 stitches)
From rows 5 to 8 we knit in hollow ribbing:
5th row: 1 stitch knit, 2 stitches slipped (yarn in front of work)
6th row: 1 stitch slipped (yarn behind work), 2 knit
7th row: same as 5th
8th row: same as 6th
9th row: all stitches knit 2 together
From row 10, begin knitting a 2x2 rib to the desired height.
Bind off stitches in any convenient way. I recommend an elastic bind-off with a needle.
SLEEVES
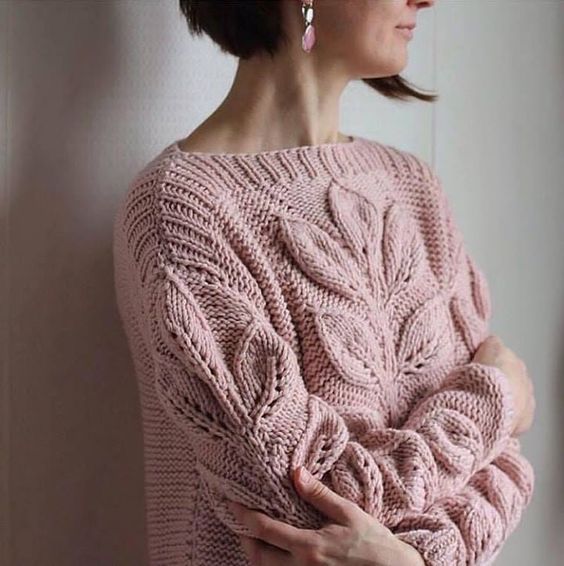
Knit as a separate piece, bottom-up. Sleeves can be knitted in stockinette or kept with leaf branches. The sleeve will be dropped.
To calculate the sleeve length, measure the arm length (mine is 53 cm) from the shoulder seam, minus 5 cm.
53 - 5 = 48 cm should be the sleeve. This means the sleeve will have 4 leaves, 5 cm of ribbing, and the remaining 3 cm — garter stitch.
There will be no central leaf on the sleeve! The continuation will be only branches of three knit stitches.
I cast on 36 stitches for the sleeve.
We knit 14 rows in ribbing. In the 15th row, we increase by 1 stitch.
For the pattern = 1 edge stitch, 1 increase stitch, 3 purl stitches, 27 stitches of the pattern, 4 purl stitches, 1 edge stitch.
To widen the sleeve, we need to increase by 34 stitches. We will increase in every 6th row (3, 9, 15, 21, 27, 33, 39, 45, 51, 57, 63, 69, 75, 81, 87, 93, 99) by 1 stitch on each side.
The first increases begin from the third row of the main pattern (the 17th row from the start of the ribbing).
More ideas