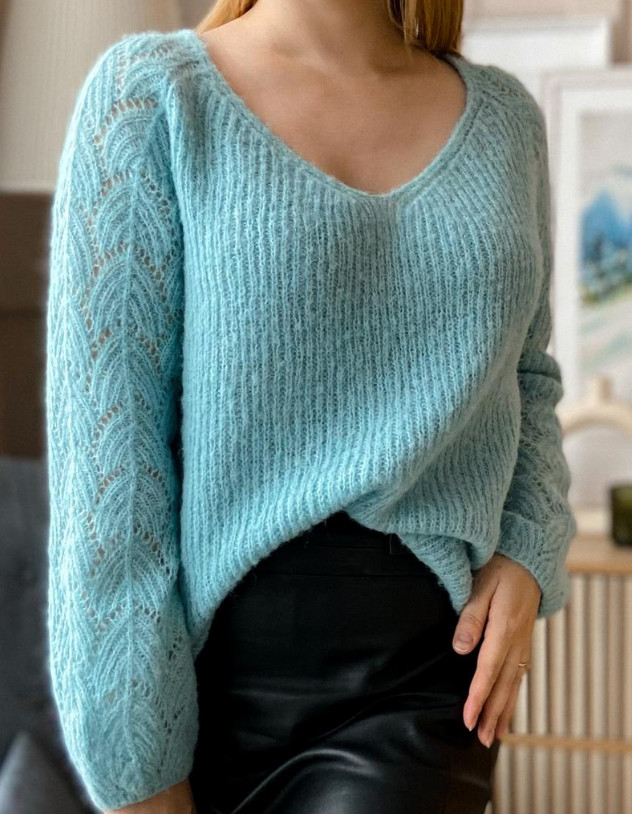
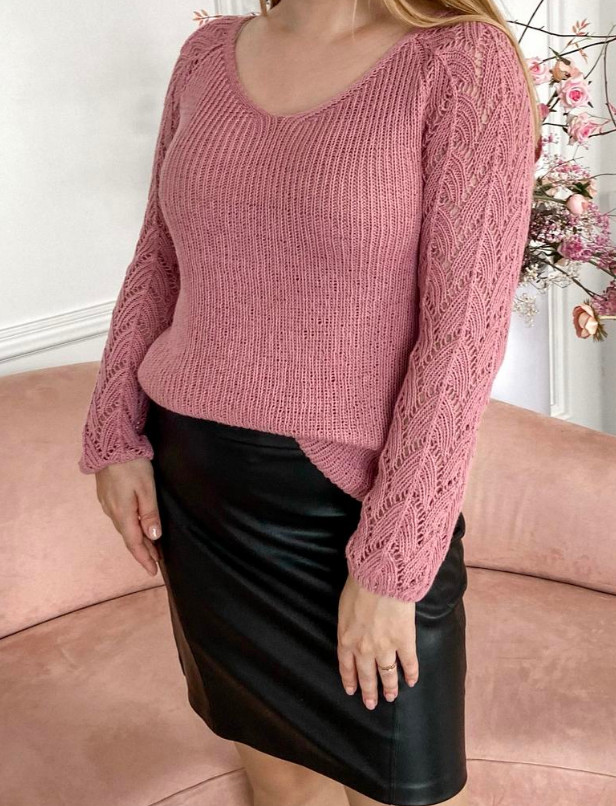
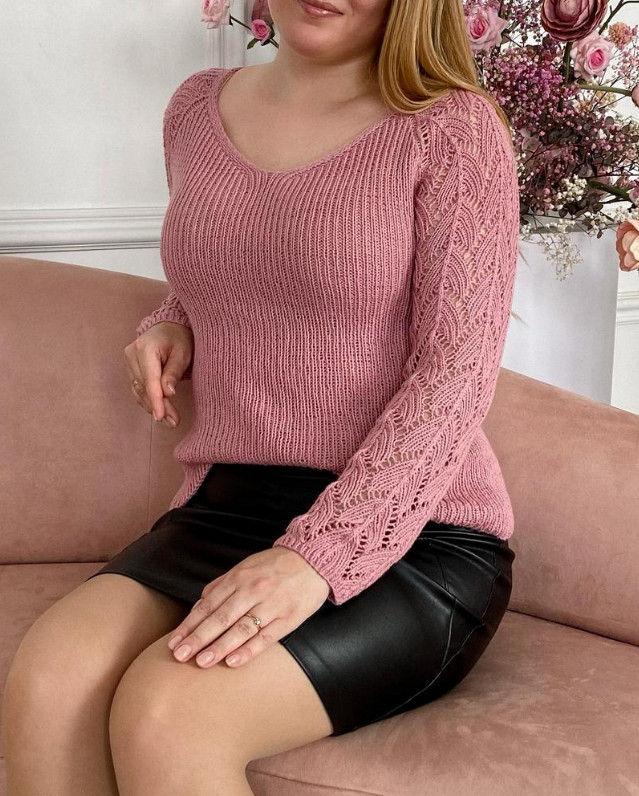
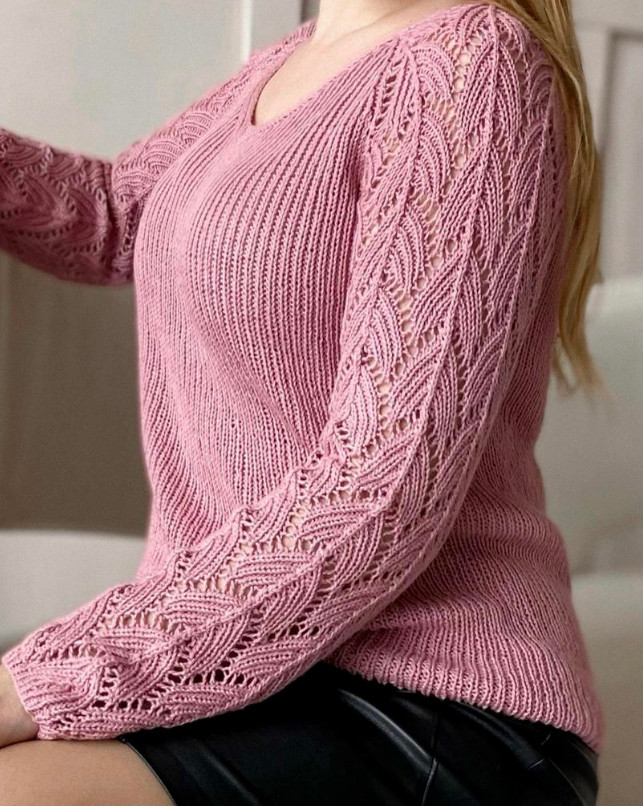
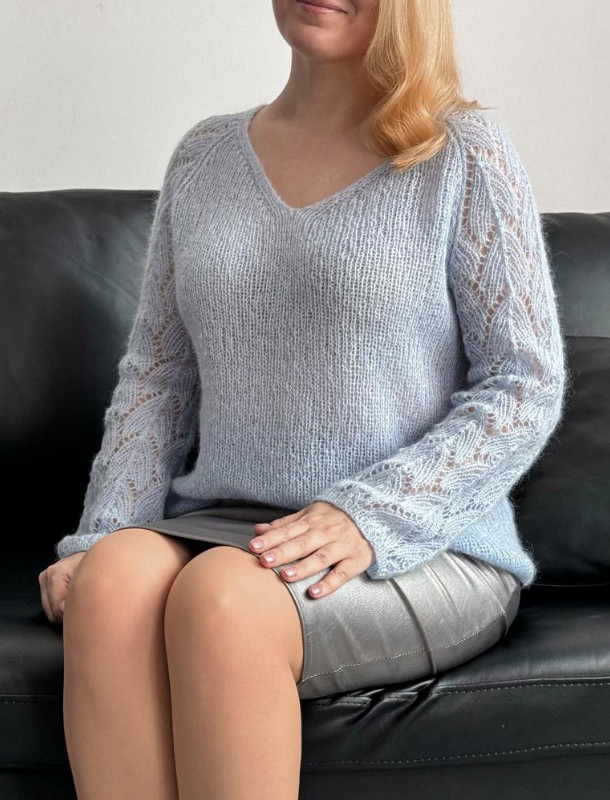
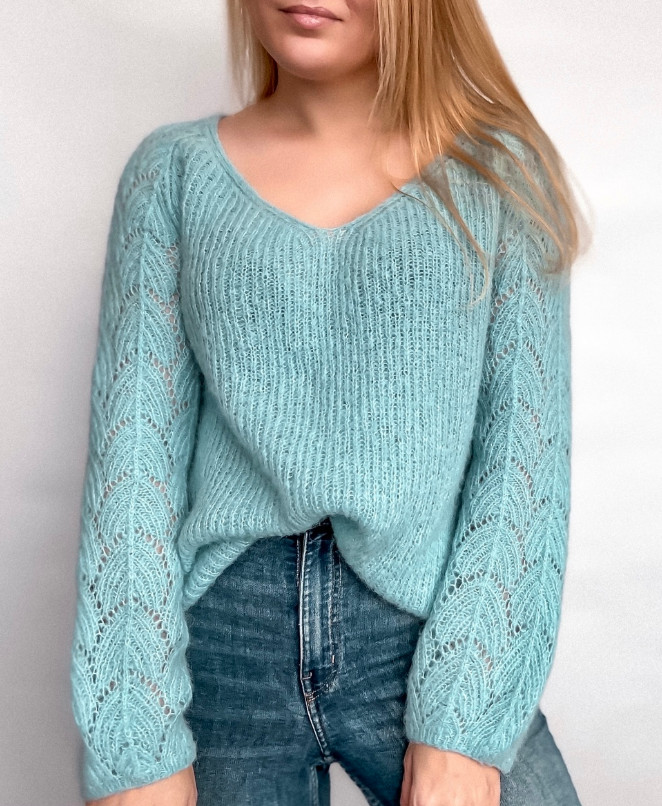
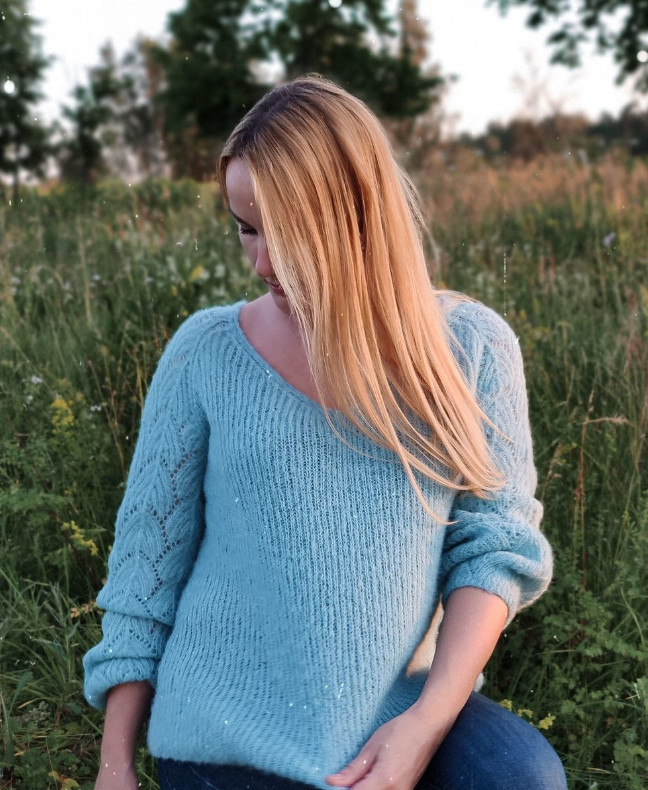
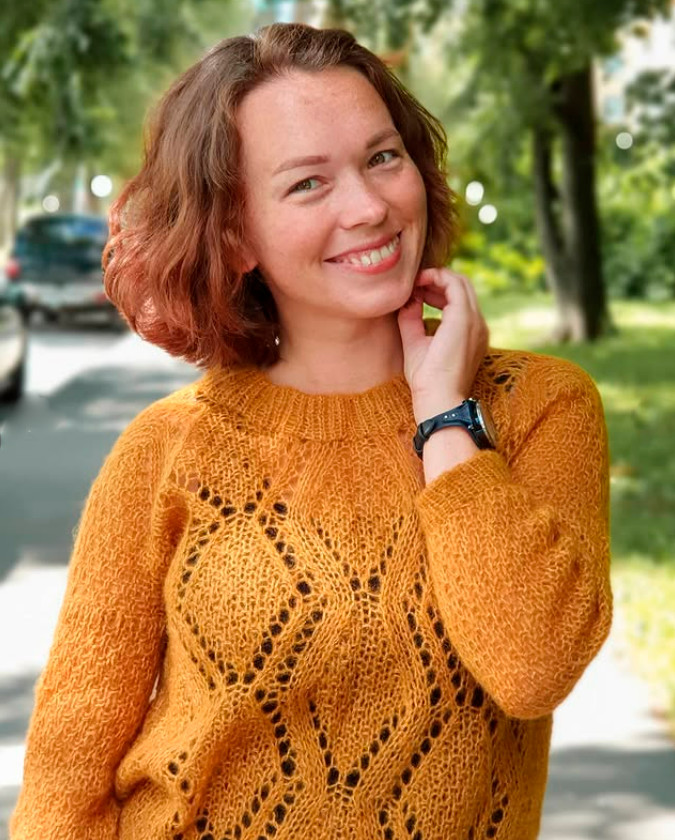
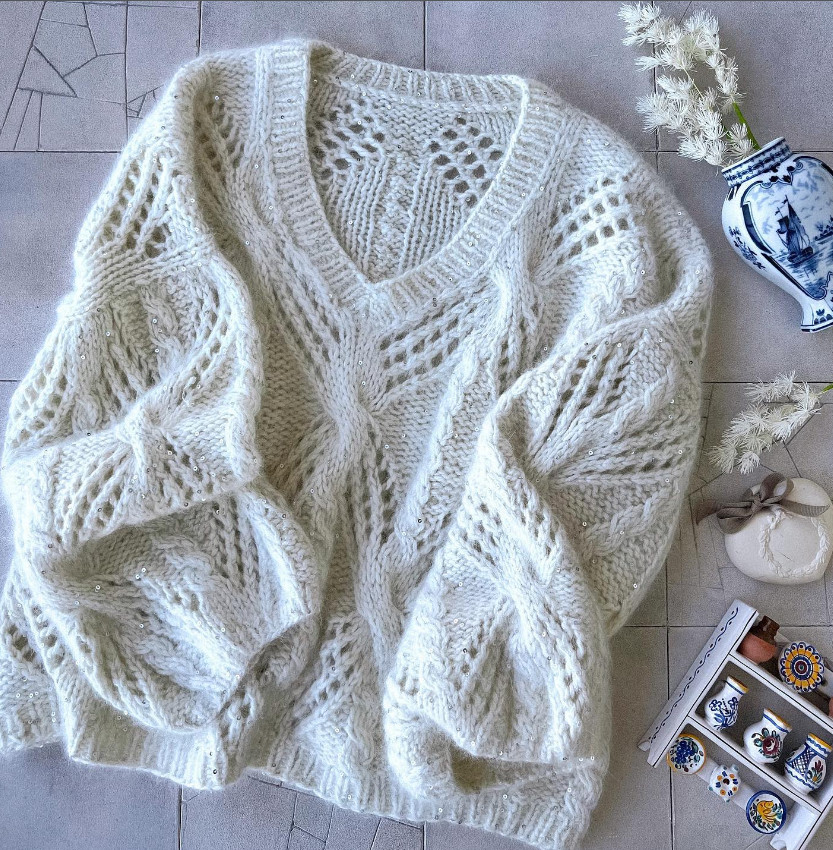
A cardigan knitted with knitting needles.
Added: 16.12.2025 в 16:11 Views: 1367
A cardigan knitted with knitting needles.Klubokhttp://klubok.work/1/3/9333/Klubokhttps://klubok.work/css/image/top-logo-en.png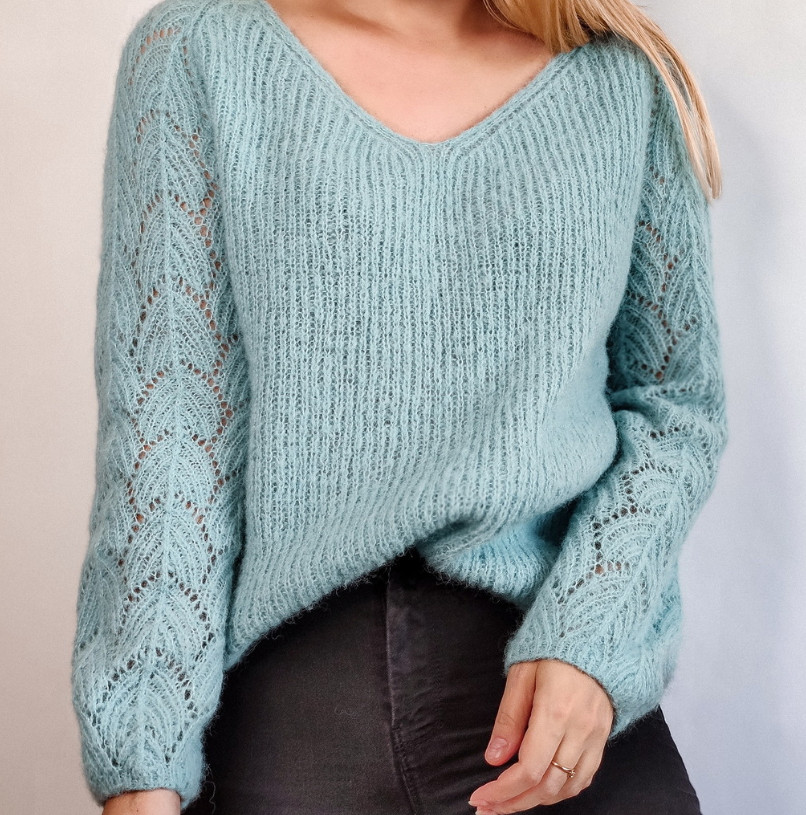
Sizes: S-M, M-L, L-XL
Materials:
-
DROPS Brushed Alpaca Silk (77% alpaca, 23 % silk) or any equivalent 140
meters in 25 grams, 6-9 skeins, depending on size and your knitting gauge. -
Needles on a cable 80 cm long, size 1.75 mm; for sleeves and neckline: needles on a 40 cm cable, size 1.75 mm.
-
Markers for knitting, stitch holder, needle with a large eye, scissors.
Gauge.
Swatch after blocking «1x1 Rib» on 1.75 mm needles:
10 cm – 28.5 stitches
10 cm – 27.5 rows
Swatch after blocking «Lace pattern» on 1.75 mm needles:
10 cm – 25 stitches
10 cm – 27.5 rows
Attention! Gauge varies! Be sure to knit a swatch, try different needle sizes to bring the swatch gauge closer to the specified one!
A brief description of the work.
A loose-fitting pullover with a dropped armhole line; knitting method – bottom-up raglan. All pullover pieces are knitted in the round, then joined into the yoke; the yoke is knitted in short rows.
Size S-M M-L L-XL
Yarn required for the
pullover, pcs.
6.5–7 7–7.5 8–8.5
*yarn consumption is given for height ≈165 cm. For tall height, more yarn is required.
Size S-M M-L L-XL
-
Back length, cm 52 57 62
-
Bust circumference, cm 94 104 114
-
Sleeve length from armhole, cm 40 41 42
-
Armhole depth, cm 22 24 26
-
Shoulder circumference, cm 34 34 34
SIZE S-M
FRONT AND BACK
On needles No. 1.75, cast on 269 stitches with the main yarn in any convenient way. Then join the knitting in the round; to do this, transfer the last stitch from the right needle to the left, insert the right needle into the first stitch, grab the last stitch and pull it through the first. Drop the first stitch off the needle; the pulled-through stitch remains on the left needle. Join knitting in the round. Place the beginning-of-round marker (BOR). Total on needles 268 stitches.
Next, knit 78 rounds in 1x1 rib.
When the required height is reached, in the last round do not knit 3 stitches for the underarm opening.
SLEEVES
On needles size 1.75, cast on 69 stitches with the main yarn in any convenient way. Then join to work in the round; to do this, transfer the last stitch from the right needle to the left, insert the right needle into the first stitch, catch the last stitch and pull it through the first. Drop the first stitch off the needle; the pulled-through stitch remains on the left needle. Join the knitting in the round. Place the beginning-of-round marker (BOR). Total on needles 68 stitches.
Knit 5 rounds in 1x1 rib, and in the last 5th round of the rib evenly increase by 17 stitches. Total on needles 85 stitches.
Increases are made by a wrap (protyazhka) as follows: pick up the wrap between two purl stitches of the rib with the left needle from front to back.
Working yarn is in front of the needle. Insert the needle from left to right into the back of the stitch. Pull the yarn. Drop the made wrap off the left needle. There is now one extra stitch on the right needle.
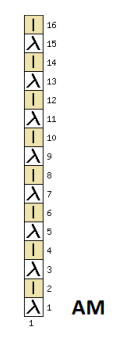
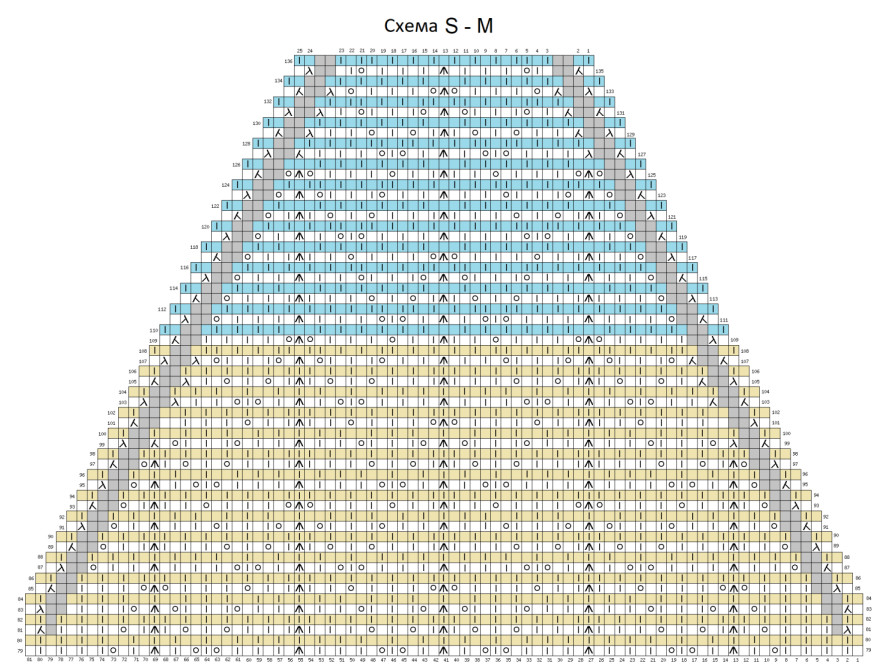
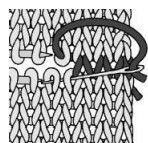
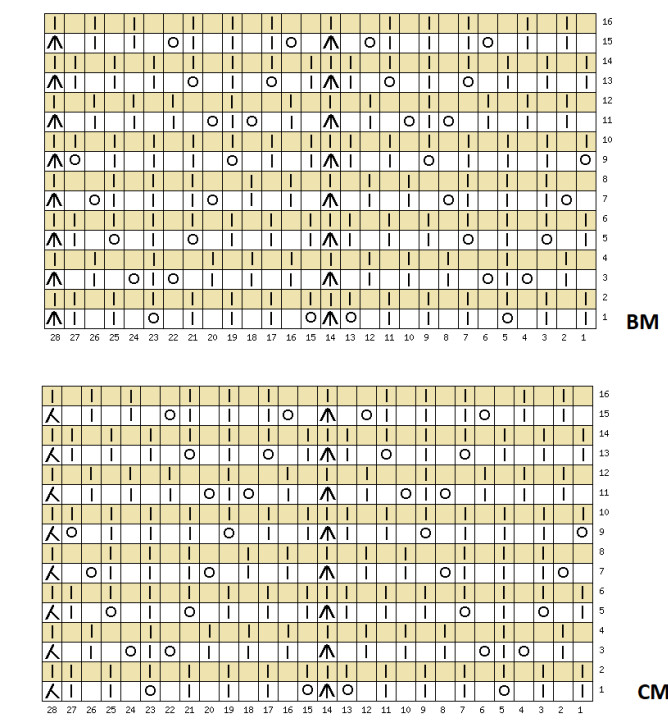
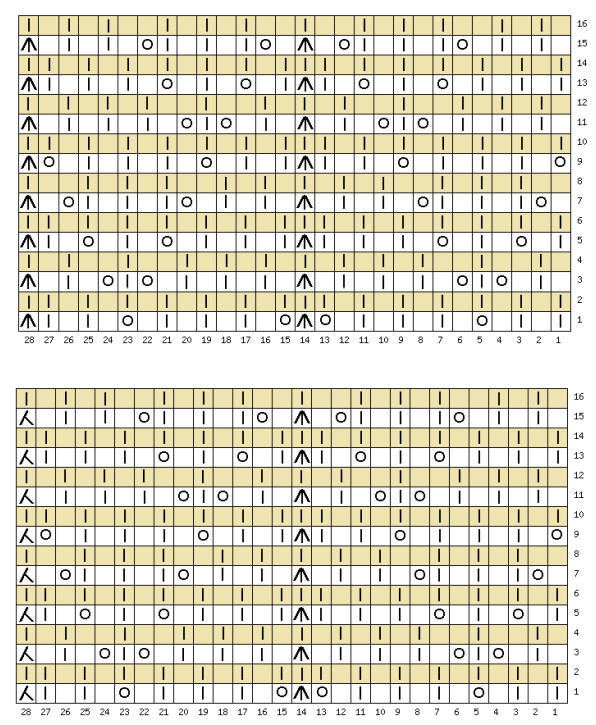
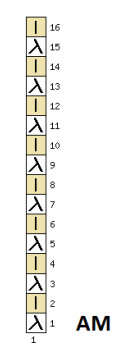
D Lace pattern: knit 103 rows in lace pattern (1 repeat in height starting from row 4 (rows 4 to 16), 5 repeats in height (rows 1 to 16), then knit one more repeat equal to 10 rows (rows 1–10 of the repeat)) according to the Schemes in the following sequence: 1 stitch according to Chart AM (1 repeat in length), 56 stitches according to Chart VM (2 repeats in length), 28 stitches according to Chart SM (1 repeat in length). Total on needles 85 stitches.
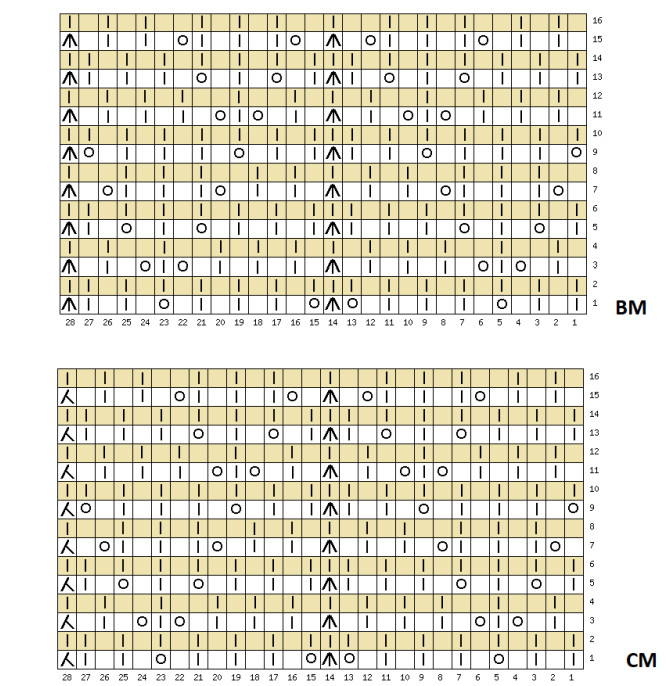
![]() knit
knit
![]() purl
purl
![]() yarn over
yarn over
![]() 2 stitches knit together with a left-leaning decrease
2 stitches knit together with a left-leaning decrease
![]() 2 stitches knit together with a right-leaning decrease
2 stitches knit together with a right-leaning decrease
2 purl stitches together to the left
2 purl stitches together to the right
![]() no stitch
no stitch
X- selvage
![]()
3 stitches knit together (3 to 1 decrease), centered (skpo)
When the required sleeve length is reached, in the last round not knit 2 stitches for the underarm opening. The second sleeve should be knitted in the same way.
UNDERARM SHAPES ON THE SLEEVES
Before joining the pullover pieces, mark the underarm openings with markers or an extra thread. To do this, slip 4 stitches for the underarm openings onto a stitch holder or an extra thread. Similarly slip the stitches for the underarm opening for the second sleeve.
JOINING THE FRONT AND BACK WITH SLEEVES
79th circular row (overall):
Step 1: With the working yarn from the main fabric (body of the pullover back) knit 81 stitches of the first sleeve (11th row of the pattern according to Scheme AM, Scheme VM, Scheme SM).
Step 2: slip 5 stitches for the armhole onto a holder or extra yarn: 1 knit stitch, 1 purl stitch, 1 knit stitch, 1 purl stitch, 1 knit stitch.
Step 3: Next, knit 129 stitches of the pullover front main fabric in 1x1 rib, starting from a purl stitch.
Step 4: Knit 81 stitches of the second sleeve (11th row of the pattern according to Scheme AM, Scheme VM, Scheme SM).
Step 5: slip 5 stitches for the armhole onto a holder or extra yarn: 1 knit stitch, 1 purl stitch, 1 knit stitch, 1 purl stitch, 1 knit stitch.
Step 6: Knit the remaining 129 stitches of the back in 1x1 rib starting from a purl stitch.
Mark the starting place of the row (the joining point of the first sleeve) with a contrast-colored marker.
80th circular row (overall):
Knit the yoke over 420 stitches straight (equal to the 12th row of the pattern according to Scheme AM, Scheme VM, Scheme SM), while purled 2 together at the joints where the sleeves join the main body of the pullover (these joined places form the raglan line – RL). Mark with a marker 4 raglan lines (RL) on both sides. Total on needles: 416 stitches.
RAGLAN LINES AND FORMING THE V-SHAPED NECKLINE
In the next overall 81st row of the Front, Back and Sleeves (equal to the 13th row of the pattern according to Scheme AM, Scheme VM, Scheme SM) start decreases for the raglan line and continue decreases every other row. In total you need to make 28 decreases.
Decrease rhythm:
Decreases every 2nd row:
Knit 2 together knitwise (1 purl, 1 knit) with a right-leaning slant BEFORE the RL and knit 2 together knitwise (1 knit, 1 purl) with a left-leaning slant AFTER the RL in the same row.
Decreases every 4th row:
Knit 2 together knitwise (1 knit, 1 knit) with a left-leaning before the RL and knit 2 together knitwise (1 knit, 1 knit) with a right-leaning after the RL in the same row.
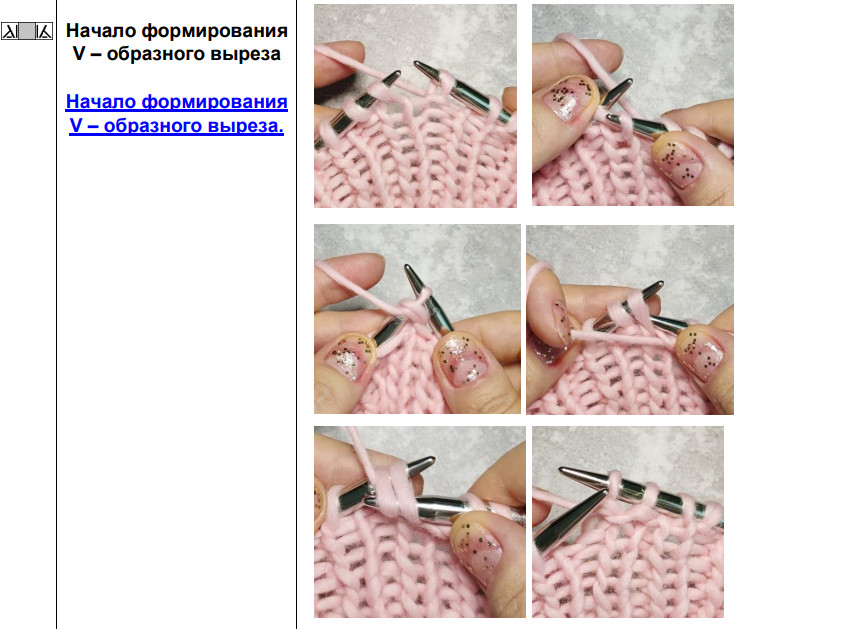
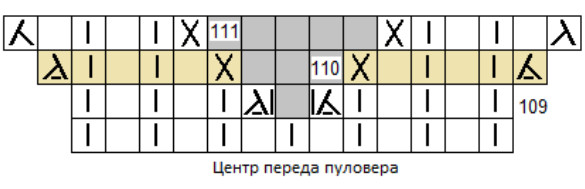
Simultaneously with raglan decreases, starting from the 109th overall row begin forming the V-shaped neckline; for this, from the central front stitch of the pullover, knit 2 purl stitches; these two stitches form the edge stitches on each half of the front, starting from the next row. Beginning of the V-shaped neckline.
Finish the 109th overall round, cut the yarn.
110th purl row: join the yarn in the center of the front, turn the knitting to the wrong side, making neckline decreases in every row, decreases along the Raglan lines in every 2nd row.
From the 110th row, each part of the front (right front panel, left front panel) is knitted separately; for the neckline, decreases are made away from the garment center. To create neat, even slopes in the shape of a V, decreases must be made at equal intervals from each other.
Decreases for the neckline should be performed from row 110 to row 136, 27 times in each row.
Rate of decreases for the V-shaped neckline:
For the right half of the neckline - located on the right side of the fabric when viewing the knitted piece from the front (in the finished garment this will be the left side):
purl row: edge stitch, purl stitch, knit stitch, purl stitch, knit stitch, next 2 stitches to be purled together with a right-leaning slant.
knit row: 2 stitches purled together knitwise with a left-leaning slant, purl, knit, purl, knit, edge stitch.
For the left half of the neckline - located on the left side of the fabric when viewing the knitted piece from the front (in the finished garment this will be the right side):
purl row: 2 stitches purled together with a left-leaning slant, knit stitch, purl, knit, purl, edge stitch.
knit row: edge stitch, knit stitch, purl, knit, purl, 2 stitches purled together knitwise with a right-leaning slant.
GROWTH
Growth and a deeper neckline are knitted with turning rows using short-row shaping.
Short rows are rows not worked to the end; i.e., to make a row short, you turn the work before the row ends, and turning, you knit the same stitches again just worked.
Short rows in the knit (right) row. In the right-side row, knit the required number of stitches up to the turning point, not knitting the next stitch; slip it onto the right needle with the yarn behind the work, wrap the stitch, and move it back to the left needle. Turn the work to the wrong side.
Short rows in the wrong-side row. In the wrong-side row, knit the required number of stitches up to the turning point, not knitting the next stitch; slip it onto the right needle with the yarn in front of the work, wrap the stitch, and move it back to the left needle. Turn the work to the right side.
Pattern for the sleeve pattern (between raglan decreases), when working the growth

Before starting the roStock growth, there are 137 stitches on the needles: 8 stitches on one front piece, 8 stitches on the other front piece, 71 stitches on the back, 25 stitches on one sleeve and 25 stitches on the other sleeve.
When knitting the rostock growth, for convenience row numbering starts over. Odd rows are right-side rows, even rows are wrong-side rows (highlighted in blue). Right-side rows in the schemes are read from right to left, wrong-side rows are read from left to right.
Row 1 (RS) – knit according to the pattern, not knitting the last 6 stitches on this RS row (BE SURE to continue making decreases along the raglan lines). Wrap the working yarn around the last remaining stitch on the left to prevent holes, place a marker on this stitch, turn the knitting to the WS and knit the 2nd WS row, not knitting the 6 stitches from the turning point.
Turn the knitting to the RS and knit the 3rd RS row (continuing decreases along the raglan lines), not knitting 3 stitches from the turning point.
Turn the knitting to the WS and knit the 4th row, not knitting 3 stitches from the turning point.
Turn the knitting to the RS (continuing decreases along the raglan lines), and knit the 5th row, not knitting 3 stitches from the turning point.
Turn the knitting to the WS and knit the 6th row, not knitting the 3 stitches from the turning point.
Turn the knitting to the RS (continuing decreases along the raglan lines), and knit the 7th row, not knitting 3 stitches from the turning point.
Turn the knitting to the WS and knit the 8th row, not knitting 3 stitches from the turning point.
Turn the knitting to the right side, knit one round in the round, knitting all yarn-overs on the stitches made during turning together with the stitch onto which they were slipped.
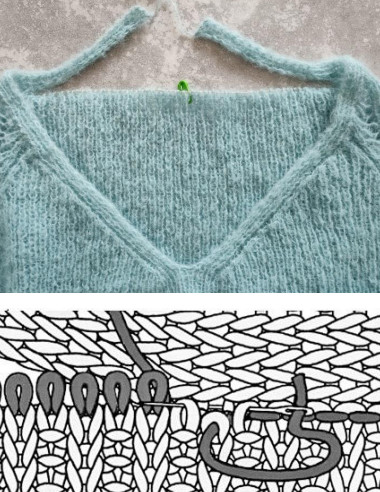
RIGHT PLACKET
The right placket is located on the right side of the fabric when viewing the knitted fabric from the right side (in the finished garment this will be the left side of the placket).
Turn the work to the wrong side. Knit 1 edge stitch, purl, knit, purl, knit, then knit the next 6th stitch together with a purl stitch with a right-leaning decrease from 1 stitch of the neckline row, turn the work to the right side. Work the right side in pattern. Placket with 1 stitch from the neckline line.
Turn the work to the wrong side. Knit 1 edge stitch, purl, knit, purl, knit, next 6th stitch knit together with a purl stitch with a right-leaning decrease from 2 stitches of the neckline line, turn the work to the right side. Work the right side in pattern. Placket with 2 stitches from the neckline line.
Repeat until the stitches reach the back neckline. Then continue knitting the placket in ribbing for 29 rows. Bind off the placket stitches. Cut the yarn.
LEFT PLACKET
The left placket is located on the left side of the fabric when viewing the knitted fabric from the right side (in the finished garment this will be the right side of the placket). Attach a yarn at the wrong side of the left placket and knit symmetrically to the right placket.
JOINING THE PLACKET TO THE BACK NECKLINE
Join the left and right plackets in any convenient way. Sew the placket with a stocking stitch seam to the open stitches of the back, using ladders between stitches on the placket.
ARMHOLE SHAPING
Slip the stitches onto a holder or auxiliary thread (open sleeve stitches and open stitches of the front and back under each sleeve), join the placket to the open stitches with a stocking stitch seam. Finishing of the armhole shaping.
WET BLOCKING
Secure all ends, cut the yarn. Hand wash the garment in a special delicate detergent. Squeeze in a terry towel, lay it flat to dry completely. The pullover is ready!
SIZE M-L
FRONT AND BACK
On needles size 1.75, cast on 297 stitches with the main yarn in any convenient way. Then join to work in the round; to do this you need to slip the last stitch from the right needle to the left, insert the right needle into the first stitch, grab the last stitch and pull it through the first. Slip the first stitch off the needle, the slipped-through stitch remains on the left needle. Join to round knitting. Place a beginning-of-round marker (MNR).
Total on needles: 296 stitches.
Next, knit 86 rounds in 1x1 rib.
When the required height is reached, in the last circular round do not knit 3 stitches for the underarm opening.
SLEEVES
On needles size 1.75, cast on 69 stitches with the main yarn in any convenient way. Then join to work in the round; to do this you need to slip the last stitch from the right needle to the left, insert the right needle into the first stitch, grab the last stitch and pull it through the first. Slip the first stitch off the needle, the slipped-through stitch remains on the left needle. Join to round knitting. Place a beginning-of-round marker (MNR).
Total on needles: 68 stitches.
Knit 5 rounds in 1x1 rib, while in the last 5th round of the rib evenly increase 17 stitches.
Total on needles: 85 stitches.
Increase by doing the make-one as follows: pick up the loop between two purl stitches of the rib with the left needle from front to back. The working yarn is in front of the needle. Insert the needle from left to right into the back of the stitch. Draw the yarn. Slip the new stitch off the left needle. There is now one additional stitch on the right needle.
Next, knit 106 rounds in a lace pattern (6 pattern repeats in height, with each repeat equal to 16 rounds; then knit one more repeat equal to 10 rounds (rows 1–10 of the repeat)) according to the Schemes in the following sequence: 1 stitch per Scheme AM (1 repeat in length), 56 stitches per Scheme BM (2 repeats in length), 28 stitches per Scheme CM (1 repeat in length). Total on needles: 85 stitches.
When the desired sleeve length is reached, in the last round do not knit 2 stitches for the underarm. Similarly knit the second sleeve.
UNDERARMS ON SLEEVES
Before joining the pullover parts, mark the underarm openings with markers or an extra thread. To do this, transfer 4 stitches for the underarm to a holder or an auxiliary thread. Similarly transfer the underarm stitches for the second sleeve.
JOINING THE FRONT AND BACK WITH THE SLEEVES
87th round (overall): with the working yarn from the main fabric (the body of the back of the pullover) knit 81 stitches of the first sleeve (11th row of the pattern according to Scheme AM, Scheme BM, Scheme CM). Slip 5 stitches for the underarm onto a holder or auxiliary thread: 1 knit stitch, 1 purl stitch, 1 knit stitch, 1 purl stitch, 1 knit stitch. Then knit 143 stitches of the main back of the pullover in rib 1x1, starting with a purl stitch. Knit 81 stitches of the second sleeve (11th row of the pattern according to Scheme AM, Scheme BM, Scheme CM). Slip 5 stitches for the underarm onto a holder or auxiliary thread: 1 knit stitch, 1 purl stitch, 1 knit stitch, 1 purl stitch, 1 knit stitch. Knit the remaining 143 stitches of the back in rib 1x1, starting with a purl stitch. Mark the starting point of the round (the point where the first sleeve is joined) with a contrasting-color marker.
88th round (overall): knit the yoke on 448 stitches straight (equal to the 12th row of the pattern AM, BM, CM), while knitting 2 together purlwise at the places where the sleeves join the main fabric of the pullover (the places joined in this way form the raglan line – RL). Place a marker for 4 raglan lines (RL) on both sides. Total on needles: 444 stitches.
RAGLAN LINES AND FORMATION OF THE V-SHAPED NECKLINE
In the next overall 89th knit row of the Front, Back and Sleeves (equal to the 13th row of the pattern AM, BM, CM), begin decreases for the raglan line and continue decreases every other row. In total, 30 decreases are required.
Rate of decreases.
Decreases every 2nd row: knit 2 stitches together as a knit (1 purl, 1 knit) with a right-leaning slope BEFORE RL and 2 stitches together as a knit (1 knit, 1 purl) with a left-leaning slope AFTER RL in the same row.
Decreases every 4th row: knit 2 stitches together as a knit (1 knit, 1 knit) with a left-leaning slope BEFORE RL and 2 stitches together as a knit (1 knit, 1 knit) with a right-leaning slope AFTER RL in the same row.
Simultaneously with raglan decreases starting from the 115th total row, begin forming the V-SHAPED NECKLINE; for this, from the central front stitch of the pullover you need to knit 2 purl stitches, both of these stitches form selvage on each half of the front, starting from the next row. Beginning of forming the V-shaped neckline. Finish knitting the 115th total round, cut the yarn.
116th purl row: attach yarn in the center of the front, turn the work to the wrong side, making decreases for the neckline in each row, decreases along the RL in every 2nd row.
Starting from row 116, each front part (right front piece, left front piece) is knitted separately, for the neckline decreases are made in the direction away from the center of the garment. To form neat, even slopes in a V shape, decreases must be made at equal distances from each other.
Decreases for the neckline must be made from row 116 to row 148, in each row 33 times.
Rhythm of decreases for the V-shaped neckline.
For the right half of the neckline – located on the right side of the fabric when viewing the knitted fabric from the right side (in the finished garment this will be the left side): wrong side row: knit the edge stitch, purl, knit, purl, knit, the next 2 stitches knit together purlwise with a right-leaning decrease. Right side row: 2 stitches knit together knitwise with a left-leaning decrease, purl, knit, purl, knit, edge stitch.
For the left half of the neckline – located on the left side of the fabric when viewing the knitted fabric from the right side (in the finished garment this will be the right side): wrong side row: 2 stitches knit together purlwise with a left-leaning decrease, knit, purl, knit, purl, edge stitch. Right side row: knit edge stitch, knit, purl, knit, purl, 2 stitches knit together knitwise with a right-leaning decrease.
Table 4. Decrease control, number of stitches.
Decreases for raglan lines are shown on Scheme M-L using the SLEEVE as an example. All rows are considered right-side rows as in circular knitting and are read from right to left. Beginning with knitting the V-shaped neckline – from row 116 odd rows are right-side (knit) rows, even rows are wrong-side rows (highlighted in blue), wrong-side rows are read from left to right.
GROWTH
Growth and the deeper neckline are knitted with turning rows of partial knitting (short rows).
Short rows are rows not worked to the end, i.e. to make a row short, turn the work before the end of the row and, after turning, knit the same stitches again.
Short rows on the right side row. In a right-side row, knit the required number of stitches up to the turning point, do not knit the next stitch, slip it to the right needle, yarn behind the work, wrap the stitch, transfer it back to the left needle. Turn the work to the wrong side.
Short rows on the wrong side row. On the wrong side row, knit the required number of stitches up to the turning point, do not knit the next stitch, slip it to the right needle, yarn in front of the work, wrap the stitch, transfer it back to the left needle. Turn the work to the right side.
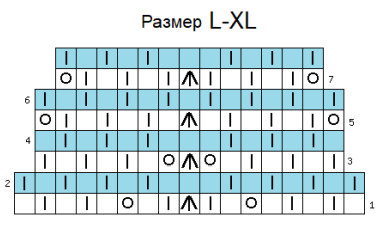
Before starting to knit the Rostok, on needles there are 137 stitches: 7 stitches on one front piece, 7 stitches on the second front piece of the pullover, 81 stitches on the back, 21 stitches of one sleeve and 21 stitches of the other sleeve.
When knitting the Rostok, for ease of knitting the row numbers start again. Odd rows – knit rows (highlighted in blue), even rows – purl rows (highlighted in blue). Right side rows in the charts are read from right to left, wrong side rows are read from left to right.
Sleeve pattern chart for shaping the Rostok
1 knit row – work according to the pattern, not finishing this knit row by knitting 6 stitches (BE SURE to continue decreases in the raglan lines). Wrap the yarn around the edge of the remaining stitches on the left to avoid holes, place a marker on this stitch, turn the knitting to the wrong side and knit the 2nd wrong-side row, not knitting 6 stitches from the turning point.
Turn the knitting to the right side and knit the 3rd knit row (continuing to make decreases in the raglan lines), not knitting 3 stitches from the turning point.
Turn the knitting to the wrong side and knit the 4th row, not knitting 3 stitches from the turning point.
Turn the knitting to the right side (continuing to make decreases in the raglan lines), and knit the 5th row, not knitting 3 stitches from the turning point.
Turn the knitting to the wrong side and knit the 6th row, not knitting 3 stitches from the turning point.
Turn the knitting to the right side (continuing to make decreases in the raglan lines), and knit the 7th row, not knitting 3 stitches from the turning point.
Turn the knitting to the wrong side and knit the 8th row, not knitting 3 stitches from the turning point.
Turn the knitting to the right side, knit one round, knitting all yarn-overs from the turning rounds together with the stitch onto which they were slipped.
The right placket is located on the right side of the fabric when viewing the knitted fabric from the front (in the finished garment this will be the left side of the placket). Turn the knitting to the wrong side. Knit 1 edge stitch, purl, knit, purl, knit, to the 6th stitch from the neckline edge, knit together the next stitch purlwise with a right-leaning decrease from 1 stitch of the neckline edge, turn the knitting to the right side. Knit the right side according to the pattern. Placket with 1 stitch from the neckline edge. Repeat until the back neckline stitches are reached. Then continue knitting the placket in ribbing for 33 rows. Bind off the placket stitches. Cut the yarn.
The left placket is located on the left side of the fabric when viewing the knitted fabric from the front (in the finished garment this will be the right side of the placket). Attach yarn from the wrong side of the left placket and knit symmetrically to the right placket.
Join the left and right plackets in any convenient way. Sew the placket with a stocking stitch (tricot stitch) to the open stitches of the back, using ladders between stitches on the placket.
Join the held stitches on a stitch holder or an auxiliary thread (open sleeve stitches and open front/back stitches under each sleeve) with a knitted sewing stitch. Finishing of the underarm seams.
WET BLOCKING. Tidy up all ends, cut the yarns. Hand wash the garment in a gentle delicate detergent. Squeeze in a terry towel, lay flat and leave to dry completely. The pullover is ready!
SIZE L-XL
FRONT AND BACK
On needles No. 1.75, cast on 325 stitches with the main yarn in any convenient way. Then join the knitting in a circle; to do this, slip the last stitch from the right needle to the left, insert the right needle into the first stitch, capture the last stitch and pull it through the first. Slip the first stitch off the needle, leaving the slipped stitch on the left needle. Join the round. Hang a start-of-round marker (SOR).
Total on needles: 324 stitches.
Then knit 94 rounds in 1x1 ribbing.
When the required height is reached, in the last round you need to knit 3 stitches short for the underarm opening.
SLEEVES
Cast on 69 stitches with the main yarn on needles size 1.75 by any convenient method. Then join the knitting in the round; to do this, you need to slip the last stitch from the right needle onto the left, insert the right needle into the first stitch, catch the last stitch and pull it through the first. Slip the first stitch off the needle, leaving the slipped stitch on the left needle. Joining in the round. Place the start-of-round marker (start of round marker).
Total on needles: 68 stitches.
Knit 5 rounds in 1x1 rib, and in the last 5th round of the rib evenly increase by 17 stitches.
Total on needles: 85 stitches.
Increases are made by the wrap method as follows: pick up the wrap between two purl stitches of the rib with the left needle from front to back. The working yarn is in front of the needle. Insert the left-to-right into the back of the loop. Draw the yarn through. Slip the added wrap off the left needle. Now there is one additional stitch on the right needle.
Then knit 109 rounds in lace pattern (1 chart repeat in height, equal to 3 rows (rows 14–16 of the repeat), 5 repeats in height (repeat equals 16 rows), then knit one more repeat equal to 10 rows (rows 1–10 of the repeat)) according to the Schemes in the following sequence: 1 stitch per Chart AM (1 repeat in length), 56 stitches per Chart VM (2 repeats in length), 28 stitches per Chart SM (1 repeat in length). Total on needles: 85 stitches.
When the required sleeve length is reached, in the last round do not knit 2 stitches for the underarm. Similarly knit the second sleeve.
ARMHOLE SHAPING
Before joining the pullover pieces, mark the armholes with markers or an extra thread. To do this, cast off 4 stitches for the sleeve underarm onto a holder or extra thread. Similarly cast off stitches for the armhole for the second sleeve.
JOINING THE FRONT AND BACK WITH THE SLEEVES
95th round (overall): with the working yarn from the main fabric (the back of the pullover) knit 81 stitches of the first sleeve (11th row of the pattern according to Schemes AM, VM, SM). Slip 5 stitches for the underarm onto a holder or extra yarn: 1 knit, 1 purl, 1 knit, 1 purl, 1 knit. Then knit 157 stitches of the pullover front body in 1x1 rib, starting with a purl stitch. Knit 81 stitches of the second sleeve (11th row of the pattern according to Schemes AM, VM, SM). Slip 5 stitches for the underarm onto a holder or extra yarn: 1 knit, 1 purl, 1 knit, 1 purl, 1 knit. Knit the remaining 157 stitches of the back in 1x1 rib, starting with a purl stitch. Mark the start of the round (the joining point of the first sleeve) with a contrast-color marker.
96th round (overall): knit the yoked portion on 476 stitches straight (equal to the 12th row of the pattern AM, VM, SM), while knitting 2 together purlwise at the places where the sleeves join the main body of the pullover (these joined places form the raglan lines – RL). Mark with a marker 4 raglan lines (RL) on both sides. Total on needles: 472 stitches.
RAGLAN LINES AND FORMING THE V-NECK
In the next overall 97th knit row of the Front, Back and Sleeves (equal to the 13th row of the pattern AM, VM, SM), begin decreases for the raglan line and continue decreasing every other row. In total, 28 decreases are required.
Rate of decreases.
Decreases every 2nd row: knit 2 stitches together as a knit (1 purl, 1 knit) with a right-leaning slant BEFORE the RL and 2 stitches together as a knit (1 knit, 1 purl) with a left-leaning slant AFTER the RL in the same row.
Decreases every 4th row: knit 2 stitches together as a knit (1 knit, 1 knit) with a left-leaning slant BEFORE the RL and 2 stitches together as a knit (1 knit, 1 knit) with a right-leaning slant AFTER the RL in the same row.
Starting from the 151st front row, continue decreases for the raglan line from the back side on every 2nd row for another 4 times; on the sleeve side perform decreases on every 4th row for another 2 times.
Simultaneously with the raglan decreases starting from the 123rd overall row, begin forming the V-NECKLINE. For this, from the central front stitch of the pullover, work 2 purl stitches; these two stitches form the edge on each half of the front, starting from the next row. Beginning of the V-shaped neckline formation.
Finish knitting the 123rd overall round, cut the thread.
124th purl row: attach the thread at the center of the front, turn the knitting to the purl side, making decreases for the neckline in every row, decreases along RL every 2nd row.
From row 124, each part of the front (right front panel, left front panel) is knitted separately; for the neckline, decreases are made toward the center of the garment. To obtain nice even slopes in the shape of a V, decreases must be made at equal distances from each other.
Decreases for the neckline should be made from row 124 to row 160 in every row, 37 times.
Center front of the pullover
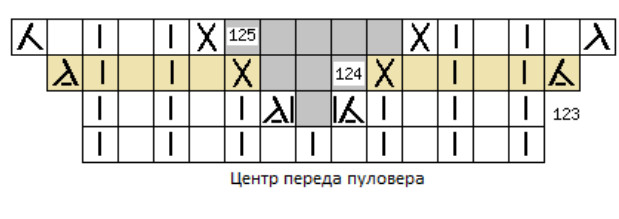
Rate of decreases for the V-shaped neckline.
For the right half of the neckline – located on the right side of the fabric when viewing the knitted piece from the right side (in the finished garment this will be the left side): Wrong side row: cast off the edge stitch, purl, knit, purl, knit, then knit the next 2 stitches together purlwise with a right-leaning slant. Right side row: knit 2 stitches together as a knit with a left-leaning slant, purl, knit, purl, knit, edge stitch.
For the left half of the neckline – located on the left side of the fabric when viewing the knitted piece from the right side (in the finished garment this will be the right side): Wrong side row: knit 2 stitches together purlwise with a left-leaning slant, knit, purl, knit, purl, edge stitch. Right side row: edge stitch, knit, purl, knit, purl, knit 2 together with a right-leaning slant.
The decreases for the raglan lines are shown on Scheme L-XL using the sleeve as an example. All rows are considered right-side rows as in circular knitting and are read right-to-left. Beginning with the V-shaped neckline from row 124, odd rows are right-side (knit), even rows are wrong-side (purl) rows (highlighted in blue); the wrong-side rows are read from left to right.

GROWTH
Growth and a deeper neckline are knitted with turning rows in partial knitting (short rows).
Short rows are rows not knitted to the end, i.e., to make a row short, turn the work before the row ends and, after turning, knit again the same stitches that were just knitted.
Short rows in a right-side (knit) row. In a right-side row, knit the required number of stitches up to the turning point, not knitting the next stitch; slip it onto the right needle, wrap the yarn behind the work, and transfer the stitch back to the left needle. Turn the work to the wrong side.
Short rows in a wrong-side (purl) row. In a wrong-side row, knit the required number of stitches up to the turning point, not knitting the next stitch; slip it onto the right needle, with the yarn in front of the work, wrap the stitch, and transfer it back to the left needle. Turn the work to the right side.
Before starting raglan shaping on the needles, 149 stitches: 8 sts of one front panel, 8 sts of the other front panel of the pullover, 91 sts of the back, 21 sts of one sleeve and 21 sts of the other sleeve.
Sleeve pattern chart during raglan shaping
When knitting raglan shaping, row numbering restarts for convenience. Odd rows are right-side (knit) rows, even rows are wrong-side rows (highlighted in blue). Right-side rows in the charts are read from right to left, wrong-side rows from left to right.
1st right-side row – knit according to the pattern, leaving 6 stitches unworked in this right-side row (BE SURE to continue making decreases in the raglan lines on the back side every 2nd row, and on the sleeve side every 4th row). Wrap the working yarn around the last remaining stitch on the left to avoid holes, place a marker on this stitch, turn the work to the wrong side and knit the 2nd wrong-side row, leaving 6 stitches unworked from the turning point.
Turn the knitting to the right side and knit the 3rd right-side row (continuing decreases in the raglan lines), leaving 3 stitches unworked from the turning point. Turn to the wrong side and knit the 4th row, leaving 3 stitches unworked from the turning point. Turn to the right side (continuing decreases in the raglan lines), and knit the 5th row, leaving 3 stitches unworked from the turning point. Turn to the wrong side and knit the 6th row, leaving 3 stitches unworked from the turning point. Turn to the right side (continuing decreases in the raglan lines), and knit the 7th row, leaving 3 stitches unworked from the turning point. Turn to the wrong side and knit the 8th row, leaving 3 stitches unworked from the turning point. Turn to the right side, knit one round, knitting all the wraps on the stitches made during the turning together with the stitch they were wrapped around.
The right placket is located on the right side of the fabric when viewing the knitted fabric from the right side (in the finished garment this will be the left side of the placket). Turn to the wrong side. Knit 1 edge stitch, purl, knit, purl, knit, the next 6th stitch to be knit together with a purl stitch with a right-leaning decrease from the 1st neckline row; turn to the right side. Knit the right side according to the pattern. Repeat until reaching the back neck stitches. Then continue knitting the placket in ribbing for 37 rows. Bind off the placket stitches. Cut the yarn.
The left placket is located on the left side of the fabric when viewing the knitted fabric from the right side (in the finished garment this will be the right side of the placket). Attach the yarn from the wrong side of the left placket and knit symmetrically to the right placket.
Join the left and right plackets in any convenient way. Sew the placket with stocking stitch to the open stitches of the back, using ladders between the stitches on the placket.
Stitches set aside on a stitch holder or auxiliary thread (open sleeve stitches and open front/back stitches under each sleeve), join with a knitting needle. Finishing of the underarm edges.
MOIST HEAT TREATMENT Tidy up all ends, cut the yarns. Hand-wash the garment in a special delicate detergent. Wring in a terry towel, lay flat to dry completely. The pullover is ready!
Dimensions of the finished garment after washing and blocking, cm Size 1. 2. 3. 4. 5. S-M 52 94 40 22 34. M-L 57 104 41 24 34. L-XL 62 114 42 26 34.