Knitted cardigan
Added: 17.12.2025 в 18:26 Views: 671
Knitted cardiganKlubokhttp://klubok.work/1/3/9335/Klubokhttps://klubok.work/css/image/top-logo-en.png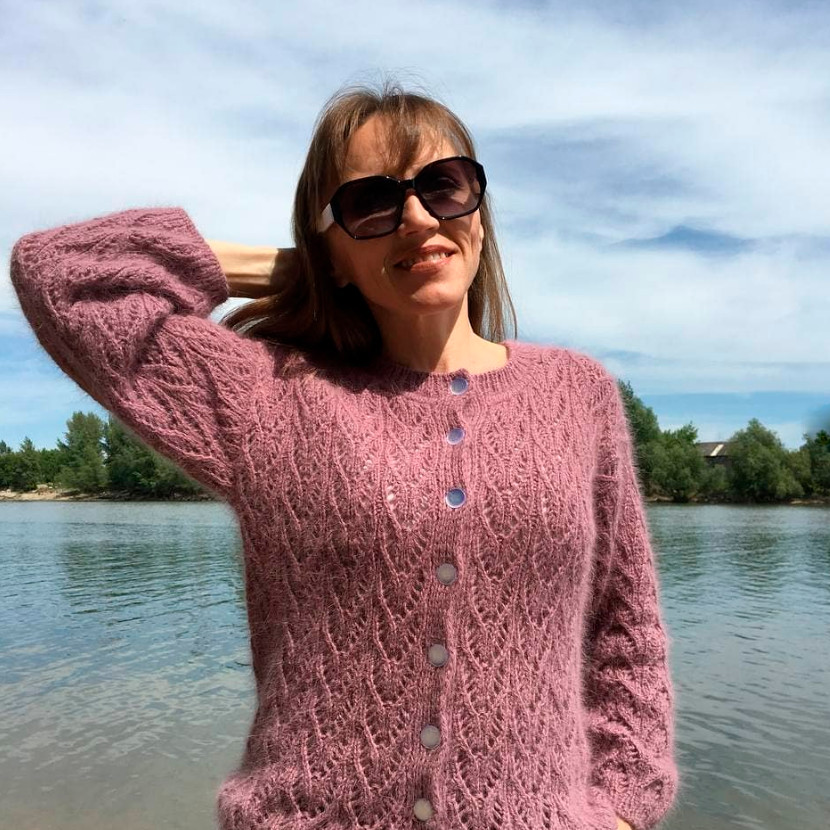
Yarn: LANA GATTO SILK MOHAIR LUX, color No. 8481, lilac.
Composition: 78% super kid-mohair; 14% silk; 4% polyamide; 4% polyester.
Length: 210 m per 25 g, in 2 plies.
Consumption:
40 (XXS) – 8 skeins
42 (XS) – 9 skeins
44 (S) – 10 skeins
46 (M) – 10 skeins + 8 g from the 11th skein, you can reduce by 1 height repeat and the consumption will be 10 skeins
48 (L) – 11 skeins
50 (XL) – 11–12 skeins
52 (XXL) – 12–13 skeins
54 (XXXL) – 13–14 skeins
56 (4XL) – 15 skeins
Yarn analogs:
– any kid-mohair, but note that the fluff should be soft so that it does not obscure the pattern, i.e., it should be evenly distributed through the main strand;
– merino with cashmere, with suitable yardage, for example LANA GATTO VIP;
– in testing, the workshop masters also knitted from:
Alize Angora Gold 100 g / 550 m (in 1 strand, for size 52 you need 3 skeins);
Tricote Merino Gold 100 g / 400 m (for size 44 you need 3 skeins);
Etrofil Angora Lux 50 g / 200 m (for size 48 you need 7 skeins).
ABBREVIATIONS
p — stitch
r — row
cm — centimeters
HB — hip circumference
OG — bust circumference
IR — purl row
LR — knit row
IP — purl stitch
LP — knit stitch
OPP — buttonhole
OR — main pattern
SlP — slipped stitch
DP — extra stitch
DPR — additional row
PP — front panel
PsP — last stitch
SP — back
LSP — left side of front
PSP — right side of front
LSSP — left side of back
PSSP — right side of back
VG — neckline
TOOLS
Needle sizes are chosen to match the required gauge, approximately from 2.75 – 3 – 3.25 – 3.5 – 4, with cable lengths of 60 and 80 cm; a straight needle for casting on stitches using the Italian method.
Needles with a large eye, scissors, hook No. 3 or 3.5.
Markers, row counter, measuring tape.
8 / 9 / 9 / 9 / 9 / 9 / 10 / 10 / 10 buttons (you may want to have one extra button as a spare).
3 pins or additional needles for transferring shoulder stitches of the fronts onto them.
TOOLS / SWATCH
On needles No. 3, cast on 33 stitches in the classic way and knit 15 rows of reinforced rib.
1st row (RS):
1st stitch is slipped, not worked (this will be the first edge stitch at the start of the row);
IP; LP, then knit from * to *, stopping 2 stitches before the end of the row;
IP; the last stitch is purled (this will be the edge at the end of the row).
2nd row:
Slip the edge stitch;
LP slip without knitting, yarn behind the work; IP; then knit from * to *, stopping 2 stitches before the end of the row;
Slip the LP without knitting, yarn behind the work; knit the edge stitch in purl.
From row 3 to 14, knit consistently repeating rows 1 and 2.
In row 15, bind off stitches using the "braid" method or leave on the needle, not binding off, measure the swatch before washing, record the result, then wash the swatch, and after it dries completely measure the swatch again.
GAUGE / SWATCH
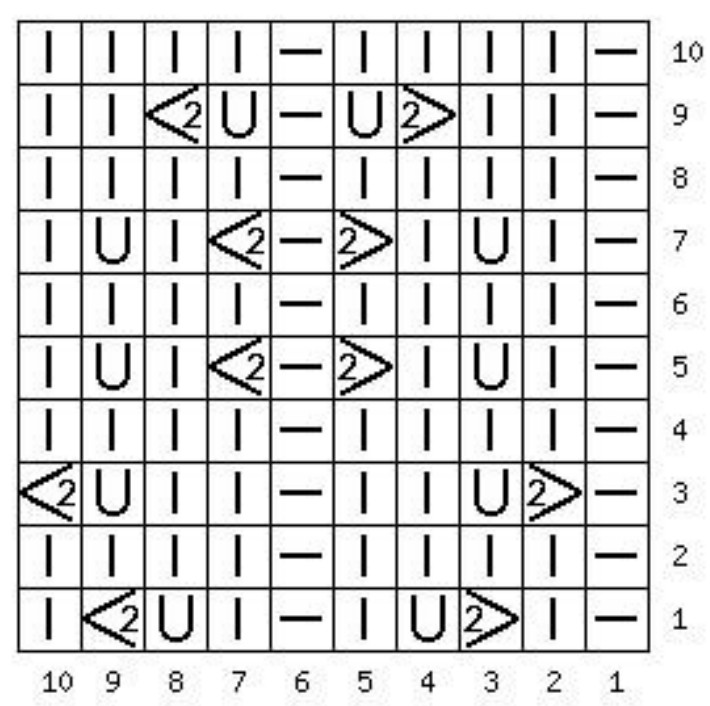
If you are not using original yarn and you are unsure how it will look in the OR, you can swatch and also knit the OR in the swatch. In this case after 14 rows of reinforced rib switch to needles No. 3.25 and knit one OR repeat in height according to the chart on page 8, as well as described on pages 16–17:
Edge stitch; OR repeat in width; then repeat OR repeat 2 more times; IP; Edge stitch.
In row 11 of OR, bind off stitches using the "braid" method, measure the swatch before washing, record the result, then wash the swatch, and after it dries completely measure again.
Measure the swatch in the ribbing in width, first slightly stretch the ribbing to the sides and release — measure:
in the central 10 cm I have 24 stitches,
24 stitches divided by 10 cm equals 2.4 stitches per cm.
Measure the swatch in the ribbing in height:
height of 12 rows = 2.5–3 cm.
If you knitted OR, its gauge:
width of one repeat — 5 cm;
height of one repeat — 3.6–3.8 cm.
Main Pattern Diagram (MP)
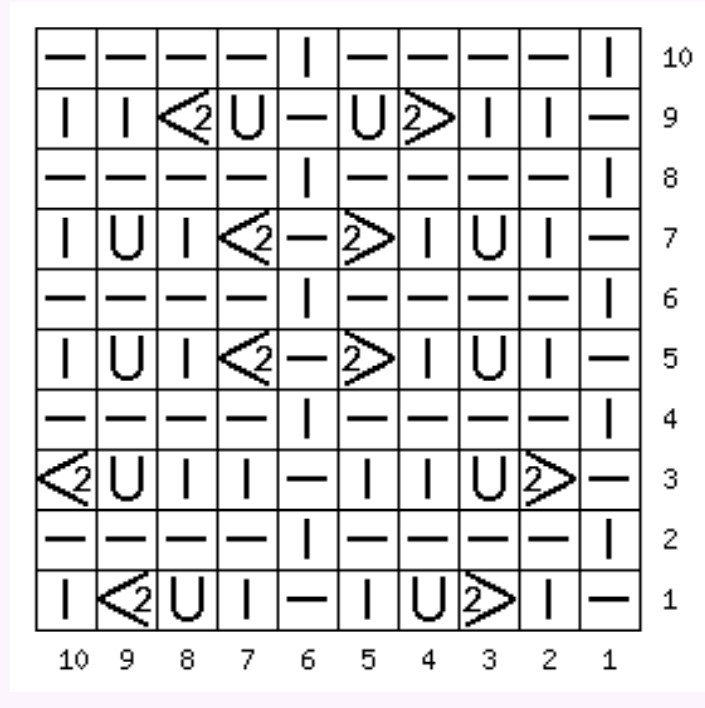
![]() - LP — knit stitch
- LP — knit stitch
![]()
- IP — purl stitch
![]() - Y — yarn over
- Y — yarn over
2> - 2 LP together with a right-leaning decrease
Main pattern chart
SIZE CHART
Size RU (EUR):
40 (XXS), 42 (XS), 44 (S), 46 (M), 48 (L), 50 (XL), 52 (XXL), 54 (3XL), 56 (4XL)
HB, cm:
82–84, 85–89, 90–93, 94–98, 99–102, 103–106, 107–110, 111–114, 115–118
Note!
If you want the sweater to sit at the hips without the “oversize” effect, as in my photo, and your bust circumference is not greater than your hip circumference, you can choose one size smaller. For example, my hip circumference is 100 cm, bust 92 cm; according to the size table I would fit into size 48, but since the ribbing will stretch a bit, I choose size 46.
If you did not match my gauge (2.4 stitches per cm), and for example your gauge is 2.6 stitches per cm, with hip circumference, for example, 92 cm, you can choose another size and knit exactly according to the description.
How to calculate, in this case, which size you should choose from the table?
Look at the table on page 13 in row A; it shows the number of stitches. First take size 46 — 227 sts; now you need to divide 227 sts by your gauge of 2.6 sts per cm and you will get 87 cm — not suitable, because your bust circumference is 92 cm. Next take the next size from the table; for size 48 it shows — 237 sts; 237 sts divided by 2.6 = 91 cm. This is very close to 92, so for the pattern you should knit size 48.
Size M

SIZE CHART
IN CENTIMETERS
40 (XXS) / 42 (XS) / 44 (S) / 46 (M) / 48 (L) / 50 (XL) / 52 (XXL) / 54 (3XL) / 56 (4XL)
A — full circumference around the ribbing / body of the sweater:
84 / 94, 88 / 99, 92 / 104, 96 / 109, 100 / 114, 104 / 119, 110 / 126, 114 / 131, 118 / 136
B — width when fastened at the ribbing / body of the sweater:
41 / 46, 43 / 48, 45 / 51, 47 / 54, 49 / 56, 51 / 58, 54 / 61, 56 / 64, 58 / 66
C — height of the ribbing:
3, 3, 3, 3, 3, 4, 4, 4, 4
D — width of the placket:
3, 3, 3, 3, 3, 4, 4, 4, 4
E — width of the front without the placket:
22.5, 22.5, 25, 25, 27.5, 30, 30, 32.5, 35
F — distance between buttonholes:
7, 7, 7, 7, 7, 7, 7, 7, 7
J — armhole depth from the ribbing to the armhole:
28, 32, 32, 36, 36, 36, 40, 40, 44
K — armhole depth from the ribbing to the neckline:
40, 43, 43, 47, 47, 47, 51, 51, 51
L — width of the shoulder:
15.5, 18, 18, 18, 18, 20.5, 20.5, 23, 23
M — width of the neckline:
25, 20, 25, 25, 30, 25, 30, 25, 30
N — depth of the neckline:
8, 8, 8, 8, 8, 8, 8.5, 8.5, 8
O — width of the placket at the neckline:
3, 3, 3, 3, 3, 3, 3, 3, 3
P — width of the armhole:
19, 19, 19, 19, 19, 19, 22, 22, 22
Q — sleeve length to the ribbing:
42, 42, 46, 46, 46, 46, 46, 46, 46
S — height of the ribbing:
3, 3, 3, 3, 3, 3, 3.5, 3.5, 3.5
T — width of the ribbing:
15 / 11, 15 / 11, 15 / 11, 15 / 11, 15 / 11, 15 / 11, 19 / 14, 19 / 14, 19 / 14
V — full height of the sweater:
56, 60, 60, 64, 64, 64, 68, 68, 68
W — shoulder slope:
6, 6, 6, 6, 6, 6, 6.5, 6.5, 6
SIZE CHART IN STITCHES AND ROWS
IN STITCHES AND ROWS

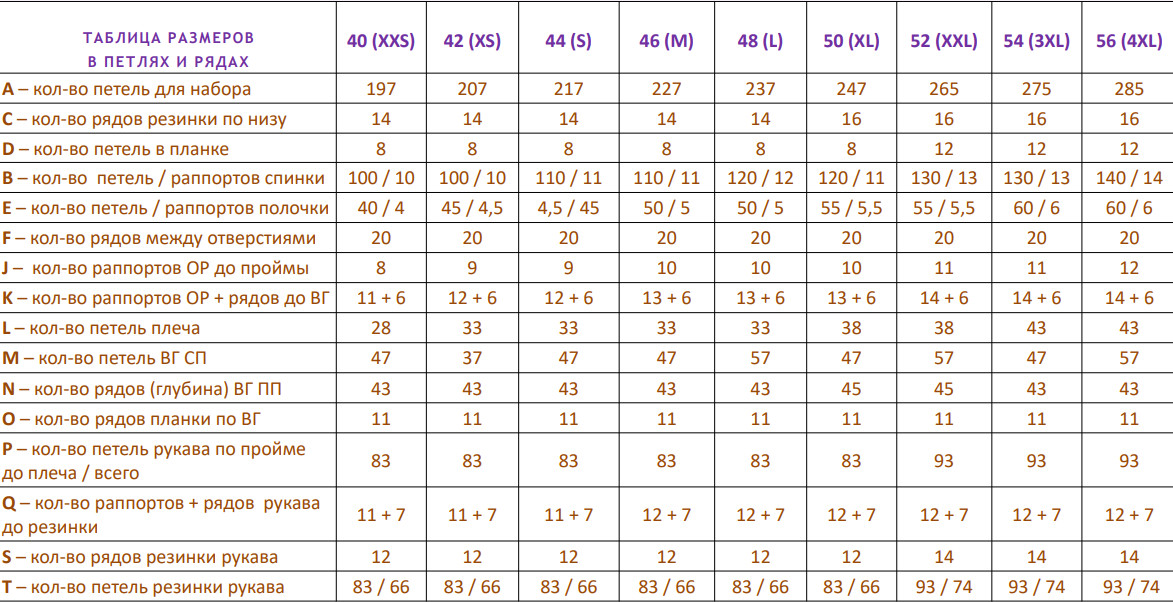
40 (XXS) / 42 (XS) / 44 (S) / 46 (M) / 48 (L) / 50 (XL) / 52 (XXL) / 54 (3XL) / 56 (4XL)
A — number of stitches for casting on:
197, 207, 217, 227, 237, 247, 265, 275, 285
C — number of ribbing rows at the bottom:
14, 14, 14, 14, 14, 16, 16, 16, 16
D — number of stitches in the placket:
8, 8, 8, 8, 8, 8, 12, 12, 12
B — number of stitches / pattern repeats on the back:
100 / 10, 100 / 10, 110 / 11, 110 / 11, 120 / 12, 120 / 11, 130 / 13, 130 / 13, 140 / 14
E — number of stitches / pattern repeats on the front:
40 / 4, 45 / 4.5, 45 / 4.5, 50 / 5, 50 / 5, 55 / 5.5, 55 / 5.5, 60 / 6, 60 / 6
F — number of rows between openings:
20, 20, 20, 20, 20, 20, 20, 20, 20
J — number of pattern repeats to the armhole:
8, 9, 9, 10, 10, 10, 11, 11, 12
K — number of repeats of the armhole + rows to the neckline:
11 + 6, 12 + 6, 12 + 6, 13 + 6, 13 + 6, 13 + 6, 14 + 6, 14 + 6, 14 + 6
L — number of shoulder stitches:
28, 33, 33, 33, 33, 38, 38, 43, 43
M — number of stitches for the back neckline front piece:
47, 37, 47, 47, 57, 47, 57, 47, 57
N — number of rows (depth) of the back neckline / front piece:
43, 43, 43, 43, 43, 45, 45, 43, 43
O — number of rows of the placket along the neckline:
11, 11, 11, 11, 11, 11, 11, 11, 11
P — number of stitches at the sleeve cap / total:
83, 83, 83, 83, 83, 83, 93, 93, 93
Q — number of pattern repeats + sleeve rows to the ribbing:
11 + 7, 11 + 7, 11 + 7, 12 + 7, 12 + 7, 12 + 7, 12 + 7, 12 + 7, 12 + 7
S — number of rows of the sleeve ribbing:
12, 12, 12, 12, 12, 12, 14, 14, 14
T — number of stitches in the sleeve ribbing:
83 / 66, 83 / 66, 83 / 66, 83 / 66, 83 / 66, 83 / 66, 93 / 74, 93 / 74, 93 / 74
RIBBING
CAST ON STITCHES
On needles No. 3 (or another needle size that matches my gauge when knitting the swatch near the ribbing) cast on using the Italian method 197 / 207 / 217 / 227 / 237 / 247 / 265 / 275 / 285 stitches, as shown in video #1. Leave a tail of yarn from 2 to 3 m (depends on size, needle size and yarn composition; for size 46 and kid mohair I left 2 m, about 10 cm more per size). To simplify casting on stitches with the Italian method, I recommend using a straight needle.
In the video, the process of casting on stitches with the Italian method is shown in detail, but I would like to briefly describe it as well:
The first stitch we create so that it is secured on the needle;
then we begin casting on stitches under the thread coming from the index finger, in this case on the needle we will get a Purl stitch (IP);
next we cast on a stitch under the thread coming from the thumb, in this case on the needle we will have a Knit stitch (LP);
then we cast on from * to *; the next-to-last stitch we must cast on under the thread coming from the index finger so that an IP is formed on the needle;
the last stitch we cast on in the classic way so that it is secured on the needle.
RIB KNITTING
If you cast on the stitches using a straight needle, now take the right needle with a cable of the same size.
1st row (RS): slip the first stitch, not worked (edge stitch at the start of the row); slip the knit stitch, yarn behind the work; and then knit from * to *, stopping 2 stitches before the end of the row: slip the knit stitch; knit the last stitch purlwise (edge stitch at the end of the row).
2nd row (WS): edge stitch; (purl; slip the knit stitch, yarn behind the work); then knit from * to *, stopping 2 stitches before the end of the row: purl; edge stitch.
3rd row (RS): edge stitch; (slip the knit stitch without knitting, yarn behind the work; purl); then knit from * to *, stopping 2 stitches before the end of the row; slip the knit stitch without knitting, yarn behind the work; edge stitch.
4th row (WS): edge stitch; (purl; knit), then knit from * to *, stopping 2 stitches before the end of the row; purl; edge stitch.
From rows 5 to 7, knit, repeating rows 3, 4, and 3.
BUTTONHOLE OPENING
BUTTONHOLE OPENING
8th row (WS):
edge stitch; purl; knit, then knit from * to *, stopping before the stitches of the placket (i.e., 8 / 8 / 8 / 8 / 8 / 8 / 12 / 12 / 12 stitches to the end of the row): purl; knit; purl; (for sizes 52 / 54 / 56, continue with knit; purl),
then yarn over; now on the left needle we have knit and purl stitches; rearrange them so that the knit stitch sits behind the purl stitch and work these two stitches together as a purl;
then knit; purl; (for sizes 52 / 54 / 56, continue with knit; purl); edge stitch.
9th row (RS):
stitches of the placket: edge stitch; slip the knit stitch, yarn behind the work; purl; slip the knit stitch, yarn behind the work;
(for sizes 52 / 54 / 56: purl; slip the knit stitch, yarn behind the work);
then we purl the yarn over; slip the knit stitch, yarn behind the work; purl; slip the knit stitch, yarn behind the work;
(for sizes 52 / 54 / 56: purl; slip the knit stitch, yarn behind the work);
ribbing: purl; slip the knit stitch, yarn behind the work; then knit from * to *, stopping before the placket stitches on the other side, i.e., 8 / 8 / 8 / 8 / 8 / 8 / 12 / 12 / 12 stitches to the end of the row: knit the stitches in the pattern of the right side; stop 4 / 4 / 4 / 4 / 4 / 4 / 6 / 6 / 6 stitches from the end of the row; pick up a marker beside the stitched edge; at this point we will sew on a button later; then finish the row in pattern; edge stitch.
From rows 10 to 14 / 14 / 14 / 14 / 14 / 14 / 16 / 16 / 16, knit repeating rows 3 and 4.
3_ video on forming the buttonhole
NOTE!
Buttonhole openings (OPP) for sizes 42 / 44 are formed every 18–20 placket rows; placket row numbers are given in the pattern. For other sizes, form openings every 20 rows in the same manner as rows 8 and 9. Also, if you have sizes 46 / 48 / 50 / 52 / 54 / 56 but are short in height and want a cardigan about 4 cm shorter than my recommended length for your size in the V-table on page 11, then form OPP after the 8th opening every 18 placket rows and monitor this yourself.
MAIN PATTERN
KNITTING THE MAIN PATTERN (hereinafter MP)
Switch to needles No. 3.25 (or to the needle size that matched your gauge in the MP sample). Reset the row counter and begin knitting the MP according to the chart on page 8, which consists of 10 rows:
4_ video about knitting MP rows 1 to 4
Row 1 (RS):
placket: edge stitch; slip stitch; purl, then repeat from * to * another 2 / 2 / 2 / 2 / 2 / 2 / 4 / 4 / 4 times; slip stitch, yarn at the back;
MP: purl; knit; 2 knit stitches together with a right-leaning decrease; yarn over; knit; purl; knit; yarn over; 2 knit stitches together with a left-leaning decrease (first rotate the right sides of these stitches so that they sit behind the needle); knit;
then repeat from * to *, stop after 9 / 9 / 9 / 9 / 9 / 9 / 13 / 13 / 13 stitches: purl; placket: slip stitch; purl, then repeat from * to * another 2 / 2 / 2 / 2 / 2 / 2 / 4 / 4 / 4 times; slip stitch, yarn at the back; edge stitch.
2nd row (WS):
placket: edge stitch; purl; knit, then repeat from * to * another 2 / 2 / 2 / 2 / 2 / 2 / 4 / 4 / 4 times; purl;
MP: knit; 4 purls; then repeat from * to *, stopping after 9 / 9 / 9 / 9 / 9 / 9 / 13 / 13 / 13 stitches: knit; placket: purl; knit, then repeat from * to * another 2 / 2 / 2 / 2 / 2 / 2 / 4 / 4 / 4 times; purl; edge stitch.
3rd row (RS):
placket: edge stitch; slip the knit stitch; purl, then repeat from * to * another 2 / 2 / 2 / 2 / 2 / 2 / 4 / 4 / 4 times; slip the knit stitch, yarn behind the work; MP: purl; 2 knit stitches together with a right-leaning decrease; yarn over; 2 knit stitches together with a left-leaning decrease (first rotate the right sides of these stitches so that they sit behind the needle); knit;
then repeat from * to *, stopping after 9 / 9 / 9 / 9 / 9 / 9 / 13 / 13 / 13 stitches: purl; placket: slip stitch; purl, then repeat from * to * another 2 / 2 / 2 / 2 / 2 / 2 / 4 / 4 / 4 times; slip stitch, yarn at the back; edge stitch.
4th row (WS):
knit the stitches in pattern as for row 2.
MAIN PATTERN
5th row (RS):
placket: edge stitch; slip the stitch; purl, then repeat from * to * another 2 / 2 / 2 / 2 / 2 / 2 / 4 / 4 / 4 times; slip the stitch, yarn at the back;
MP: purl; knit; knit; 2 knit stitches together with a right-leaning decrease; yarn over; knit; 2 knit stitches together with a left-leaning decrease (first rotate the right sides of these stitches so that they sit behind the needle); knit; yarn over; knit;
then repeat from * to *, stopping after 9 / 9 / 9 / 9 / 9 / 9 / 13 / 13 / 13 stitches: purl; placket: slip stitch; purl, then repeat from * to * another 2 / 2 / 2 / 2 / 2 / 2 / 4 / 4 / 4 times; slip stitch, yarn at the back; edge stitch.
6th row (WS):
work the stitches in pattern as in row 2.
7th row (LR):
placket: KR; knit stitches slip; purl stitches, then repeat from * to * another 2 / 2 / 2 / 2 / 2 / 2 / 4 / 4 / 4 times; slip knit stitches, yarn at back;
WS: Purl; Knit; YO; Knit; 2 Knit stitches together with a right-leaning decrease; Purl; 2 Knit stitches together with a left-leaning decrease (first we turn the right walls of these stitches so that they sit behind the needle); Knit; YO; Knit;
then repeat from * to *, stopping after 9 / 9 / 9 / 9 / 9 / 9 / 13 / 13 / 13 sts: Purl;
placket: Knit stitches slip; purl stitches, then repeat from * to * another 2 / 2 / 2 / 2 / 2 / 2 / 4 / 4 / 4 times; slip knit stitches, yarn at back; KR.
8th row (IR):
knit stitches according to the pattern, as in row 2.
9th row (LR):
placket: KR; knit stitches slip; purl stitches, then repeat from * to * another 2 / 2 / 2 / 2 / 2 / 2 / 4 / 4 / 4 times; slip knit stitches, yarn at back;
WS: Purl; 2 Knit stitches; 2 Knit stitches together with a right-leaning decrease; YO; Purl; YO; 2 Knit stitches together with a left-leaning decrease; 2 Knit stitches;
then repeat from * to *, stopping after 9 / 9 / 9 / 9 / 9 / 9 / 13 / 13 / 13 sts: Purl;
placket: Knit stitches slip; purl stitches, then repeat from * to * another 2 / 2 / 2 / 2 / 2 / 2 / 4 / 4 / 4 times; slip knit stitches, yarn at back; KR.
10th row (IR):
knit stitches according to the pattern, as in row 2.
2nd BUTTONHOLE OPENINGS
At this point the first repeat of the wrong side in height is finished; next we begin knitting the 2nd repeat of the wrong side from rows 1 to 10, described on pages 16 and 17.
Note that after 20 rows of the placket we need to form the 2nd OPP (description of the 1st OPP on page 15). It’s easy to count the number of placket rows by the elongated knit stitches, i.e., there should be 10 elongated knit stitches between the OPPs.
For sizes 40 / 42 / 44 / 46 / 48 / 50:
2 repeats: at the level of row 4 form the 2nd OPP / rows 28 and 29 of the placket.
For sizes 52 / 54 / 56:
2 repeats: at the level of row 2 of the OR form the 2nd OPP / rows 28 and 29 of the placket.
ADDITIONAL PLACKET ROWS
KNITTING ADDITIONAL PLACKET ROWS (hereafter DPR)
Since the placket is knitted with a reinforced rib, to prevent the placket from pulling away from the cardigan’s body, we will knit the DPR every 20 rows. The first time we knit 2 DPR in 1 row for 3 repeats; a detailed video on knitting 2 DPR is shown in video #5 at 7 minutes 45 seconds.
1st row (LR) of the 3rd repeat of the OR:
knit 8 / 8 / 8 / 8 / 8 / 8 / 12 / 12 / 12 stitches of the placket in the knit-row pattern;
then move the 1st OR stitch to the right needle (this is IP), bring the working yarn to the front of the work, return the slipped stitch to the left needle (thus we wrapped the IP) and turn the knitting to the wrong side;
then knit the placket stitches according to the pattern of the purl row; thus we have knitted 2 DPR of the placket without knitting the OR stitches, then knit the placket stitches according to the knit-row pattern;
next, we need to lift the thread with which we wrapped the OR IP on the right needle and place it behind our IP; then knit this IP and the wrap thread together as IP, thus we have knitted the 1st OR stitch;
then knit the row according to the pattern of the 1st OR; knit the placket stitches according to the knit-row pattern.
2nd row (IR) of the 3rd repeat of the OR:
knit 8 / 8 / 8 / 8 / 8 / 8 / 12 / 12 / 12 stitches of the placket according to the pattern of the purl row;
then move the 1st OR stitch to the right needle (this is LП), bring the working yarn to the front, return the slipped stitch to the left needle (thus we wrapped the LП) and turn the knitting to the knit side;
then knit the placket stitches according to the knit-row pattern; thus we have knitted 2 DPR of the placket without knitting the OR stitches, then knit the placket stitches according to the pattern of the purl row;
now we need to lift the yarn with which we wrapped the OR LП on the right needle, but catch it behind the needle so that the wrap is not visible from the front, and place it behind our LП; then knit this LП and the wrap together as LП, thus we have knitted the 1st OR stitch;
then knit the row according to the pattern of the 2nd OR; knit the placket stitches according to the pattern of the purl row.
Next knit rows 3 to 10 of the OR according to the scheme on page 8 and the description on pages 16 and 17.
For sizes 52 / 54 / 56, before knitting row 8 of the 3rd repeat, go to page 21.
BODY OF THE CARDIGAN BEFORE ARMHOLE DIVISION
KNITTING THE CARDIGAN BODY BEFORE ARMHOLE DIVISION
for sizes 40 / 42 / 44 / 46 / 48 / 50
Next we knit the cardigan body from 4 to 8 / 9 / 9 / 10 / 10 / 10 / 10 repeats according to the above-described knitting rules, taking into account the following nuances (note! For sizes 52 / 54 / 56 this section is described on page 21):
4 repeats of OR: at the level of row 2 of OR form the 3rd OPP / rows 48–49 of the placket;
5 repeats OR: at the level of row 1 OR knit 2 DPR planks;
5 repeats OR: at the level of row 10 OR form the 4th OPP / 68–69 rows of the placket;
6 repeats OR: knit according to the OR pattern;
7 repeats OR: at the level of row 1 OR knit 2 DPR planks;
7 repeats OR: at the level of row 8 OR form the 5th OPP / 88–89 rows of the placket;
8 repeats OR: knit according to the OR pattern; then for size 40 proceed to splitting the knitting into front pieces and back on page 22.
Note that regardless of your size, if you are not tall, you can make the cardigan 4 cm shorter than indicated in the V row of the table on page 11. To do this, you need to knit up to the division of knitting into the fronts and back by one OR repeat less. It is also important to remember the nuance about pattern height changes: if after washing the pattern increased in height, then in this place you must account for this and, considering the pattern changes, knit one more or one fewer repeat to achieve the length you want or the length I recommend.
9th repeat OR: at levels 1 and 2 OR knit 2 DPR planks.
For sizes 42 / 44:
9th repeat OR: at the level of row 4 OR form the 6th OPP / 106–107 placket rows and then proceed to splitting the knitting into fronts and back on page 22.
For sizes 46 / 48 / 50:
9th repeat OR: at the level of row 6 OR form the 6th OPP / 108–109 placket rows;
10th repeat OR: knit according to the OR pattern and then proceed to splitting the knitting into fronts and back on page 22.
3rd OR repeat: at the 8th row of OR we form the 3rd OPP / 48–49th rows of the placket;
4th OR repeat: OR, knit according to the pattern;
5th OR repeat: at the level of the 1st OR row knit 2 DPR planks;
5th OR repeat: at the level of the 6th OR row form the 4th OPP / 68–69th rows of the placket;
6th OR repeat: OR, knit according to the pattern;
7th OR repeat: at the level of the 1st OR row knit 2 DPR planks;
7th OR repeat: at the level of the 4th OR row form the 5th OPP / 88–89th rows of the placket;
8th OR repeat: knit according to the OR pattern;
9th OR repeat: at the level of the 1st OR row knit 2 DPR planks;
9th OR repeat: at the level of the 2nd OR row form the 6th OPP / 108–109th rows of the placket;
10th OR repeat: knit according to the OR pattern.
WE BEGIN THE SEPARATION OF KNITTING INTO FRONT PIECES AND BACK
First of all, we need to separate the PSP loops and hang a marker at this point. To do this, from the start of knitting count 4 / 4.5 / 4.5 / 5 / 5 / 5.5 / 5.5 / 6 / 6 pattern repeats OR 48 / 53 / 53 / 58 / 58 / 63 / 67 / 72 / 72 stitches, and place a marker at this point.
6_video about dividing knitting into PP and SP
Note! For size 40 at the level of the 1st row 9 repeats and for sizes 46 / 48 / 50 at the level of the 1st row 11 repeats, we knit 2 DPR.
1st row (RS) 9 / 10 / 10 / 11 / 11 / 11 / 11 / 11 / 11 repeats:
knit the placket stitches according to the pattern; then knit OR, stopping before the marker;
now we need to create a DP: with the left needle pick up from the lower row the left wall of the just knitted stitch, place it on the left needle so that its right wall sits behind the needle, and then knit this stitch as a turned purl, i.e., behind the left wall.
The remaining SP and LSP stitches transfer to an additional needle.
2nd row (WS) 9 / 10 / 10 / 11 / 11 / 11 / 11 / 11 / 11 repeats:
remove the first stitch, not worked — this will be the KR; then knit the row according to the pattern. At the end of the row for sizes 52 / 54 / 56 form the 7th OPP / 128–129th rows of the planks.
3rd row (RS) 9 / 10 / 10 / 11 / 11 / 11 / 11 / 11 / 11 repeats:
knit the placket stitches according to the pattern; then for sizes 52 / 54 / 56 knit 2 DPR;
then knit OR, stopping before KR; create a DP similar to row 1; KR knit IP.
Note! After knitting two DPR for sizes 42 / 44 / 50 / 52, in the end of each RS, in the last repeat you will knit 6 of the 10 stitches of the OR repeat.
4th row (WS) 9 / 10 / 10 / 11 / 11 / 11 / 11 / 11 / 11 repeats:
KR; K, 4 IP, then knit, repeating from * to *, i.e., knit according to the pattern of the wrong-side row;
at the end of the row for sizes 46 / 48 / 50 form the 7th OPP / 128–129th rows of the placket.
From the 5th row of 9 / 10 / 10 / 11 / 11 / 11 / 11 / 11 / 11 repeats in blocks of 6 rows 12 / 13 / 13 / 14 / 14 / 14 / 15 / 15 / 15 repeats, we knit according to the pattern considering the actions below.
For size 40:
9th OR repeat: at the 6th OR row form the 6th OPP / 108–109th rows of the placket;
10th OR repeat: knit according to the OR pattern;
11th OR repeat: at the 1st OR row knit 2 DPR;
11th OR repeat: at the 4th OR row form the 7th OPP / 128–129th rows of the placket.
For sizes 42 / 44:
10th OR repeat: knit according to the OR pattern;
11th OR repeat: at the 2nd OR row form the 7th OPP / 124–125th rows of the placket;
11th OR repeat: at the 5th OR row knit 2 DPR;
12th OR repeat: at the 8th OR row form the 8th OPP / 142–143rd rows of the placket;
13th OR repeat: at the 3rd OR row knit 2 DPR.
For sizes 46 / 48 / 50:
12th OR repeat: knit according to the OR pattern;
13th OR repeat: at the 1st OR row knit 2 DPR;
13th OR repeat: at the 2nd OR row form the 8th OPP / 148–149th rows of the placket;
14th OR repeat: knit according to the pattern up to and including the 6th OR row.
For sizes 52 / 54 / 56:
12th OR repeat: at the 10th OR row form the 8th OPP / 148–149th rows of the placket;
13th OR repeat: at the 1st OR row knit 2 DPR;
14th OR repeat: at the 8th OR row form the 9th OPP / 168–169th rows of the placket;
15th OR repeat: at the 1st OR row knit 2 DPR, then knit according to the pattern up to and including the 6th OR row.
In the 7th row (RS) of the 12 / 13 / 13 / 14 / 14 / 14 / 15 / 15 / 15 repeats, we proceed to form the neckline (hereinafter — Neckline).
WE BEGIN FORMING THE NECKLINE ON THE RIGHT SIDE OF THE FRONT PIECE
7th RS repeat 12 / 13 / 13 / 14 / 14 / 14 / 15 / 15 / 15 repeats,
in this row we need to decrease 4 / 4 / 4 / 5 / 5 / 5 / 3 / 3 / 3 stitches:
-
knit the placket stitches and transfer them to a pin or to an extra thread;
Note! In sizes 40 / 42 / 44 the neckline shaping is 4 cm narrower than in other sizes, so if you want a wider neckline like mine in the photo, you should shape the neckline as follows:
for size 40 — as described in 46,
for sizes 42 / 44 — as in 50 / 52. -
IP;
-
knit the next stitch according to the pattern and pass it through the previously knitted stitch, pull the working yarn so that the stitch on the needle is very loose, so the finished edge is not drawn tight;
-
then repeat from * to * 3 / 3 / 3 / 4 / 4 / 4 / 2 / 2 / 2 times; then
-
for 40 / 42 / 44: knit IP; 2 KN together with a left-leaning decrease; KN; YO; KN; then knit the row according to the OR pattern; KR.
-
for 46 / 48 / 50: knit 4 KN; then knit the row according to the OR pattern; KR.
-
for 52 / 54 / 56: knit KN; IP; 2 KN together with a left-leaning decrease; KN; YO; KN; then knit the row according to the OR pattern; KR.
-
8th row (WS) 12 / 13 / 13 / 14 / 14 / 14 / 15 / 15 / 15 repeats:
-
KR; then knit according to the pattern, stopping 1 stitch before the end of the row and turning to the right side.
Row 9 (LR) 12 / 13 / 13 / 14 / 14 / 14 / 15 / 15 / 15 repeats,
in this row we need to decrease 3 / 3 / 3 / 4 / 4 / 4 / 4 / 4 / 4 stitches:
-
slip the 1st stitch from the left needle over the unworked stitch on the right needle;
-
knit the next stitch according to the pattern and pass it through the previously knitted stitch, pull the working yarn to make the stitch on the needle very loose, so that the final cast-off edge is not tight;
-
then repeat from * to * 1 / 1 / 1 / 2 / 2 / 2 / 2 / 2 / 2 times; then
-
for 40 / 42 / 44: knit 2 stitches; then finish the row following the OR pattern; edge.
-
for 46 / 48 / 50: purl stitch; 2 knit stitches; 2 knit stitches together with a right-leaning decrease; yarn over; purl stitch; then finish the row following the OR pattern; edge.
-
for 52 / 54 / 56: knit 2 stitches; then knit the row following the OR pattern; edge.
-
Row 10 (IR) 12 / 13 / 13 / 14 / 14 / 14 / 15 / 15 / 15 repeats:
-
K; then knit according to the pattern, stop 1 stitch before the end of the row and turn to the right side.
Row 1 (LR) 13 / 14 / 14 / 15 / 15 / 15 / 16 / 16 / 16 repeats,
in this row we need to decrease 2 / 2 / 2 / 3 / 3 / 3 / 3 / 3 / 3 stitches:
-
slip the 1st stitch from the left needle over the unworked stitch on the right needle;
-
knit the next stitch according to the pattern and pass it through the previous knitted stitch, pull the working yarn to make the stitch on the needle very loose, so that the final cast-off edge is not tight;
-
then repeat from * to * 0 / 0 / 0 / 1 / 1 / 1 / 1 / 1 / 1 times; then
-
for 40 / 42 / 44: purl stitch; then knit the row following the OR pattern; edge.
-
for 46 / 48 / 50: knit 2 stitches; Purl stitch; Knit stitch; Yarn over; knit 2 stitches together with a left-leaning decrease; knit stitch; then knit the row following the OR pattern; edge.
-
for 52 / 54 / 56: knit stitch; 2 knit stitches together with a right-leaning decrease; Yarn over; knit stitch; then knit the row following the OR pattern; edge.
-
Row 2 (IR) 13 / 14 / 14 / 15 / 15 / 15 / 16 / 16 / 16 repeats:
-
K; then knit according to the pattern, stop 1 stitch before the end of the row and turn to the right side.
Row 3 (LR) 13 / 14 / 14 / 15 / 15 / 15 / 16 / 16 / 16 repeats,
in this row we need to decrease 1 / 1 / 1 / 2 / 2 / 2 / 2 / 2 / 2 stitches:
-
slip the 1st stitch from the left needle over the unworked stitch on the right needle;
-
for 40 / 42 / 44: knit 2 stitches together with a right-leaning decrease; yarn over; 2 knit stitches; purl; then knit the row following the OR pattern; edge.
-
then knit the next stitch according to the pattern and pass it through the previous knitted stitch, pull the working yarn so that the stitch on the needle is very loose;
-
for 46 / 48 / 50: purl stitch; 2 knit stitches; yarn over; 2 knit stitches together with a left-leaning decrease; then knit the row following the OR pattern; edge.
-
for 52 / 54 / 56: knit 2 stitches; purl stitch; then knit the row following the OR pattern; edge.
Row 4 (IR) 13 / 14 / 14 / 15 / 15 / 15 / 16 / 16 / 16 repeats:
-
K; then knit according to the pattern, stop 1 stitch before the end of the row and turn to the right side.
Row 5 (LR) 13 / 14 / 14 / 15 / 15 / 15 / 16 / 16 / 16 repeats,
in this row we need to decrease 1 / 1 / 1 / 1 / 1 / 1 / 2 / 2 / 2 stitches:
-
slip the 1st stitch from the left needle over the unworked stitch on the right needle;
-
for 40 / 42 / 44: knit 3 stitches; then knit the row following the OR pattern; edge.
-
for 46 / 48 / 50: knit 2 stitches together with a left-leaning decrease; knit stitch; yarn over; knit stitch; then knit the row following the OR pattern; edge.
-
for 52 / 54 / 56: slip the next stitch as per the pattern and pass it over the previously knitted stitch, pull the working yarn to make the stitch on the needle very loose;
then purl the next stitch; then finish the row following the OR pattern; edge.
Row 6 (IR) 13 / 14 / 14 / 15 / 15 / 15 / 16 / 16 / 16 repeats:
-
K; then knit according to the pattern, stop 1 stitch before the end of the row and turn to the right side.
Row 7 (LR) 13 / 14 / 14 / 15 / 15 / 15 / 16 / 16 / 16 repeats,
in this row we need to decrease 1 / 1 / 1 / 1 / 1 / 1 / 2 / 2 / 2 stitches:
-
slip the 1st stitch from the left needle over the unworked stitch on the right needle;
-
for 40 / 42 / 44: knit 2 stitches; purl; then knit the row following the OR pattern; edge.
-
for 46 / 48 / 50: knit 3 stitches; purl; then knit the row following the OR pattern; edge.
-
for 52 / 54 / 56: knit the next stitch following the chart and pull it through the previously knitted stitch, pulling the working yarn so that the stitch on the needle is very loose;
then knit 3 knit stitches; purl; then knit a row according to the OR pattern; KR.
8 р (ИР) 13 / 14 / 14 / 15 / 15 / 15 / 16 / 16 / 16 repeat:
-
KR; then knit according to the pattern, KR.
9 р (ЛР) 13 / 14 / 14 / 15 / 15 / 15 / 16 / 16 / 16 repeat,
in this row we need to decrease 1 st:
-
slip the first stitch from the left needle over the unknitted stitch on the right needle;
-
for 40 / 42 / 44: knit; purl; then knit a row according to the OR pattern; KR.
-
for 46 / 48 / 50 / 52 / 54 / 56: knit 2 stitches; purl; then knit a row according to the OR pattern; KR.
-
10 р (ИР) 13 / 14 / 14 / 15 / 15 / 15 / 16 / 16 / 16 repeat:
-
KR; then knit according to the pattern, stop 1 stitch before the end of the row and turn to the right side.
1 р (ЛР) 14 / 15 / 15 / 16 / 16 / 16 / 17 / 17 / 17 repeat,
in this row we need to decrease 1 st:-
slip the first stitch from the left needle over the unknitted stitch on the right needle;
-
for 40 / 42 / 44: knit; then knit a row according to the OR pattern; KR.
-
for 46 / 48 / 50: knit; purl; then knit a row according to the OR pattern; KR.
-
for 52 / 54 / 56: knit; purl; then knit a row according to the OR pattern; KR.
2 р (ИР) 14 / 15 / 15 / 16 / 16 / 16 / 17 / 17 / 17 repeat:
-
for 40 / 42 / 44: KR; knit according to pattern, stop 1 stitch before end of row and knit it as purl — KR.
-
for 46 / 48 / 50 / 52 / 54 / 56: KR; then knit according to the pattern, stop 1 stitch before end of row and turn to the front side.
3 р (ЛР) 14 / 15 / 15 / 16 / 16 / 16 / 17 / 17 / 17 repeat,
in this row we need to decrease 0 / 0 / 0 / 1 / 1 / 1 / 1 / 1 / 1 st:-
for 40 / 42 / 44:
1st stitch is slipped, not knitted; then Purl; 2 Knit stitches; K2tog with a left-leaning decrease; Purl; then knit the row according to the OR pattern; KR. -
for 46 / 48 / 50 / 52 / 54 / 56:
draw the first stitch through the unknitted stitch; Purl; then knit according to the pattern; KR.
4 р (ИР) 14 / 15 / 15 / 16 / 16 / 16 / 17 / 17 / 17 repeat:
-
KR; then knit according to the pattern, stop 1 stitch before the end of the row and knit it as Purl — this will be KR.
5 р (ЛР) 14 / 15 / 15 / 16 / 16 / 16 / 17 / 17 / 17 repeat:
-
First stitch is slipped without knitting;
-
for 40 / 42 / 44: Purl; 2 Knit stitches together with a left-leaning decrease; Knit; Purl; Knit; Purl; then knit the row according to the OR pattern; KR.
-
for 46 / 48 / 50 / 52 / 54 / 56: Purl; then knit according to the pattern; KR.
6 р (ИР) 14 / 15 / 15 / 16 / 16 / 16 / 17 / 17 / 17 repeat:
-
KR; then knit according to pattern, KR.
7 р (ЛР) 14 / 15 / 15 / 16 / 16 / 16 / 17 / 17 / 17 repeat:
-
First stitch is slipped without knitting;
-
for 40 / 42 / 44: Purl; 2 Knit stitches together with a left-leaning decrease; Knit; Purl; Knit; Purl; then knit the row according to OR pattern; KR.
-
for 46 / 48 / 50 / 52 / 54 / 56: Purl; then knit according to OR pattern; KR.
8 р (ИР) 14 / 15 / 15 / 16 / 16 / 16 / 17 / 17 / 17 repeat:
-
KR; then knit according to pattern, KR.
Thus, when shaping VG PSP we have reduced
14 / 14 / 14 / 19 / 19 / 19 / 19 / 19 / 19 sts,
and now on the needles we have left
28 / 33 / 33 / 33 / 33 / 38 / 38 / 43 / 43 sts.In the 9 р (ЛР) 14 / 15 / 15 / 16 / 16 / 16 / 17 / 17 / 17 repeat, we proceed to forming the shoulder slope.
COMMENCING SHOULDER SLOPE FORMATION ON THE RIGHT SIDE OF THE FRONT PIECE
We will form the shoulder slope using short rows; turning rows with PSP will be performed on the knit stitches after a certain number of stitches; this number may differ by size; there will be
5 / 5 / 5 / 5 / 5 / 6 / 6 / 5 / 5 short rows.Before starting to knit, we count from the end of the row
5 / 5 / 5 / 5 / 5 / 5 / 5 / 7 / 7 stitches
and we place a marker at this place, then proceed to knit 9 rows (RS).9 rows (RS) 14 / 15 / 15 / 16 / 16 / 16 / 17 / 17 / 17 repeats:
-
for sizes 42 / 44 / 50 / 52: KR; then knit a row according to the chart, stopping 1 stitch before the marker: knit stitches and then turn to the wrong side, keep the marker in place for now;
-
for sizes 40 / 46 / 48: KR; then knit a row according to the chart, stopping 1 stitch before the marker: N; knit stitches and then turn to the wrong side, keep the marker in place;
-
for sizes 54 / 56: KR; then knit a row according to the chart, stopping 4 stitches before the marker: 4 knit stitches and then turn to the wrong side, keep the marker in place for now;
10 rows (WS) 14 / 15 / 15 / 16 / 16 / 16 / 17 / 17 / 17 repeats:
-
move the 1st stitch from the left needle to the right – this is the last stitch we knitted in RS, bring the working yarn behind the needle and tighten it, and our stitch will have 2 legs (as if two stitches on the needle) – this stitch we will call the complex stitch – SlP,
-
then knit the row according to the OR pattern to the end of the row; KR.
Before starting to knit 1 row (RS) we remove the outermost marker, and from the remaining marker count
7 / 5 / 5 / 7 / 7 / 5 / 5 / 7 / 7 stitches
(remember that SlP counts as one stitch) and place a new marker here.1 row (RS) 15 / 16 / 16 / 17 / 17 / 17 / 18 / 18 / 18 repeats:
-
for sizes 42 / 44 / 50 / 52: knit 4 stitches; P; then knit the row according to the OR chart, stopping 1 stitch before the marker: knit stitches and then turn;
-
for sizes 40 / 46 / 48: knit 4 stitches; P; then knit the row according to the OR chart, stopping 1 stitch before the marker: knit stitches and then turn;
-
for sizes 54 / 56: knit 3 stitches; P; 4 stitches; P; then knit the row according to the OR chart, stopping 2 stitches before the marker: 2 knit stitches and then turn.
Before starting to knit 2 rows (WS) 15 / 16 / 16 / 17 / 17 / 17 / 18 / 18 / 18 repeats,
remove the outermost marker, and from the remaining marker count
7 / 5 / 5 / 7 / 7 / 5 / 5 / 7 / 7 stitches
(remember that SlP counts as one stitch) and place a new marker here.2 rows (WS) 15 / 16 / 16 / 17 / 17 / 17 / 18 / 18 / 18 repeats:
-
move the 1st stitch from the left needle to the right and form SlP, then
-
for sizes 42 / 44 / 50 / 52: knit the stitches and then knit the row according to the pattern, stopping before the marker and turning;
-
for sizes 40 / 46 / 48: knit; 4 Purl stitches; then knit the row according to the pattern, stopping before the marker and turning;
-
for sizes 54 / 56: Purl stitches; Knit stitches and then knit the row according to the pattern, stopping before the marker and turning.
Before starting to knit 3 rows (RS) 15 / 16 / 16 / 17 / 17 / 17 / 18 / 18 / 18 repeats,
remove the outermost marker, and from the remaining marker count
5 / 5 / 5 / 5 / 5 / 5 / 5 / 7 / 7 stitches
(remember that SlP counts as one stitch) and place a new marker here.
3 rows (RS) 15 / 16 / 16 / 17 / 17 / 17 / 18 / 18 / 18 repeats:
-
for sizes 42 / 44 / 50 / 52: knit 4 stitches; P; then knit the row according to the OR pattern, stopping 1 stitch before the marker: knit stitches and then turn;
-
for sizes 40 / 46 / 48: knit 4 stitches; P; then knit the row according to the OR pattern, stopping 1 stitch before the marker: knit stitches and then turn;
-
for sizes 54 / 56: knit 3 stitches; P; 4 stitches; P; then knit the row according to the OR pattern, stopping 2 stitches before the marker: 2 knit stitches and then turn.
-
Before starting 4 rows (WS) 15 / 16 / 16 / 17 / 17 / 17 / 18 / 18 / 18 repeats,
remove the outermost marker, and from the remaining marker count
5 / 5 / 5 / 5 / 5 / 5 / 5 / 7 / 7 stitches
(remember SlP counts as one stitch) and place a new marker here.4 rows (WS) 15 / 16 / 16 / 17 / 17 / 17 / 18 / 18 / 18 repeats:
-
move the 1st stitch from the left needle to the right and form SlP, then
-
for sizes 42 / 44 / 50 / 52: knit the stitches and then knit the row according to the pattern, stopping before the marker and turning;
-
for sizes 40 / 46 / 48: knit; 4 Purl stitches; then knit the row according to the pattern, stopping before the marker and turning;
-
for sizes 54 / 56: Purl stitches; Knit stitches and then knit the row according to the pattern, stopping before the marker and turning.
Before starting 5 rows (RS) 15 / 16 / 16 / 17 / 17 / 17 / 18 / 18 / 18 repeats,
remove the outermost marker, and from the remaining marker count
5 / 5 / 5 / 5 / 5 / 5 / 5 / 7 / 7 stitches
(remember that SlP counts as one stitch) and place a new marker here.5 rows (RS) 15 / 16 / 16 / 17 / 17 / 17 / 18 / 18 / 18 repeats:
-
for sizes 42 / 44 / 50 / 52 sizes: knit 4 stitches; purl; then work a row in the OR pattern, stopping 1 stitch before the marker: knit and then turn;
-
for sizes 40 / 46 / 48 sizes: knit 4 stitches; purl; then work a row in the OR pattern, stopping 1 stitch before the marker: knit and then turn;
-
for sizes 54 / 56 sizes: knit 3 stitches; purl; 4 stitches; purl; then work a row in the OR pattern, stopping 2 stitches before the marker: 2 knit stitches and then turn.
6 rows (purl side) 15 / 16 / 16 / 17 / 17 / 17 / 18 / 18 / 18 repeats:
-
slip the first stitch from the left needle to the right and form a slipped stitch, then work a row in the pattern to the end of the row; KR.
Next, in 1 row (knit side) begin knitting the row in the pattern (purl and knit stitches, as the stitch lies, so you knit it) from the start to the end, with five slipped stitches that you will encounter along the way, you need to knit them in a specific way by inserting the right needle into the middle of the complex stitch, see video No. 8 at 8 minutes.
Cut the yarn to a length sufficient to complete the shoulder seam.
Transfer the stitches PSP onto a pin or an extra thread/needle and begin knitting the left front piece (hereafter — LFP).
SHOULDER SLOPE OF PSP
-
-
Transfer the PSP stitches onto a pin or an extra thread/needle and begin knitting the left front piece (hereafter — LFP).
COMMENCING KNITTING THE LEFT FRONT PIECE
First, we need to separate the LFP stitches from the back stitches (SP). To do this, transfer the LFP stitches from the additional needle onto the working needle: counting from the start of the row
49 / 54 / 54 / 59 / 59 / 64 / 68 / 73 / 73 stitches,
they include the placket stitches and
4 / 4.5 / 4.5 / 5 / 5 / 5.5 / 5.5 / 6 / 6 pattern repeats OR,
at the end the wrong-side stitches also should be included in the LFP stitches.
1 row (knit side) 14 / 15 / 15 / 16 / 16 / 16 / 17 / 17 / 17 repeats:
-
KR; then work a row in OR pattern, stopping 2 stitches before the end and then
-
for 40 / 42 / 44: purl; KR.
-
for 46 / 48 / 50 / 52 / 54 / 56 knit the stitches and turn.
2 rows (purl side) 14 / 15 / 15 / 16 / 16 / 16 / 17 / 17 / 17 repeats,
in this row you need to decrease 0 / 0 / 0 / 1 / 1 / 1 / 1 / 1 / 1 stitch:-
for 40 / 42 / 44 sizes: KR; then knit the row in the pattern; KR.
-
for 46 / 48 / 50 / 52 / 54 / 56 sizes: slip the first stitch from the left needle over the unknit stitch on the right needle;
-
then knit a row in the pattern; KR.
-
FORMING THE NECKLINE SHAPE OF THE LEFT FRONT PIECE
3 rows (knit side) 14 / 15 / 15 / 16 / 16 / 16 / 17 / 17 / 17 repeats:
-
for 40 / 42 / 44 sizes: KR; then knit the row in OR pattern; KR.
-
for 46 / 48 / 50 / 52 / 54 / 56 sizes: KR; then knit the row in OR pattern, stopping 2 stitches before: purl; KR.
From 4th row (IR) to 8th row (IR)
14 / 15 / 15 / 16 / 16 / 16 / 17 / 17 / 17 repeats:-
KR; then knit the row in pattern; KR.
Thus, when forming the neckline of the left front piece we have reduced
14 / 14 / 14 / 19 / 19 / 19 / 19 / 19 / 19 stitches
and now on the needles we have 28 / 33 / 33 / 33 / 33 / 38 / 38 / 43 / 43 stitches.In 9 rows (knit side)
14 / 15 / 15 / 16 / 16 / 16 / 17 / 17 / 17 repeats
we proceed to forming the shoulder slope.
BEGIN FORMING THE SHOULDER SLOPE OF THE LEFT FRONT PIECE
We will shape the shoulder slope with short rows, turning with the LFP after a certain number of stitches; each size may have a different number of stitches; in total there will be
5 / 5 / 5 / 5 / 5 / 6 / 6 / 5 / 5 turns.First, we will knit 9 rows (knit side) in a certain way so that the LFP is symmetrical to the PSP.
9 rows (knit side) 14 / 15 / 15 / 16 / 16 / 16 / 17 / 17 / 17 repeats:
-
for 42 / 44 / 50 / 52 / 54 / 56 sizes: KR; P; 4 knit; P; then knit the row in OR pattern; KR.
-
for 40 / 46 / 48 sizes: KR; P
-
Page 41
COMMENCING FORMING THE SHOULDER SLOPE OF THE LEFT FRONT PIECE
Forming the shoulder slope we will use short rows, turning with the LFP we will perform after a certain number of stitches, in each size there may be a different number of stitches, in total there will be
5 / 5 / 5 / 5 / 5 / 6 / 6 / 5 / 5 turns.First, we will knit 9 r (L R) in a certain way so that the LFP is symmetrical to the PSP.
9 r (L R) 14 / 15 / 15 / 16 / 16 / 16 / 17 / 17 / 17 repeats:
-
for 42 / 44 / 50 / 52 / 54 / 56 sizes: KR; P; 4 knit; P; then knit the row in OR pattern; KR.
-
for 40 / 46 / 48 sizes: edge stitch; purl; 4 knit stitches; yarn over; purl; yarn over; 2 knit stitches together with a left-leaning decrease; 2 knit stitches; purl; then knit a row following the OR pattern; edge stitch.
Before starting to knit 10 rows (purl row) pattern repeat: 14 / 15 / 15 / 16 / 16 / 16 / 17 / 17 / 17 stitches,
counting from the start of the row
5 / 5 / 5 / 5 / 5 / 5 / 5 / 7 / 7 stitches
and place a marker at this point.10 rows (purl row) pattern repeat: 14 / 15 / 15 / 16 / 16 / 16 / 17 / 17 / 17 stitches:
-
edge stitch; then knit a row according to the OR pattern;
-
stop before the marker and turn.
SHOULDER SLOPE OF THE LEFT FRONT BODICE (LSP)
The shoulder slope on the left front is formed similarly to the right side, but in mirror image.
The work is done with short rows, and turns are made on knit stitches.Number of turns:
-
5 / 5 / 5 / 5 / 5 / 6 / 6 / 5 / 5 — depending on size.
Before starting:
-
on the needles remains 28 / 33 / 33 / 33 / 33 / 38 / 38 / 43 / 43 stitches — this is the shoulder stitches of the LSP;
-
the stitches of the placket have already been removed earlier and do not participate in the work anymore.
1st Short Row (SR)
-
work the stitches according to the OR pattern;
-
do not knit to the end of the row a certain number of stitches (depends on size);
-
turn the knitting, turning on a knit stitch.
IR
-
slip the first stitch;
-
work the row in the pattern up to the turning point;
-
turn the knitting again.
Subsequent Short Rows
Each subsequent short row:
-
is worked 1–2 stitches further than the previous one;
-
turns are made always on knit stitches;
-
the turning stitches are neatly tightened so that no holes form.
Thus all of them are formed:
-
5 / 5 / 5 / 5 / 5 / 6 / 6 / 5 / 5 turning rows.
Finishing the Shoulder Slope of the LSP
After completing all short rows:
-
knit one full row according to the pattern, joining all sections;
-
stitches of the shoulder of the LSP are laid on a pin or an extra needle, similarly to the right side.
RESULT
In the end:
-
the shoulder slope of the LSP is fully formed;
-
the number of shoulder stitches corresponds to the data in the table:
28 / 33 / 33 / 33 / 33 / 38 / 38 / 43 / 43; -
both fronts (PSP and LSP) are symmetrical.
-
After finishing the shoulder slopes, the shoulder stitches of both fronts are taken onto a pin or additional needles. Next, we proceed to knitting the back. The back is knitted straight with the main pattern, without a placket. Knit to the height of the neckline, which corresponds to K – the height of the OR from the rib to the yoke: 40 / 43 / 43 / 47 / 47 / 47 / 51 / 51 / 51 cm or 11 + 6 / 12 + 6 / 12 + 6 / 13 + 6 / 13 + 6 / 13 + 6 / 14 + 6 / 14 + 6 / 14 + 6 repeats and rows according to the table. During knitting for sizes 42 / 44 / 46 / 48 / 50 / 52 / 54 / 56, the additional placket rows are no longer worked since there is no placket on the back. When the neckline height is reached, begin shaping the back neckline. To do this, close the central stitches in the amount of 47 / 37 / 47 / 47 / 57 / 47 / 57 / 47 / 57, then finish each side of the back separately. At the same time, shape the back shoulder slope with short rows, similar to the fronts. The number of back shoulder stitches corresponds to 28 / 33 / 33 / 33 / 33 / 38 / 38 / 43 / 43, the number of turns is the same as on the fronts. After finishing the shoulder slopes, move the back shoulder stitches onto a pin or additional needles. Then perform the shoulder seam, joining the shoulder stitches of the fronts and back with stockinette stitch or the method recommended in the master class. After finishing the shoulder seams, proceed to pick up stitches around the neckline for further finishing.
After finishing the shoulder seams, begin picking up stitches around the neckline. Pick up stitches on the right side of the bodice, evenly around the entire neckline, including the areas of the fronts and back, following the rule: from each edge stitch pick up 1 stitch, and at the curved areas distribute stitches evenly as needed so the edge does not draw in or ripple. The total number of placket stitches around the back neckline is 11 rows for all sizes. After picking up the stitches, proceed to finishing the neckline with a false crochet edge. Knit the first row wrong side, then make a row forming the fold, after which the edge is carefully folded inward and fixed with a crochet edge seam, while the stitches are not tightened, the edge remains elastic and even. After completing the false crochet edge, proceed to knitting the rib around the neckline. We knit the rib with the same needle size as used earlier for the garment rib; the rib height corresponds to the table and is 3 cm for all sizes. After achieving the required height, close the stitches with a flexible method using a tapestry needle, similarly to how the rib at the bottom of the garment is closed, so the neckline edge stretches well and does not deform during wear.
Next we move on to the sleeves. For the sleeve, pick up stitches along the armhole starting from the lowest point of the armhole. The number of stitches along the armhole to the shoulder and in total is 83 / 83 / 83 / 83 / 83 / 83 / 93 / 93 / 93. Distribute the stitches evenly, ensuring there is neither tightness nor excessive looseness. After picking up the stitches, knit the sleeve in the main pattern in the round or in stocking stitches depending on the chosen method. The number of repeats and rows before the ribbing is 11 + 7 / 11 + 7 / 11 + 7 / 12 + 7 / 12 + 7 / 12 + 7 / 12 + 7 / 12 + 7 / 12 + 7. After finishing the main pattern, proceed to knit the ribbing for the sleeve. The number of ribbing rows is 12 / 12 / 12 / 12 / 12 / 12 / 14 / 14 / 14, the number of rib stitches 83 / 66 for sizes up to 50 inclusive and 93 / 74 for sizes 52 / 54 / 56. After knitting the ribbing, bind off the sleeve stitches with an elastic method using a needle. If the sleeve was not knitted in the round, sew the sleeve seam with a stocking stitch.
- If the sleeve is knitted in the round, then after picking up the stitches along the armhole 83 / 83 / 83 / 83 / 83 / 83 / 93 / 93 / 93 stitches join the knitting in the round, place the beginning-of-round marker and knit the main pattern without the placket, strictly according to the OR chart. The number of repeats and rows before the ribbing corresponds to 11 + 7 / 11 + 7 / 11 + 7 / 12 + 7 / 12 + 7 / 12 + 7 / 12 + 7 / 12 + 7 / 12 + 7, while knitting, ensure the pattern does not shift and the repeats stay vertical. After knitting the given number of repeats, switch to the sleeve ribbing; the rib height is 3 cm for sizes 40 / 42 / 44 / 46 / 48 / 50 and 3.5 cm for sizes 52 / 54 / 56, the number of rib rows 12 / 12 / 12 / 12 / 12 / 12 / 14 / 14 / 14, the number of rib stitches 83 / 66 or 93 / 74 depending on size. After reaching the required height, bind off the stitches with an elastic method, not pulling the edge. We knit the second sleeve the same as the first, strictly observing symmetry and the number of rows. After finishing the sleeves, wash the garment in cool water with a mild detergent, gently wring without twisting and lay flat to dry according to the pattern, aligning the plackets, neckline, and sleeve length. After the garment is completely dry, the cardigan is ready to wear.
-
-
-
-
- After finishing the garment assembly, check the placement of the buttons using the markers set earlier, sew the buttons strictly opposite the buttonholes, not pulling the placket. The plackets should lie flat, without skewing, and the buttonholes should align in height. If necessary, lightly steam the garment through the fabric, avoiding pressing the iron against the fabric, especially when using kid mohair. The finished garment should correspond to the sizes in the table: full length of the cardigan 56 / 60 / 60 / 64 / 64 / 64 / 68 / 68 / 68 cm, shoulder width 15,5 / 18 / 18 / 18 / 18 / 20,5 / 20,5 / 23 / 23 cm, neckline depth 8 / 8 / 8 / 8 / 8 / 8,5 / 8,5 / 8 / 8 cm. After blocking the pattern opens up, the ribbing stabilizes, and the plackets do not stretch thanks to the additional rows. The cardigan is ready to wear.