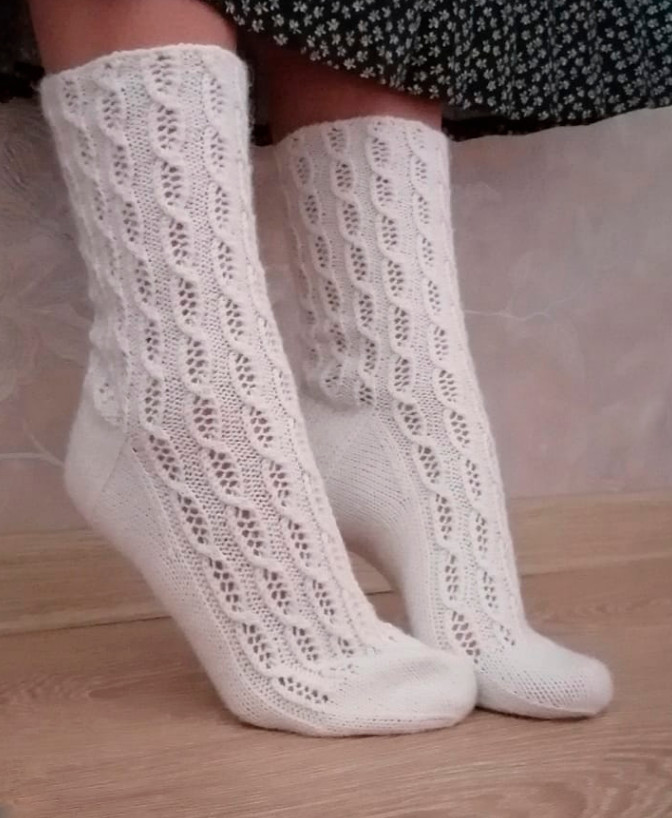
Socks on two needles without seams
Added: 07.08.2018 в 15:32 Views: 27845
Socks on two needles without seamsKlubokhttp://klubok.work/1/53/7287/Klubokhttps://klubok.work/css/image/top-logo-en.png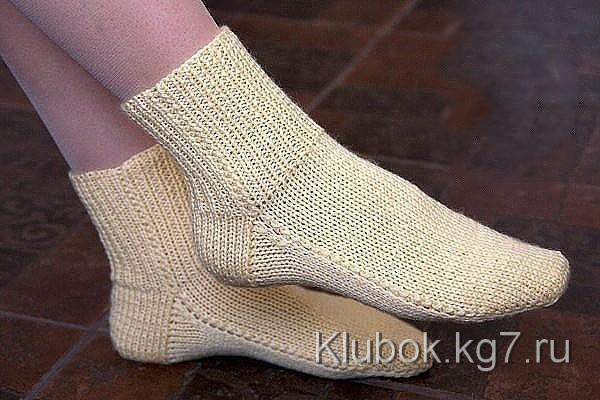
A simple way of knitting. We present to your attention a simple way to knit socks on two needles. The socks fit well on the foot and are comfortable to wear. This model of socks has a square (straight) heel. Such a heel allows you to knit socks for any foot arch: from low to high. Knitting socks on two needles is loved by beginner knitters, as this method is simple and does not require much experience. However, if you are picking up the needles for the first time, we recommend watching knitting lessons for beginners, where the basics of knitting with needles are shown. Stitch calculation To calculate the stitches, the following measurements are needed: foot length and foot circumference at the instep. The foot circumference at the instep can be determined by a calculation method: it is equal to the foot length minus 1 cm for a wide foot or minus 2 cm for a narrow foot. The number of stitches to cast on the needles is equal to the foot circumference at the instep multiplied by the horizontal knitting density divided by 2 (since we first knit half of the sock). We get: (23 x 2.2):2 = 25. Work process Cast on 25 stitches and knit the cuff to the desired width (11 cm) in a 1x1 ribbing. Next, we move on to knitting the heel. Knit the heel in stockinette stitch. The height of the heel is usually 1/4 of the foot length. The height of the heel can also be determined as follows: the number of rows should be equal to the number of stitches on the needle minus 2 if the number is even and minus 3 if the number is odd. We get: 25 - 3 = 22 rows. Knit 21 rows in stockinette stitch, and in the 22nd row, we start to shape the heel cup. Mentally divide the stitches into 3. We get 8 - 9 - 8 stitches. If there is 1 stitch left - join it to the middle part. If 2 - add one to each of the side parts. Starting from the 22nd row, decrease the stitches. Knit 8 stitches from the first part, then 8 stitches from the second (middle) part, and the 9th stitch from the second part is knitted together with the stitch from the third (side) part as a purl stitch. Turn the work to the front side. Slip the first stitch, knit 8 stitches from the middle part, and the 9th stitch is knitted together with the stitch from the side part as a knit stitch. Turn the work again, slip the first stitch, knit 8 stitches from the middle part, and the 9th stitch is knitted together with the stitch from the side part as a purl stitch. Continue like this, knitting only the stitches from the middle part, joining the stitches from the side parts until all of them are joined. There should be 9 stitches left on the needle. Now we proceed to knitting the middle lower part of the sock. After knitting the heel, the number of stitches is greater than calculated. The extra stitches should be decreased. The section where we decrease the stitches is called the instep wedge. The knitting scheme for the instep wedge is universal. Row 1: pick up stitches from the left part from the edge stitches (11 stitches). You can pick up the edge stitches either through both walls or through one wall facing the front side. Row 2: knit purl stitches. Pick up stitches (11 stitches) from the right part of the heel. Rows 3, 5, 7: at the end of the row before the edge stitch, knit 2 stitches together knitwise with a left-leaning decrease; Rows 4, 6, 8: at the end of the row before the edge stitch, knit 2 stitches together purlwise. Thus, we have decreased the stitches on the instep wedge by knitting 2 stitches together at the end of each row, and the calculated number of stitches remains on the needle - 25. Note: if you have a high foot arch, you can knit 2 additional rows without decreases before the two decrease rows. This will provide more freedom in the area of the foot arch. At the same time, you can adjust the height of the arch: you can knit 2 additional rows only before the first decreases, before the first and second, or before all three. The knitting scheme for the high foot arch wedge: Row 1: pick up stitches from the left part from the edge stitches (11 stitches). You can pick up the edge stitches either through both walls or through one wall facing the front side. Row 2: knit purl stitches. Pick up stitches (11 stitches) from the right part of the heel. Rows 3, 7, 11: knit stitches; Rows 4, 8, 12: purl stitches; Rows 5, 9, 13: at the end of the row before the edge stitch, knit 2 stitches together knitwise with a left-leaning decrease; Rows 6, 10, 14: at the end of the row before the edge stitch, knit 2 stitches together purlwise. Continue to knit the middle lower part of the sock up to the toe. You can try on the sock and knit until the end of the little toe. You can determine the calculation method: the toe is approximately equal to the length of the heel cup. Subtract the length of the toe and the length of the cup (5 + 5 = 10) from the foot length (24), and you get that the middle part is equal to 14 cm or 44 rows. Next, knit the toe. Decrease the stitches as you did for the instep wedge, knitting 2 stitches together before the edge stitches at the end of each row. When there is 1/3 of the stitches left on the needle (9), pick up stitches from the edge stitches. In the knit rows, knit the edge stitch as a knit stitch, and in the purl rows, as a purl stitch. Pick up the wall of the edge stitch facing the purl side. The first stitch of the row is not slipped as usual, but knitted as a knit stitch in knit rows and as a purl stitch in purl rows. This first stitch should be knitted tighter. Continue to pick up stitches until the calculated number of stitches (25) remains on the needle. The upper middle part of the sock is also knitted by picking up stitches from the edge stitches, but to keep the number of stitches calculated, at the end of each row, decrease the stitches in the same way as before, knitting 2 stitches together at the end of each row. Important: the corner stitch should be knitted through both walls so that the hole does not become too large. In the ribbing section, we knit the edge stitches differently. Now we pick up the wall of the edge stitch facing the front side, and the edge stitch will be knitted together with the last stitch of the row. The first stitch of the row is knitted in such a way that the ribbing pattern continues - as a purl stitch. The last stitch of the row is transferred to the right needle, the edge stitch is picked up with the left needle, and the last stitch of the row is returned to the left needle. Knit 2 stitches together according to the ribbing pattern: as a knit or purl stitch. This way, the extra stitch is decreased, and the calculated number of stitches remains on the needle. The second sock is knitted in the same way.