Home slippers with knitting needles
Added: 24.09.2018 в 02:45 Views: 28426
Home slippers with knitting needlesKlubokhttp://klubok.work/1/53/7510/Klubokhttps://klubok.work/css/image/top-logo-en.png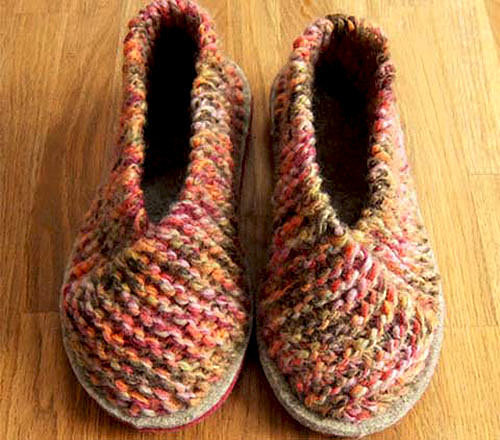
Simple home slippers with a felt sole that even beginners can knit in just a few hours! YOU WILL NEED Yarn (51% wool, 49% polyacrylic) 50 g of melange for sizes smaller than 35, 100 g for sizes 35-40; 150 g for slippers size 41 and above; knitting needles #5.5; 2 felt insoles of the required size with punched holes for each slipper: one simple and the other with latex coating on the outer side. ATTENTION! You can use any other sufficiently warm and loose yarn, but then you will need to determine the necessary number of stitches for knitting a strip of the required width yourself. KNITTING DENSITY 13 st. x 24 rows = 10 x 10 cm WORK EXECUTION STEP 1 Cast on stitches: 11 st. for children's slippers size 19-34, 12 st. for slippers size 34-39, 13 st. for sizes 40-44, and 14 st. for larger sizes. If you want deeper slippers, you can adjust the width of the knitted strip along the leg. Then knit in garter stitch straight. The number of rows in the finished strip should be twice the number of punched holes in the insole, that is, if you have, for example, 68 holes in the insole, you need to knit a strip with a length of 136 rows. After finishing the knitting, leave a thread about a meter long to sew the strip to the sole. You can also use another strong thread of a suitable color.

STEP 2 Start assembling the slipper from the toe, first sewing the part of the strip with the leftover thread to the simple felt sole. First, you need to sew the part of the strip that will be the outer side of the slipper. There should be 1 stitch of garter stitch for each hole in the sole! Here, you don't need to worry about the neatness of the stitches, as they will be covered by the second sole made of felt.

STEP 3 When you reach the first stitch (= to the toe of the slipper), sew the short side of the slipper to the sole, moving in the same direction, and then carefully attach it to the edge. Carefully hem the short side of the strip that ended up on the inside. Using wear-resistant threads or the same yarn from which the slippers are knitted, carefully and tightly sew the second insole, connecting it to the first hole by hole. You can use any type of stitch that seems appropriate for sewing. In this tutorial, the "back stitch" was used.


STEP 4 This is what the finished slippers look like from the inside and outside.

You can also use solid yarn, and decorate the finished slippers with buttons, knitted flowers, etc.
Category: Slippers, socks, knee socks