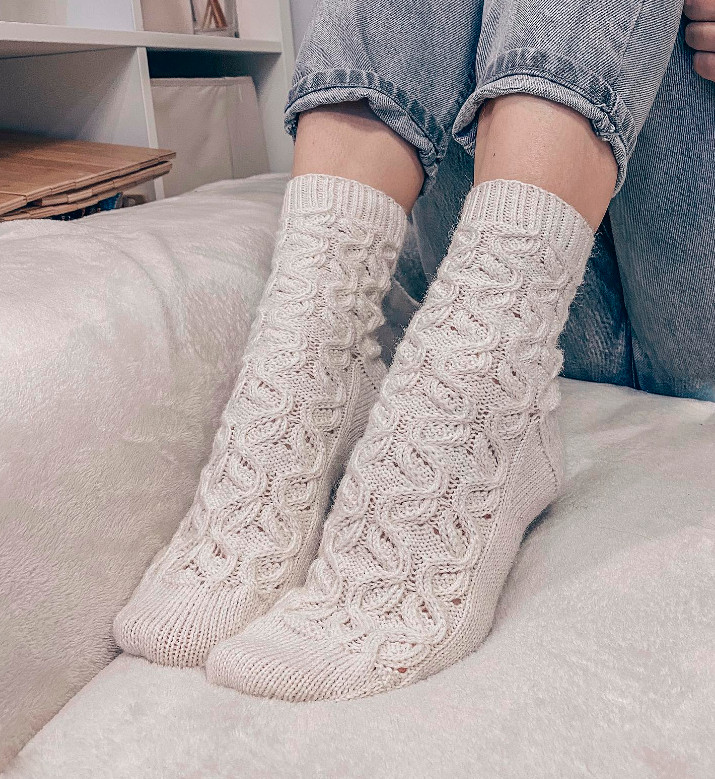
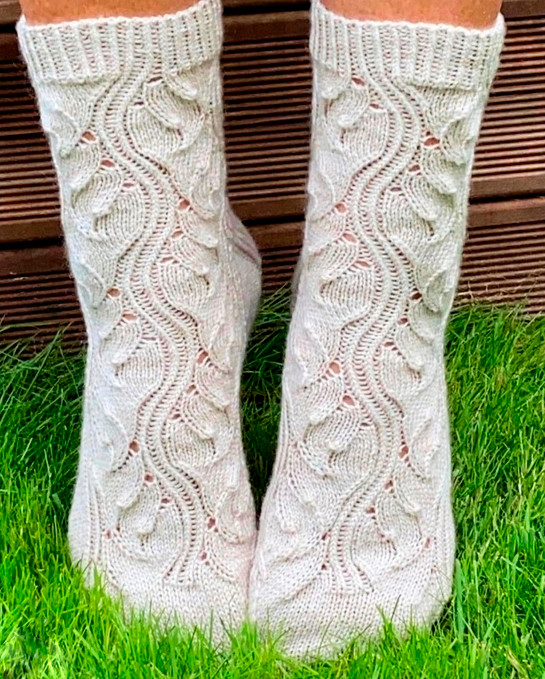
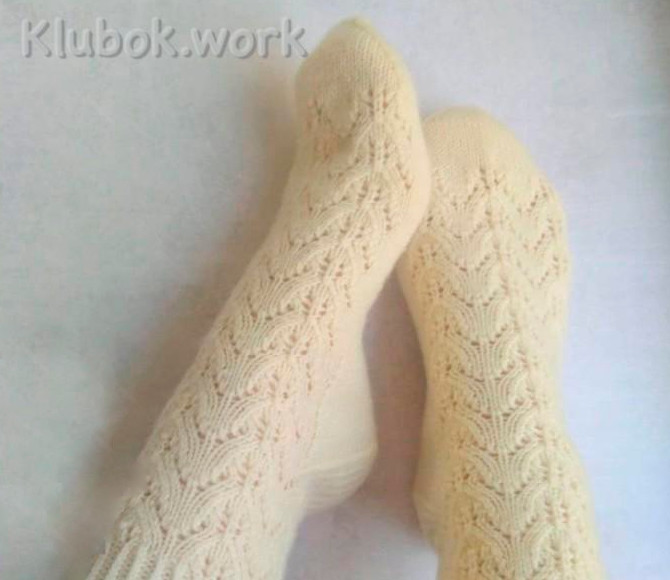
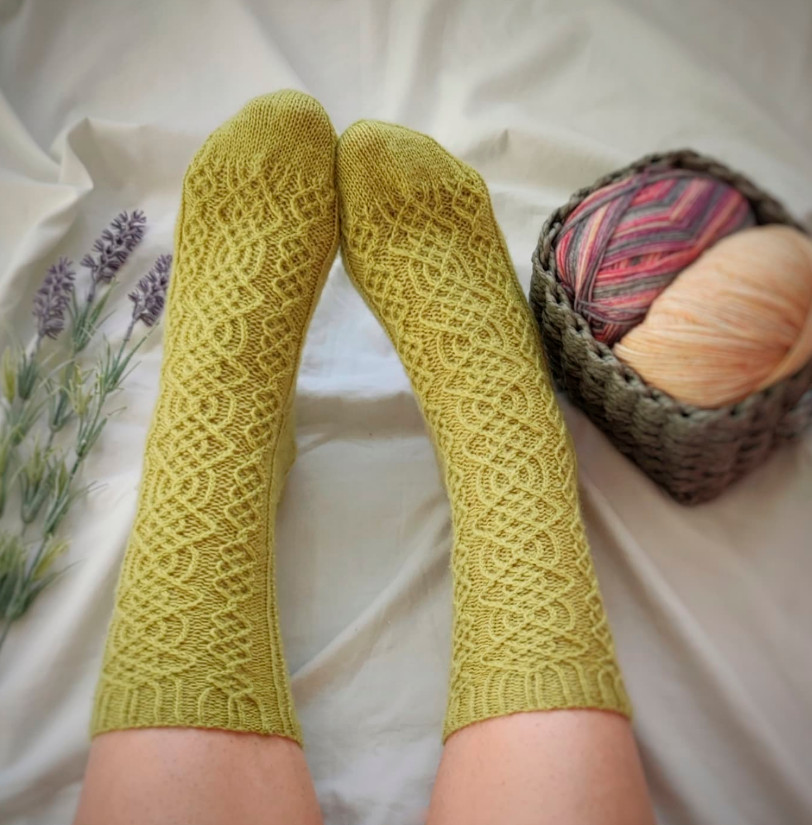
Knitted socks
Added: 16.12.2025 в 18:06 Views: 672
Knitted socksKlubokhttp://klubok.work/1/53/9334/Klubokhttps://klubok.work/css/image/top-logo-en.png
The patterned socks are knitted in the round on two needles with a long cable using the Magic Loop method (not simultaneously).
Therefore, if you are knitting on five needles, be careful
Necessary tools and materials
Needles with a cable length of 80-100 centimeters (the needle size is given below in the "Yarn" section);
Scissors;
Knitting needle;
Marker (optional);
Measuring tape for taking measurements (gauge);
Sock blockers for drying socks (they can be purchased in yarn stores or made yourself. Sock blockers are needed to give the knitted sock a proper, smooth shape (blockers give socks a commercial look), but this is not an essential "tool".
Yarn
1. Classic sock yarn. Note that at the same yardage (200-210 meters per 50 grams) it splits into two variants by composition and texture (+20-30% polyamide for durability of socks).
• classic yarn: sheep wool (for example, classic Regia, Gruendl Hot Socks), wool+yak (Regia Premium Merino yak), Austermann Step, Lana Grossa Meilenweit, merino wool Lana Grossa Meilenweit Merino, Lamana Merida.
Purl density after washing: 32 stitches - 10 cm.
Needles 2-3 mm.
• fine yarn: merino (Alegria Manos Del Uruguay); merino+silk (Regia Premium Silk), merino+cashmere (Gruendl Hot Socks Pearl). Hand-dyed merino, merino (Coopknits Sock Yeah), merino+angora (Casagrande Ampezzo), merino (Magic Infinity Design), merino (Arwetta Filcolana).
Purl density after washing:
Density 34 stitches - 10 cm.
Needles 1.75mm-2.5mm.
Consumption from 70 grams for adult sizes.
• Rico Superba Premium 4-ply, Rico Superba Premium 4-ply Tweed, Casagrande Ampezzo,
2. Sisu sandnes garn, Drops Nord yardage 50 grams - 175 meters, consumption: from 70 grams.
Purl density after washing:
30 stitches - 10 cm
Needles: 2.5-3.5 mm.
Consumption from 70 grams for adult sizes.
3. Rosarios 4 Meia, yardage 50 grams – 185 meters, consumption from: from 70 grams.
Purl density after washing:
29 stitches - 10 cm
Needles: 2.5-3.5 mm.
Consumption from 70 grams for adult sizes.
If you make the ribbing, heel, and toe in another color, you can take 50
grams of one color and 50 of the other, or use leftovers.
Swatch
The first thing to do before starting work according to the pattern is to knit a swatch and achieve the recommended gauge above. Since the garment is knitted in the round, it is best to knit the swatch in the round as well. Cast on 45-50 stitches, join the knitting in the round, and knit stockinette to a height of about 6 cm. Block the swatch (hand wash at a temperature not higher than 30 degrees with shampoo or a specialized product, and let dry). Using this swatch, determine how many stitches you get per 10 cm. If you have more stitches than indicated in the description, you need larger needles; if fewer, smaller.

Leg
We start knitting the sock directly with the pattern (no ribbing). Classic method: cast on 60/72 stitches + 1 stitch for joining in the round.
Next, all calculations will proceed in this order: the first number is for 60 stitches / the second for 72. If there is only one number, it means it is suitable for all sizes. You can cast on stitches on one needle, but loosely, or firmly on two. Joining in the round: move the cast-on stitches to the middle of the cable, count from the last cast-on stitch half the stitches and at this point make a bend in the cord and pull out part of the cord. Move both parts of the knitting toward the ends of the needles, from the left needle to the right (the right needle – from which the tail dangles) transfer by hand one stitch, slightly pull the left needle out of the stitches so it’s convenient to work, look at the right needle – you see one stitch moved from the left needle, and the last cast-on stitch, slide the last cast-on stitch from the left onto the right needle onto the TRANSFERRED stitch! Joined in a circle, return the left needle back into the knitting (move the stitches closer to the tip of the needle), pull out the right needle (this will be the needle you knit with). At this point there will be the start of the round (for convenience you can hang a marker). The first round is all knit stitches

![]() purl
purl
![]()
knit
 – cross 4 stitches to the left (knit 4), slip 2 stitches onto an extra needle and hold in front of the work, knit the next 2 stitches, return the 2 slipped stitches from the extra needle to the left needle and knit them 2 knit.
![]() yarn over
yarn over
 2 stitches together to the left

2 stitches together to the right
Yarn overs in the pattern – wrap the working yarn over onto the right needle away from you.
Decreases in the pattern: Two stitches together one knit with a left-leaning decrease – transfer the two stitches to the right needle, turning them as shown in the photo (the other wall facing forward), return them to the left needle and knit them together through the back loop
Two stitches together one knit with a right-leaning decrease – knit the two stitches together one knit as they lie on the needle, without turning
Turn for the 60-stitch heel (heel 29 stitches):
Row 1 (knit) – turn the knitting, slip the first stitch (yarn in front), 16 knit, 2 together knit with a left-leaning decrease, 1 knit, left side remains 9 stitches, turn the knitting;
Row 2 (purl) – slip the first stitch (yarn in front), 6 purl, 2 together one knit, 1 purl, (left side remains 9 stitches) turn the knitting;
Row 3 (knit) – slip the first stitch (yarn behind), 7 knit, 2 together knit with a left-leaning decrease (turn only the second stitch, the first is already turned, knit them together), 1 knit, turn the knitting;
Row 4 (purl) – slip the first stitch (yarn in front), 8 purl, 2 together one purl, 1 purl, turn the knitting;
Row 5 (knit) – slip the first stitch (yarn at the back), 9 knit, 2 together knitwise with a left-leaning decrease (we only turn the second stitch, the first is already turned, knit them together), 1 knit, turn the work;
Row 6 (purl) – slip the first stitch (yarn in front), 10 purl, 2 together one purl, 1 purl, turn the work;
Row 7 (knit) – slip the first stitch (yarn at the back), 11 knit, 2 together knitwise with a left-leaning decrease (turn only the second stitch, the first already turned, knit them together), 1 knit, turn the work;
Row 8 (purl) – slip the first stitch (yarn in front), 12 purl, 2 together one purl, 1 purl, turn the work;
Row 9 (knit) – slip the first stitch (yarn at the back), 13 knit, 2 together knitwise with a left-leaning decrease (turn only the second stitch, the first already turned, knit them together), 2 knit, turn the work;
Row 10 (purl) – slip the first stitch (yarn in front), 15 purl, 2 together one purl, 2 purl, turn the work;
Row 11 (knit) – slip the first stitch (yarn behind), 18 knit (there should be 19 stitches on the needles).
Turning the heel for 72 stitches (heel – 35 stitches)
Row 1 (knit) – turn the work, slip the first stitch (yarn in front), 19 knit, 2 together knitwise with a left-leaning decrease, 1 knit, 12 stitches remain on the left, turn the work;
Row 2 (purl) – slip the first stitch (yarn in front), 6 purl, 2 together one purl, 1 purl, (12 stitches remain on the left) turn the work;
Row 3 (knit) – slip the first stitch (yarn at back), 7 knit, 2 together knitwise with a left-leaning decrease (turn only the second stitch, the first already turned, knit them together), 1 knit, turn the work;
Row 4 (purl) – slip the first stitch (yarn in front), 8 purl, 2 together one purl, 1 purl, turn the work;
Row 5 (knit) – slip the first stitch (yarn at back), 9 knit, 2 together knitwise with a left-leaning decrease (turn only the second stitch, the first already turned, knit them together), 1 knit, turn the work;
Row 6 (purl) – slip the first stitch (yarn in front), 10 purl, 2 together one purl, 1 purl, turn the work;
Row 7 (knit) – slip the first stitch (yarn behind), 11 knit, 2 together knitwise with a left-leaning decrease (turn only the second stitch, the first already turned, knit them together), 1 knit, turn the work;
Row 8 (purl) – slip the first stitch (yarn in front), 12 purl, 2 together one purl, 1 purl, turn the work;
Row 9 (knit) – slip the first stitch (yarn behind), 13 knit, 2 together knitwise with a left-leaning decrease (turn only the second stitch, the first already turned, knit them together), 1 knit, turn the work;
Row 10 (purl) – slip the first stitch (yarn in front), 14 purl, 2 together one purl, 1 purl, turn the work;
Row 11 (knit) – slip the first stitch (yarn behind), 15 knit, 2 together knitwise with a left-leaning decrease (turn only the second stitch, the first already turned, knit them together), 1 knit, turn the work;
Row 12 (purl) – slip the first stitch (yarn in front), 16 purl, 2 together one purl, 1 purl, turn the work;
Row 13 (knit) – slip the first stitch (yarn at back), 17 knit, 2 together knitwise with a left-leaning decrease (turn only the second stitch, the first already turned, knit them together), 1 knit, turn the work;
Row 14 (purl) – slip the first stitch (yarn in front), 18 purl, 2 together one purl, 1 purl, turn the work;
Row 15 (knit) – slip the first stitch (yarn at back), 20 knit (there should be 21 stitches on the needles).
Raising stitches from the heel wall
If the heel was a different color, to switch to the main color, start picking up stitches with the main color yarn.
From the right side, on the left heel wall: one stitch hangs on the working needle, the next is the first edge loop, and behind it the second; between them find the bridge (see video), insert a needle into it and knit a new stitch with the working yarn. This way we pick up one stitch along the left side from each bridge (since our edge stitches are 15/18, we pick up 15/18 stitches).
Divide the knitting into three parts: the left heel wall, the pattern, and the right heel wall. On the patterned parts, knit the pattern according to Chart No. 2.
To avoid confusion, you can separate the pattern on both sides with markers.
Below is the chart for the patterned parts; after the chart is the textual description of the knitting process.
Chart 2 for 60 stitches

Chart 2 for 72 stitches

Row 1:
Left heel wall – pick up 15/18 stitches from the left side of the heel.
If 15/18 stitches are too few and a hole appears when joining with the pattern,
pick up one more stitch from this side.
Pattern (before the toe is worked according to Chart No. 2) – *2 purl, 2 together knitwise to the right, 1 yarn over, 2 knit* – repeat 4/5 times, 2 purl;
Right heel wall (see video) – pick up 15/18 stitches from the other
side of the heel.
From the stitches on the left cable count 10/11 stitches; at this point make a loop in the cable, pull it out and knit these 10/11 stitches with the knit stitch. This is where the row will begin (see video).
Now we have completed knitting the first row, together with picking up stitches.
Row 2 (even):
Left heel wall – all stitches knit up to the first stitch where the pattern begins, you can place a marker to separate the pattern from the heel wall.
Pattern (Row 2 according to Chart 2) – *2 purl, 2 knit, 1 yarn over, 2 together knitwise to the left* – repeat 4/5 times, 2 purl;
Right heel wall – all stitches knit; on this side you can also separate the pattern from the heel wall with a marker.
Row 3 with decreases (odd):
Left heel wall – all stitches knit, not closing 2 stitches before the pattern starts - 2 together knitwise with a right-leaning decrease.
Pattern (Row 3 according to Chart 2) – *2 purl, 2 together knit to the right, 1 yarn over, 2 knit* – repeat 4/5 times, 2 purl;
Right heel wall – after the last pattern stitch 2 together knitwise with a left-leaning decrease, all stitches knit to the end.
Row 4 without decreases (even):
Left heel wall – all stitches knit up to the first stitch where the pattern begins, you can place a marker to separate the pattern from the heel wall.
Pattern (Row 4 according to Chart 2) – *2 purl, 2 knit, 1 yarn over, 2 together knit to the left* – repeat 4/5 times, 2 purl;
Right heel wall – all stitches knit; on this side you can also separate the pattern from the heel wall with a marker.
Row 5 with decreases (odd):
Left heel wall – all stitches knit, not binding off 2 stitches before the pattern starts - 2 together knitwise with a right-leaning decrease.
Pattern (Row 5 according to Chart 2) – *2 purl, 2 together knit to the right, 1 yarn over, 2 knit* – repeat 4/5 times, 2 purl;
Right heel wall – after the last pattern stitch 2 together knitwise with a left-leaning decrease, all stitches knit to the end.
Row 6 without decreases (even):
Left heel wall – all stitches knit up to the first stitch where the pattern begins, you can place a marker to separate the pattern from the heel wall.
Pattern for 60 stitches (Row 6 according to Chart 2) – *2 purl, 2 knit, 1 yarn over, 2 together knit to the left, 2 purl, 4 stitches crossed to the left* – repeat 2 times, 2 purl, 2 knit, 1 yarn over, 2 together knitwise to the left, 2 purl;
Pattern for 72 stitches (Row 6 according to Chart 2) – *2 purl, 2 knit, 1 yarn over, 2 together knitwise to the left, 2 purl, 4 stitches crossed to the left* – repeat 3 times, 2 purl;
Right heel wall – all stitches knit; on this side you can also separate the pattern from the heel wall with a marker.
Next we continue knitting:
• pattern according to Chart 2 for the next row (7th row):
pattern continuation (text) below on page 23;
• on the heel walls, in every other row continue decreases in all odd rows, in even rows – all stitches knit with no decreases. Decreases: on the left heel wall, not reaching two stitches to the pattern, knit two stitches together with a right-leaning decrease; on the right heel wall, the first two stitches are knit together with a left-leaning decrease.
Line of decreases on the left heel wall Line of decreases on the right
heel wall. On the heel walls, decrease until the total number of stitches on the needles returns to the original number of stitches of the pattern up to the heel (for size 60 stitches decrease to 60, 72 to 72). At this moment you can try the sock on your foot, and if you have too many or too few stitches, you can decrease or, conversely, remove the last decreases so that the sock fits the foot more loosely or more snugly, if the leg is narrow and there is a small rise.
Rise. This can regulate the fit of the sock on the foot (some like the sock to fit snugly on the foot, some loosely).
After the last decrease, continue knitting the pattern according to Scheme 2, and the heel wall stitches in stockinette without decreases to the required length.
Note: With a certain number of stitches, if in every odd row you make two decreases, you cannot obtain an even number of stitches. In this case, make the last decrease only on one side of the heel.
Carefully recalculate the stitches in this place to check whether their number is indeed even. Reaching the toe by mistake will require re-knitting to correctly distribute the stitches=). Next - continue knitting the non-decreased portion of the instep stitches, and the pattern according to Scheme No. 2 to the required length:
• subtract from the required foot length 5.5 cm (toe length); for children's sizes 4 cm - that is how many centimeters we need to knit before the decreases start. The foot length can be measured on your own leg (place your foot on a sheet of paper, trace with a pen and measure the length from the end of the big toe to the protruding part of the heel) or
look at the size chart at the beginning of the file. The pattern can be finished in any row (it's pretty if
the last row is 6 or 12 according to Scheme 2). If for the required size you don't have enough toe length with the pattern, then after finishing the pattern you need to knit a few more rows of knit stitches.
• put the sock on the foot when the little toe has just hidden, start the toe
• approximate guideline for length and number of repeats:
Size 38-40 = 6 full repeats + 3 rows of knit stitches after
the heel for classic sock yarn/5 full repeats + 6 rows
of the sixth repeat for yarn 175 meters – 50 grams;
7th row according to Scheme 2 – *2 purl, 2 together knitwise to the right, 1 yarn over, 2 knit.* – repeat 4/5 times; 2 purl;
8th row according to Scheme 2 – *2 purl, 2 knit, 1 yarn over, 2 together knitwise to the left* – repeat 4/5 times, 2 purl;
9th row according to Scheme 2 – *2 purl, 2 together knitwise to the right, 1 yarn over, 2 knit.* – repeat 4/5 times, 2 purl;
10th row according to Scheme 2 – *2 purl, 2 knit, 1 yarn over, 2 together knitwise to the left* – repeat 4/5 times, 2 purl;
11th row according to Scheme 2 – *2 purl, 2 together knitwise to the right, 1 yarn over, 2 knit.* – repeat 4/5 times, 2 purl;
12th row according to Scheme 2 for 60 stitches – *2 purl, 4 stitches cross to the left, 2 purl, 2 knit, 1 yarn over, 2 together knit to the left* – repeat 2 times, 2 purl, cross 4 stitches to the left, 2 purl;
12th row according to Scheme 2 for 72 stitches – *2 purl, 4 stitches cross to the left, 2 purl, 2 knit, 1 yarn over, 2 together knit to the left* – repeat 3 times, 2 purl;
Toe
The toe section describes the principle by which you can knit a toe with any number of stitches.
1. Knit one row in stockinette stitches, distributing the stitches so that on each needle there is an equal number of stitches (the start of the row does not shift, it stays in the middle of the heel).
2. Divide the stitches on each needle in half. If it divides evenly, then in the middle there will be a «line» of two knit stitches (as in the photo on the left), if there is a remainder, then there will be one. For example, 32/2 = 16+16, so in the middle there will be two knit stitches (31/2 = 15+15+1, in the middle between decreases there will be 1 knit stitch).
You can place markers on both sides of the line to not lose them. The "line" is always knitted with knit stitches;
3. Not approaching the "line," we knit all the stitches in knit, decrease to the right (two stitches together with a right-leaning), "line", decrease to the left (two stitches together with a left-leaning), knit to the end of the first needle
On the second – similarly.
4. Three rows of knit stitches without decreases;
5. Repeat step 3;
6. Two rows of knit stitches without decreases;
7. Repeat step 3;
8. One row of knit stitches without decreases;
9. Repeat step 3;
10. One row of knit stitches without decreases;
11. Repeat step 3;
12. One row of knit stitches without decreases;
13. Repeat step 3;
15th row: Repeat step 3 in each row until there are 8 stitches left on each needle. If on each needle the number of stitches is odd, knit until there are 9 stitches left on each needle. Then: on the first needle - 3 knit, two stitches together with a right-leaning, 4 knit; on the second needle - 3 knit, two stitches together with a left-leaning, 4 knit..
16. When there are 8 stitches on each needle, knit: 4 knit stitches, pull the right (working) needle to the left and distribute the stitches to 8 stitches on each needle - we shifted the start of the row by four stitches
Next we will seam the toe of our sock with a stockinette seam.
Stockinette seam (see video)
Look at the sock from the top to see the pattern. The working thread hangs from the top (far) needle.
Cut the thread about 20 cm long and thread it into the needle (photo on the right):
1. insert the needle into the first stitch on the bottom (near) needle from front to back, drop it off the needle, then insert the needle into the next stitch on the bottom (near) needle from back to front, pull the thread (three photos below);
2. insert the needle into the first stitch on the top (far) needle from back to front, drop it off the needle, insert the needle into the next stitch from front to back, pull the thread; Repeat steps 1-2 until the end.
Weave in the remaining ends on the wrong side of the sock.
Wash the finished socks with shampoo or a wool-specific product at a temperature not higher than 30 degrees. Then rinse them, wrap in a towel (it will absorb excess moisture). It is recommended to dry on sock blockers.
Most sock yarns, due to the presence of polyamide, can be machine washed, so check the yarn label; it should indicate this.