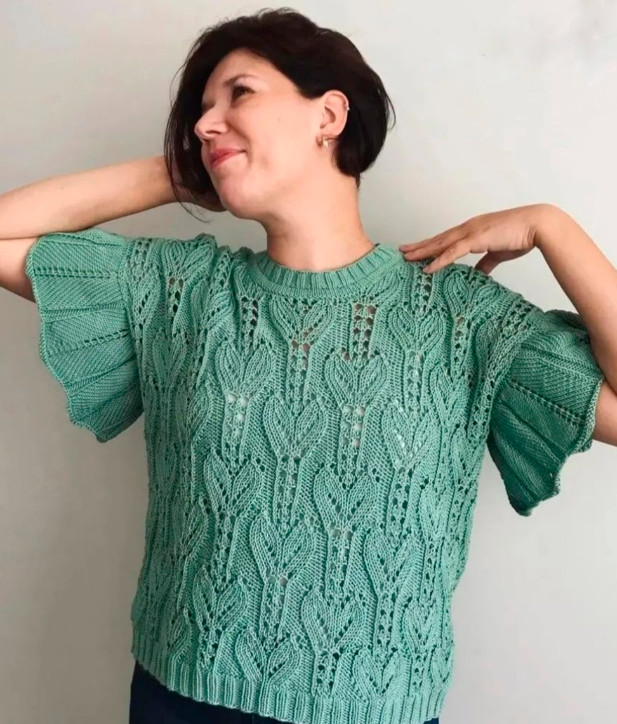
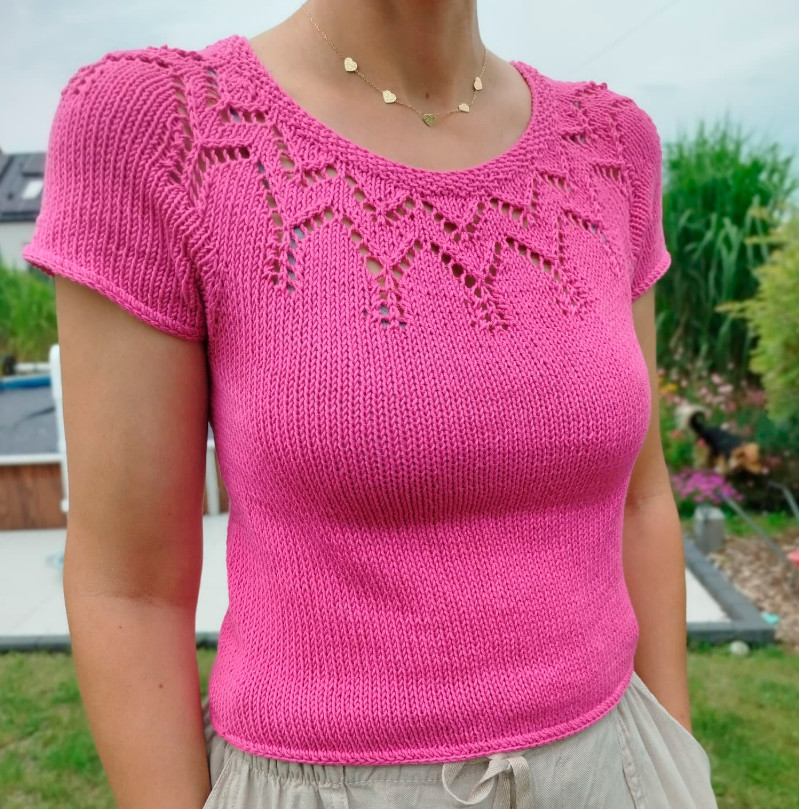
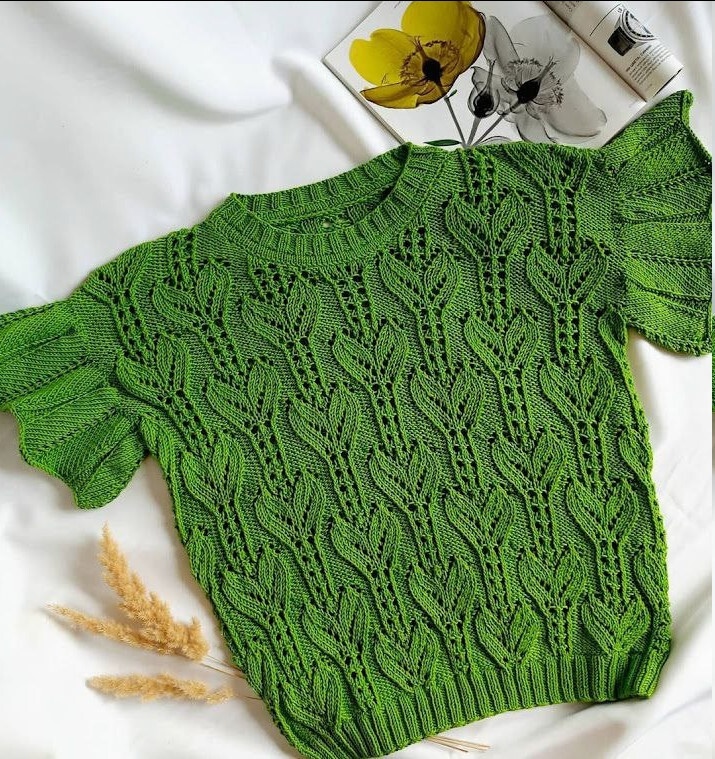
Green top with a lace pattern.
Added: 30.06.2025 в 22:13 Views: 2324
Green top with a lace pattern.Klubokhttp://klubok.work/1/82/8862/Klubokhttps://klubok.work/css/image/top-logo-en.png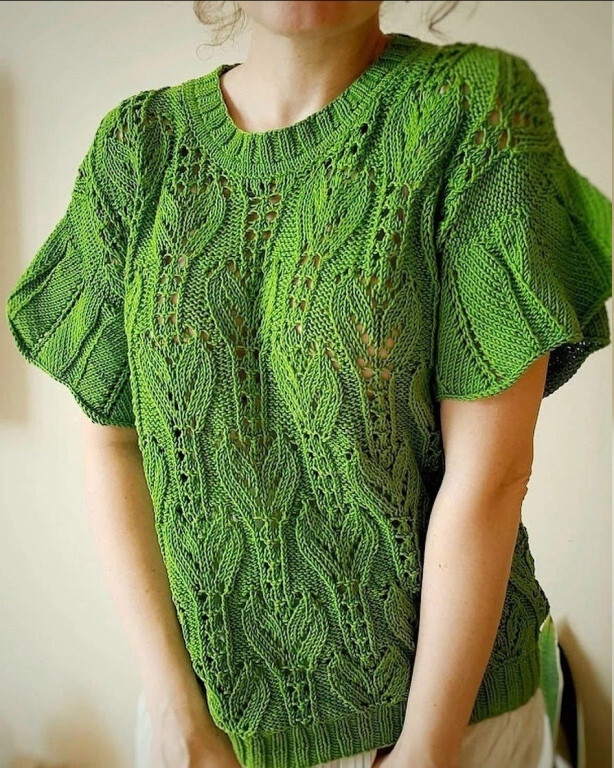
We knit the T‑shirt from bottom to top in the round up to the armholes, then switch to turning (flat) knitting, sew the shoulders, perform the neckline garter stitch, and knit puff sleeves.
Under the weight of the cotton, the yarn stretches a bit in length when worn, so we do not make a full pattern, but adjust the calculations considering the stretch.
Difficulty level: intermediate.
For knitting you will need:
-
Yarn: Hawaii from Seam (Hawai Seam) – 50 g/120 m (100% mercerized, Egyptian cotton). Knit with a single strand.
Consumption: XS – 9 skeins, S-M – 10 skeins, L-XL – 12 skeins. You can use any other cotton with the same length and similar twist. -
Circular needles: No. 3 for ribbing and No. 3.5 for the main fabric (cable 60 cm for the body and 40 cm for the ruffles).
-
Markers to denote pattern repeats and neckline stitches (4 pcs).
-
Row counter (optional).
-
Thick needle for seams and weaving in ends.
-
Crochet hook for closing off the puff sleeve stitches.
The description is designed for height 168–170 cm. If your height differs, adjust the length up to the armholes. Changing the length affects yarn consumption.
Gauge for the main pattern (turning rows) after blocking, 10×10 cm:
20 stitches × 30 rows.
SIZE XS
With needles size 3, cast on 180 sts + 1 for joining in the round.
Check that it does not twist, join, and mark the beginning of the round.
On needles, 180 stitches.
Knit rib 2×2 (2 knit, 2 purl) — 16 rows = 5 cm.
Next switch to needles No. 3.5 and knit 1 row in knit stitches, evenly increasing 2 stitches using a wrap method.
Total 182 stitches.
Then knit according to the pattern: the second setup row (from the 7th stitch), 7 repeats in width.
Knit in the round until the start of the armholes — 31 cm (2 full repeats + 12 rows).
For pattern symmetry, start not from the 1st stitch, but from the 7th.
Example of the first repeat (26 sts):
3 purl, k2tog with a right-leaning decrease, yarn over, 3 knit, yarn over, ssk, 7 purl, twisted knit, yarn over, 3 together with the central knit, yarn over, twisted knit, 4 purl.
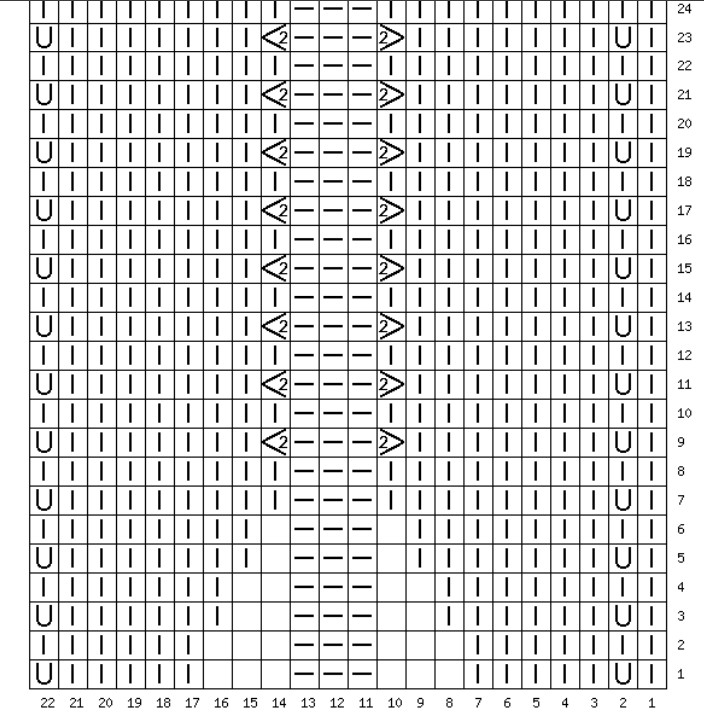
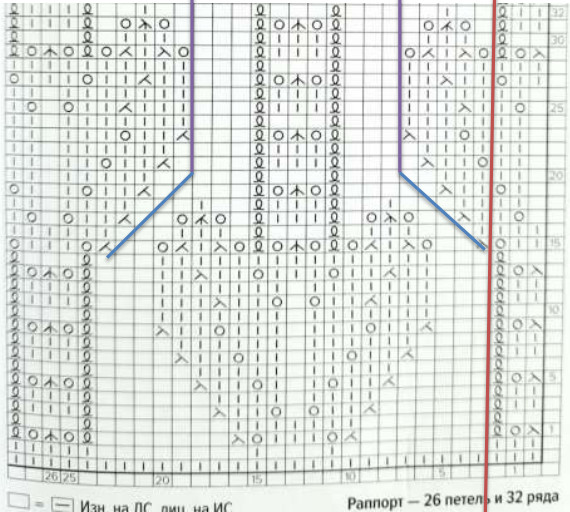
MAIN PATTERN CHART FOR SIZE XS
The chart shows knit and purl rows for circular knitting.
KEY:
![]() 2 stitches together with a right-leaning decrease
2 stitches together with a right-leaning decrease
![]() Yarn over
Yarn over
![]() Twisted knit stitch
Twisted knit stitch
![]() Knit
Knit
![]() 2 stitches together with a left-leaning decrease
2 stitches together with a left-leaning decrease
![]() 3 together with the central knit
3 together with the central knit
![]() 3 together with a right-leaning decrease
3 together with a right-leaning decrease
![]()
3 together with a left-leaning decrease![]() – purl stitch
– purl stitch
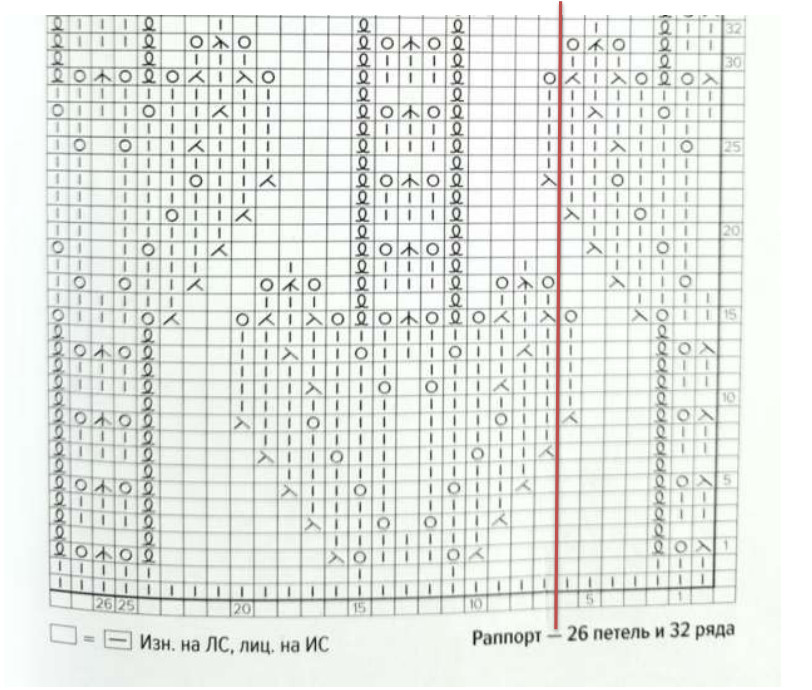 Repeat: 26 stitches and 32 rows
TRANSITION FROM CIRCULAR TO TURNING KNITTING
Having knitted to the armholes (in the 13th row of the pattern), divide the knitting into the back and front, and switch to turning knitting.
From the marker at the beginning of the row, knit 91 stitches following the pattern, turn.
The remaining 91 stitches are placed on an extra thread.
Slip the first edge stitch, knit the last stitch on knit rows; on purl rows — purl.
Since the repeat starts from the 7th stitch, you need to balance the wraps with the stitches purled together.
Examples:
– In the 7th row, slip the first stitch as the edge, 5 knit, purl, then follow the chart. The last 7 stitches of the row: purl, 5 knit, crossed knit.
– In the 15th: slip the edge, knit, 2 together to the right, yarn over, then follow the chart, the last 5 stitches: crossed, yarn over, 2 together to the left, knit, crossed knit.
– In the 17th: do not knit the yarn over, slip 1 as if to knit (k), 2 together to the left, yarn over, purl, then continue according to the chart. The last 5 stitches: crossed, purl, yarn over, 2 together to the right, knit = edge.
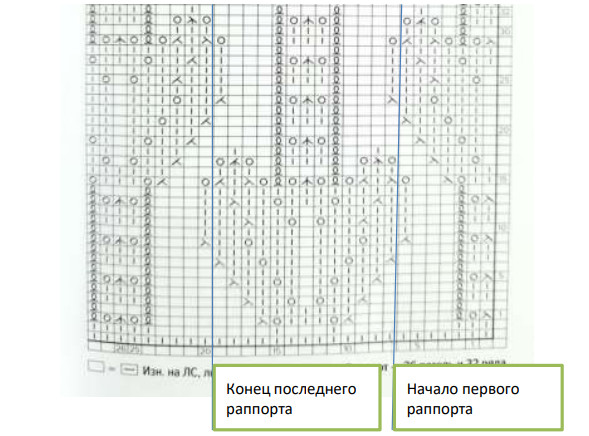
From rows 23 to 29, at the beginning of the first and at the end of the last repeat, the stitches outlined by the blue line on the chart become edge stitches, so we work them by the edge-stitch rule: slip the first, knit the last on knit rows and purl on purl rows.
Knitting the pattern with turning rows differs from knitting in the round.
When knitting in the round, all stitches — both on right-side and wrong-side rows — are worked according to the chart.
In turning rows:
on right-side rows (odd on the chart) knit as shown;
on wrong-side rows — the opposite: knit → purl, purl → knit;
crossed knit stitches — as crossed purls.
In total, knit from the start of the armhole to the start of the neckline 26 pattern rows — continue the repeat to the end, start a new repeat and stop on the 6th row.
NECKLINE SHAPING AND FRONT SHOULDER SLOPES
The front is stopped at the 6th row of the pattern.
In the 7th row we begin shaping the neckline and later — the shoulder slopes.
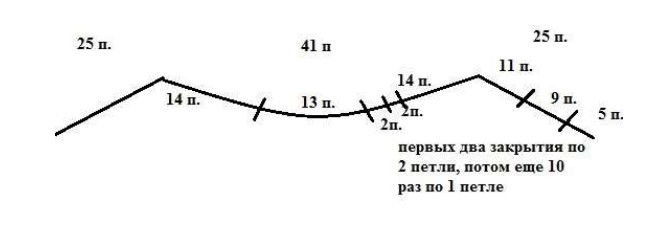
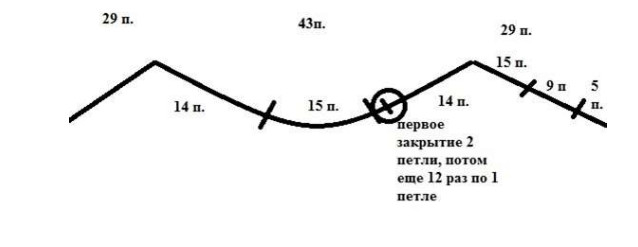
According to the stitch distribution scheme for size XS:
Count 25 shoulder stitches (including the edge), place a marker,
count 41 neck stitches — the second marker.
Total: 41 neck stitches and 25 on each shoulder.
The middle 13 neck stitches should also be marked with markers.
In the 7th row:
slip the edge stitch, knit 38 stitches following the pattern, bind off 13 stitches, knit 38 stitches, slip the edge stitch.
Turn, purl the row.
From this point, bind off the halves of the neckline separately.
At the end of the mini-row, slip the last stitch unworked (to avoid a jog).
Turn, bind off 2 stitches and knit to the end of the row.
Next, in every right-side row, bind off 2 stitches once more and 1 stitch seven times for the neckline.
CONTINUATION OF SHOULDER SHAPING:
8th time — bind off 1 stitch at the neckline, knit to the end of the row, turn, bind off 5 stitches, knit the row, slip the last stitch.
9th time — bind off 1 stitch at the neckline, complete the row, slip the last stitch, turn, bind off 9 stitches of the shoulder, finish, slip the last.
Turn and bind off the remaining shoulder stitches.
Close the second side symmetrically, with neckline decreases in purl rows and shoulder decreases in knit rows.
The first row will be purl — join the yarn at the base of the neckline from the wrong side.
KNITTING THE BACK
Transfer the back stitches from the additional thread onto the needles, join the yarn and begin knitting from the 13th row of the pattern:
knit, 3 purl, twisted, yarn over, 3 together, yarn over, twisted, 3 purl, then three full repeats from the 7th stitch, the last — knit.
Turn to a purl row and continue with turning rows according to the 48-row pattern
(1st repeat: rows 13–32; 2nd repeat: rows 1–28).
Edge stitches: slip the first; the last — knit in knit rows and purl in purl rows.
Since a bust growth is anticipated, the back will be longer than the front (the front ends at the 31st row).
From the 29th row, begin shaping the neckline and shoulder slopes.
The shoulder and neckline binding off is done simultaneously.
Distribution of stitches for the neckline and shoulders of the back (XS):
Count 25 shoulder stitches (including the edge) — the first marker,
count 41 neck stitches — the second marker.
Total: 41 neck stitches and 25 — shoulders.
The middle 13 neck stitches should also be marked.
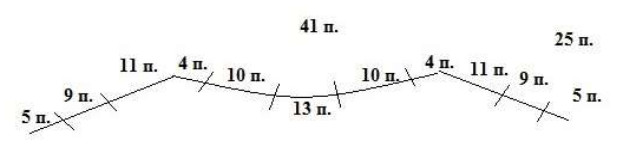
From the 29th row: bind off 5 stitches from the shoulder, work according to the pattern until the second marker, bind off the 13 central stitches, knit the row to the end, turn, bind off 5 shoulder stitches.
Knit a mini-row to the end, slip the last stitch.
Turn, bind off 10 stitches of the neckline, knit to the end, slip the last stitch;
turn, bind off 9 stitches, knit the row, slip the last stitch;
turn — bind off the remaining shoulder and neckline stitches.
Second side — symmetrically: bind off 10 stitches for the neckline, finish, slip the last stitch;
turn, bind off 9 stitches of the shoulder, finish, slip, turn and bind off the remaining stitches.
SEWING SHOULDER SEAMS
Fold the shoulder to shoulder, pin with pins or markers,
sew on the right side of the garment.
After sewing, cut the thread and conceal the end on the inside.
NECKLINE FINISHING
After sewing, begin edging the neckline.
With size 3 needles (60 cm circular), pick up stitches starting a little away from the shoulder seam toward the back.
The picking-up rhythm varies:
along the sides — two stitches from the edge, one from the space between stitches,
in the center — every stitch.
The total number of stitches is divisible by 4 (2×2 rib). In total, cast on 100 stitches.
First row — purl stitches.
Then knit a false hem:
increase stitches by knitting into the front and back of one stitch to make two;
6 rows of garter stitch;
then knit the purl and knit stitches together, returning to the original stitch count.
After — 7 rows of 2×2 rib.
Bind off the stitches in any convenient way.
This method is universal — suitable for any rib (1×1, 2×2, 1×3, etc.).
SLEEVE-FLARES
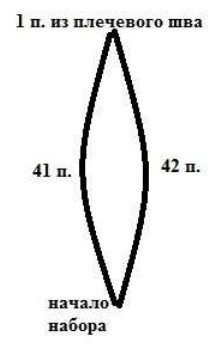
On needles No. 3.5 with a 40 cm cable, cast on sleeve stitches from the base of the armhole.
Cast on the stitches evenly on both sides of the armhole,
one stitch cast on from the shoulder seam.
Total — 84 stitches (a multiple of 14 — the sleeve-flare pattern repeat).
The first row after casting on — knit stitches around the circle.
Then knit according to the sleeve-flare pattern, starting from the 1st stitch of the 1st row.
In the 19th, 21st and 23rd rows of the sleeve near the armhole, perform decreases for a better fit:
at the beginning of the row — 3 stitches in pattern, then a decrease (k2tog to the right),
at the end — not knitting to the marker, decreasing to the left and completing the 3-stitch repeat.
Bind off the sleeve-flare stitches crochet.
RUFFLE PATTERN CHART
Empty cell — no stitch.
Repeat of row 1 — 14 stitches (yarn-overs are not counted).
Repeat of row 24 — 22 stitches.
The chart shows rounds for circular knitting (both knit and purl).
2> - Knit 2 stitches together with a right-leaning decrease
SIZE S–M
Cast on 208 sts + 1 st for joining in the round on needles size 3 (60 cm cord).
Check that it does not twist, join in the round, mark the start of the round.
On needles — 208 sts.
Knit 2×2 rib (2 knit, 2 purl) — 16 rows = 5 cm.
Next switch to needles 3.5. For size S–M: knit according to the main pattern chart two establishing rows (not numbered) — 8 repeats, then follow the chart up to the armholes — 35 cm (2 full repeats + 24 rows).
If you’re not afraid of getting tangled, but want to avoid marker displacement — start the first repeat from the 2nd stitch,
but when separating the front and back, return to the correct stitch!
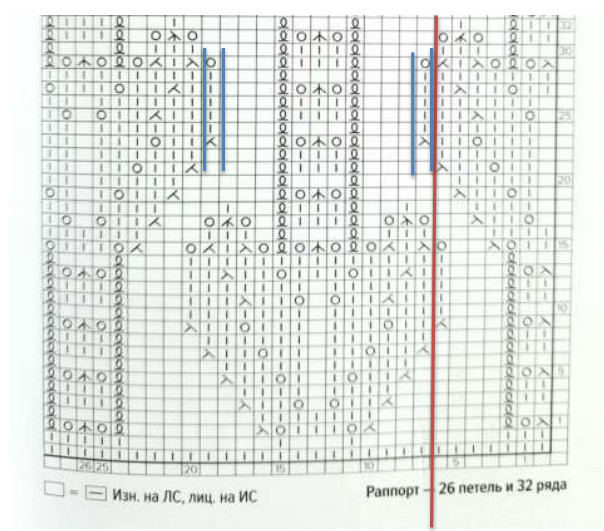
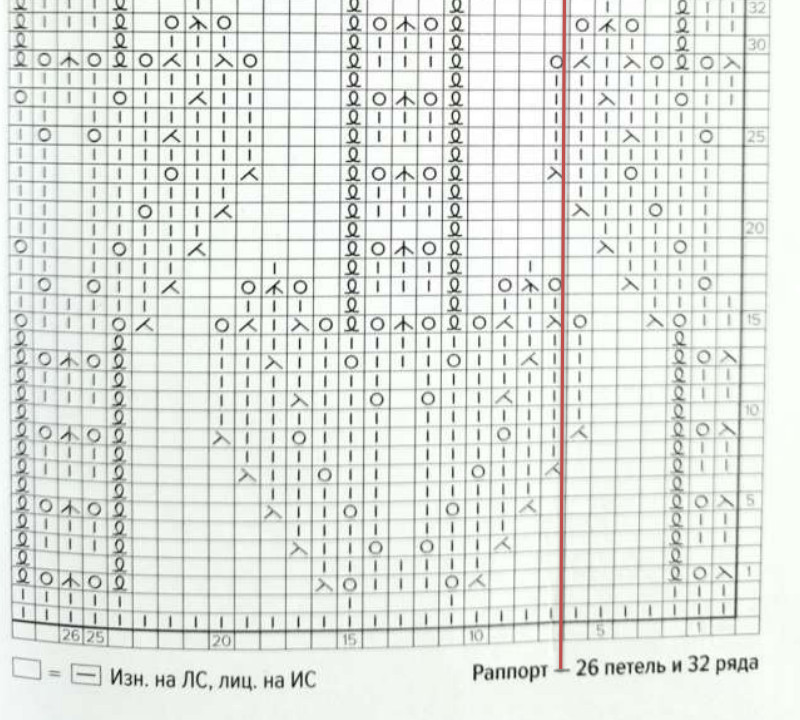
MAIN PATTERN CHART FOR SIZE S–M
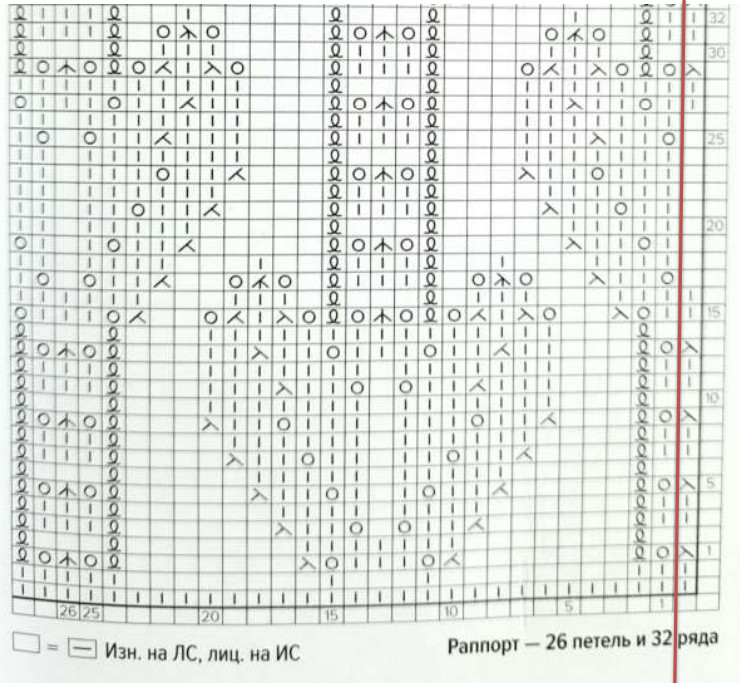
Pattern repeat starts from the first stitch (marked with a red line).
An empty square — purl stitch.
The chart shows knit and purl rows for circular knitting.
TRANSITION FROM CIRCULAR KNITTING TO TURNING (FLAT) KNITTING
Having knitted to the armholes, divide the knitting into back and front, and switch to turning (flat) knitting.
For symmetry: from the start-of-row marker, knit 101 sts following the pattern (the 25th row of the pattern):
2 knit, 2 together left, 3 knit, 3 purl, crossed, 3 knit, crossed, 3 purl, 3 knit, 2 together right, 2 knit, yarn over, purl;
then repeat the pattern yarn over, 2 knit, 2 together left, 3 knit, 3 purl, crossed, 3 knit, crossed, 3 purl, 3 knit, 2 together right, 2 knit, yarn over, purl. twice,
and finish near: yarn over, 2 knit, 2 together left, 3 knit, 3 purl, crossed, 3 knit, crossed, 3 purl, 3 knit, 2 together right, 2 knit.
Turn, knit the 26th purl row: slip the first stitch, knit the last. The remaining 107 sts are transferred to an auxiliary yarn.
Not knitting the yarn-overs at the start and end of the row gives symmetry.
Now the repeat shifts by 2 stitches — starting from the 3rd stitch of the pattern.
Knitting the pattern with turning rows differs from circular knitting:
in the knit rows — according to the chart,
in the purl rows — the opposite (knit ↔ purl),
crossed knit → crossed purl.
For size S–M, knit with turning rows up to the start of the neckline for 26 rows,
stop on the 18th row.
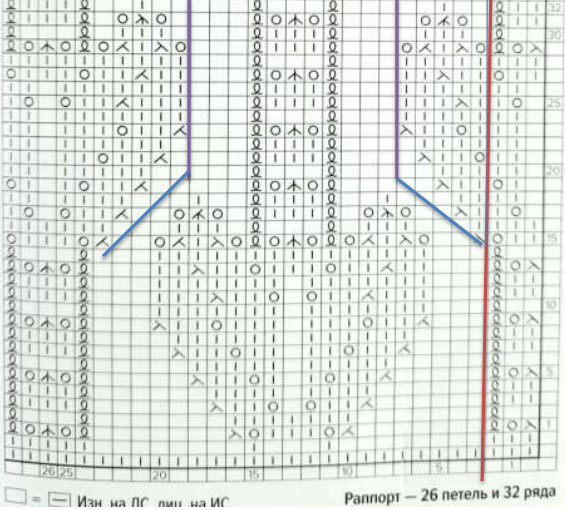
MAIN PATTERN CHART FOR SIZE S–M (front, turning rows)
Row 27 is different:
edge stitch, 5 knit, 3 purl, crossed, yarn over, 3 together, yarn over, crossed, 3 purl, 2 knit, 2 together to the right, 2 knit, yarn over, 3 knit, yarn over —
and then continue according to the chart, observing the new repeat.
From the 15th row at the beginning and end of the repeat, the stitches outlined by the blue line are purled (the sleeve leaf is not needed; stockinette fabric forms).
FORMING THE NECKLINE AND SHOULDER SLOPES OF THE FRONT (S–M)
In the 19th row start shaping the neckline and then — shoulder slopes.
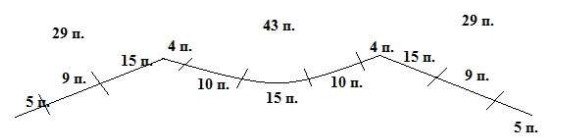
According to the stitch distribution chart:
29 stitches of the shoulder (including the edge),
43 stitches of the neckline,
15 central neckline stitches to be marked with markers.
In the 19th row: slip the edge stitch, work 42 stitches in pattern, bind off 15 stitches, 42 stitches in pattern, knit the edge.
At the beginning and end of the row, work 8 stitches in purl, not following the pattern.
Turn, knit a purl row.
From this point, each side of the neckline is knitted separately.
At the end of the row, slip the last stitch unworked (for a smooth transition).
Turn, bind off 2 stitches and knit to the end.
Then in every knit row, bind off another 9 times by 1 stitch.
CONTINUATION OF SHOULDER AND NECKLINE SHAPING:
10th time — bind off 1 st, finish the row, turn, bind off 5 sts, finish the row, slip the last.
11th time — bind off 1 st, finish, slip the last, turn, bind off 9 sts of the shoulder, finish the row, slip the last and bind off the remaining stitches.
Second side to be closed symmetrically: neckline decreases — in purl rows, shoulders — in knit rows.
Beginning of the first row — purl, join the yarn at the base of the neckline.
Front knitting completed on the 13th row.
KNITTING THE BACK (S–M)
The back stitches, held on an auxiliary thread, transfer to needles and knit similarly to the front using turning rows, according to the pattern.
Selvedge stitches: slip the first, knit the last in knit rows, in purl rows — purl.
Since the garment includes a gusset, the back will be 2 cm longer than the front.
After joining the yarn, knit the first stitch to secure, then knit the 25th row of the pattern:
2 knit, 2 together left, 3 knit, 3 purl, crossed, 3 knit, crossed, 3 purl, 3 knit, 2 together right, 2 knit, yarn over, purl;
then yarn over, 2 knit, 2 together left, 3 knit, 3 purl, crossed, 3 knit, crossed, 3 purl, 3 knit, 2 together right, 2 knit, yarn over, purl. Repeat twice;
finish: 2 knit, 2 together left, 3 knit, 3 purl, crossed, 3 knit, crossed, 3 purl, 3 knit, 2 together right, 1 knit, edge stitch.
Thus, the pattern symmetry is preserved, the repeat shifts by 2 stitches.
Row 26: slip the edge stitch, then follow the pattern, crossed — crossed purl, yarn-overs — purl, crossed purl.
Row 27: slip the edge stitch, 2 knit, 2 together left, 2 knit, 3 purl, crossed, yarn over, 3 together, yarn over, crossed, 3 purl, 2 knit, 2 together to the right, 2 knit, yarn over, 3 knit, yarn over;
then repeat the motif ... twice and finish with: 2 knit, 2 together left, 2 knit, 3 purl, crossed, yarn over, 3 together, yarn over, crossed, 3 purl, 2 knit, 2 together to the right, 2 knit, edge stitch.
After that — the 28th purl row, then follow the chart with the new repeat (marked by the red line) up to and including the 32nd row.
Next, continue according to the chart, but just as on the front, from the 15th row at the beginning and end of the repeat, the stitches outlined by the blue line should be purled (the leaf motif on the sleeves is removed, leaving reverse stockinette).
Thus, knit with turning rows taking into account the growth by 6 rows longer than on the front.
The start of shaping the neckline and shoulder slopes occurs on the 13th row of the pattern.
Binding off the shoulders and neckline is done simultaneously.
SCHEME OF NECKLINE AND SHOULDER BIND-OFF DISTRIBUTION FOR THE BACK (S–M):
Count 29 shoulder stitches (including edge), place a marker;
count 43 neck-opening stitches — second marker.
Total: 43 neck-opening stitches, 29 for the shoulders each.
The middle 15 stitches of the neck opening should also be marked.
From the start of the 13th row:
bind off the first 5 shoulder stitches, then follow the chart — 2 together to the right, 2 knit stitches and up to the second marker;
bind off the 15 central stitches, knit to the end of the row;
turn, bind off 5 shoulder stitches, complete a mini-row, slip the last stitch;
turn, bind off 10 neck-opening stitches, knit the row to the end, slip the last stitch;
turn, bind off 9 stitches, knit to the end, slip the last stitch;
turn — bind off all remaining shoulder and neck-opening stitches.
Second side — symmetrical:
join the yarn at the neck from the wrong side, bind off 10 stitches, finish, slip the last stitch;
turn, bind off 9 shoulder stitches, finish, slip the last;
turn — in the wrong-side row bind off all remaining stitches.
SEWING THE SHOULDER SEAMS
Fold the shoulders right sides together, secure with pins or markers.
Sew the seam on the right side of the garment.
Cut the yarn, weave the end in from the wrong side.
NECKLINE TREATMENT
After completing the shoulder seams, begin finishing the neckline.
With size 3 needles (60 cm circular), pick up stitches starting a little away from the shoulder seam toward the back.
The method of picking up stitches varies:
along the sides — two stitches from under the edge, one from the space between stitches;
at the center of the front and back — every stitch.
The total number of stitches is divisible by 4 since the edging is a 2×2 rib.
Cast on 108 stitches in total.
First row — purl stitches.
Then — false ketlovka:
increase the number of stitches (from one to two),
knit 6 rows of hollow rib,
then knit the purl and knit stitches together with a knit stitch, returning to the original count.
After this, knit 7 rows of ribbing 2×2 (2 knit, 2 purl).
Bind off stitches in any convenient way.
The method is universal — suitable for all types of ribbing (1×1, 2×2, 1×3, etc.).
RIBBON SLEEVES (S–M)
On size 3.5 needles (40 cm circular) pick up stitches for the sleeve from the base of the armhole.
Ensure even pickup on both sides, pick up one stitch from the shoulder seam.
Total — 84 stitches (a multiple of 14 — the sleeve pattern repeat).
The first row after picking up stitches — knit stitches around the circle.
Then knit according to the sleeve ruffle pattern (see page 25), starting from the 1st stitch of the 1st row.
In the 19th, 21st and 23rd rows, make decreases for a better fit:
at the beginning of the row — 3 stitches in pattern, then knit 2 together to the right;
at the end — 5 stitches before the marker — knit 2 together to the left and 3 stitches of the repeat.
Bind off the sleeve stitches with a crochet hook.
SIZE L–XL
On size 3 needles (60 cm circular) cast on 236 stitches + 1 stitch for joining in the round.
Be careful not to twist, join in a circle and mark the beginning of the round.
On needles — 236 stitches.
Knit 2×2 rib (2 knit, 2 purl) — 16 rounds = 5 cm.
Switch to needles No. 3.5.
Knit 1 row in stockinette, evenly increasing by 2 stitches using a make-one increase.
Total — 238 stitches.
Continue knitting according to the pattern chart (see page 27) from the 7th stitch, 9 repeats across the width.
Knit in the round until the armholes begin — 35 cm (2 full repeats + 24 rows).
For symmetry of the pattern, start not from the 1st but from the 7th stitch of the repeat.
MAIN PATTERN CHART (L–XL)
The chart shows knit and purl rows for circular knitting.
An empty cell indicates a purl stitch.
TRANSITION FROM CIRCULAR TO TURNING KNITTING
Having knitted to the armholes (height 35 cm), divide the fabric into back and front, and switch to turning knitting.
From the start-of-round marker, knit 119 stitches following the pattern, turn.
The remaining 119 stitches transfer to an additional thread.
Edge stitches: slip the first stitch, the last stitch in right-side rows to be knitted, in wrong-side rows — purled.
Pattern repeat begins at the 7th stitch of the row.
For symmetry, work while balancing the increases and decreases.
FORMATION OF NECKLINE AND SHOULDER SLOPES FRONT (L–XL)
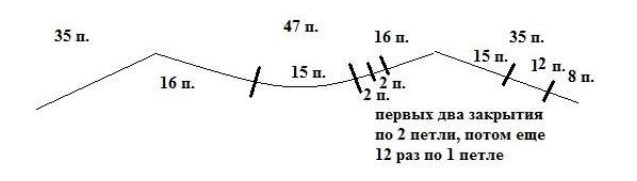
Stopped at the 18th row of the pattern.
In the 19th row we begin shaping the neckline and the sloped shoulders.
Distribution of stitches:
33 stitches of the shoulder (including edge),
47 stitches of the neckline,
15 central stitches of the neckline to be marked with markers.
In the 19th row:
slip the edge stitch, 51 stitches in pattern, bind off 15 stitches, 51 stitches in pattern, edge knit.
At the beginning and end of the row, 8 stitches in purls, not following the pattern.
Turn, knit the purl row.
From this moment, each side of the neckline is worked separately.
At the end of the row, slip the last stitch without knitting (to avoid a step).
Turn, bind off 2 stitches, complete the row.
Then in every knit row bind off 1 time 2 stitches and 9 times 1 stitch.
SHOULDER SHAPING:
11th time — bind off 1 stitch, complete the row, turn, bind off 5 stitches, complete the row, slip the last stitch.
12th time — bind off 1 stitch, complete the row, slip the last stitch, turn, bind off 9 stitches of the shoulder, finish, slip the last stitch,
turn — bind off the remaining shoulder stitches.
The other side — symmetrically; decreases for the neckline are worked on the purl rows, and the shoulders — on the knit rows.
BACK (L–XL)
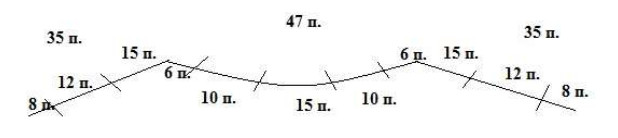
Transfer back stitches with an extra strand onto needles.
Join the yarn, work according to the chart with turning rows.
Edge stitches: slip the first, the last — knit in knit rows, purl in purl rows.
Due to the growth, the back is 2 cm longer than the front.
The start of shaping the neckline and shoulders is on the 13th row of the pattern.
Binding off the neckline and shoulders is done simultaneously.
Distribution of stitches:
33 stitches of the shoulder (including edge),
47 stitches of the neckline,
15 central stitches of the neckline to be marked.
In the 13th row:
bind off 5 stitches of the shoulder, work in pattern until the second marker, bind off 15 stitches, complete the row,
turn, bind off 5 stitches of the shoulder,
work a mini-row, slip the last stitch.
Turn, bind off 10 stitches of the neckline, complete, slip the last stitch.
Turn, bind off 9 stitches, complete, slip the last stitch.
Turn — bind off the remaining shoulder stitches.
Close the second side symmetrically:
join the yarn at the base of the neckline, bind off 10 stitches, complete, slip the last stitch;
turn, bind off 9 stitches of the shoulder, finish, slip the last stitch;
turn — bind off the remaining stitches.
SHOULDER SEAMS
Fold the shoulders right sides together, pin with pins or markers.
Sew along the right side of the garment.
Cut the yarn, weave in ends.
NECKLINE FINISHING
After finishing the shoulder seams, proceed to finish the neckline.
With size 3 needles (60 cm circular), pick up stitches starting a little away from the shoulder seam toward the back.
Picking up stitches rhythm:
at the sides — 2 stitches from under the edge, 1 — from the space between stitches,
at the center of the front and back — each stitch.
Number of stitches should be a multiple of 4 (for 2×2 rib).
A total of 116 stitches should be picked up.
First row — purl stitches.
Then — faux garter stitch:
from each stitch knit two,
6 rows of hollow ribbing,
then knit and purl stitches are worked together with a knit stitch.
Then — 7 rows of 2×2 ribbing,
bind off the stitches in any convenient way.
SLEEVE-FLARES (L–XL)
On needles No. 3.5 (circular 40 cm) pick up stitches around the armhole:
on both sides of the armhole evenly, one stitch — from the shoulder seam.
Total — 98 stitches (multiple of 14).
1st row — knit stitches.
Then follow the ruffle pattern chart (see page 25).
In rows 19, 21 and 23, make decreases for better fit:
at the beginning of the row — 3 stitches in pattern, then 2 together to the right;
at the end — with 5 stitches remaining to the marker — 2 together to the left and 3 stitches in pattern.
Bind off the ruffle stitches with a crochet hook.
If desired, the bottom of the T-shirt and sleeves can be steamed to make the ruffles lay softer and more evenly.
Do not press the iron onto the fabric; keep it 1–2 cm away, lightly touching with steam.
After washing and blocking, allow the garment to dry completely laid flat on a horizontal surface.
If you want the ruffles to have a more pronounced shape,
you can lightly starch them using a starch solution or a fabric-fixation spray.
FINAL ASSEMBLY
-
Carefully thread all yarn ends in from the wrong side.
-
Check the symmetry of the side lines and shoulder seams.
-
If needed — press the garment again, without stretching.
-
Allow to dry completely and cool.
The T-shirt is ready!
Thanks to the mercerized cotton it holds its shape well and has a light noble sheen.
MAIN DIMENSIONS OF THE FINISHED GARMENT (after blocking)
| Size | Bust circumference | Back length | Length to armhole |
|---|---|---|---|
| XS | 84 cm | 54 cm | 31 cm |
| S–M | 92 cm | 56 cm | 35 cm |
| L–XL | 102 cm | 58 cm | 35 cm |
The knitting gauge may vary slightly depending on the individual knitting style.
USEFUL TIPS
-
If the yarn is very slippery — use wooden or bamboo needles.
-
To avoid yarn from slipping when joining skeins, use the “Russian join” or “woven join” method.
-
Before starting to knit, it is recommended to knit and steam-block a swatch to check gauge and shrinkage.
-
Cotton tends to stretch a bit when worn, especially lengthwise, so it’s better to knit the garment a little shorter than the desired length.
-
After washing, the shape easily recovers — just lay the T-shirt on a towel and gently smooth the edges.
HEM (ADDITIONAL OPTION)
If you want to make the bottom denser and more elastic:
-
after the ribbing, add one row of knit stitches and then knit four more rows of 1×1 rib;
-
bind off stitches using a “to pattern” method for a neat elastic edge.
This method helps prevent curling at the hem and looks good even without blocking.
GARMENT CARE
-
Wash by hand or in a washing machine at 30°C on the “Delicate Cotton” cycle.
-
Use a mild detergent without bleach.
-
Do not wring! Gently press out in a towel and lay flat to dry.
-
Do not tumble dry!
-
Store folded, not on a hanger, to prevent shoulder deformation.
-
If necessary — steam from the inside (wrong side).
COLOR ADVICE
The T-shirt looks great both in solid color and with a light melange or a subtle gradient.
If you want to add personality, you can do a garter-stitch neckline and bottom rib with a contrasting color yarn.
CUSTOM FIT
If your measurements fall between sizes:
-
when the difference is small, it’s better to knit the smaller size — cotton will stretch with wear;
-
when there is a larger difference, you can add one extra pattern repeat (26 stitches) in width and a few rows in length up to the armholes.
For a neater fit, you can make small decreases at the sides:
every 10 cm, one decrease on each side from the side markers.
ARMHOLE SELECTION GUIDELINES
If you want the armhole a bit looser — when separating the front and back, knit an additional 4–6 rounds in the round before the separation.
If, on the other hand, you prefer a tighter fit — separate 2–4 rounds earlier.
This will help adapt the pattern to your individual proportions without changing the overall knitting scheme.