Top with needles
Added: 30.07.2025 в 16:52 Views: 428
Top with needlesKlubokhttp://klubok.work/1/82/8965/Klubokhttps://klubok.work/css/image/top-logo-en.png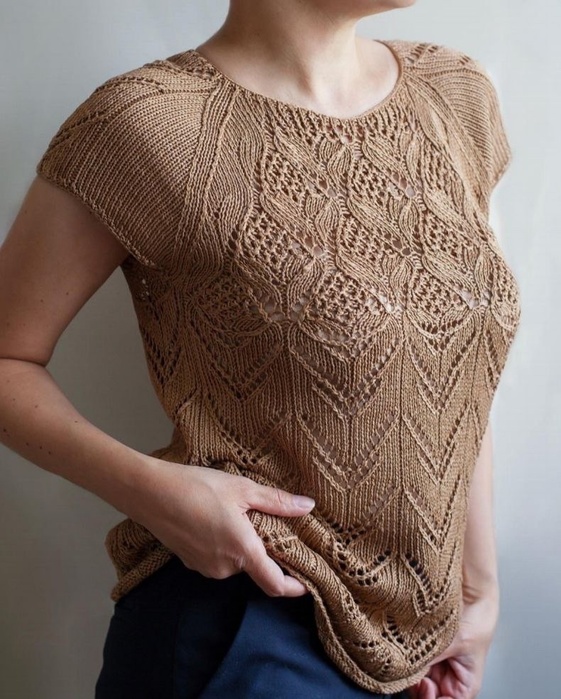
Main Information
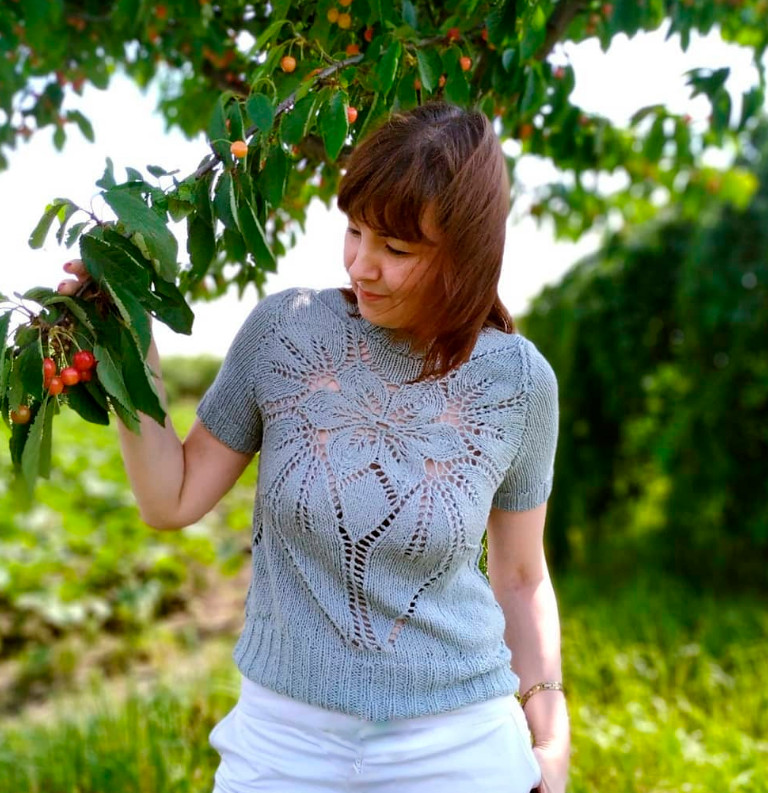
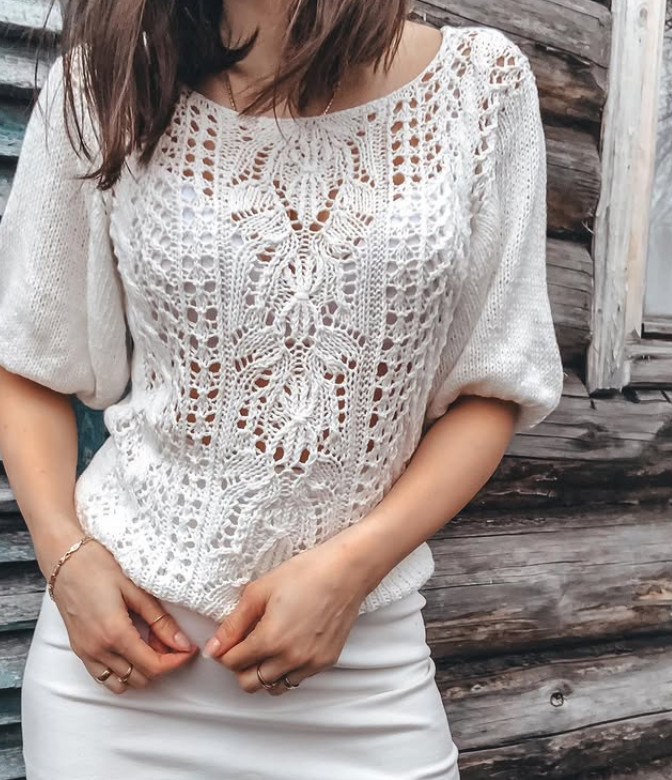
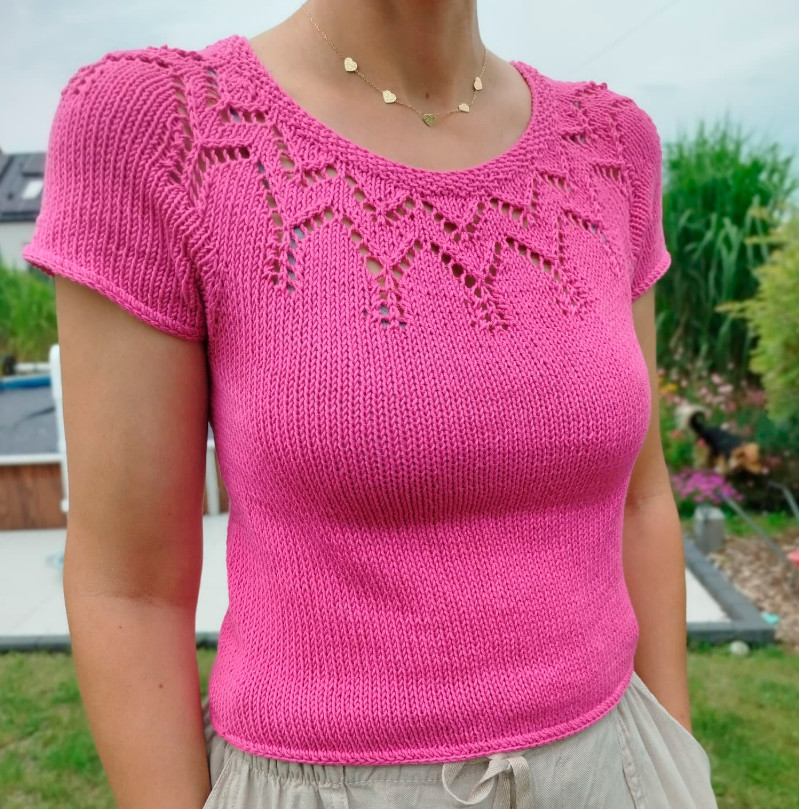
The top is knitted from 100% silk in 3 threads in the round from bottom to top as a single piece (without seams).
Required Skills: casting on, circular knitting, ability to read patterns and use them for circular knitting, understanding the principles of raglan and short rows.
Description is provided for the following sizes:
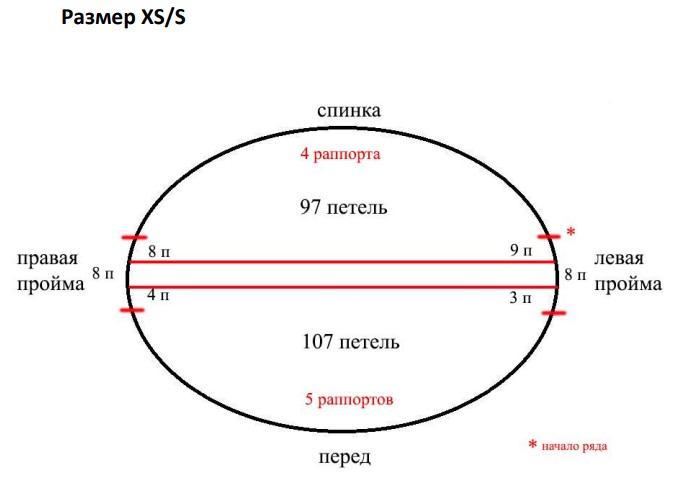
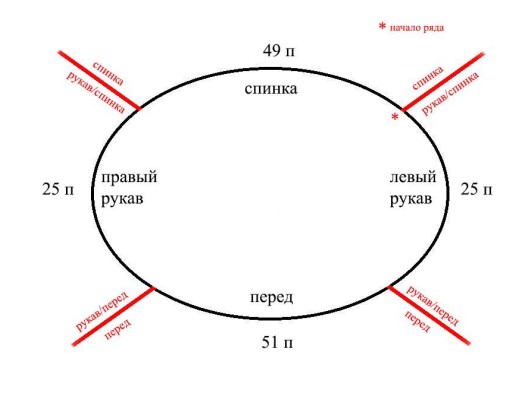
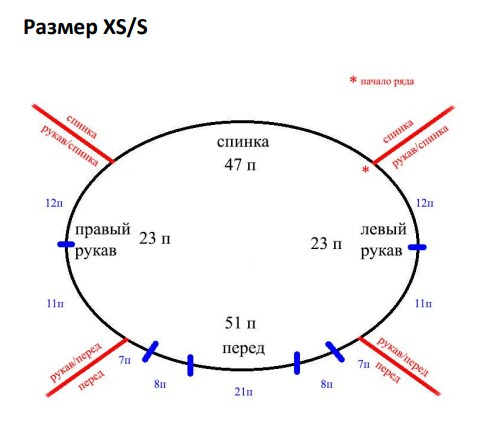
XS/S – (Bust 83-92) garment width 46 cm, length from shoulder 57-59 cm.
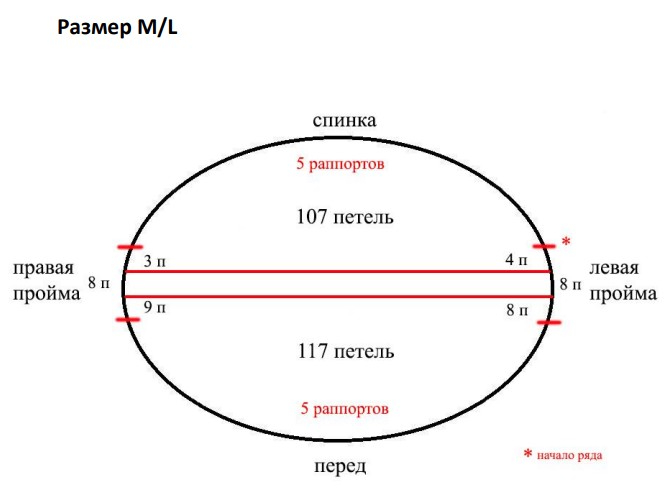
M/L – (Bust 93-102) garment width 51 cm, length at the back 60-63 cm.
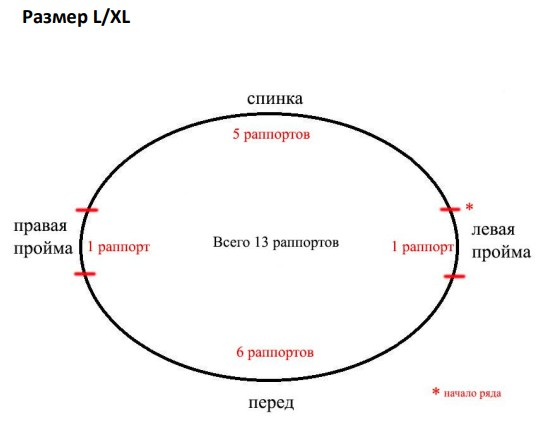
L/XL – (Bust 103-110) garment width 55 cm, length at the back 64-66 cm.
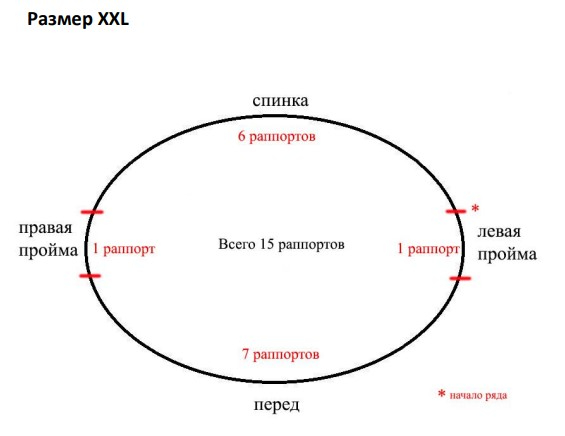
XXL – (Bust 111 – 120) garment width 60 cm, length at the back 66-68 cm.
You will need:
- 3.0mm needles on a 60 cm cable (for the main fabric)
- 2.5mm needles on a 30-40 cm cable (for the cuffs)
- markers, additional contrasting yarn, measuring tape.
Yarn:
- Silk Shappe 800m/100g (composition: 100% silk). If using different yarn, check the gauge after washing and blocking.
Yarn Consumption: XS/S – 250 g., M/L - 300 g., L/XL – 350 g., XXL – 400 g.
Knitting Gauge:
Sample in stockinette stitch with 3.0 mm needles after washing and blocking:
10cm x 10cm = 13 sts x 34 rows
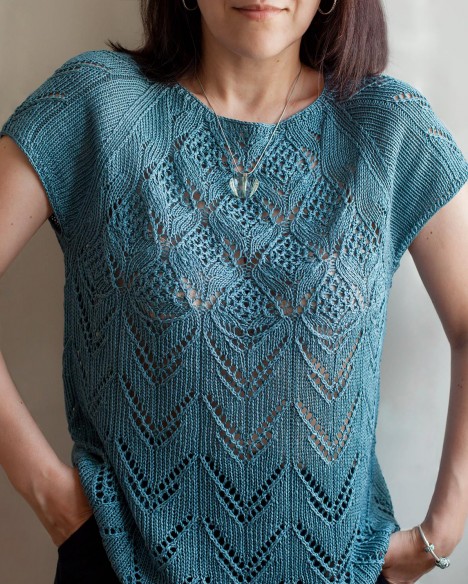
Pattern Diagrams
Two patterns were used in knitting the top. One for the lower part of the main fabric and the sleeves (Diagram 1), the second for the yoke area.
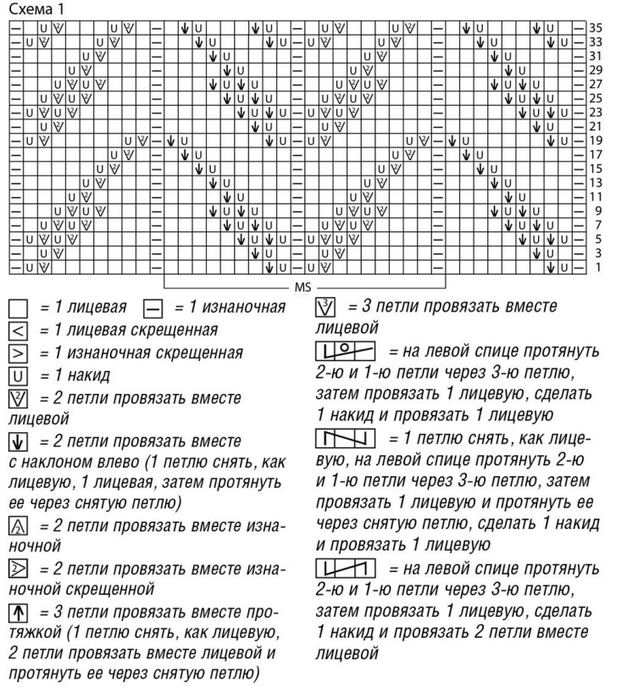
Please note – only the odd rows are shown in diagram 1.
Additional explanations for the diagrams (how I used them) will be provided in the description of the work below.
Step 1. Starting Work
On 3.0 mm needles, cast on the specified number of stitches for the chosen size plus 1 stitch (for joining in the round):
XS/S – 220 sts
M/L – 240 sts
L/XL – 260 sts
XXL – 300 sts
Knit in 1x1 ribbing (1 knit, 1 purl) for 2 rows. Then knit 1 row as a preparatory row for the pattern – 1 purl, 9 knits and repeat until the end of the row.
From the next row, switch to the pattern according to Diagram 1.
Step 2. Pattern 1
Explanations for using Diagram 1!
From this diagram, repeat the necessary number of times the rapport highlighted by square brackets marked MS. This rapport is equal to 20 stitches. Thus, the number of repetitions for each size will be:
XS/S – 11
M/L – 12
L/XL – 13
XXL – 15
In height, according to this diagram, we knit as follows:
First for all sizes, knit rows 1 through 32 once.
Then knit rows 15 through 32: for size XS/S - 2 times, for M/L - 3 times, for L/XL – 3 times, XXL – 4 times.
And finish this pattern by knitting for all sizes rows 15 through 36 once.
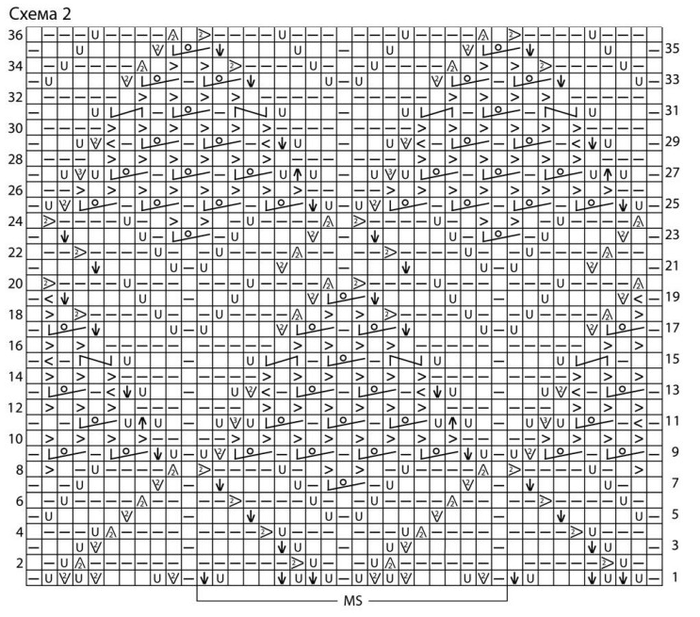
Next, we move on to the pattern according to Diagram 2.
Step 3. Transition to Pattern 2
Explanations for using Diagram 2!
Repeat the stitches of the rapport highlighted by square brackets marked MS (the number of stitches in the rapport is also 20, just like in the case of the pattern according to Diagram 1, so one pattern will transition seamlessly into the second).
But this will not be the case for the entire height! We will return to the explanation of this pattern when necessary. For now, for each size, you need to knit a certain number of rows of this pattern:
XS/S – 8 rows
M/L – 7 rows
L/XL – 7 rows
XXL – 6 rows
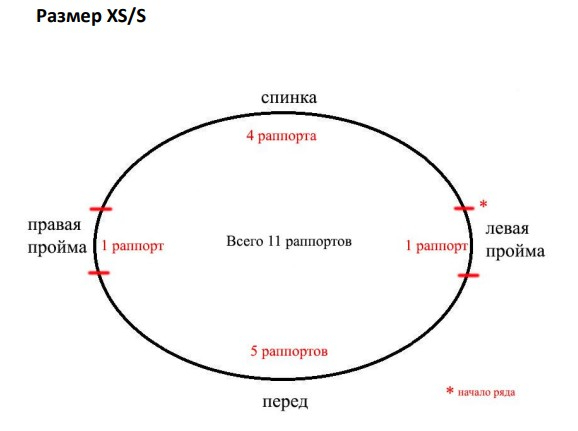
Step 4. Division of Patterns
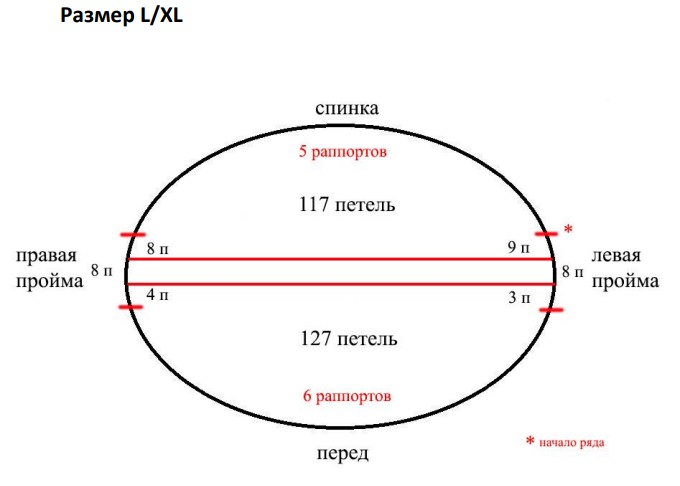
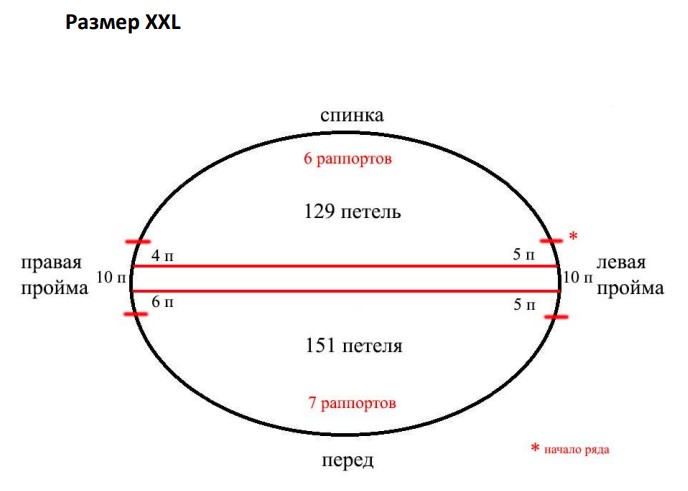
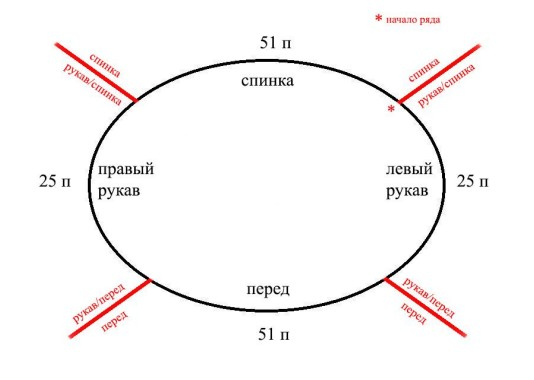
At this stage, we will conditionally divide the number of all pattern rapports into the front, back, and highlight 1 rapport on each side for the future armholes (for convenience, use markers).
The start of the row, as before, is a purl stitch (the first stitch of the rapport).
The diagrams show the division of the rapports for each size.
Read why we do this immediately after the diagrams.

In the next 2 rows, we continue to knit the stitches of the front and back rapport according to pattern Diagram 2, while the stitches of the highlighted rapports for the armholes are knitted in knits (except for the first stitch of the rapport, which we continue to knit as a purl).
Thus, by this point, we have knitted the following number of rows of the pattern according to Diagram 2:
XS/S – 10 rows
M/L – 9 rows
L/XL – 9 rows
XXL – 8 rows
Step 5. Separating Armhole Stitches
In the next row, we will close the armhole stitches and add the sleeves. For this, we will need additional contrasting yarn.
The number of armhole stitches will be as follows:
- for sizes XS/S, M/L and L/XL – 8 stitches
- for size XXL – 10 stitches
Divide the stitches of the rapports left for the armholes into stitches for the front, back, and the armhole itself. Remember that the first stitch of these rapports is knitted as a purl, and the others as knits.
For each size, the division is shown in the diagrams and the final number of stitches for the back and front is indicated after separating the armhole stitches.
Step 6. Closing Armhole Stitches and Adding Sleeves
In the next row, we close the armhole stitches. The start of the row is now at the stitches of the rapport that we joined to the back.
Therefore, we start the row as follows: 1 purl, knit stitches: XS/S – 8 knits, M/L – 3 knits, L/XL – 8 knits, XXL – 4 knits, and then take the contrasting yarn and close the necessary number of armhole stitches (the number was given above).
Immediately after closing the stitches, it is necessary to cast on the required number of stitches for the sleeves using another additional contrasting yarn:
XS/S – 67 stitches
M/L – 75 stitches
L/XL – 83 stitches
XXL – 93 stitches
Cast on in the classic way, the main thing is to correctly take both yarns – one is our working yarn, the other is the additional one.
Having cast on the required number of stitches, release the contrasting yarn and continue knitting with the main yarn: knit stitches (XS/S – 3 knits, M/L – 8 knits, L/XL – 3 knits, XXL – 5 knits), then knit the specified number of front pattern rapports, and then move on to the stitches of the right armhole.
And again, we have the first stitch as a purl, then knits (in the diagrams, purls and knits are indicated together) and close the armhole stitches in the same way, cast on stitches for the second sleeve, knit the remaining knits (according to the pattern), and finish the row by knitting the back (the specified number of pattern rapports).
Step 7. General Explanations for Further Work
At this point, we have stitches for 4 parts of the top on the needles – front, back, and two sleeves.
By the number of stitches for each size:
XS/S – 67 sts for the left sleeve, 107 sts for the front, 67 sts for the right sleeve, 97 sts for the back
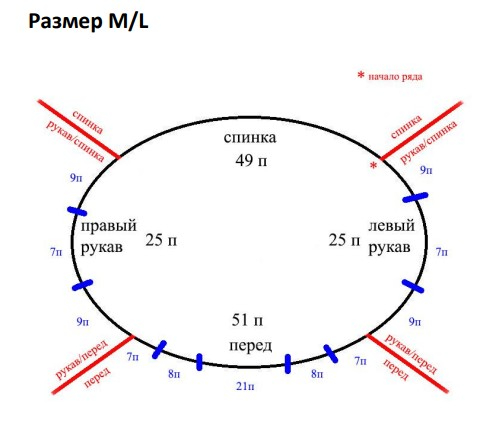
M/L – 75 sts for the left sleeve, 117 sts for the front, 75 sts for the right sleeve, 107 sts for the back
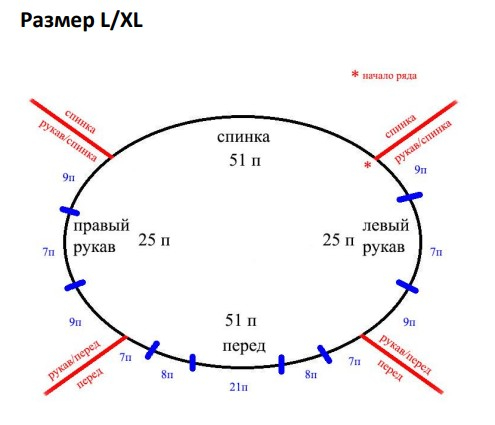
L/XL – 83 sts for the left sleeve, 127 sts for the front, 83 sts for the right sleeve, 117 sts for the back
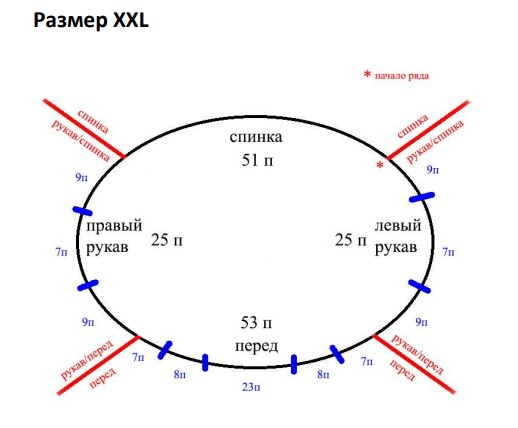
XXL – 93 sts for the left sleeve, 151 sts for the front, 93 sts for the right sleeve, 129 sts for the back
For convenience, it is better to separate these 4 parts with markers. Note that the start of the row has shifted by a few stitches and now the row starts with the left sleeve!
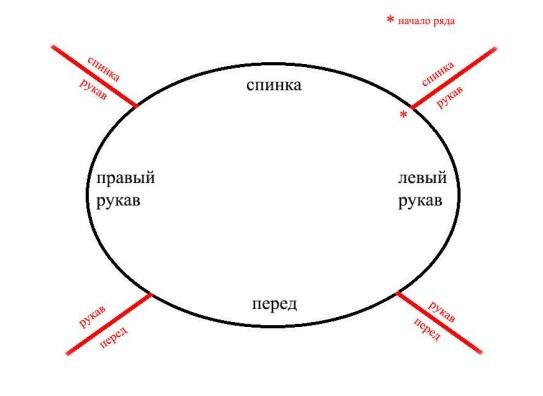
The diagram also shows the raglan lines, along which decreases will be made on both sides. Decreases along sides with the same names will be the same, but for each name (front, back, sleeve) they will be different.
For example, if we are making decreases on the sleeves, it means that in one row there will be 4 decreases (two on each sleeve along the two raglan lines).
From the very first row after casting on the sleeve stitches, we begin to count the rows for the bodice and keep track of the rows for decreases along the raglan lines.
But before we move on to the decreases themselves, it is necessary to give explanations about the pattern on the sleeves and the placement of the pattern on the bodice.
Step 8. Pattern on the Sleeves
On the sleeves of the top, we will knit the pattern according to Diagram 1 in the central part, but not from the first row.
In the 1st row after casting on the stitches, knit all sleeve stitches as knits.
The second row will be preparatory for the pattern, knit it as follows:
XS/S – 23 knits, 1 purl, 9 knits, 1 purl, 9 knits, 1 purl, 23 knits.
M/L – 27 knits, 1 purl, 9 knits, 1 purl, 9 knits, 1 purl, 27 knits.
L/XL – 31 knits, 1 purl, 9 knits, 1 purl, 9 knits, 1 purl, 31 knits.
XXL – 36 knits, 1 purl, 9 knits, 1 purl, 9 knits, 1 purl, 36 knits.
From the next row, we will start knitting the pattern according to Diagram 1 (the highlighted rapport on the central 21 stitches of the sleeve). And so until the neckline.
Step 9. Pattern for the Front and Back
As you may have noticed, the pattern in the bodice area of the top becomes narrower and narrower as it approaches the neckline.
How to achieve such narrowing.
The first time we knit, as mentioned earlier, that part of the pattern that is highlighted by square brackets (20 stitches) and in height from rows 1 to 20!
In row 21, it is necessary to shift our pattern by half a rapport on both sides.
That is, the first 10 stitches of the first rapport and the last 10 stitches of the last rapport are knitted as knits. Thus, you knit from row 21 to row 36!
Please note that after row 36 you transition to row 5 of the diagram!
Next, continue to shift by half a rapport on both sides of the pattern, knitting from rows 5 to 20, and then again from rows 21 to 36, and so on as many times as necessary in height. When there are no more shifts in the pattern, continue to knit all stitches as knits.
Step 10. Order of Decreases
So, as already mentioned, immediately after casting on the sleeve stitches, we begin to count the rows for making decreases.
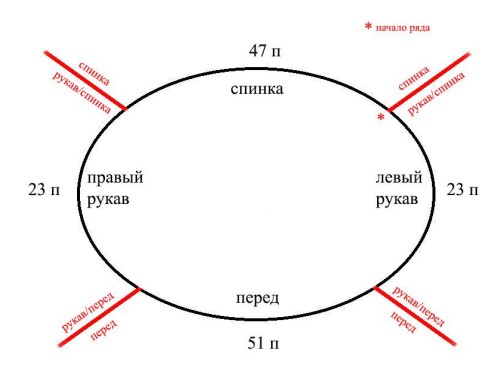
The total number of rows for the bodice (up to the short row):
XS/S – 60 rows
M/L – 62 rows
L/XL – 66 rows
XXL – 68 rows
The raglan lines conditionally pass between the previously separated parts of the top (see the diagram above). We will make decreases by stepping back one stitch on both sides from the raglan line.
To the left of the raglan line, decreases are made by knitting 2 stitches together as a knit leaning to the left, and to the right of the raglan line – 2 stitches together as a knit leaning to the right.
The video shows how to make decreases. But note that decreases are not always made simultaneously on both sides of the raglan line. Below, the distribution of decreases by rows is outlined for each line.
Step 11. Distribution of Decreases by Sizes
Explanations are given in Steps 7 and 10.
For size XS/S
Front: 4 times every 3 rows, then 24 times every 2 rows.
Back: 10 times every 3 rows, then 15 times every 2 rows.
Sleeve: 16 times every 3 rows, then 6 times every 2 rows.
Total 60 rows. The diagram shows what will remain on the needles after making the decreases.
For size M/L
Front: 4 times every row, then 29 times every 2 rows.
Back: 4 times every 3 rows, then 25 times every 2 rows.
Sleeve: 12 times every 3 rows, then 13 times every 2 rows.
Total 62 rows. The diagram shows what will remain on the needles after making the decreases.
For size L/XL
Front: 10 times every row, then 28 times every 2 rows.
Back: 33 times every 2 rows.
Sleeve: 8 times every 3 rows, then 21 times every 2 rows.
Total 66 rows. The diagram shows what will remain on the needles after making the decreases.
For size XXL
Front: 30 times every row, then 19 times every 2 rows.
Back: 10 times every row, then 29 times every 2 rows.
Sleeve: 34 times every 2 rows.
Total 68 rows. The diagram shows what will remain on the needles after making the decreases

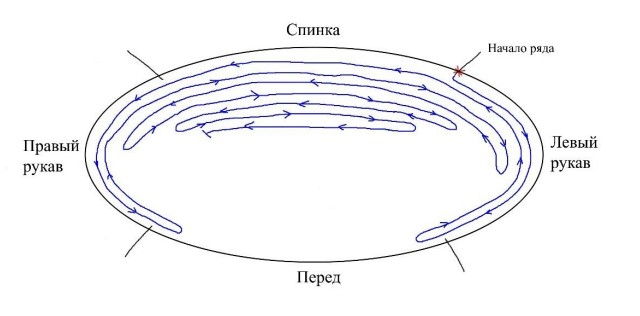
Step 12. Short Rows
What short rows represent – these are shortened rows, which help to form the height difference of the neckline from the front and back.
When knitting short rows, we switch from circular knitting to knitting in both directions (i.e., knit and purl rows).
Diagrammatically, short row knitting is shown in the illustration. That is, we knit a row to a certain point, turn the work, and knit in the opposite direction to a point symmetric to the first. Then we reach the next point, reducing the number of knitted stitches and again turning the work. And so for several rows.
The number of short rows by sizes:
XS/S – 6
M/L – 8
L/XL – 8
XXL – 8
Thus, it is necessary to mark the turning points of knitting with markers according to the number of short rows.
The turning points are marked in blue on the diagrams below.
The central stitches of the front are no longer knitted, i.e., from the start of the row, we reach the mark to the right of the central stitches of the front and turn the work. After turning, it is necessary to make a yarn over and continue knitting in the opposite direction to the symmetric mark to the left of the central stitches of the front.
In the next row, we reach the next mark, turn again, and knit in the opposite direction to the symmetric mark, and so on.
In each 2nd row of the short rows, we make decreases along all raglan lines that we will cross!
As a result, after finishing the short rows, the following number of stitches will remain on the needles:
XS/S – 124 sts
M/L – 126 sts
L/XL – 128 sts
XXL – 130 sts
Step 13. Neckline
On the remaining stitches, knit in 1x1 ribbing (1 knit, 1 purl) for 3 rows and close the stitches in the usual way.
Step 14. Finishing the Sleeves
All that remains to be done – is to finish the sleeves.
To do this, unravel the contrasting yarns from the closed armhole stitches and from the cast on stitches for the sleeve itself and put the stitches on 2.5mm needles.
Thus, on the needle now:
XS/S – 74 sts
M/L – 82 sts
L/XL – 90 sts
XXL – 102 sts
Besides these stitches, it is necessary to pick up 2 sts from each side between the armhole and the sleeve!
Secure the yarn on the inside next to the armhole and after picking up the stitches mentioned above, knit 3 rows of ribbing on all stitches.
Then close the stitches as on the neckline and repeat all actions for the second sleeve.
It remains to weave in all yarn ends and wash the top.
Step 15. Wet Heat Treatment
Wash the top by hand in cool water (up to 40 degrees), using a liquid silk washing detergent. Gentle wash, rinse, and careful spin. Dry on a flat surface, turning it over periodically. After wet blocking, the product will straighten and level out.