


Top with knitting needles
Added: 18.09.2025 в 19:38 Views: 715
Top with knitting needlesKlubokhttp://klubok.work/1/82/9127/Klubokhttps://klubok.work/css/image/top-logo-en.png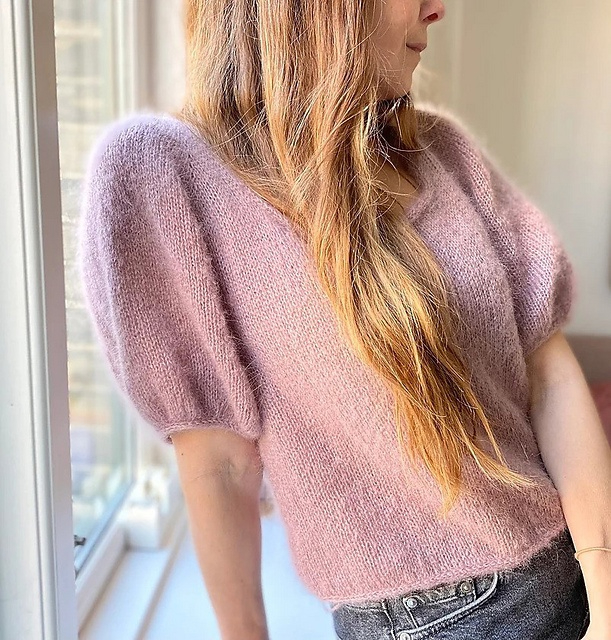
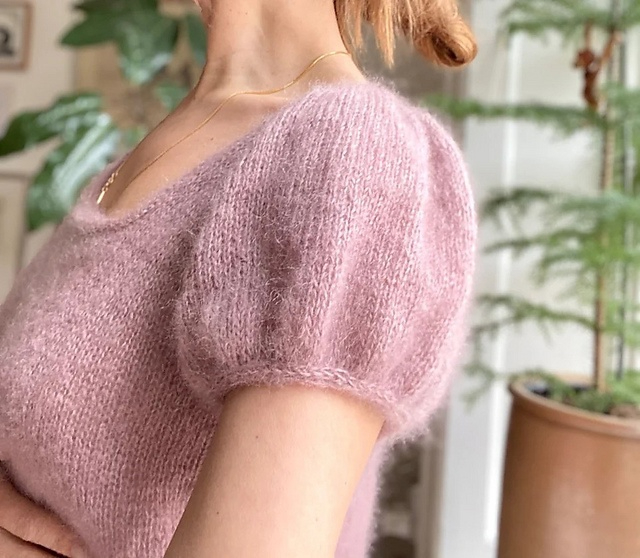
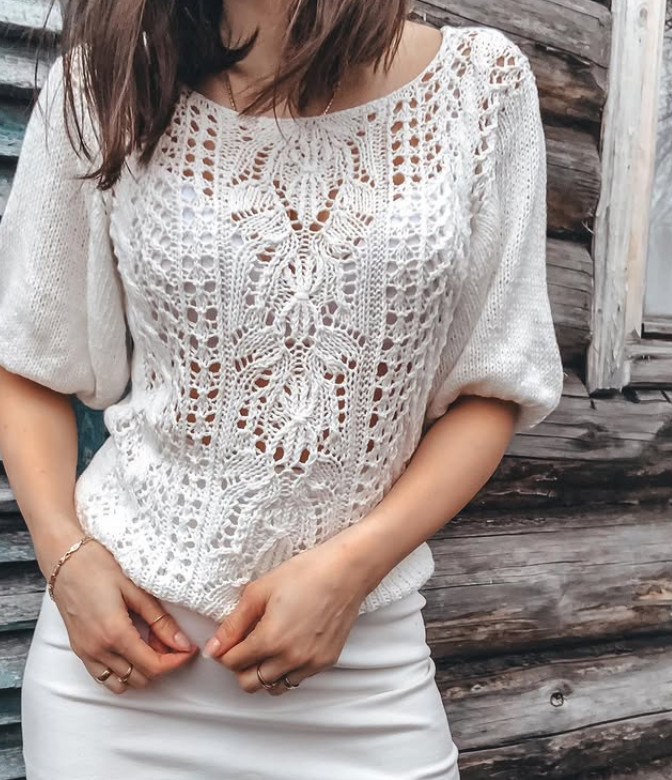
Rubus Blouse Square-neck - a feminine blouse with a square neck, raglan sleeves, and puffed lantern sleeves. The blouse requires no modifications after knitting, despite the puffed balloon sleeves, as they are shaped using decreases and increases. The blouse is knitted from the top down, so you can easily adjust the length of both the body and sleeves while knitting.
The blouse should have an ease of about 0-10 cm. The pattern includes instructions for a very short sleeve and a sleeve that goes to the elbow.
Sizes:
XS (S) M (L) XL
Finished measurements:
Chest circumference: 88 (92) 98 (104) 109 cm. Sleeve length, measured from the center under the arm: approximately 5/16. (6/17) 7/18 (8/19) 8/19 cm. Body length, measured from the center back: 48 (49.5) 52 (56) 56.5 cm.
Materials:
125/150 (150) 175 (175/200) 200 g of soft silk mohair from Knitting for Olive 220 m/25 g, doubled, or any other silk mohair, such as Kid Seta from Gepard Garn or Silk Mohair from Isager Yarn 212 m/25 g.
The model shown is knitted from Soft Silk Mohair yarn in the color “Dusty Rose” from Knitting for Olive.
For this model, I recommend using only silk mohair or another lightweight fluffy yarn, such as Midnatssol from Camarose.
Recommended needles:
The blouse is knitted in stockinette stitch in the round on 4 mm circular needles (80 cm) using two strands of fine silk mohair held double. The I-cord edge around the neckline is knitted on 3 mm circular needles (80 cm). I recommend interchangeable circular needles.
Gauge:
19 sts x 27 rows in stockinette stitch in the round on 4 mm needles = 10 x 10 cm, using two strands of silk mohair.
Techniques:
When casting on, avoid holes under the arm:
Backwards loop cast on:
Backwards loop cast on is used for casting on stitches for the square neckline at the center front before assembling the work and under the arm when the body separates from the sleeves.
I-cord bind off:
This technique can be used to create a beautiful edge along the neckline, sleeves, and body.
Instructions can be found in the link below. The video shows I-cord bind off with 3 sts, you will need to bind off 4 sts.
Increases for lantern sleeves:
Puffed sleeves are formed by knitting a significant number of increases at the top of the armholes.
The increases are worked using the left lifted increase (LLI) method. This technique is also called the invisible increase.
LLI = left lifted increase
When knitting stockinette stitch, you will see a “V” under the actual stitch on the needle. This “V” consists of a right and left stitch. Knit 1 st. After that, pick up the left stitch below with the left needle and knit it through the back loop. Check this video for more information:
Raglan increases:
You often knit raglan increases on both sides of the raglan. This blouse does not have raglan stitches. Place a stitch marker at each of the 4 transitions between the body and sleeves. Increases are knitted at each transition, on both sides of the stitch marker. There are no stitches between the increases, which means you are using the same panel for 2 increases, and it may turn out slightly tight.
Careful!! Usually, you knit a right-leaning increase before the marker and a left-leaning increase after the marker. This is the point of this instruction, the increases are mirrored, i.e., you knit a left-leaning increase before the marker and a right-leaning increase beyond the marker, creating a slight eyelet effect between these two increases:
(In total, you will need to knit 19 (20) 22 (24) 25 stockinette rows with raglan increases).
In all stockinette rows:
M1L: left-leaning increase (before stm): Lift the strand between 2 sts, inserting the needle front to back. Knit the new stitch through the back loop.
M1R: right-leaning increase (after stm): lift the strand between 2 sts, inserting the needle back to front. Knit the new stitch.
Place a stitch marker:
When you receive the appropriate instruction, transfer the stitch marker (stm) from the left needle to the right.
Abbreviations (in alphabetical order):
cb = center back
edge st (selvage stitch): slip one stitch as purl, leaving the yarn in front: insert the right needle into the first stitch on the left needle as if you want to knit a purl stitch.
Keep the yarn in front of the work. Always knit the last stitch on the needle.
k = knit
LLI = left lifted increase
p= purl
st = stitch
stm = stitch marker
This is where your blouse project begins:
Cast on 60 (62) 64 (66) 68 sts on 4 mm circular needles (80 cm) using the Longtail cast on.
The 1st and last stitch are selvage stitches: Always slip the 1st st as purl, keeping the yarn in front. Always knit the stitches.
Begin by knitting a purl row: selvage, 58 (60) 62 (64) 66 sts, selvage.
Now knit a knit row: selvage, 58 (60) 62 (64) 66 knit sts, selvage.
Place stitch markers:
On the next purl row, you will need to place all your stms. They will divide your work into front parts, sleeves, and back and mark where you need to make increases for the raglan.
Knit as follows (purl row):
Selvage st, place stm, 11 sts, place stm, 36 (38) 40 (42) 44, place stm, 11 sts, place stm, selvage st.
Attention! You have placed all your stms! They are divided as follows: 1 st for the right front, 11 sts for the right sleeve, 36 (38) 40(42) 44 sts for the back, 11 sts for the left sleeve, 1 st for the left front = a total of 60 (62) 64 (66) 68 sts.
Raglan increases:
Now you will need to make increases for the raglan. Knit a total of 19 (20) 22 (24) 25 rows with raglan increases (the increases are knitted every other row) (see raglan increases in the “Techniques” section – please read the complete instruction:
Row 1 (knit row) 1st raglan increase:
Selvage st, M1L, slip stm, M1R, 11 knit sts, M1L, slip stm, M1R, 36 (38) 40 (42) 44, M1L, slip stm, M1R, 11 knit sts, M1L, slip stm, M1R, selvage st. Now on the needle you have 68 (70) 72 (74) 76 sts.
Row 2 (purl row):
selvage, 66 (68) 70 (72) 74 sts, selvage.
Start increases for lantern sleeves, continue raglan increases:
Now you will increase the number of stitches by making increases in each sleeve stitch to create additional “fabric” for the lantern Sleeve, which will be decreased later to shape the sleeve. (See Increasing lantern sleeves in the Abbreviations and methods section)
Increases are knitted in 2 knit rows.
Row 3 (knit row) 2nd raglan increase and 1st increase for lantern sleeve:
selvage, 1 knit st, M1L, slip stm, M1R, 2 knit sts into 1 st a total of 13 times with LLI, M1L, slip stm, M1R, 38 (40) 42 (44) 46 knit sts, slip stm, M1R, 2 knit sts into 1 st a total of 13 times with LLI, M1L, slip stm, M1R, 1 knit st, selvage st. Now you have a total of 102 (104) 106 (108) on the needle.
Row 4 (purl row): selvage, 100 (102) 104 (106) 108 sts, selvage.
Row 5 (knit row) 3rd raglan increase and 2nd increase for lantern sleeve:
selvage, 2 knit sts, M1L, slip stm., M1R, 2 knit sts into 1 st a total of 28 times with LLI, M1L, slip stm., M1R, knit sts 40 (42) 44 (46) 48, M1L, slip stm, M1R, 2 knit sts into 1 st a total of 28 times with LLI, M1L, slip stm, M1R, 2 knit sts, selvage st.
Now you have a total of 166 (168) 170 (172) 174 sts on the needles. The stitches are distributed as follows: 4 sts for the right front, 58 sts for the right sleeve, 42 (44) 46 (48) 50 sts for the back, 58 sts for the left sleeve, 4 sts for the left front = a total of 166 (168) 170 (172) 174 sts.
You have finished increasing stitches on the sleeves and completed raglan increases 3 times.
Row 6 (purl row): selvage st., 164 (166) 168 (170) 172, selvage st.
Continue making raglan increases for another 10 (11) 13 (14) 15 times in all knit rows – after this you will make a total of 13 (14) 16 (17) 18 raglan increases.
Now you have a total of 246 (256) 274 (284) 294 sts on the needles. The stitches are distributed as follows: 14 (15) 17 (18) 19 sts for the right front, 78 (80) 84 (86) 88 sts for the right sleeve, 62 (66) 72 (76) 80 sts for the back, 78 (80) 84 (86) 88 sts for the left sleeve, 14 (15) 17 (18) 19 sts for the left front = a total of 246 (256) 274 (284) 294 sts.
Continue raglan increases, cast on stitches for the neckline, and knit in the round:
At the end of the row, where you made the 13th (14th) 16th (17th) 18th raglan increase, place a marker before casting on 36 (38) 40 (42) 44 sts using the Backwards loop cast on. After casting on, join the work. From this point, you will knit in the round. Now you have 282 (294) 314 (334) 346 sts on the needles.
Continue increasing the size of the raglan:
Knit in the round. Now you will need to make raglan increases another 6 (6) 6 (7) 7 times in every other row. Start with a row without raglan increases. After the last row with raglan increases, knit 3 rows without increases before the sleeve stitches are placed on the cable.
Now there are 330 (342) 362 (382) 394 sts on the needle. The stitches are divided as follows:
76 (80) 86 (92) 96 sts for the front, 90 (92) 96 (100) 102 sts for the right sleeve, 74 (78) 84 (90) 94 sts for the back, 90 (92) 96 (100) 102 sts for the left sleeve.
Place the sleeve stitches on the beginning of the cable:
Transfer the sleeve stitches onto a cable or an extra piece of yarn, finishing the body as follows:
Knit straight to the left sleeve. Remove the stm and place the sleeve stitches on a needle for the cable. Also remove the next stm and cast on 8 new stitches with the stitches under the armhole. Continue knitting to the next stm. Remove the stm and place the sleeve stitches on a needle for the cable. Remove the stm and cast on 8 new stitches under the armhole. Continue knitting straight to the stm where you cast on stitches for the square neckline. Now you have a total of 166 (174) 186 (198) 206 sts on the needle.
Body:
Continue knitting in stockinette stitch in the round until the length of the body reaches 31 (32) 33 (34) 35 cm from the armhole or to your desired length. Now you will need to decrease the number of stitches by 4, evenly distributing them around the round using k2tog - Remove your stm and let your round begin under your right sleeve. Now you will finish the body using I-cord bind off.
Binding off stitches. See how to do this in the link to I-cord bind off in the Techniques section (in alphabetical order).
Sleeves:
Cast on the remaining 90 (92) 96 (100) 102 sts for the right sleeve onto 4 mm circular needles (80 cm). Find the armhole in the center of the hole on the body and cast on 4 sts on the newly cast on sts, knit in stockinette stitch in the round and cast on another 4 sts.
(There will be small holes visible on both sides of the lifted stitches, which you will have to sew when the blouse is finished) avoid this using the technique described in the “Techniques” section (in alphabetical order): “Avoiding holes under the armhole”.
Attention! When performing the method described in the video, cast on a total of 8 sts before starting to knit the 1st row in stockinette. After that, let the row start in the center between these 8 sts.
Now you have 98 (100) 104 (108) 110 sts on the needle.
Now you will knit in stockinette stitch in the round using the Magic Loop method; alternatively, you can knit the stitches on double-pointed needles.
Continue knitting until the length of the sleeve is 5/16 (6/17) 7/18 (8/19) 8/19 cm or reaches the desired length – for a long sleeve, I recommend that it ends just before the elbow. Now you will decrease 46 (46) 46 (48) 48 sts evenly (the start of the round is positioned at the center under the sleeve). Now you have 52 (54) 58 (60) 62 sts on the needle.
Finish the sleeve by knitting I-cord bind off. See how to do this in the link to I-cord bind off in the Techniques section.
For the left sleeve, knit similarly.
Finishing:
Square neckline:
The neckline will be finished with a beautiful I-cord edge.
Start with casting on stitches for the neckline:
You will need to start by picking up stitches all along the neckline. You should pick up stitches with the right side of the blouse facing you. You will need to place the picked up stitches on 80 cm long 3 mm needles.
Divide the back stitches at the top of the blouse into two parts and place a stitch marker—you need to leave 2 more stitches on the right side than on the left side in all sizes. In size XS, you will have 17 sts on the left side and 19 sts on the right side.
Start picking up sts next to the stm. Pick up sts in the gaps between the sts from the stm towards the left sleeve.
Pick up one st in each gap between the sts a total of 18 (18) 20 (20) 22 sts, then pick up 1 st in the band between the raglan stitches.
Pick up 10 sts in the gap between the left sleeve stitches, pick up 1 st in the band between the raglan increases, and then cast on 26 (28) 32 (36) 38 sts in each st along the left side of the square neckline. Cast on 1 st at the left corner of the square neckline, and then cast on 38 (40) 42 (44) 46 sts in the gap between the sts along the front line of the square neckline.
Cast on 1 st at the right corner of the square neckline, then cast on 26 (28) 32 (36) 38 sts in each st along the right side of the neckline. Now pick up 1 st in the band between the raglan increases, pick up 10 sts in the gap between the left sleeve stitches, pick up 1 st in the band between the raglan increases, and finally pick up 17 (19) 19 (21) 21 sts in each gap between the back stitches. Now you have a total of 151 (159) 171 (179) 187 sts along the neckline.
Knit the I-cord edge:
Once you have cast on stitches around the entire neckline, you will need to bind off the stitches on size 3 mm needles using the technique: I-cord.
Binding off stitches: This technique is shown in the link in the “Techniques” section: I-cord binding off. Weave in all ends.
You might want to sew a small strip of elastic along the finished neckline. Weave in all ends.
admin@klubok.work