Mini tulips by freeform master Iriss
Added: 07.01.2019 в 07:23 Views: 21195
Mini tulips by freeform master IrissKlubokhttp://klubok.work/2/199/7609/Klubokhttps://klubok.work/css/image/top-logo-en.png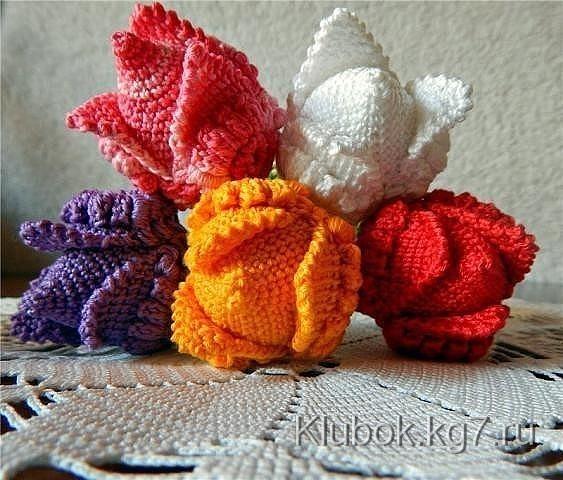
We will need: Hook No. 1, 1 yarn: iris, CRYSTAL (100% acrylic) 275 m./50 g. Sewing needle; Scissors; Filler; For fastening No. 1: a ready-made loop (usually comes in pairs with the hook) For fastening No. 2: glue, paperclip, button, fabric adhesive plaster Optional: key ring or keychains, carabiner for keychains, etc. Flower height – 5 cm, diameter – 4 cm. If you knit tulips with thicker yarn, they may turn out to be life-size. Abbreviations: ch – chain stitch; sc – single crochet; inc – increase: 2 single crochets in one stitch; dec – decrease: 2 single crochets together; sl st – slip stitch. Bud: Crocheted in a spiral. Stuff with filler as you go. Row 1: 6 sc in magic ring = 6 sc* Row 2: (inc) x 6 times = 12 sc Row 3: (inc, 1 sc) x 6 times = 18 sc Row 4: (inc, 2 sc) x 6 times = 24 sc Row 5: (inc, 3 sc) x 6 times = 30 sc Row 6: (inc, 4 sc) x 6 times = 36 sc. ** Rows 7-12: 36 sc Row 13: (10 sc, dec) x 3 times = 33 sc Row 14: (9 sc, dec) x 3 times = 30 sc Row 15: (8 sc, dec) x 3 times = 27 sc Row 16: (7 sc, dec) x 3 times = 24 sc Row 17: (6 sc, dec) x 3 times = 21 sc Row 18: (5 sc, dec) x 3 times = 18 sc. Row 19: (4 sc, dec) x 3 times = 15 sc Row 20: (3 sc, dec) x 3 times = 12 sc Row 21: (2 sc, dec) x 3 times = 9 sc Row 22: (1 sc, dec) x 3 times = 6 sc Pull the stitches tight. Finish crocheting. Cut the yarn and tuck it inside. * If we imagine the tulip as a keychain, then after the 1st row insert a loop (from a clothing hook) ** If you do not have a ready-made loop, you can make it from a paperclip or a piece of wire. Straighten the paperclip or wire, apply glue to it, and tightly wrap it with green yarn in the middle for about 2 cm. Let it dry. Bend it in half, keeping the wrapped part rounded. Insert both ends of the wire into the center of the crocheted bottom, insert a button of suitable diameter from the back (this is for reliability), twist the ends of the wire together and wrap them with adhesive plaster. This construction takes time but is very reliable and attractive from the outside: Buds with various fastening options Freeform – petals: 3 pieces for each flower. 3-4 ch to form a ring; or start with a magic ring Row 1: 1 ch, 6 sc in magic ring, 8 dc in the back loops (2 dc in 1 stitch); 10 tr in the back loops (2 tr in 1 stitch) = curl; Do not cut the yarn! Row 2: continue crocheting with the working yarn: (cone, 1 ch) x 5 times, 11 twisted columns; Row 3: without turning the work, pick up as many stitches as possible under the cones (I get 11 stitches) and crochet several rows of Tunisian crochet, decreasing it to nothing. Row 4: crochet slip stitches along the left edge of the resulting triangle to its base. Without turning the work, return crab stitch to the top of the triangle, and then along the right side to the twisted columns. Row 5: 1 ch, (concave tr + 1 ch) x 11 times, sc, turn the work to the right side. Row 6: 1 ch, one wrapped column around the leg of each of the concave tr from the previous row, sc, 1 ch. Row 7: smoothly "crawl" with sl st or ch to the free half-stitches of the curl and crochet crab stitch on them towards the center. Secure the yarn and tuck it in on the wrong side. Leave a long tail for sewing. Place the finished petals on the bud. Attach each petal with a pin at the top, and with another pin at the base. If you are satisfied with the placement of the petals, then sew each petal to the bud around the perimeter with invisible stitches (a semicircle of wrapped columns), leaving the corners of the Tunisian crochet unsewn. Remove the pins. The corners will beautifully curl outward by themselves.
Category: Flowers