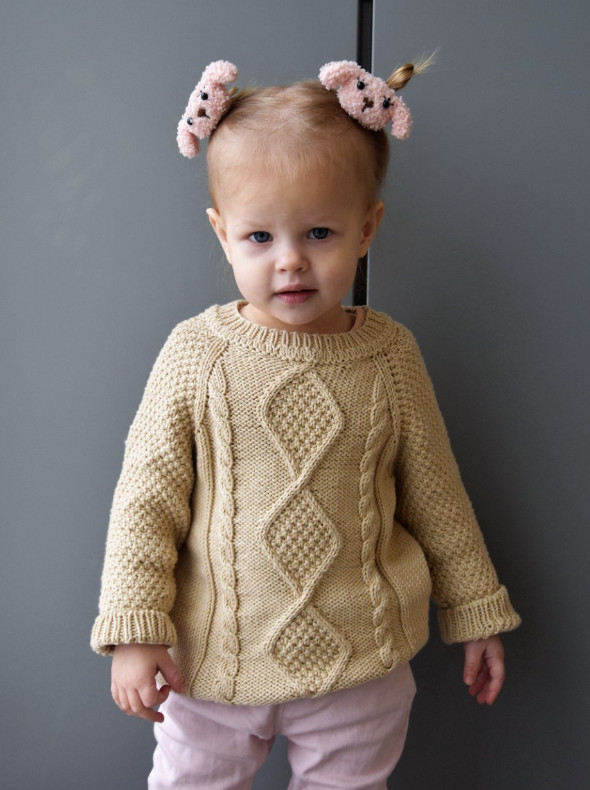
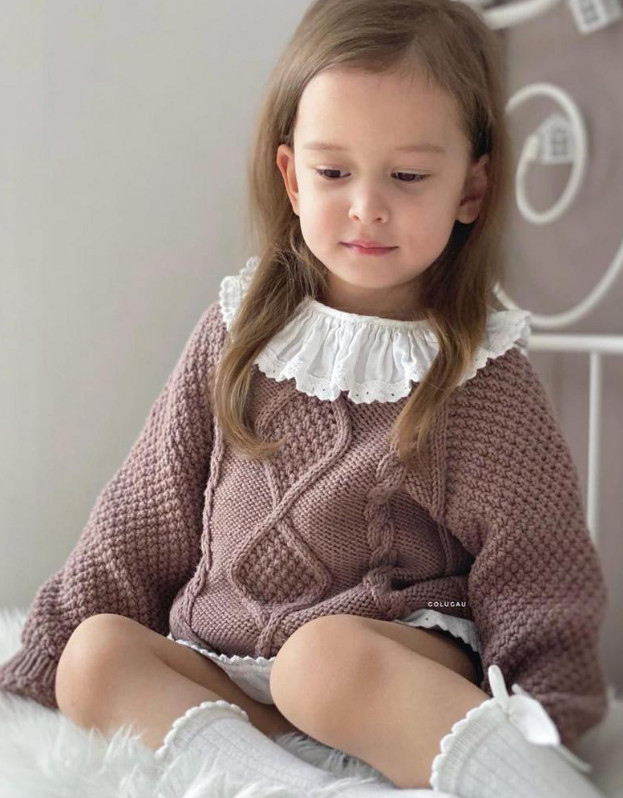
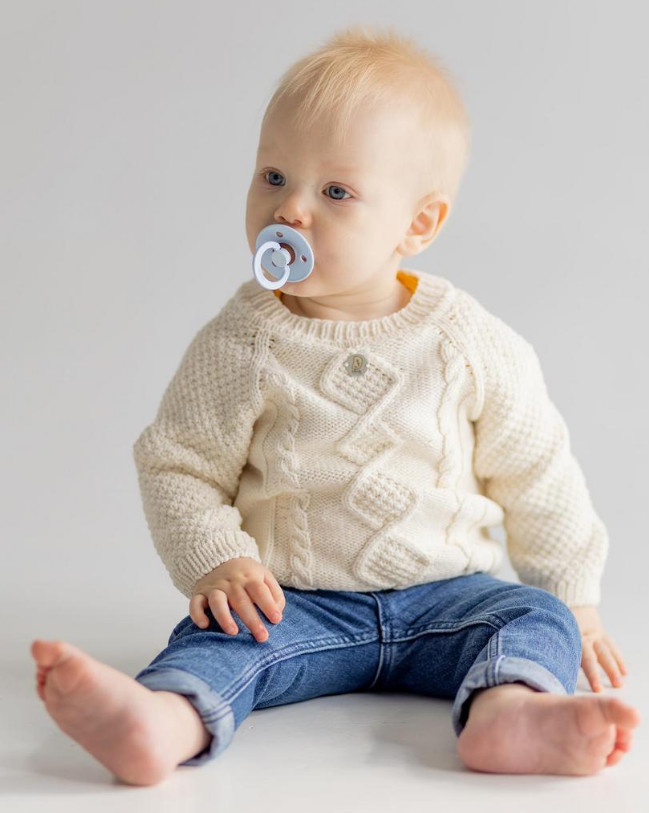
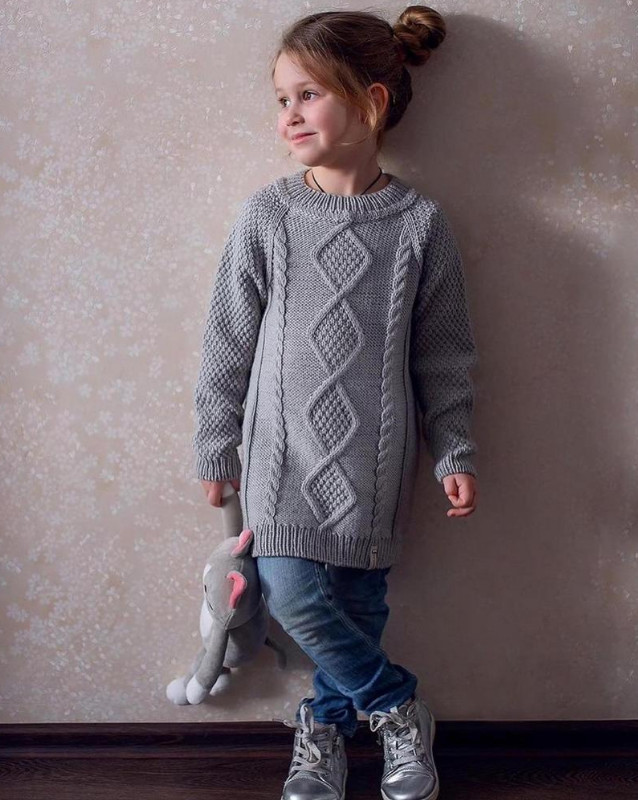
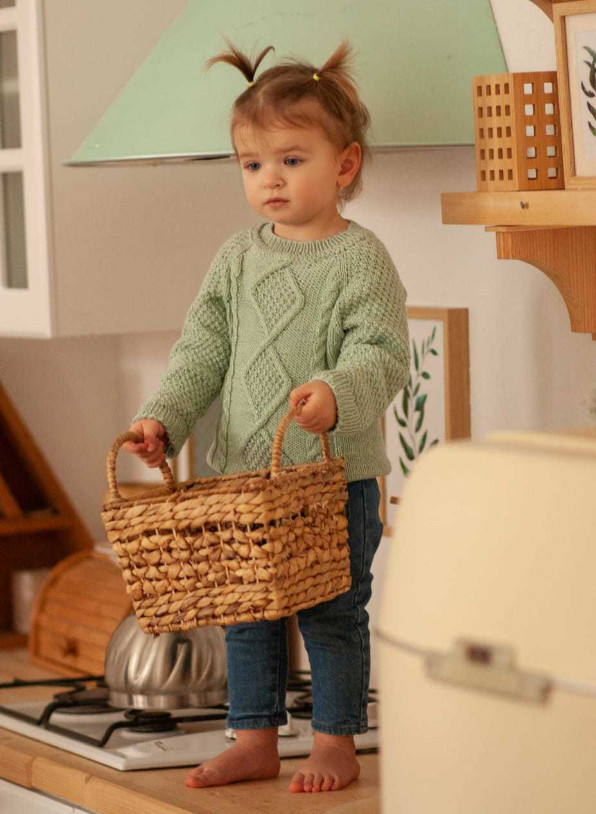
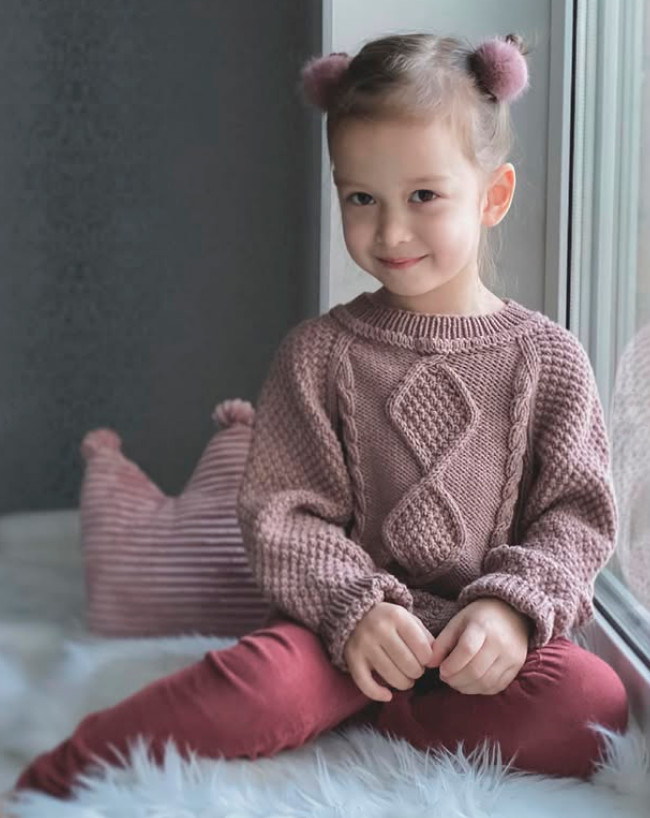
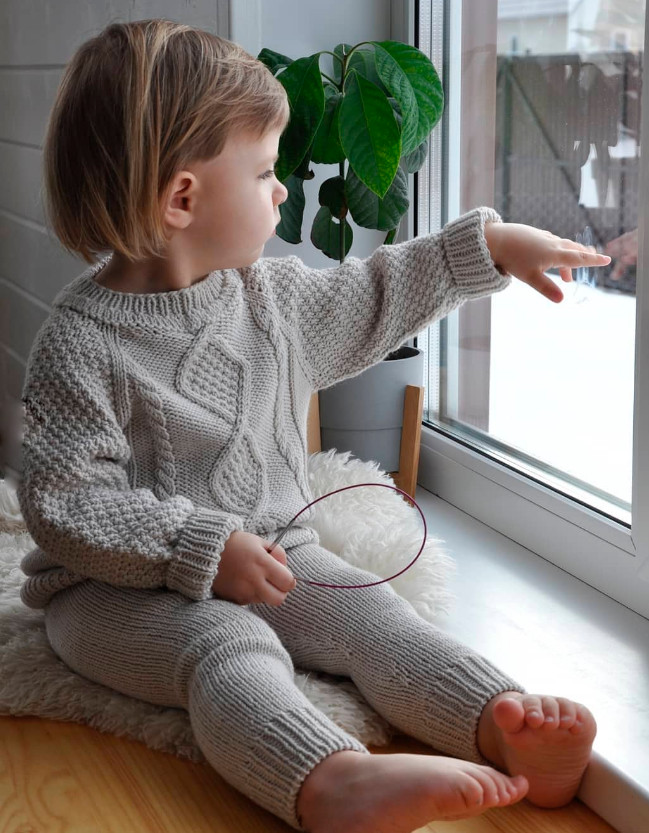
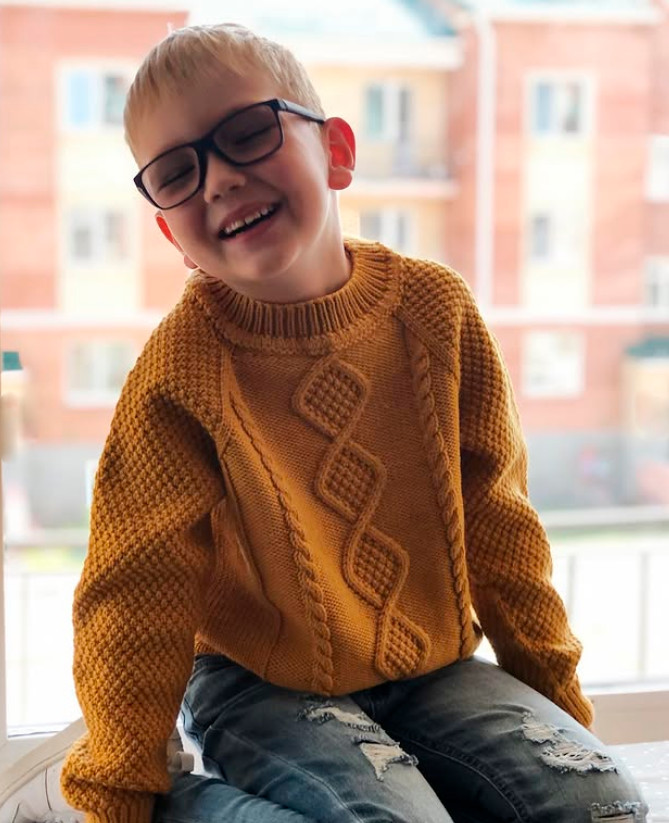
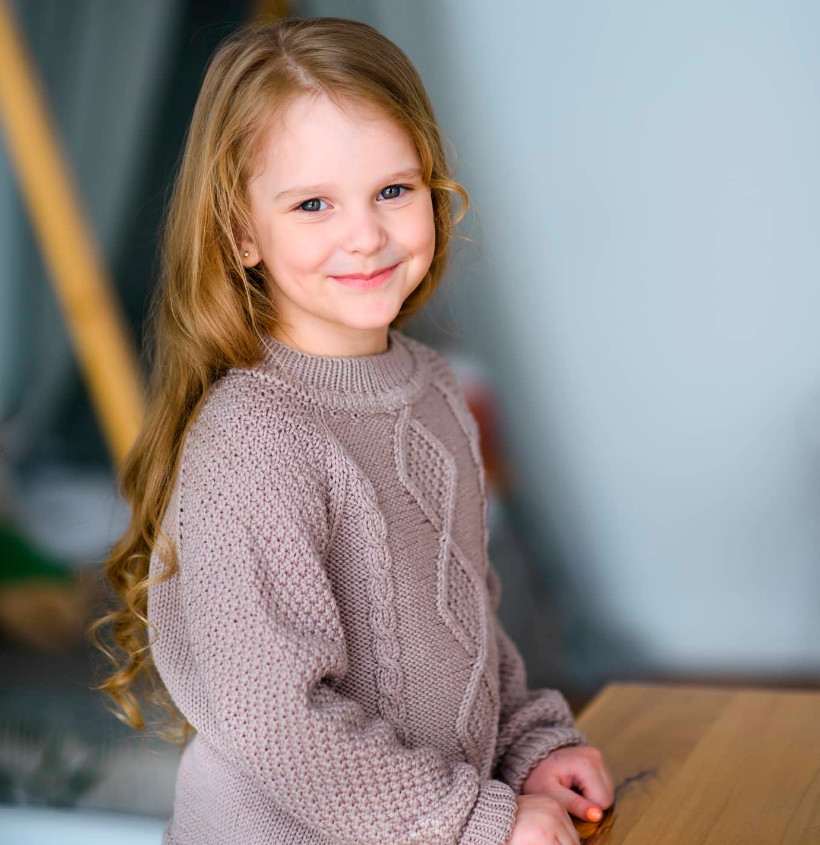
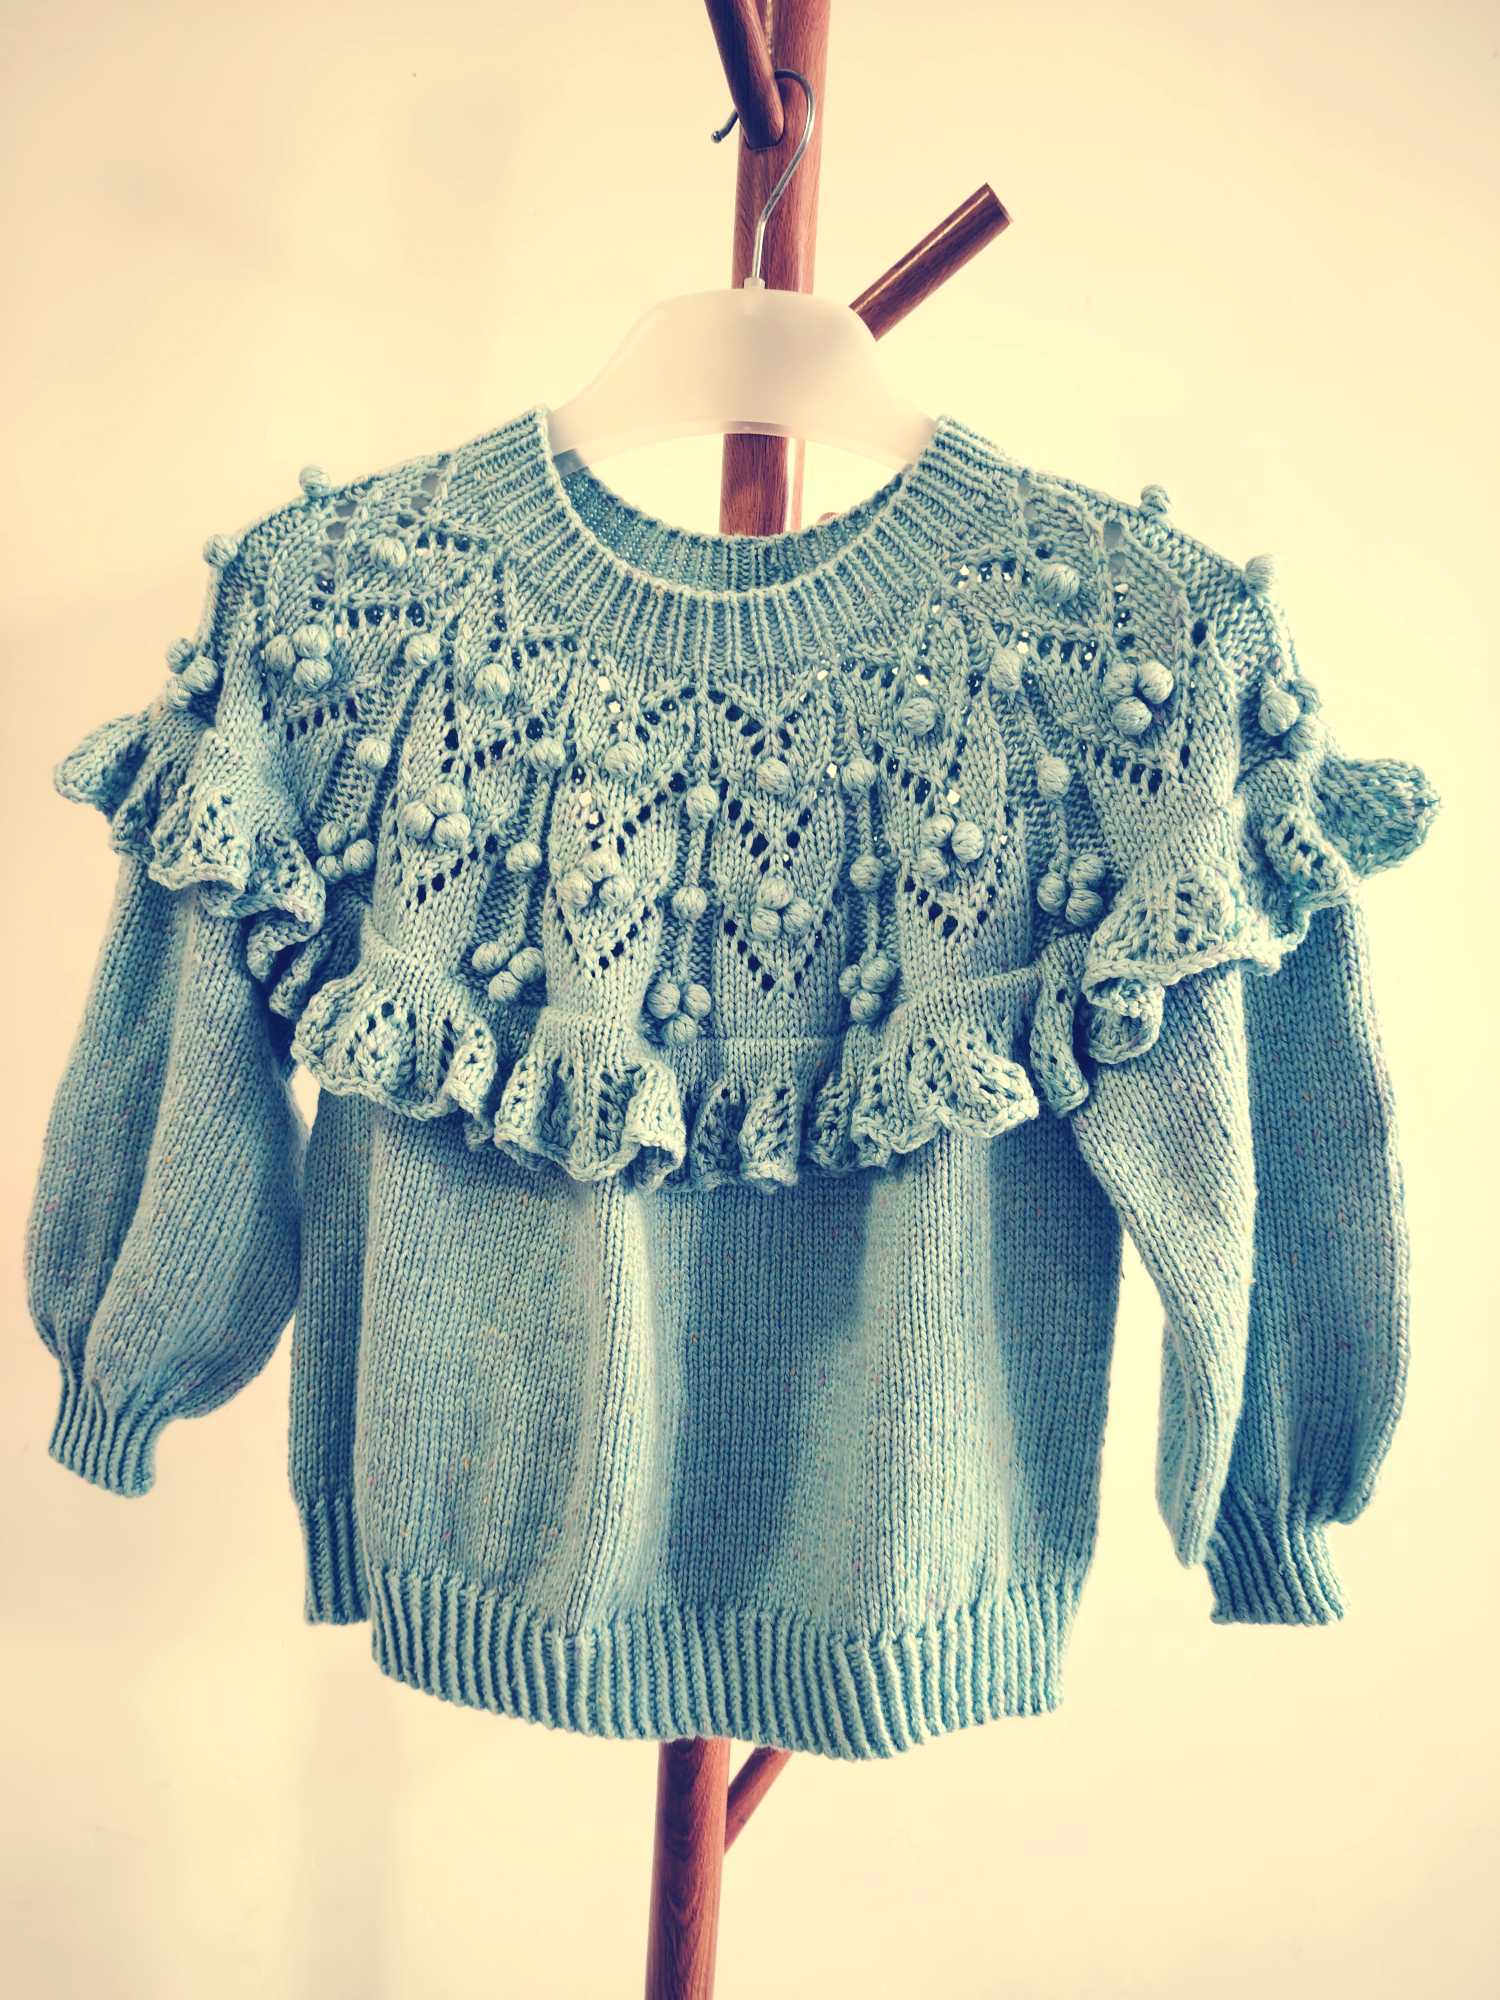
A knitted cardigan
Added: 18.12.2025 в 18:53 Views: 412
A knitted cardiganKlubokhttp://klubok.work/23/182/9337/Klubokhttps://klubok.work/css/image/top-logo-en.png
Sweater sizes
The model is designed for the child’s height:
-
6–12 months — 68–80 cm
-
1–2 years — 80–92 cm
-
2–4 years — 92–104 cm
-
4–6 years — 104–116 cm
-
6–8 years — 116–128 cm
-
8–10 years — 128–140 cm
Size is chosen based on the child’s actual height.
It is recommended to additionally compare measurements with the length chart.
Garment lengths
Front length of the garment (center):
-
6–12 months: 33–34 cm
-
1–2 years: 34–35 cm
-
2–4 years: 37–38 cm
-
4–6 years: 38–39 cm
-
6–8 years: 43–44 cm
-
8–10 years: 47–48 cm
Inner sleeve length:
-
6–12 months: 18–19 cm
-
1–2 years: 21–22 cm
-
2–4 years: 26–27 cm
-
4–6 years: 29–30 cm
-
6–8 years: 34–35 cm
-
8–10 years: 36–37 cm
Size designations in the description
All numerical data in the instructions below are given through a slash
in the following order:
6–12 / 1–2 / 2–4 / 4–6 / 6–8 / 8–10
Yarn
Recommended yarn:
-
Lana Gatto — Maxi Soft (90 m / 50 g)
-
Mondial — Super Otto (90 m / 50 g)
Composition: 100% merino
Substitution with any yarn of similar yardage is allowed, provided it matches the specified gauge.
What you will need to knit
Amount of yarn required depending on size:
-
6 / 7 / 8 / 9 / 10 / 11 skeins
Tools:
-
circular needles No. 4–4.5 (size chosen to suit your personal gauge)
-
markers: 8 pieces of one color + 4 contrasting (optional)
-
needle with a large eye for casting off stitches
Gauge
Gauge swatch:
-
21 stitches × 28 rows = 10 × 10 cm
-
swatch worked in stockinette stitch
-
needles 4 mm
-
measurements taken after blocking
Note that gauge may vary among different knitters.
Before starting work, be sure to:
-
knit a swatch of at least 10×10 cm ;
-
perform blocking;
-
if necessary, change the needle size to achieve the required gauge.
-
Needles and cast-on stitches
For knitting the neck rib, use needles:
-
on 0.5–1 size smaller than the main ones.
The cast-on is performed in the classic way.
Number of stitches for cast-on (including the join):
- 73 / 79 / 83 / 87 / 91 / 95 stitches
Stitches are cast on on one needle, so the neckline edge is firm and does not stretch.
-
Joining knitting in the round
Before starting to knit in the round, perform a neat join of the stitches in the round, without offset (jog) and without tearing the fabric.
The joining method is shown in a separate video.
After joining:
-
the joining stitch disappears;
-
what remains on the needles:
-
72 / 78 / 82 / 86 / 90 / 94 stitches
-
Neckline ribbing
Starting the knitting
-
A marker for the start of the row is placed — M0
-
Knitting is worked in the round
Ribbing pattern
A 1×1 rib is used:
-
alternating knit and purl stitches
Number of ribbing rows by size:
-
6 / 6 / 8 / 8 / 10 / 10 rows
Important:
-
do not pull the ribbing too tightly,
-
so that the sweater can pass easily over the child’s head later.
After completing all ribbing rows:
-
needles do not change;
-
the false garter stitch begins.
False garter stitch: preparation
Changing the number of stitches
Before starting the false garter stitch, the number of stitches must be doubled.
Setup row
Around the circle, the following sequence is repeated:
-
one purl stitch
-
yarn over (movement of the yarn away from you)
These actions are repeated to the end of the row.
After completing the setup row:
on the needles:
144 / 156 / 164 / 172 / 180 / 188 stitches
Page 10 — False garter stitch: Row 1
Row 1 (in the round)
Across the round, the following sequence is repeated:
-
slip one stitch unknit, with the working yarn behind the work;
-
from the yarn over, knit a purl stitch, the stitch is not crossed.

The row is worked all the way around without changing the number of stitches.
There is a tutorial video available for this stage.
False garter stitch:
Row 2 (in the round)
Sequence of stitches:
-
1 knit stitch;
-
slip the next stitch unknit, working yarn is placed in front of the work.


The actions are repeated until the end of the round.
The number of stitches on the needles remains unchanged.
There is also a separate video explaining this row.
False garter stitch:
Row 3 (in the round)
Sequence:
-
one stitch slip unknit, working yarn behind the work;
-
1 purl stitch.
These actions are repeated to the end of the row.
Row 4 (in the round)
Sequence:
-
1 knit stitch;
-
slip one stitch unknit, working yarn in front of the work.
The row is fully worked around the circle.
At this stage:
-
the number of stitches is still doubled;
-
a characteristic edge of the false garter stitch forms;
-
needles do not change.
Finishing the false garter stitch and the finished neckline
In the last row of the false garter stitch, the number of stitches must be returned to the original, reducing them by half. To do this, around the circle, two stitches are turned with their left halves toward each other and purled together over the right halves. This purling is repeated to the end of the row without gaps.
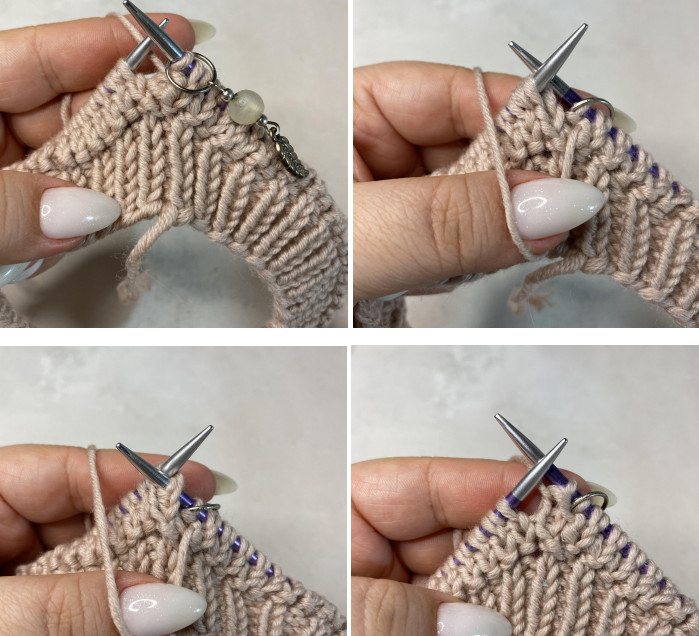
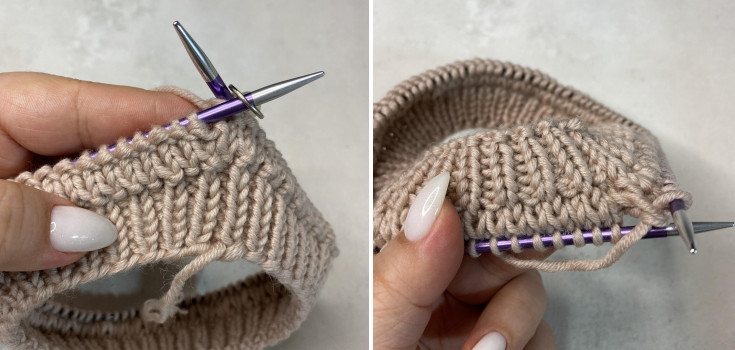
After completing this row, the number of stitches on the needles returns to the original and is 72/78/82/86/90/94 stitches depending on size. The faux garter stitch is considered finished, the neckline edge looks neat from both the right side and the wrong side, as further shown in the photo in the description.
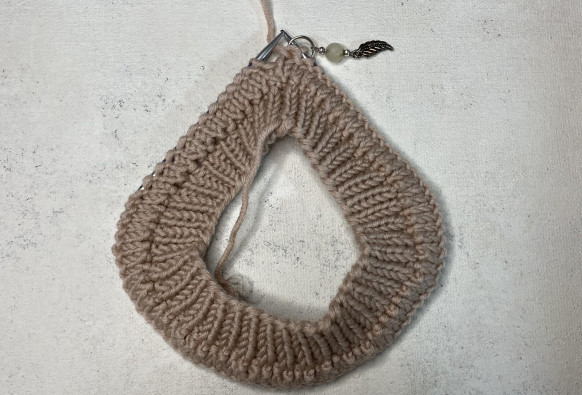
At this stage, the work on the neckline is completely finished; subsequent actions will be performed on the main needle size and move on to shaping the raglan.
Beginning of Raglan and Short-Row Scheme
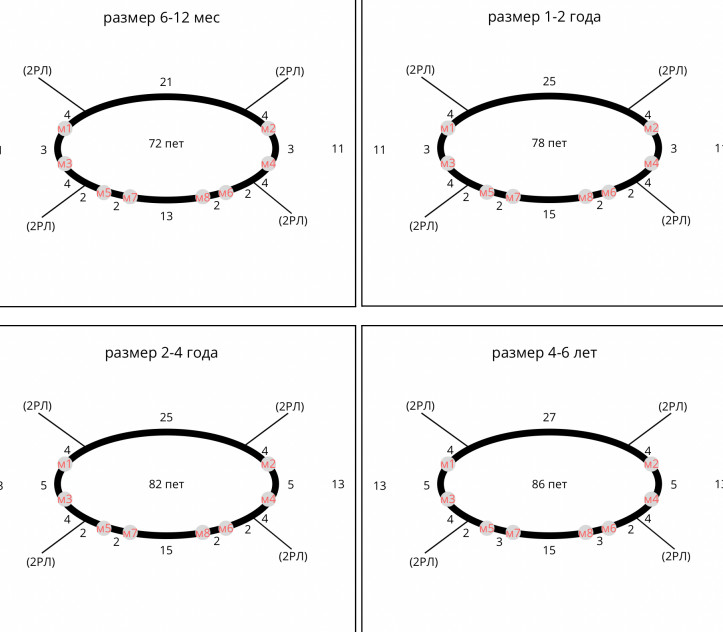
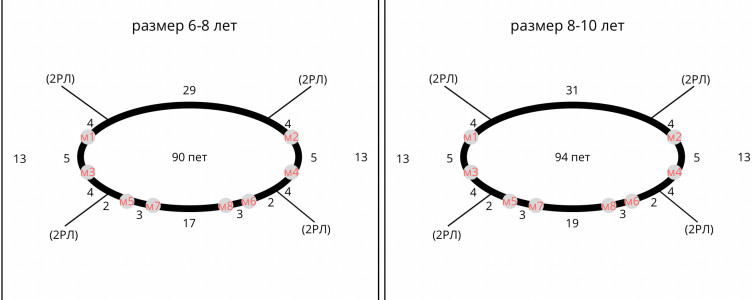
After finishing the neckline, the needles are changed to the main size. Next is an establishing round, in which markers are placed for the raglan lines and for the short rows. In the chart they are designated as m0 m1 m2 m3 m4 m5 m6 m7 m8. If desired, you can additionally mark the raglan lines themselves with markers.
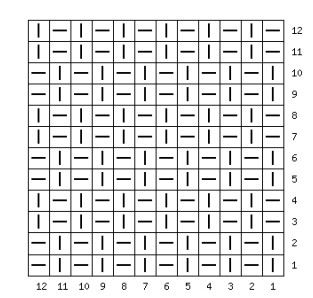
On the sleeves the "Rice" pattern
On the sleeves, the Rice pattern is used; on the front and back the main raglan structure is formed. The establishing round begins with the start-of-round marker, which also serves as the m0 and m2 markers. Then 4 stitches of the Rice pattern are worked starting from the knit stitch, then 2 knit stitches of the raglan line, then 21/25/25/27/29/31 knit stitches, then again 2 knit stitches of the raglan line, then 4 Rice pattern stitches starting from the purl stitch, then the marker m1 is placed. Next, according to the pattern, 3/3/5/5/5/5 stitches of the Rice pattern are worked, then marker m3 is placed, after which 4 Rice stitches are worked, then 2 knit stitches of the raglan line, then 2 purl stitches, then marker m5, then 2/2/2/3/3/3 purl stitches, then marker m7, then 4/5/5/5/6/7 purl stitches, then 2 knit stitches, 1 purl stitch, 2 knit stitches, then again 4/5/5/5/6/7 purl stitches, then marker m8, then 2/2/2/3/3/3 purl stitches, then marker m6, then 2 purl stitches, then 2 knit stitches of the raglan line, then 4 Rice stitches starting from the purl stitch, then marker m4, and finally 3/3/5/5/5/5 Rice stitches according to the chart.
For clarity, the description includes diagrams showing the arrangement of raglan lines and short rows.
After the establishing round begins the formation of the yoke using short rows. The knitting is not done in the round but with turning. The first row is worked from the start of the round at the marker m0 to the marker m1; the second row from m1 to m2; the third row from m2 to m3; the fourth row from m3 to m4; the fifth row from m4 to m5; the sixth row from m5 to m6; the seventh row from m6 to m7; the eighth row from m7 to m8. At the end of each short row the corresponding marker is removed from the knitting.
At this stage, preparation is made for knitting the raglan yoke using short rows, and then a detailed description of each row with wraps and turns begins.
Knitting Short Rows of the Neckline Rise
The actual execution of the short rows of the neckline rise begins with turns and wraps. The first row is worked on the right side starting from the marker m0; 4 stitches of the Rice pattern are knitted with the pattern’s alternation of knit and purl stitches; then 2 knit stitches of the raglan line; then 21/25/25/27/29/31 knit stitches; then again 2 knit stitches of the raglan line; then 4 Rice pattern stitches starting from the purl stitch, after which the marker m1 is removed and the knitting is turned.
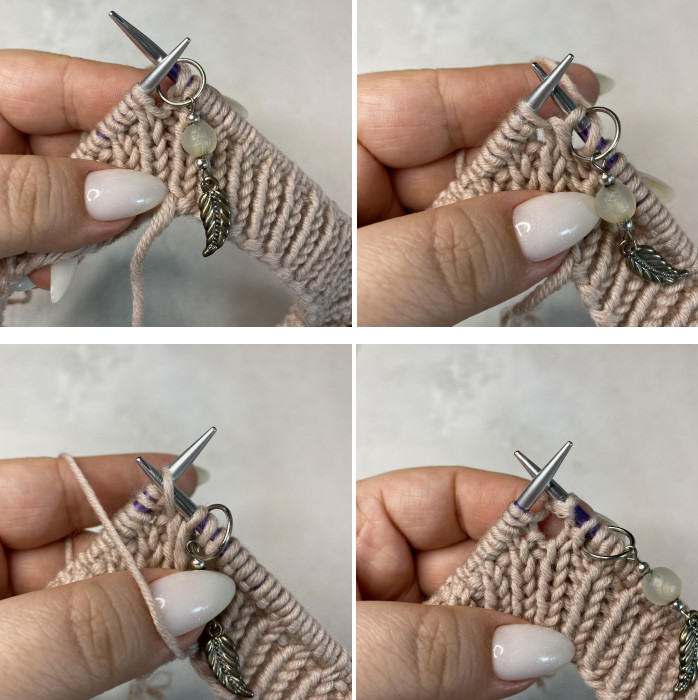
The second row is worked on the wrong side; in front of the first stitch a wrap is made on the right needle; then 4 Rice pattern stitches are worked as per the pattern; then 2 purl stitches of the raglan line; then 21/25/25/27/29/31 purl stitches; then 2 purl stitches of the raglan line; then 4 Rice pattern stitches as per the pattern, after which the marker m2 is removed and the knitting is turned. For this moment, there is a separate video showing the correct wrapping before the knit stitch.
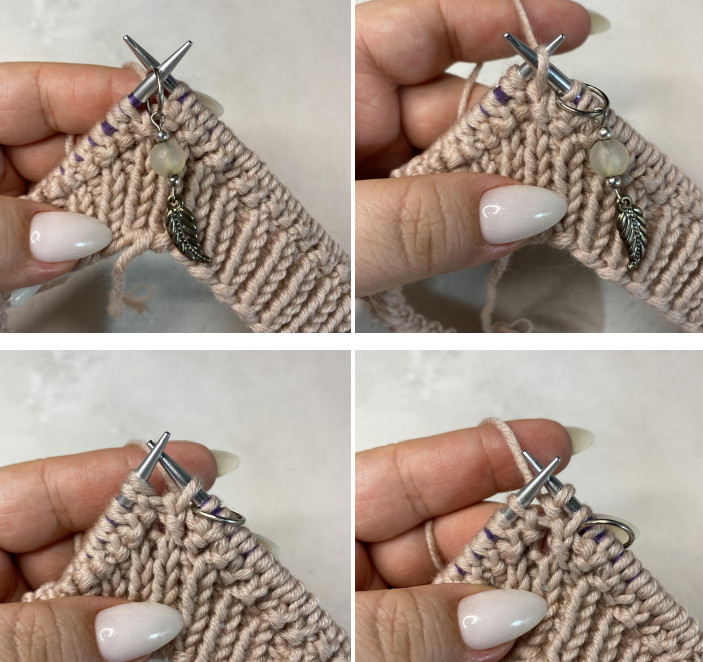
The third row is worked on the right side: first a wrap is made, then 4 Rice pattern stitches are worked; then an additional wrap is made on itself, then 2 knit stitches of the raglan line; then a wrap on itself; then 21/25/25/27/29/31 knit stitches; then another wrap on itself; then 2 knit stitches of the raglan line; then a wrap on itself; then 4 Rice pattern stitches; after which the wrap is worked together with the next knit stitch; then 2/2/4/4/4/4 Rice pattern stitches are worked; then marker m3 is removed and the knitting is turned. The description separately shows videos on performing wraps before the purl stitch along the raglan lines and on knitting the wrap together with the next stitch.
It is noted that when knitting the short rows the Rice pattern at the front raglan lines may temporarily look incomplete, which is normal and not considered an error provided that the alternation of knit and purl stitches is preserved.
The fourth row is worked on the wrong side, starting with a wrap, then 7/7/9/9/9/9 stitches of the Rice pattern are worked; then from the wrap a crossed purl stitch is worked; then 2 purl stitches of the raglan line; then again a crossed purl stitch; then 21/25/25/27/29/31 purl stitches; then again a crossed purl stitch; then 2 purl stitches of the raglan line; then a crossed stitch according to the pattern; then 4 Rice pattern stitches; then the wrap is worked together with the next stitch according to the pattern; then 2/2/4/4/4/4 Rice pattern stitches are worked; after which marker m4 is removed and the knitting is turned. For this row there are videos analyzing two options for knitting wraps along the raglan line.
At this stage, the neckline rise continues to form through sequential turns and symmetrical increases along the raglan lines.
Continuation of Short Rows and Completion of the Neckline Rise
The fifth row is worked on the right side starting with a wrap, then 8/8/10/10/10/10 stitches of the Rice pattern are worked; then a wrap is made on itself; then 2 knit stitches of the raglan line; then a wrap on itself; then 23/27/27/29/31/33 knit stitches; then again a wrap on itself; then 2 knit stitches of the raglan line; then a wrap on itself; then 8/8/10/10/10/10 stitches of the Rice pattern; after which the wrap is worked together with the next stitch according to the pattern; then 3 Rice pattern stitches; then 2 knit stitches of the raglan line; then 2 purl stitches; after which marker m5 is removed and the knitting is turned.
The sixth row is worked on the wrong side: starting with a wrap, then 2 knit stitches, then 2 purl stitches of the raglan line, then 12/12/14/14/14/14 stitches of the Rice pattern, then a crossed stitch according to the pattern, then 2 purl stitches of the raglan line, then a crossed purl stitch, then 23/27/27/29/31/33 purl stitches, then again a crossed purl stitch, then 2 purl stitches of the raglan line, then a crossed stitch according to the pattern, then 8/8/10/10/10/10 stitches of the Rice pattern; after which the wrap is knitted together with the next stitch according to the pattern; then 3 Rice pattern stitches; then 2 purl stitches of the raglan line; then 2 knit stitches; after which marker m6 is removed and the knitting is turned.
The seventh row is worked on the right side, starting with a yarn over on the right needle, then 2 purl stitches are worked, then a yarn over onto itself, then 2 knit stitches on the raglan line are worked, then a yarn over away from itself, then 13/13/15/15/15/15 stitches of the rice pattern, then a yarn over onto itself, then 2 knit stitches on the raglan line, then a yarn over away from itself, then 25/29/29/31/33/35 knit stitches, then a yarn over onto itself, then 2 knit stitches on the raglan line, then a yarn over away from itself, then 13/13/15/15/15/15 stitches of the rice pattern, then a yarn over onto itself, then 2 knit stitches on the raglan line, then a yarn over away from itself, then 2 purl stitches, after which the yarn over is worked together with the next stitch as a purl stitch with the stitches of the left half turned toward you, then 1/1/1/2/2/2 purl stitches are worked, after which the marker m7 is removed and the knitting is turned.
The eighth row is worked on the wrong side, starting with a yarn over, then 4/4/4/5/5/5 knit stitches, then a crossed knit stitch, then 2 purl stitches on the raglan line, then a crossed stitch along the pattern, then 13/13/15/15/15/15 stitches of the rice pattern, then a crossed stitch along the pattern, then 2 purl stitches on the raglan line, then a crossed purl stitch, then 25/29/29/31/33/35 purl stitches, then a crossed purl stitch, then 2 purl stitches on the raglan line, then a crossed stitch along the pattern, then 13/13/15/15/15/15 stitches of the rice pattern, then a crossed stitch along the pattern, then 2 purl stitches on the raglan line, then a crossed knit stitch, then 2 knit stitches, after which the yarn over is knitted together with the next stitch as a knit stitch, then 1/1/1/2/2/2 knit stitches are worked, and the marker m8 is removed and the knitting is turned.
The ninth row is worked on the right side, starting with a yarn over, then 5/5/5/6/6/6 purl stitches, then a yarn over onto itself, then 2 knit stitches on the raglan line, then a yarn over away from itself, then 15/15/17/17/17/17 stitches of the rice pattern, then a yarn over onto itself, then 2 knit stitches on the raglan line, then a yarn over away from itself, then 27/31/31/33/35/37 knit stitches, then a yarn over onto itself, then 2 knit stitches on the raglan line, then a yarn over away from itself, then 15/15/17/17/17/17 stitches of the rice pattern, then a yarn over onto itself, then 2 knit stitches on the raglan line, then a yarn over away from itself, then 5/5/5/6/6/6 purl stitches, then the yarn over is knitted together with the next purl stitch, then 3/4/4/4/5/6 purl stitches are worked, then 2 knit stitches, 1 purl stitch, 2 knit stitches, then 3/4/4/4/5/6 purl stitches, after which the last stitch is knitted together with the next yarn over as a purl stitch and a marker is hung which now marks the beginning of the circular row.
After this, the knitting fully returns to the circular mode of working rows.
Finishing the sprout, symmetry check, and beginning of the front patterns
After returning to circular knitting, a tenth row is worked in which 5/5/5/6/6/6 purl stitches are knitted, then a crossed purl stitch, then 2 knit stitches on the raglan line, then a crossed stitch along the pattern, then 15/15/17/17/17/17 stitches of the rice pattern, then again a crossed stitch along the pattern, then 2 knit stitches on the raglan line, then a crossed knit stitch, then 27/31/31/33/35/37 knit stitches, then a crossed knit stitch, then 2 knit stitches on the raglan line, then a crossed stitch along the pattern, then 15/15/17/17/17/17 stitches of the rice pattern, then a crossed stitch along the pattern, then 2 knit stitches on the raglan line, then a crossed purl stitch, then 9/10/10/11/12/13 purl stitches, then 2 knit stitches, 1 purl stitch, 2 knit stitches, then 4/5/5/5/6/7 purl stitches.
After completing this row, it is recommended to check the symmetry of stitches along the raglan lines; the left front raglan line should be mirror-symmetric to the right front, and the left back should be mirror-symmetric to the right back. At this stage the sprout is considered fully formed and there are 96/102/106/110/114/118 stitches on the needles.
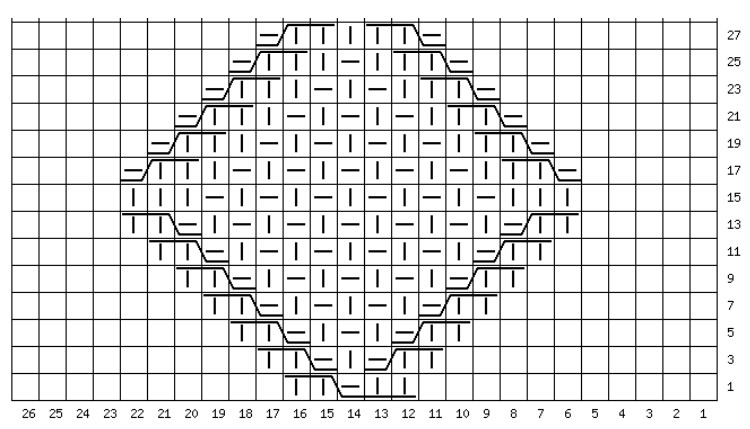
Next, decorative patterns are introduced. In the center of the front, an aran diamond motif is worked in, with the central position indicated in the photo in the description. To the right and left of the front raglan lines, from yarn-overs, knit stitches are started to form the braids and cables. Raglan increases continue with alternating rows with and without increases; in even rows yarn-overs are worked along the raglan lines, and in odd rows these yarn-overs are worked as crossed stitches.
On the sleeves, the rice pattern is continued strictly according to the chart. On the back, stockinette stitch is used without patterns. The charts show only the odd rows, and in all even rows the stitches are worked as shown. In the central part of the diamonds, the rice pattern is additionally used.
For sizes 6-12 months, 1-2 years, and 6-8 years:
 For sizes 2-4 years, 4-6 and 8-10 years:
 Leave 2 knit stitches on the first auxiliary needle behind the work and 1 purl stitch on the second auxiliary needle behind the work. Knit 2 knit stitches, 1 purl stitch from the second auxiliary needle, and 2 knit stitches from the first auxiliary needle.
 Leave 1 stitch on the auxiliary needle behind the work. Knit 2 knit stitches and 1 purl stitch from the auxiliary needle.
 Leave 2 stitches on the auxiliary needle in front of the work. Knit 1 purl and 2 knit stitches from the auxiliary needle.
Beginning raglan with diamonds and gradual formation of braids
The work continues in the round with simultaneous raglan shaping and introduction of patterns. In the first row of this block, 6/6/6/7/7/7 purl stitches are worked, then a yarn over onto itself, then 2 knit stitches on the raglan line, then a yarn over away from itself, then 17/17/19/19/19/19 stitches of the rice pattern, then a yarn over onto itself, then 2 knit stitches on the raglan line, then a yarn over away from itself, then 29/33/33/35/37/39 knit stitches, then a yarn over onto itself, then 2 knit stitches on the raglan line, then a yarn over away from itself, then 17/17/19/19/19/19 stitches of the rice pattern, then a yarn over onto itself, then 2 knit stitches on the raglan line, then a yarn over away from itself, then 10/11/11/12/13/14 purl stitches, and then another 4/5/5/5/6/7 purl stitches.

In the second row, all yarn-overs are worked as crossed stitches, preserving the same order of pattern stitches, knit stockinette, and raglan lines, and at the end of the row an additional 2 knit stitches, 1 purl stitch, 2 knit stitches and 4/5/5/5/6/7 purl stitches are worked. It is noted separately that on the sleeves, in the rice pattern, density must be monitored, as the fabric should not be loose.
In the third row, one knit stitch is added before the first raglan line, after which yarn-overs along the raglan lines are again worked and the number of stitches in the rice pattern and in the central front portion increases to 19/19/21/21/21/21 and 31/35/35/37/39/41 knit stitches, respectively. At the end of the row, a sequence of purl and knit stitches is formed to prepare for future cables.
The fourth row is worked in pattern with all yarn-overs worked as crossed stitches, and by the end of the row a stable section of 2 knit, 1 purl, 1 knit, 1 purl, 2 knit stitches appears.
The fifth and sixth rows continue with the same logic; in every odd row, one knit stitch is added before the raglan line, and the number of stitches in the rice pattern and the front stockinette increases to 21/21/23/23/23/23 and 33/37/37/39/41/43 respectively. In even rows, all increases are worked as crossed stitches, gradually forming a symmetric front structure.
In the seventh and eighth rows, the number of knit stitches before the raglan line increases to three, then to four, while the sequence of yarn-overs and crossed stitches remains, and at the end of the eighth row, for the first time, a section of seven stitches of the rice pattern appears between the knit sections.
In the ninth row the number of knit stitches before the raglan lines reaches four, and in the central part of the front 37/41/41/43/45/47 knit stitches are worked. From the next row it is indicated that from the yarn-overs on the front part the crossed purl stitches resume being worked.
In the tenth row these yarn-overs are worked as crossed purl stitches, and on the front part of the sweater, to the right and left of the raglan lines, four knit stitches are formed. It is precisely from these sections that the cable braids are formed according to the charts. By the end of this block the areas of the future diamonds of the pattern and the stockinette on the front are clearly marked, completing the preparatory stage before actively forming decorative elements.
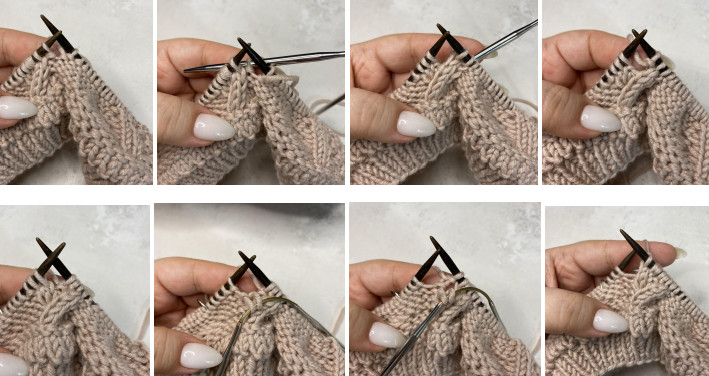
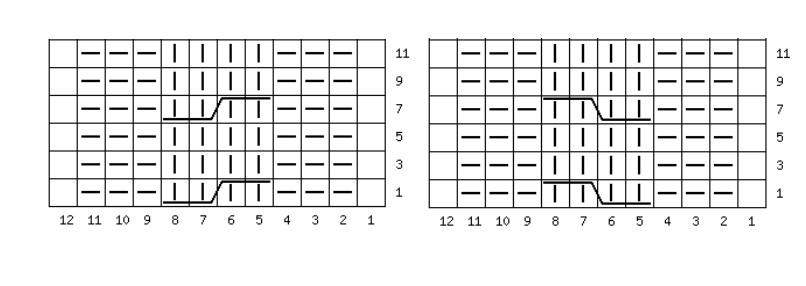
On the following pages there are diagrams of cable braids formed from knit stitches located to the right and left of the front raglan lines. In the diagrams, as before, only odd rows are shown since in even rows all stitches are worked according to the pattern without crossing. The cables twist from the raglan lines toward the center of the front, creating a symmetric decorative effect.
To perform the crossings you use an auxiliary needle. In one case two stitches are slipped onto the auxiliary needle and left behind the work, after which two knit stitches are worked and then two knit stitches from the auxiliary needle, which forms a right-leaning cross. In another case two stitches are slipped onto the auxiliary needle and left in front of the work, then two knit stitches are worked and then two knit stitches from the auxiliary needle, forming a left-leaning cross.
Cable chart
The eleventh row begins with 6/6/6/7/7/7 purl stitches, then one purl stitch is worked, then a yarn over onto itself, then 2 knit stitches of the raglan line, then a yarn over away from itself, then 27/27/29/29/29/29 stitches of the pattern chart, then a yarn over onto itself, then 2 knit stitches of the raglan line, then a yarn over away from itself, then 39/43/43/45/47/49 knit stitches, then a yarn over onto itself, then 2 knit stitches of the raglan line, then a yarn over away from itself, then 27/27/29/29/29/29 stitches of the pattern chart, then a yarn over onto itself, then 2 knit stitches of the raglan line, then a yarn over away from itself, then one purl stitch, followed by 5/6/6/7/8/9 purl stitches, then 9 stitches of the pattern, and 0/0/0/0/1/2 purl stitches. For convenience of further diamond knitting, it is permitted to shift the start marker of the row so that before the cable at the start of the row there are three stitches.
Twelfth row is performed taking into account this shift and begins with 3 purl stitches, then 4 knit stitches, 1 purl stitch, then a crossed purl stitch, then 2 knit stitches of the raglan line, then a crossed stitch according to the chart, then 27/27/29/29/29/29 pattern chart stitches, then a crossed stitch according to the chart, then 2 knit stitches of the raglan line, then a crossed knit stitch, then 39/43/43/45/47/49 knit stitches, then a crossed knit stitch, then 2 knit stitches of the raglan line, then a crossed stitch according to the chart, then 27/27/29/29/29/29 pattern chart stitches, then a crossed stitch according to the chart, then 2 knit stitches of the raglan line, then a crossed purl stitch, then 1 purl stitch, then 4 knit stitches, then 5/6/6/7/8/9 purl stitches, then 2 knit stitches, 11 stitches of the pattern chart, 2 knit stitches and 2/3/3/4/5/6 purl stitches.
Next the knitting continues according to diagrams until between the cables and raglan lines there are 4/4/4/8/8/8 purl stitches. After reaching this number of purl stitches on the front part of the sweater, from the yarn-overs along the raglan lines, crossed knit stitches resume. The raglan continues until the end on an even row, with all yarn-overs fully knitted. The length of the raglan line should be 14/15/15/16/16/17 centimeters and is measured on the front from the ribbing at the neckline to the needle. After finishing the raglan, on the needles there are 200/222/226/238/242/262 stitches and then stitch distribution to the front, sleeve, and back is performed.
Distribution of stitches, underarm shaping, and start of knitting the body of the sweater
After finishing the raglan, the stitches are separated into front, sleeve, and back. The stitches of the raglan lines are distributed as follows: from the first raglan line two stitches belong to the front; from the second raglan line two stitches belong to the back; from the third raglan line two stitches also belong to the back; from the fourth raglan line two stitches belong to the front.
In the setup row, first the stitches of the front are knitted according to the pattern, then two knit stitches of the raglan line are knitted, after which 43/45/49/51/51/55 stitches are slipped onto an additional thread or a cord — these are the stitches of the first sleeve. Between the front and the sleeve, underarm stitches are increased by 5/5/5/7/7/7 stitches. The description shows an example of picking up stitches for the underarm and emphasizes that when knitting it is necessary to strictly adhere to the specified number of stitches for each size.
After this, 59/67/67/71/73/79 knit stitches belonging to the back are knitted, then 43/45/49/51/51/55 stitches of the second sleeve are slipped onto an additional thread or cord. Next again 5/5/5/7/7/7 underarm stitches are picked up, after which two knit stitches of the raglan line are knitted and the remaining front stitches are knitted according to the pattern. After completing this row, there are 124/138/138/150/154/166 stitches on the needles.
Next the knitting of the main part of the sweater begins in the round. In the central motif of the front there should be 3/3/3/3/4/4 diamonds. For the correct completion of the pattern, one more crossing of the central aran stitches is performed, after which in the last row of the pattern all stitches are knitted according to the chart with no additional crossings. The length of the sweater at this stage is 27/27/30/30/36/40 centimeters and is measured on the front from the neckline to the bottom of the garment as shown in the photo in the description.
After reaching the desired length, the front stitches are worked to the middle of the underarm and knitting stops at the side of the garment; this place becomes the new start of the circular row. Then a 1×1 rib is worked without changing needles so that the bottom of the garment does not pull in. The number of rib rows is 8/10/10/12/8/8, after which the stitches are bound off with a needle. Binding off of the rib includes three additional rows that are not part of the total number of rib rows and are shown in detail in the video materials. If you wish to lengthen the garment, you may knit one more repeat of the main pattern. At this stage the body of the sweater is considered fully ready.
Beginning of sleeve knitting, stitch pickup, and setup rows
After finishing the body of the sweater, proceed to knitting the sleeves, which are worked in circular rows. The stitches of the first sleeve are returned from the extra thread or cord back onto the needles. The number of sleeve stitches at this stage is 43/47/49/51/51/55 stitches.
Next, a setup row is performed in which additional underarm stitches are added to the sleeve stitches. A total of 7/7/7/9/9/9 stitches are added, of which 5/5/5/7/7/7 stitches are picked up directly from the underarm and one stitch is picked up from the distance between the underarm and the sleeve stitches on each side. The distribution is arranged so that 4/4/4/5/5/5 stitches are at the start of the circular row; this is 3/3/3/4/4/4 stitches from the underarm and one stitch from the gap between the underarm and the sleeve, then 43/47/49/51/51/55 stitches of the sleeve are knitted according to the chart, and at the end of the row there are 3/3/3/4/4/4 stitches that include one stitch from the gap and 2/2/2/3/3/3 stitches from the underarm. The description separately marks the stitch-pickup points on the chart for size 6–12 months, and for other sizes the number of stitches given in the text is used.
After completing the setup row, there are 50/54/56/60/60/64 stitches on the needles. In the next row, the first stitch, which is the central stitch on the inner side of the sleeve, is always knitted. Then 3/3/3/4/4/4 stitches of the underarm are knitted, after which 43/47/49/51/51/55 stitches of the sleeve are worked in the pattern, and then the remaining 3/3/3/4/4/4 underarm stitches are knitted. After that, another 6 rows of the sleeve are knitted in the pattern, and the setup row is not included in this count.
It is recommended to distribute the stitches on the needles so that the central stitch on the inner side of the sleeve is centered on the needle; this makes it easier to control the pattern and perform decreases in the future.
Sleeve decreases: shaping length and decrease technique
On the seventh row of knitting, the decreases begin on the inner side. The sleeve stitches are knit following the pattern, with the last stitch of the row remaining unworked, after which the decrease is performed. The decrease is performed as follows: two stitches are slipped onto the needle as if they were knitted together with a right-leaning decrease, then the next stitch is knitted according to the pattern and pulled through the two previously slipped stitches; in this way a neat central decrease on the inner side of the sleeve is formed. This technique is provided with a separate instructional video in the description.
After completing a decrease row, six more rows of the sleeve are knitted in the pattern with no decreases, then the decrease row is repeated. This sequence is maintained until the number of stitches on the needles decreases to 40/42/42/42/42/44 stitches, which corresponds to 5/6/7/9/9/10 decreases performed depending on the size.
The description additionally shows what the decreases look like on the inner side of the sleeve on the finished fabric so that you can visually compare the result. After completing all decreases, knitting of the sleeve continues until a length of 16/19/23/26/30/32 centimeters is reached. Measurement of the length is performed along the inner side of the sleeve from the underarm seam downward as shown in the instruction photo.
Finishing the sleeves: second sleeve and final recommendations
After reaching the required sleeve length, knitting ends with two rows of the rice stitch pattern, with the first of these rows beginning with a purl stitch. Next a 1×1 rib is worked. The number of ribbing rows for the sleeves is 8/8/10/10/12/12 rows depending on size. After this the stitches are bound off with a needle. The ribbing bind-off includes three additional rows which are not included in the total number of ribbing rows and are shown in video materials dedicated to the first row of hollow rib, the second row of hollow rib, binding off stitches with a needle, and joining the end and beginning of the row. If necessary, for knitting the rib on the sleeves, it is allowed to use smaller needles so that the edge turns out neater and denser.
The second sleeve is knitted completely in the same way as the first, following all the stages of picking up stitches, distribution of the pattern, making decreases, and forming the length. After completing the second sleeve, the sweater is considered fully ready.
A mandatory damp-heat treatment of the finished garment is recommended to even out the fabric, reveal the patterns, and give the sweater its final shape. The finished work is suggested to be posted on Instagram with the model's hashtag as well as on the studio page where the author shares the best completed garments.
In conclusion, a list of yarns suitable for knitting this sweater is provided. In the original, Mondial Super Otto and Lana Gatto Maxi Soft with a yardage of 90 meters per 50 grams are used. As a replacement, options made from 100% merino with identical or nearby yardage are offered, including Laines du Nord Dolly Maxi, Lana Grossa Bingo, BBB Full, Ornaghi Merino Kind Maxi, CEAM Mambo, and Profil Merino 90. Replacement is possible provided the chosen yarn achieves the specified knitting gauge.