


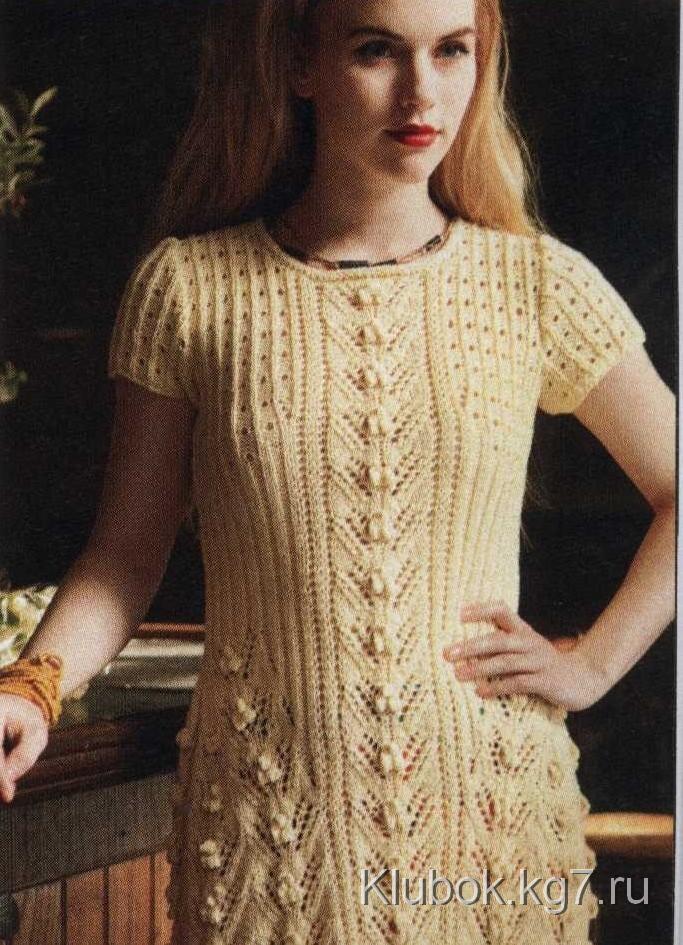
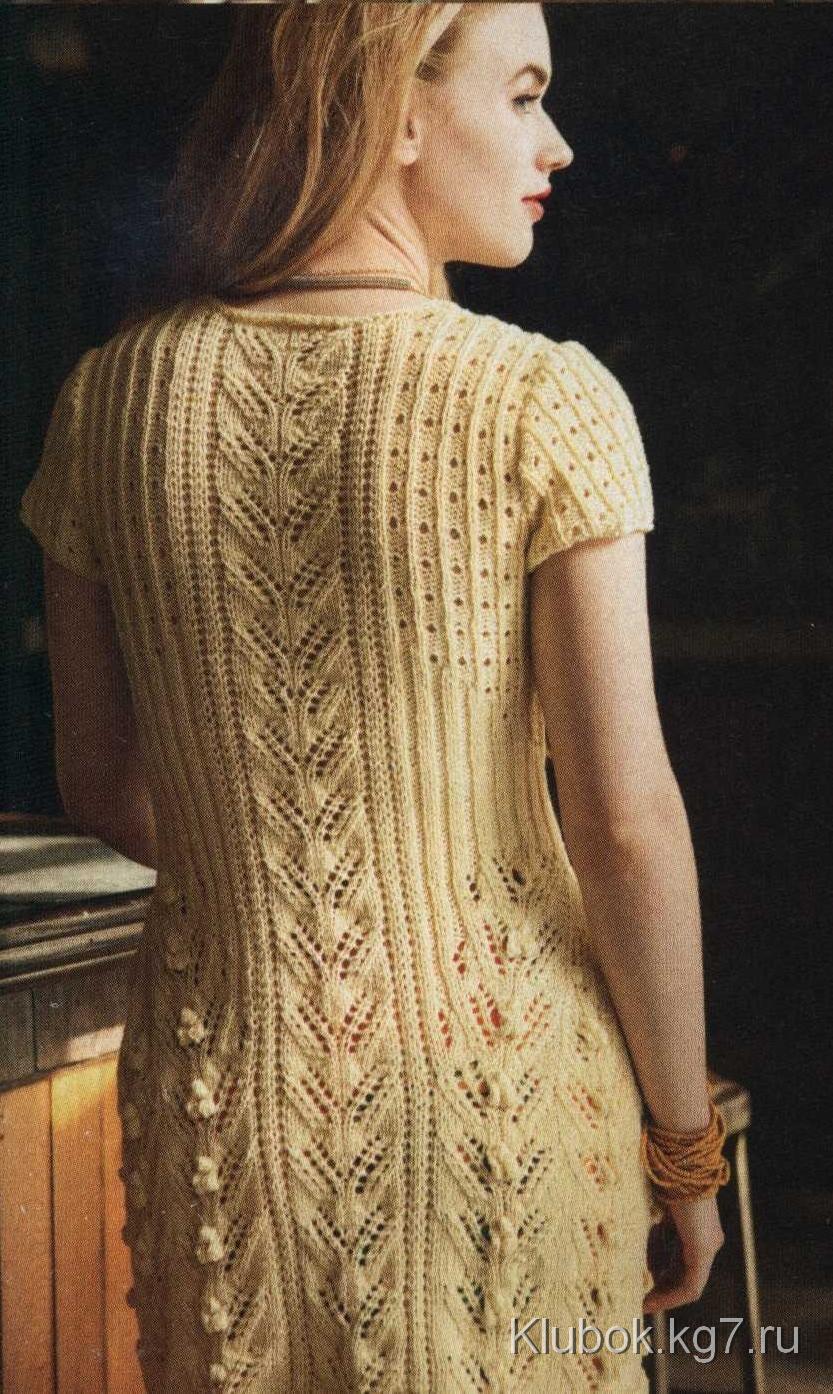
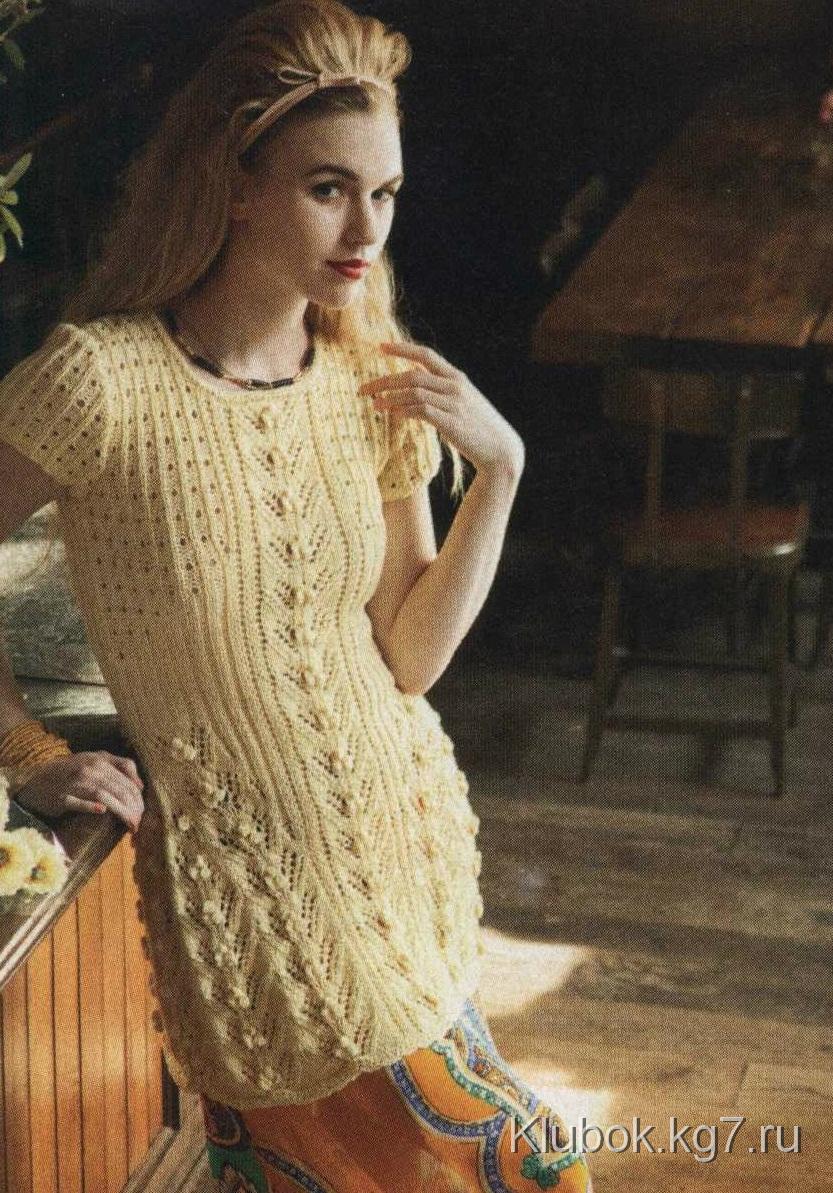
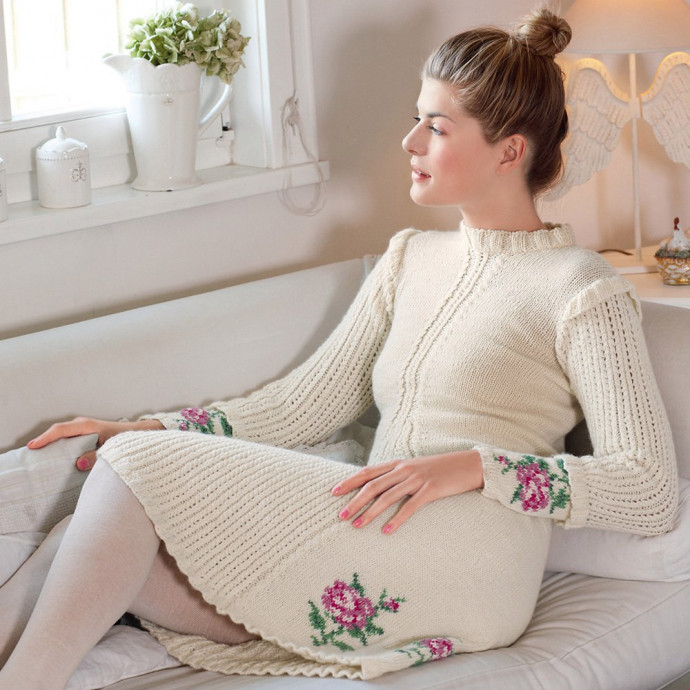
Lace tunic/dress with a "bump" pattern
Added: 04.02.2014 в 11:15 Views: 41274
Lace tunic/dress with a "bump" patternKlubokhttp://klubok.work/1/100/4180/Klubokhttps://klubok.work/css/image/top-logo-en.png

Description in Russian
A close-fitting lace tunic/dress with a bobble pattern, with an elastic band at the waist and various patterns on the bodice.
Sizes: Small, Medium, and Large. The photo shows size Small.
Finished sizes:
Chest circumference: 85 (90, 95) cm
Tunic length: 82.5 (84, 85) cm.
Dress length: 91.5 (92.5, 94) cm.
Upper sleeve width: 32.5 (34, 36) cm.
You will need:
For the tunic: 6 (7, 8) skeins of Cotton Fleece yarn from Brown Sheep Co in banana color number CW620 (cotton, wool, 197 m/100g);
Needles 3.75 mm or another size to achieve the required knitting density;
Hook 3.75 mm;
Knitting markers.
Knitting density:
Lace strip with 3.75 mm needles: 22 sts and 26 rows = 10 x 10 cm;
Lace ribbing with 3.75 mm needles: 21 sts and 26 rows = 10 x 10 cm.
Be sure to knit a sample.
Glossary of terms:
Bobble: from 1 knit st, work 3 sts (1 knit, 1 twisted knit, 1 knit), turn, 3 purl, turn, 3 knit sts, turn, 3 purl sts; turn, double decrease (slip 1 st as knit, knit 2 sts together knit and pull it through the slipped st.) = bobble completed.
Notes:
1) First, knit the front.
2) Knit patterns according to the charts.
Front: Cast on 125 (131, 137) sts.
Initial (setup purl row): slip 1 st with yarn in front, purl to the end of the row.
Row 1 (knit): slip 1 st (selvage), knit from 1st to 28th st of the side panel chart, then from 10th to 30th st of the side panel chart, 25 (31, 37) sts of the central panel chart, then from 10th to 28th st of the side panel chart, then from 10th to 39th st of the side panel chart, 1 knit (selvage st.)
Knit straight in the same way according to the charts for 36 rows (or 3 repeats), while placing a marker in the last purl row (36th):
Next row (purl): knit 12 sts, place a marker, knit 2 times (19 sts, place a marker), knit 25 (31, 37) sts, 2 times (place a marker, 19 sts), place a marker, knit 12 sts.
Knit row (with decreases): this is the first pattern row. Knit to 2 sts before the 1st marker, left-leaning decrease, move marker, knit to 2 sts before the 2nd marker, left-leaning decrease, move marker, knit to 2 sts before the 3rd marker, decrease, move marker, knit 25 (31, 37) central sts, move marker, knit 2 together, knit to the 5th marker, move marker, knit 2 together, knit to the 6th marker, move marker, knit 2 together, knit to the end of the row = 6 sts decreased.
The sts in the side panels now consist of 18 sts of the repeat and 11 sts at the beginning and end of the row.
Knit straight for 11 rows.
Next row (knit): Repeat the decrease row = 113 (119, 125) sts.
The sts in the side panels now consist of 17 sts of the repeat and 10 sts at the beginning and end of the row.
Knit 11 rows straight, removing the 1st and 6th markers.
After that, the remaining markers will be considered as 1, 2, 3, and 4.
Forming the skirt and shifting the patterns of charts 1 and 2:
Knit row (with decreases): Knit to 2 sts before the 1st marker, knit 2 together, move marker, then shift the pattern of chart 1 for the next 17 sts, move marker and knit the central 25 (31, 37) sts, move marker, shift the pattern of chart 2 for 17 sts, move marker, left-leaning decrease, knit to the end of the row = 2 sts decreased.
Continue to knit the shift of patterns of charts 1 and 2, while repeating the decrease row 23 more times in each knit row = 89 (95, 101) sts.
After the 48th row, the shift of the patterns is completed, remove the 1st and 4th markers.
On both sides of the central panel's 25 (31, 37) sts, continue to knit 32 sts in ribbing 2 x 2 (2 knit, 2 purl) (49th and 50th rows of the chart)
Continue in the same way until there are 18 rows of ribbing at the waist.
Shifting the patterns of charts 3 and 4:
Row 1 (knit): Knit 32 sts of the shift pattern of chart 3; 25 (31, 37) sts of the central panel, 32 sts of the shift pattern of chart 4.
Continue according to the charts as indicated until 30 rows of pattern shifts are completed.
Knit row (with increases, bust): While working the 31st row of the charts, knit to 1 st before the marker, yarn over, 1 knit, move the marker, 25 (31, 37) sts of the central panel, move the marker, 1 knit st, yarn over, knit to the end of the row.
Next row: knit straight, working the 32nd row of the pattern shifts.
Note: Continue to repeat rows 27 to 32 of the pattern shift on both sides of the central panel for the lace ribbing.
In the next row, repeat the increase row (and knit the increased sts in purl stockinette) and repeat once more in each knit row = 95 (101, 107) sts.
Note: These increased sts now become the 3 central sts of the additional 4-stitch lace ribbing on both sides of the central panel.
Knit straight until the entire waist to the armhole section (starting with 2 knit, 2 purl sts of ribbing) measures 23 cm.
Armhole: Bind off 5 sts at the beginning of the next 2 rows, then decrease 5 (7, 8) times 1 st on both sides every 2nd row = 75 (77, 81) sts.
Knit straight until the height of the armhole reaches 9 (10, 11.5) cm.
Neckline:
Next row (knit): Knit 29 (30, 31) sts, join the yarn from the 2nd skein and bind off the middle 17 (17, 19) sts, knit to the end of the row.
Continue knitting both sides simultaneously, binding off the edges of the neckline 1 more time by 3 sts, 1 time by 2 sts, and decreasing 3 times by 1 st in every 2nd row = 21 (22, 23) sts on each side.
Knit straight until the height of the armhole reaches 18 (19, 20.5) cm.
Shoulders: Bind off 3 (2, 1) times 7 sts from the edge of each shoulder, then 0 (1, 2) times 8 sts.
Back:
Note: The back is knitted like the front up to the row with increases on the bust, and the central panel is knitted according to the chart without bobbles (for comfort when wearing), replace the bobble sts with stockinette.
Knit the back like the front upwards to the row with increases on the bust.
Do not knit the increase row.
Continue on 89 (95, 101) sts until the armhole.
Armhole: At the beginning of the next 2 rows, bind off 5 sts.
On both sides, decrease 2 (4, 5) times by 1 st every 2nd row = 75 (77, 81) sts.
Knit straight until the height of the armhole reaches 18 (19, 20.5) cm, in the last purl row mark the central 23 (23, 25) sts.
Shoulders and neckline: From the edge of each shoulder, bind off 3 (2, 1) times 7 sts, 0 (1, 2) times 8 sts, simultaneously, as for the third shoulder closure, bind off the central 23 (23, 25) sts and while working both sides simultaneously, bind off 5 sts from the edge of each neckline once more.
Sleeves: Cast on 67 (71, 75) sts.
Row 1 (purl): 1 purl st, 1 knit st, * 3 purl sts, 1 knit st; repeat from * 15 (16, 17) more times, bind off 1 purl st.
Row 2 (knit): knit the knit sts as knit and purl sts as purl.
These 2 rows form the cuff finish on the reverse side of the lace ribbing.
Beginning of lace ribbing
Row 2 of the chart (purl): 1 knit st, 1 purl st, * 3 knit sts, 1 purl st; repeat from * and finish with 1 knit st.
Continue according to the chart (from the next row, as Row 3), until the piece measures 4 cm from the start.
Sleeve cap: At the beginning of the next 2 rows, bind off 5 sts, at the beginning of the next two rows, bind off 2 sts.
Row 1 (with decreases, knit): 1 knit st, 2 together purl, knit to the last 3 sts, 2 together purl twisted, 1 knit st.
Repeat Row 1 with decreases every 2nd row 7 (8, 9) times more.
Row 2 (with decreases, purl): 1 purl st, decrease (slip 1 st as knit, 1 knit st and pull it through the slipped), knit to the last 3 sts, decrease (slip 2 sts as knit one at a time, insert the left needle into the 2 slipped sts from left to right behind the front walls and knit them together as knit), 1 purl st.
Perform 5 times (Row 1 with decreases, Row 2 with decreases).
Bind off the remaining 15 (17, 19) sts.
Assembling the tunic parts: Wet the parts to the required sizes.
Make one shoulder seam.
Neckline facing: From the front side along the edge of the neckline, evenly pick up 88 (88, 92) sts knit.
Knit 1 row knit, 1 row - purl.
Bind off the sts as knit.
Make a second shoulder seam and the seam of the neckline facing.
Set in the sleeves, make side seams and sleeve seams.
Finish the bottom edge:
Row 1: With a hook from the purl side of the skirt, knit half double crochet evenly around the bottom edge as follows: * 1 half double crochet in each of 2 sts, skip 1 st; repeat from * around.
Return to work with the next round row from the knit side.
Row 2: 1 chain st, 1 slip st, * 4 chain sts, skip 2 sts, half double crochet (or slip stitch) in the next st; repeat from * around.
Secure the yarn. Lightly dampen the hem.
Front piece (dress length): Cast on 125 (131, 137) sts.
Initial (setup purl row): slip 1 st with yarn in front, purl to the end of the row.
Row 1 (knit): slip 1 st (selvage), knit from 1st to 28th st of the side panel chart, then from 10th to 30th st of the side panel chart, 25 (31, 37) sts of the central panel chart, then knit from 10th to 28th st of the side panel chart, then from 10th to 39th st of the side panel chart, 1 knit (selvage st.)
Continue straight according to the charts in the same way until 24 rows (or 2 repeats) are knitted.
Bind off the sts.
Back piece (dress length): Work as the front piece.
Wet the pieces to the required sizes.
Sew the bound-off edge sts of the piece to the main product (front and back), sewing under the lower edge of the selvage.
Make the side seams of these two pieces.
Finish the bottom edge.
Do the same as for the main product.
Description in English


