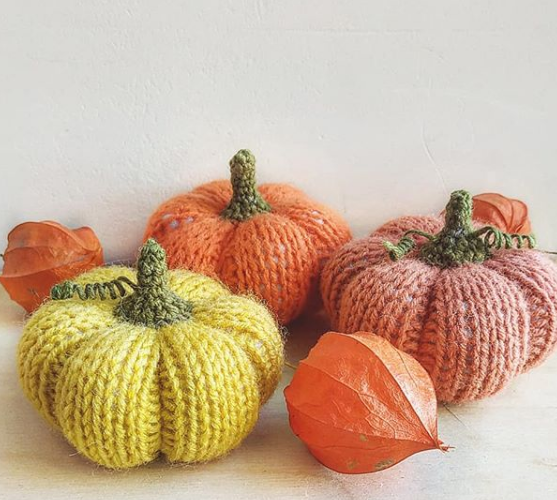
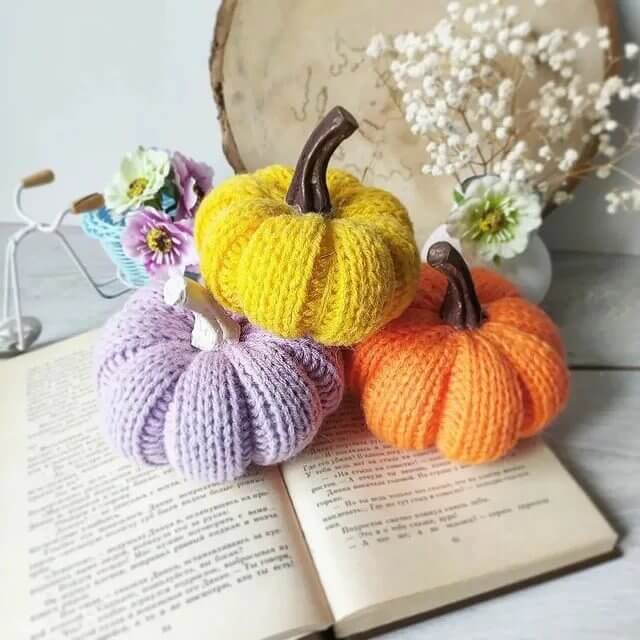
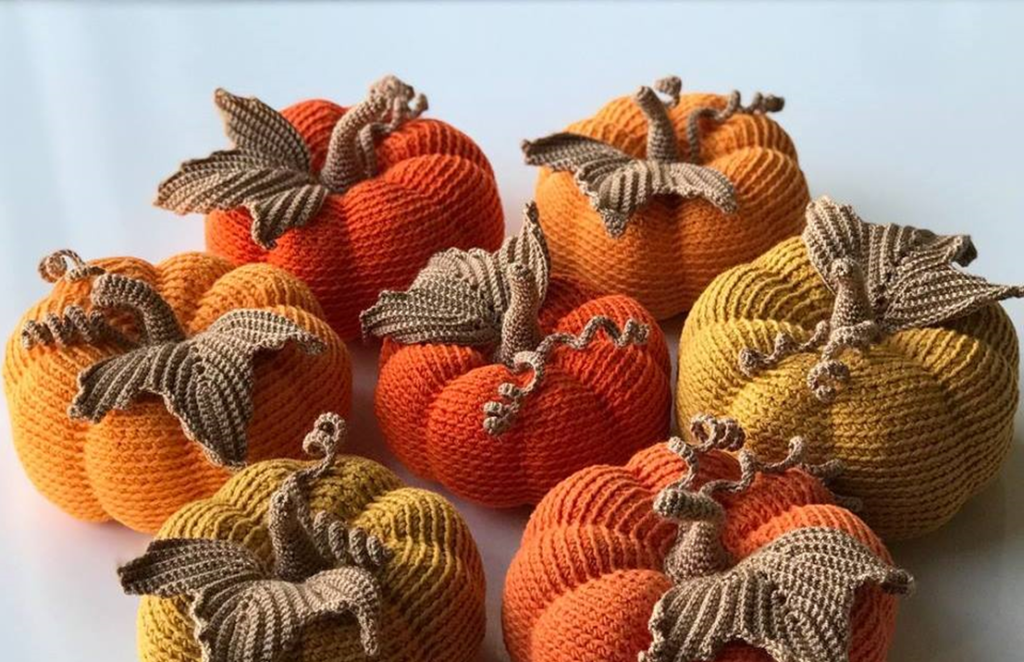
Crochet Pumpkin. Pumpkin Photo Author of these pumpkins Natalia Erkhova. To crochet them, orange yarn GAZZAL Baby Cotton was used, for the leaves and stem - a thinner yarn. The pumpkin is crocheted in a circle with single crochet stitches behind the right loop of the stitch. It starts with an amigurumi ring. Into it, there are 8 single crochet stitches. Abbreviations: X - single crochet (SC), V - 2 SC in one stitch, Y - 2 SC crocheted together. We crochet a ball. Ball crochet pattern. Pull the hole. Now this ball must be turned into a pumpkin. To do this, we make gathers. The author's words:
Added: 22.09.2025 в 11:07 Views: 109
Crochet Pumpkin. Pumpkin Photo Author of these pumpkins Natalia Erkhova. To crochet them, orange yarn GAZZAL Baby Cotton was used, for the leaves and stem - a thinner yarn. The pumpkin is crocheted in a circle with single crochet stitches behind the right loop of the stitch. It starts with an amigurumi ring. Into it, there are 8 single crochet stitches. Abbreviations: X - single crochet (SC), V - 2 SC in one stitch, Y - 2 SC crocheted together. We crochet a ball. Ball crochet pattern. Pull the hole. Now this ball must be turned into a pumpkin. To do this, we make gathers. The author's words: Klubokhttp://klubok.work/1/145/9148/Klubokhttps://klubok.work/css/image/top-logo-en.png
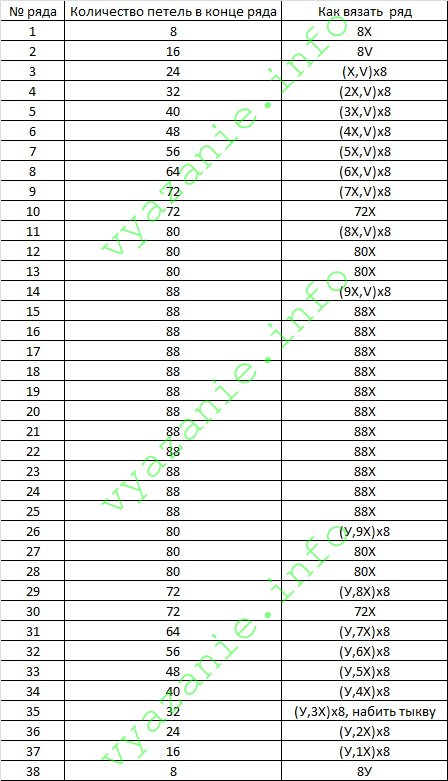
The pumpkin is crocheted in the round with single crochet stitches through the right loop of the stitch.
It starts with a magic ring. In it, there are 8 single crochet stitches.
Notations:
X - single crochet (sc),
V - 2 sc in one stitch,
U — 2 sc crocheted together.
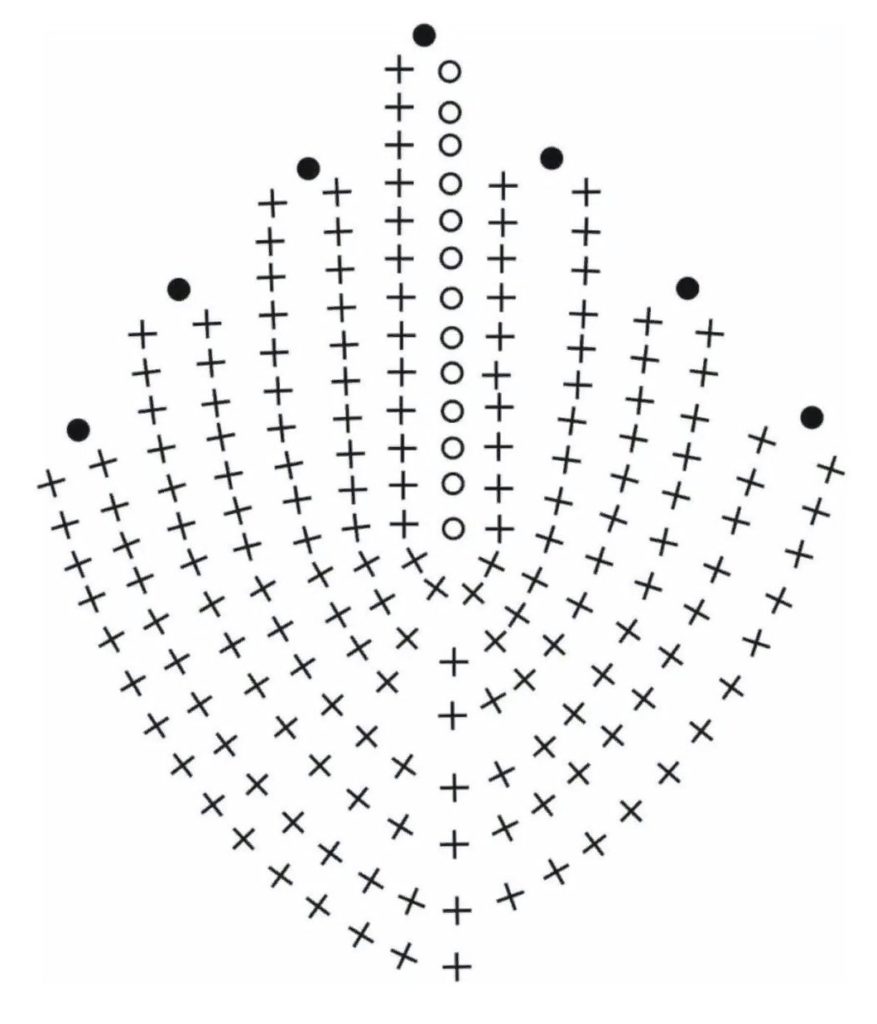
Crochet the ball.
Tighten the opening. Now this ball needs to be turned into a pumpkin. For this, we make indentations. The author's words: “The first indentation is made in the center. Then, eight indentations are made on the sides.” How? I think those who crochet toys know how. I didn't get ones like in the photo.
Whiskers.
Let's crochet two whiskers, 7 and 10 cm long.
First, we will crochet a chain of the required length of chain stitches, then we will bind it with one row of single crochet stitches.
Then we need to dilute PVA glue with water 1:1, moisten the crocheted elements with the resulting solution, shape them, and let them dry.
Stem.
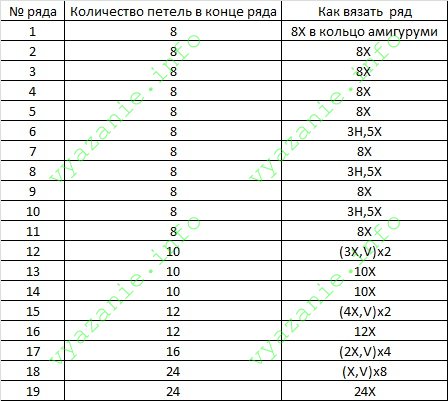
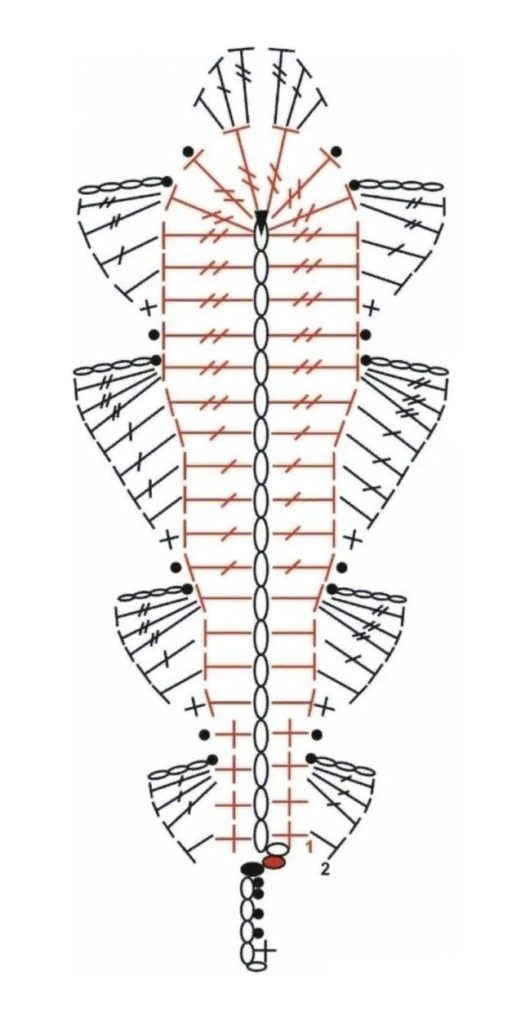
Pumpkin leaf.
Abbreviations: ch — chain stitch,
sc — single crochet.
Starting from row 3, we crochet the stitches through the right loop of the stitch.
1) We make a chain of 16 ch.
2) Skipping 2 stitches, we crochet 14 sc, 4 ch, 14 sc (binding the chain stitches of the first row on the other side), 1 ch.
3) Skipping 1 stitch, we crochet 13 sc, in the arch of the previous row's chain stitches 2 sc 4 ch 2 sc, 11 sc, 1 ch.
4) Skipping 1 stitch, 12 sc, in the arch 2 sc 4 ch 2 sc, 12 sc, 1 ch.
5) Skipping 1 stitch, 13 sc, in the arch 2 sc 4 ch 2 sc, 11 sc, 1 ch.
6) Skipping 1 stitch, 12 sc, in the arch 2 sc 4 ch 2 sc, 12 sc, 1 ch.
7) Skipping 1 stitch, 13 sc, in the arch 2 sc 4 ch 2 sc, 12 sc, 1 ch.
8) Skipping 1 stitch, 13 sc, in the arch 2 sc 4 ch 2 sc, 12 sc, 1 ch.
9) Skipping 1 stitch, 13 sc, in the arch 2 sc 4 ch 2 sc, 12 sc, 1 ch.
10) Skipping 1 stitch, 13 sc, in the arch 5 sc, 12 sc.
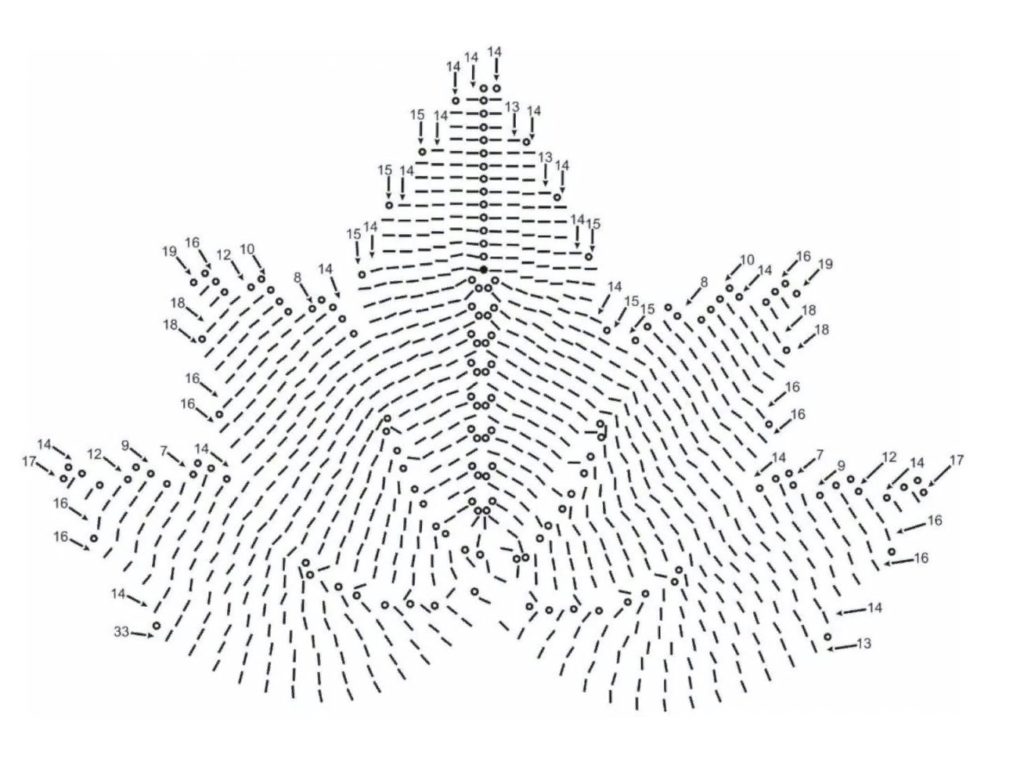
11) 5 ch, skipping 2 stitches, 8 sc, 1 ch, skipping 1 stitch, 1 sc behind two loops of the stitch, 1 ch.
12) Turn the work, 1 sc in the chain stitch of the previous row, 9 sc.
13) 5 ch, skipping 2 stitches, 14 sc, 1 ch, skipping 1 stitch, 1 sc behind two loops of the stitch, 1 ch.
14) Turn the work, 1 sc in the chain stitch of the previous row, 15 sc.
15) 4 sc, skipping 2 stitches, 19 sc, 1 ch, skipping 1 stitch, 1 sc behind two loops of the stitch, 1 ch.
16) Turn the work, 1 sc in the chain stitch of the previous row, 17 sc, 1 ch.
17) Skipping 1 stitch, 18 sc, 1 ch, skipping 1 stitch, 1 sc behind two loops of the stitch, 1 ch.
18) Turn the work, 1 sc in the chain stitch of the previous row, 15 sc, 1 ch.
19) Skipping 1 stitch, 16 sc, skipping 1 stitch, 3 sc behind two loops of the stitch, 14 sc.
20) 5 ch, skipping 2 stitches, 8 sc, 1 ch, skipping 1 stitch, 1 sc behind two loops of the stitch, 1 ch.
21) Turn the work, 1 sc in the chain stitch of the previous row, 9 sc.
22) 5 ch, skipping 2 stitches, 14 sc, 1 ch, skipping 1 stitch, 1 sc behind two loops of the stitch, 1 ch.
23) Turn the work, 1 sc in the chain stitch of the previous row, 15 sc.
24) 4 sc, skipping 2 stitches, 19 sc, 1 ch, skipping 1 stitch, 1 sc behind two loops of the stitch, 1 ch.
25) Turn the work, 1 sc in the chain stitch of the previous row, 17 sc, 1 ch.
26) Skipping 1 stitch, 18 sc, 1 ch, skipping 1 stitch, 1 sc behind two loops of the stitch, 1 ch.
27) Turn the work, 1 sc in the chain stitch of the previous row, 15 sc, 1 ch.
28) Skipping 1 stitch, 16 sc, 1 ch, skipping 1 stitch, 1 sc behind two loops of the stitch, 1 sl st, cut the yarn and hide it inside the toy.
Assembly.
1) Sew the whiskers in the center.
2) Place stuffing at the base of the stem and sew it to the pumpkin, covering the place where the whiskers are attached.
3) Sew on the leaf.
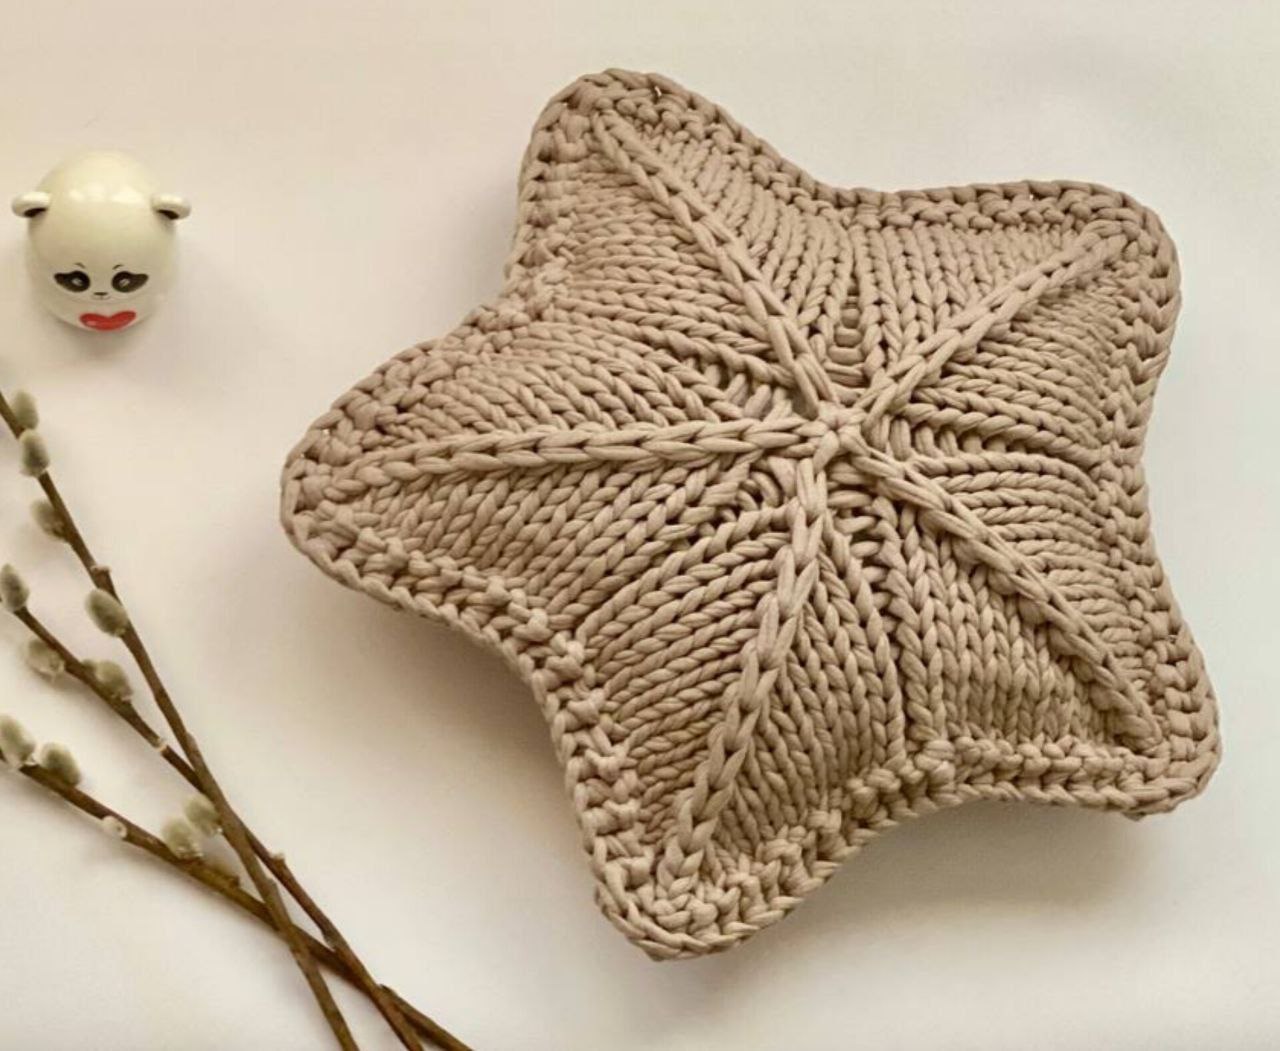
The pumpkin is ready!
You can crochet any leaves. Here are a few patterns.