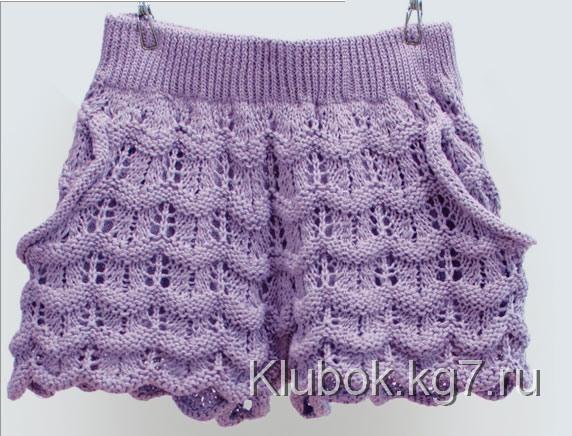
Knitted shorts for a fashionista.
Added: 16.02.2014 в 04:25 Views: 201364
Knitted shorts for a fashionista.Klubokhttp://klubok.work/1/152/4345/Klubokhttps://klubok.work/css/image/top-logo-en.png


They knit online on Osinka
Description is provided by Mila_Salvo
The knitting option from the bottom:
Front:
First, we knit the legs, separately for the right and left. For each leg, we cast on a number of stitches equal to ? the hip circumference + 11 stitches (gusset). Important! The first row must be “puffy.” If the yarn is thin or elastic, you need to weigh this row or two (knit with two strands, or later in the finished product, bind with half-columns).
Attention!!!! 11 stitches on each leg, this is a seamless gusset. Later, we need to connect the two legs into one piece, those stitches will go away. For example, your pattern repeat = 12 stitches. For the right leg, we need to finish the last (must be whole!!!!) repeat + 11 stitches according to the pattern, and for the left leg, we need to start with 11 stitches, then the first whole repeat.
We knit straight for about 11 cm. Then decrease 3+3+2+1+1 stitches in each row. When both parts are ready, we connect them on one needle. If everything is done correctly, the pattern should match in repeats. Next, the front in the middle will be whole. According to my preliminary estimates, by this point, half the length along the side seam of the shorts should be knitted. Attention!!! The side seam – this is vertical!!!!
We start to form the slope for the pocket (from the middle length along the side seam). For the slopes, we need to evenly decrease the number of stitches = 2 cm from each side. Finish knitting with a helper thread.
Back:
First, we knit the legs, separately for the right and left. For each leg, we cast on a number of stitches equal to ? the hip circumference + 18 stitches (gusset). Everything is like in front. Decreases for forming the gusset: 5+4+2+2+2+1+1+1.
Now the pocket. I think that in these shorts, the pocket is for the model, just for a beautiful line of hips. Therefore, it is not worth making a deep pocket. We will add about 5cm on each side by casting on stitches. Then we knit straight until the height is equal to the length of the front along the side seam. Attention!!! The side seam – this is vertical!!!! After that, everything depends on the characteristics of the figure. Girls with flat bottoms (sorry)))) nothing personal) can finish knitting with a helper thread. Girls with curves should continue knitting, you need to knit several rows of short rows to raise the middle, so that the shorts sit on the bottom. Then finish knitting with a helper thread. Let's return to the pocket. The pocket needs to be deepened. We will return to the needle the stitches that we cast on additionally. And we will knit down (relative to the main fabric) about 2 cm. This is the pocket lining. If your yarn is thick, it is better to do this with thin threads of the same color. Don’t worry about the pattern, we knit with stocking or garter stitch – whatever you like.
The second part of the pocket lining. We cast on the same yarn that we used to finish the pocket. The number of stitches is equal to what we cast on for forming the pocket on the back (=5cm). We knit first 2 cm straight. Then, on one side, we decrease, just like we decreased in front along the side seam. By height = ? the length of the shorts, i.e., it should match the front if you apply it with the sloped edge
Pocket processing
We cast on stitches on the needle along the sloped edge of the front and knit several rows with stocking stitch. The wrong side of the knitting when turned should become the front for the pocket and ideally curl up beautifully. And also on the other side.
Assembly of the side seam
We sew the sloped edge of the lining to the sloped edge of the front so that the finishing curl remains free, not sewn. We sew along the outer edge of the lining and the back, forming the pocket. Then we finish sewing the shorts along the side seam. Now the pocket fold is noticeable near the waist. Part of this fold is simply sewn, the one that forms the pocket.
Waistband Now you can put stitches on circular needles, unraveling the helper thread. We start knitting the waistband. Here too, there are nuances. If your shorts are not deep or you have a small difference between the waist and hips, then just start knitting the ribbing. After knitting to the desired height of the ribbing, knit one row of knit stitches, so that the purl wraps are on the front side of the waistband and knit as much again. This knit row will break the pattern and form the edge. Without pulling, close the stitches as loosely as possible and sew to the inside. If you have high shorts or a large difference between the waist and hips, then you need to make a little fit – evenly decrease stitches in the first row and continue knitting as described above.
Sew the gusset and step seams.

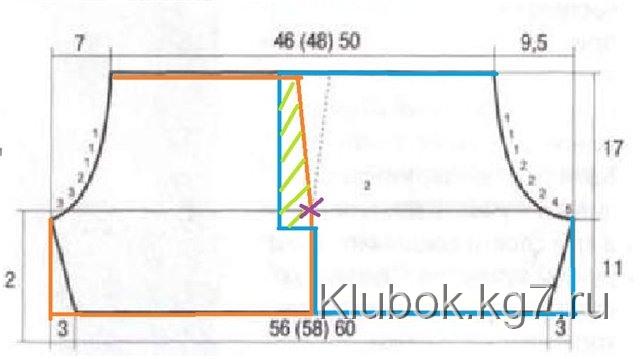
The front is outlined in red, the back in blue, the green hatching is the pocket lining, the cross indicates the beginning of the side seam
The pattern with needles as in the original:
Rows 1-6: all knit
Row 7: 1 knit, yarn over, 2 knits, three stitches together (two knits together through the front wall, the next stitch is moved from the left needle to the right and the previous stitch is lifted over it without knitting), 2 knits, yarn over, 1 knit
Row 8: all knit
Row 9: as row 7
Row 10: all knit
Row 11: as row 7
Row 12: all knit
Row 13 = 1 row
You can replace rows 1-6 of garter stitch with 6 rows of stockinette stitch.
If the yarn stretches a lot, you can knit a cord i-cord. Just knit 4 rows of stockinette stitch, and in the fifth row, the stitches are knitted two together with the stitches of the first row of stockinette stitch.