Knitting the armhole.
Added: 03.02.2016 в 01:33 Views: 216976
Knitting the armhole.Klubokhttp://klubok.work/1/203/6161/Klubokhttps://klubok.work/css/image/top-logo-en.png


Knitting the armhole cap
Author Tamica
For beginner knitters, knitting a set-in sleeve often becomes a significant obstacle on the way to their dream. I was one of them: I avoided patterns with set-in sleeves and instead knitted sleeves with straight armholes (but most often this option is good only for baby clothes), and a little later I learned to knit raglan and for a long time didn’t dare to move further. Then I started studying the theory of constructing the armhole cap, understood the essence, made notes in my workbook, and even sometimes successfully applied the knowledge in practice, but it still seemed so tedious to me... until the idea came to me to knit a set-in sleeve using my favorite piece from my wardrobe as a sample.
Now I use this piece not only for knitting the armhole cap but also for calculating all other dimensions - the length of the finished product, its width, shoulder width, neckline depth, armhole, etc. In fact, the factory sweater became a ready pattern and a starting point for realizing my desires: I like its fit, I know how it sits on me, so by adding or subtracting cm in the necessary places, I can achieve the desired result.
So, I will tell you how I knit the armhole cap.
Step 1. I take my favorite sweater and lay it flat on a surface.
Step 2. I knit a gauge swatch and find out the knitting density. Let’s say these values are: 10x10 cm = 21 st. x 29 rows.
Step 3. Before knitting the sleeve, it is necessary to knit the front and back, and accordingly, to knit the armholes on them. The question arises: what should be the height of the armhole? I measure it. The height of the armhole is = 18 cm. I convert this value into rows 1.8 x 29 rows and find that the armhole needs to be knitted over 52 rows.
Step 4. I proceed directly to the calculations for knitting the armhole cap:
- I measure the width of the sleeve = 30 cm and convert it immediately into stitches 3 x 21 st.= 63 stitches;
- I measure the height of the cap = 11 cm or 1.1 x 29 = 32 rows; this number of rows is required to knit the entire armhole cap;
- another necessary value is the width of the straight line at the top of the cap. I lay the sleeve so that the shoulder line is centered and measure the required value - 11.5 cm. Referring to the theory of constructing the cap, I have come across recommendations to make the width of the line at the top of the cap = 5-6 cm. Perhaps this is a classic armhole cap, but I am not inclined toward that, nor do I like the measured value in the finished sweater, so I will allow myself to reduce it and make it = 9 cm, which when converted to stitches = 19 stitches.
All necessary measurements have been made, and it remains to distribute the closure of stitches to form the set-in sleeve cap.
I summarize the obtained information for a correct representation:
- before starting to knit the armhole cap, there are 63 stitches on the needles;
- the cap needs to be completed over 32 rows;
- the width of the straight line at the top of the cap is 19 stitches.
I remind you that classically any stitch closures are done every 2nd row.
Without getting distracted by the theory of calculating the width of the armhole (although there is nothing complicated here; to create a smooth line of the armhole, stitches are closed from a larger number of stitches to a smaller one in several passes), I will write what the closure of stitches for my armhole was: 4,2,1,1. What are these values needed for? The same stitch closure needs to be done at the beginning of knitting the armhole cap, i.e., close every 2nd row from both sides of the fabric in the order 4,2,1,1.
In total, 8 rows have been knitted, closed (4+2+1+1)x2 = 16 stitches, and 63-16=47 stitches remain on the needles.
I will immediately exclude from the calculations the stitches at the top of the cap: 47-19=28 stitches still need to be closed from both sides of the sleeve; accordingly, from one side, I need to close 28/2=14 stitches over 22 rows = 32r.(total number)-8r.(already knitted)-2r.(for closing the central 19 stitches).
For a smooth rounded cap, I will make the penultimate stitch closures like this: 2,3,4. This will take 6 rows and 9 stitches from each side.
It remains to close the middle 14-9=5 stitches of the cap over 22-6=16 rows. Closing one stitch every 2nd row will take 10 rows. 6 rows are excess. Reducing rows means decreasing the height of the cap, which is incorrect. The second solution is to slightly change the line of the cap; in the finished product, this will be almost unnoticeable, so I will make an adjustment to the distribution of stitches. For 6 rows, I need to obtain 6 stitches, 3 stitches on each side of the cap.
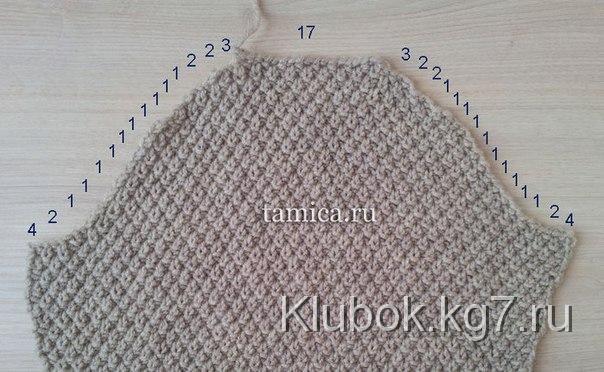
Let the width of the line at the top of the cap be not 19, but 17 stitches; this will give 2 unused stitches, plus I will adjust the penultimate stitch closures for rounding the cap and instead of such a sequence 2,3,4 I will make it 2,2,3, which will free up 2 more stitches from each side. In total, 6 required stitches have been found, and the final distribution of stitch closures for the sleeve cap will look like this:
4,2,1,1,1,1,1,1,1,1,1,1,2,2,3,17,3,2,2,1,1,1,1,1,1,1,1,1,1,2,4.
This distribution can be seen in the photo (the sample has a different distribution of stitches and is presented for visual example, so do not try to find correspondence with the calculations by examining the stitches smile).