Learning to knit a neckline with needles.
Added: 08.12.2018 в 13:10 Views: 32133
Learning to knit a neckline with needles.Klubokhttp://klubok.work/1/203/7589/Klubokhttps://klubok.work/css/image/top-logo-en.pngCalculating and knitting a round neckline, like any line, is one of the most complex elements of knitting with needles. Be careful and patient!
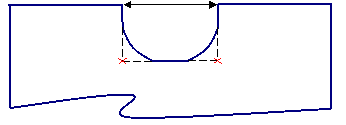
Example from the magazine: For the neckline, bind off the middle 15 sts and in every 2nd row.
1 x 3, 2 x 2, and 1 x 1 st.
Note: If in this description the sign «x» is replaced with the word «times», it can be read as: bind off the middle 15 sts and in every 2nd row bind off 1 time 3 sts, 2 times 2 sts, and 1 time 1 st.
To facilitate knitting, make a diagram of the neckline on a sheet of graph paper, where each square corresponds to one stitch, and each row corresponds to one row of knitting.
When binding off stitches, mark the number corresponding to the number of bound-off stitches on the diagram.

Sequence of knitting: According to the completed diagram, count the total number of stitches for the neckline. Then check if this number of stitches on the fabric matches the width of the neckline on the pattern, and only after that begin to decrease stitches.
Note: For this and the following measurements, mark the first and last of the 31 sts of the neckline in the center of the fabric.
If necessary, you can increase or decrease one or several decreases by 1 st. For example, instead of 3 sts, you can decrease 4 sts or 2 sts. Keep in mind that any changes should be made equally on both sides of the neckline.
Start the neckline on the right side of the work. In the center, bind off the middle 15 sts and knit to the end of the row. The fabric is divided into two parts. Check the number of stitches in each part – it should be the same. Then knit each side separately.
On the left side of the fabric (from which the yarn is coming), bind off stitches in groups according to the calculation at the beginning of each right-side row. Stitches should be secured like the last row of the fabric; under no circumstances should you knit 3 or 4 stitches together. Knit the wrong-side rows without decreases.
When all the neckline stitches are bound off and there are stitches left for the shoulder on the needle, check if the depth of the neckline matches the pattern. Measure from the mark upwards to the shoulder. If the depth of the neckline is insufficient, you can knit 2-4 rows straight without decreases. Then bind off the shoulder stitches on the wrong side of the work from the edge towards the neckline.
Start the right half of the neckline on the wrong side of the work.
Note: When joining the yarn to the second half of the neckline, do not tie a knot or attach the yarn in any other way. Do not fold the yarn tail with the main part and knit it into the fabric. In this case, part of the row will be knitted with double yarn, and the fabric will have thickened stitches. It is best to leave the yarn tail longer and hide it when the band or collar is knitted.
Bind off the first group of stitches and knit the wrong side row to the end. Knit the right side rows without decreases. Bind off the remaining stitches according to the calculation at the beginning of each wrong side row. Bind off the shoulder stitches on the right side of the work from the edge towards the neckline. The front with the round neckline is finished! When assembling the product along the neckline of the front and back, pull the stitches and knit the collar or band. You can crochet the neckline with a "crab stitch." There are also other options for making such a neckline: you can leave the neckline stitches unbound, leaving them open without completing the rows. Later, when crocheting the neckline, there is no need to pull stitches for the collar or band. The stitches that were left open when forming the neckline are used for this.
You can immediately attach a second ball to the right half after securing the middle stitches and knit both halves simultaneously from two balls. But for a beginner knitter, such options are an excessive complication of the work.
Binding off one half of the neckline in every right-side row and the second half in every wrong-side row means binding off stitches in every 2nd row.
Tip: If you have never knitted a round neckline, try first to knit a small sample of the «Upper part of the front». This will greatly simplify the knitting of the large detail of the product.
This small knitting exercise will help you easily and quickly learn to knit a round neckline.
Cast on 51 sts. Knit in stockinette stitch for 10-14 rows. Execute the neckline according to the provided calculation. For each shoulder, bind off 10 sts.
.
?