Neckline design
Added: 23.08.2019 в 12:48 Views: 19667
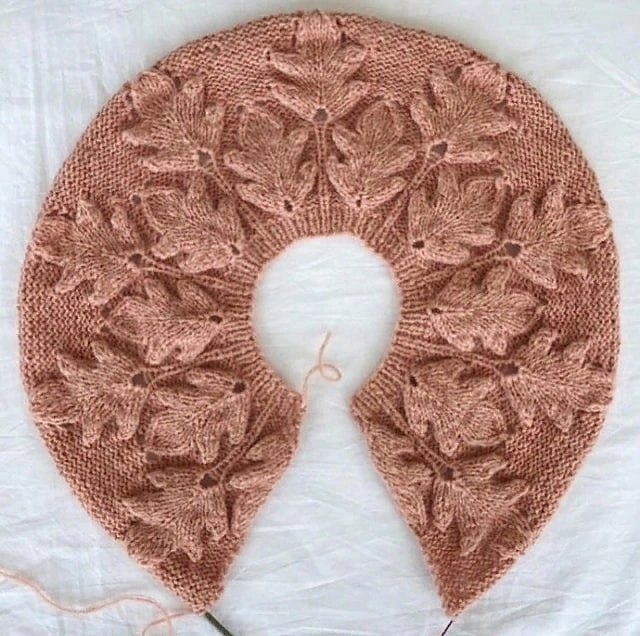
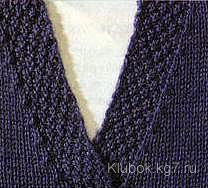
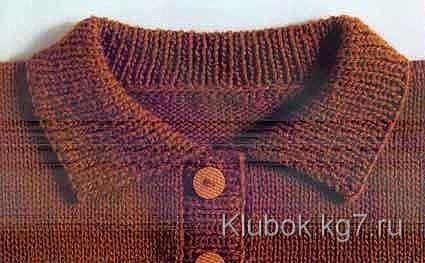
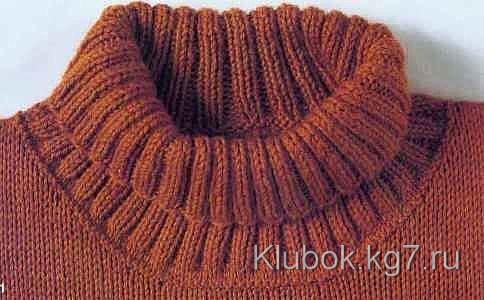
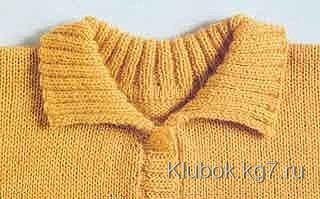
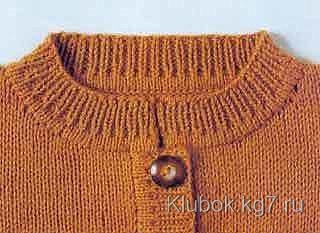
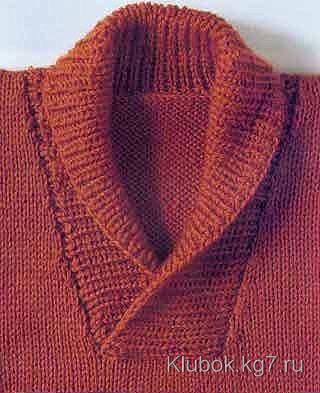
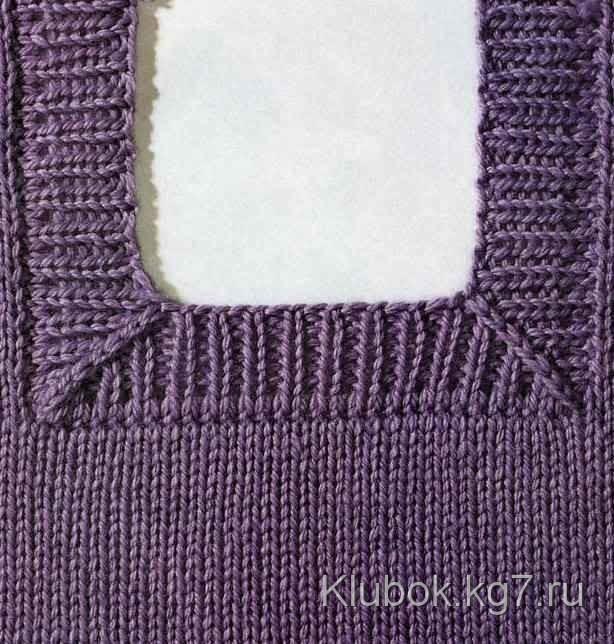
Neckline designKlubokhttp://klubok.work/1/203/7845/Klubokhttps://klubok.work/css/image/top-logo-en.pngThe band, knitted in one piece with the front, is made with a pearl pattern: alternating 1 knit and 1 purl, shifting the pattern by 1 stitch in every 2nd row. The number of stitches for the front must be even. Mark the middle 8 stitches. Before the marked stitches, divide the work and finish the left side first. To shape the neckline, knit 2 stitches on the left side before the marked stitches together with a left slant, and then cast on 8 new stitches for the band. For the first 7 stitches of the band, knit in a pearl pattern, the last stitch is the edge stitch. Repeat the decrease for the slope in every 4th row. Finish the right side symmetrically. The 1st marked stitch is the edge stitch; knit the next 7 stitches in a pearl pattern = band. For the neckline slope, knit the next 2 stitches together knitwise. Sew the inner end of the band with a whip stitch. The knitted band for the front can be continued to knit the band for the back. After securing the shoulder stitches, pick up 1 new edge stitch from the inside of the band and knit on 9 stitches to a length equal to half the length of the neckline edge of the back, then close the stitches. Make the shoulder seams. Sew the ends of the band together, inserting the band into the neckline of the back. The band with crossed ends The number of stitches for the front must be even. Divide the stitches in the middle and finish the left side first. For the slope, knit the 4th and 3rd stitches from the inside together knitwise. Repeat this decrease in every subsequent 4th row. Finish the right side symmetrically, i.e., for decreases, knit the 3rd and 4th stitches from the inside together in the same rhythm, but with a left slant: slip the 3rd stitch as if to knit, knit the 4th stitch and pull the slipped stitch over it. After processing the knitted parts and making seams, cast on for the band on circular needles, starting from the top of the corner, stitches (= a number of stitches that is a multiple of 4). Knit rows in both directions. First, make 1 purl row with purl stitches, then alternate 2 knit and 2 purl stitches. In purl rows, knit the stitches according to the pattern. After knitting the band to the required width, close the stitches. Sew the ends of the band, placing the right side over the left, and sew: the top end – on the front side with a mattress stitch, the bottom – on the back side with a whip stitch. Polo collar A collar without a stand For jackets and pullovers with a polo closure, it is important that the cast-on edge of the collar looks equally good on both the outside and inside of the garment, and that it can be worn unbuttoned. 1 Bind the closure strips on the short sides and the neckline edge with 1 row of single crochet. Here, for better visibility, the edging is done with a contrasting color. At the beginning and end of the edging on the rounded sections of the neckline, the number of stitches should be the same. 2 The cast-on for the collar is done on circular needles from the middle of the right closure strip. For this, from each single crochet stitch, capture the front yarn with the needle to knit 1 knit stitch, while after every 3rd or 4th stitch, make an additional yarn over to ensure a sufficient number of stitches for the rib pattern. In the next row, alternate 1 knit and 1 purl stitch, while knitting each yarn over according to the pattern – as a knit or purl stitch. In subsequent rows, knit the stitches according to the pattern. After knitting the collar, close the stitches. 3 Another collar option, made in the manner described above. Bind the closure strips on the short sides and the neckline edge similarly. Start the cast-on for the collar from the right strip and finish before the left strip. Then knit in ribbing as described above. In the 3rd row, after the 3rd stitch and before the last 3rd stitch, add 1 knit stitch. In the 7th row, in the same places, add 1 purl stitch. Repeat these additions in every subsequent 4th row. After knitting the collar, close the stitches. Set-in turtleneck The turtleneck and band can be made separately and then sewn into the neckline. 1. Cast on the required number of stitches on circular needles or double-pointed needles and knit in the round (= cast-on edge = upper edge of the collar). For the collar of this model, alternate 2 knit and 2 purl stitches. The number of stitches in the starting row must be a multiple of 4. After knitting the collar or band to the required width, perform 2 more rows in knit stitches and close the stitches with a contrasting auxiliary yarn. 2. Make the shoulder seams. Lay the front and back on a flat surface in one layer, place the collar on the edge of the neckline with the closed stitches facing down and pin evenly. 3. Attach the collar with a needle with a rounded tip (the mattress stitch in the photo is done with a contrasting color for better visibility), unravel the first 2 closed stitches of the collar, insert the needle from bottom to top through the edge of the neckline, pull it out through the 2nd stitch of the collar and insert it into the 1st stitch, capturing the edge of the neckline, * Unravel the next closed stitch and, inserting the needle from bottom to top through the neckline edge, pull the needle through it. Insert the needle into the previous stitch, capturing the neckline edge. Repeat from * until all stitches are sewn. 4. An analogous collar with a similar appearance of the junction of its lower edge with the neckline edge is shown in the photo. But for such a collar, the stitches are cast on along the neckline edge on circular needles and first execute 1 row of purl stitches and 2 rows of knit stitches. Then knit in ribbing 2x2 and upon reaching the corresponding width of the collar, close the stitches. Similarly, a band can be made as for the collar. Double stand-up collar This collar is made on jackets and pullovers with a polo style. The double stand-up collar holds its shape well and looks neatly finished on the inside when unbuttoned, as the cast-on edge of the collar is hidden under the stand. 1. Start casting on stitches on circular needles from the outside of the garment from the middle of the right closure strip. The number of stitches cast on the rounded edge of the neckline on the right and left should be the same, and the total number of stitches should be sufficient so that the neckline does not tighten. The total number of stitches cast on for this model is a multiple of 4 plus 2 additional stitches. Make 1 purl row of purl stitches, 1 knit row of knit stitches, and 1 purl row of purl stitches, then temporarily leave the stitches and cut the working yarn. After every 10th stitch, make a mark with contrasting yarn. 2. On the second circular needles, from the inside of the garment along the neckline edge, cast on the same number of stitches: from each cross yarn of the 1st cast-on row of the outer part of the stand, knit 1 stitch (= 10 stitches between marks). Knit 3 rows in stockinette stitch on all stitches as described above. 3. In the next knit row, connect the stitches of the inner and outer parts of the stand: knit the 1st stitch of the front needle and the 1st stitch of the back needle together knitwise, inserting the needle first into the stitch on the front needle. Knit the next pair of stitches from the front and back needles together in the same manner. Knit the next 2 stitches from the front and back needles together purlwise, first transferring the stitch from the back needle to the front. Knit the next pair of stitches together purlwise as well. Continue knitting as described, alternating between knitting 2 stitches together knitwise and 2 stitches together purlwise until the end of the row. Then knit the collar in the corresponding pattern, using needles that are one size larger. After knitting the collar, close the stitches loosely according to the pattern. Neckline band and closure strips with a double cast-on edge. If the cast-on edges of the band and strips are made double, the garment will take on the appearance of a finished, store-bought item. For the closure strips, cast on stitches along the front edge of each front piece (an odd number for this model), as described for the double stand-up collar (see the previous section), and knit for the external part of the base of the strip 3 rows in stockinette stitch. Knit the internal part of the base of the strip similarly. In the row connecting the outer and inner parts, when knitting the stitches together, alternate between 1 purl and 1 knit stitch. Continue knitting the strip according to the pattern (on one of the closure strips, make buttonholes in the middle). After knitting the strip to the required width, close the stitches. Make the neckline band similarly, starting and finishing the cast-on in the middle. Shawl collar The width of the shawl collar insert at the back neckline should be wider than at the front neckline. This is achieved by using the technique of knitting short rows. For the front neckline, at the desired height from the lower edge of the piece, close the middle stitches (16 stitches for this model) and finish both sides separately. For each slope of the neckline, decrease stitches from the inner edge. The number of stitches to decrease depends on the width and depth of the neckline. For the left slope, knit 2 stitches together with a left slant before the last stitch for each decrease; for the right slope, knit 2 stitches together after the 1st stitch knitwise. Make the shoulder seams. Along the slanted edges of the neckline and the back neckline, cast on an odd number of stitches on circular needles (start the cast-on from the left slope). In the next purl row, alternate between 1 knit and 1 purl stitch and finish the row at the 2nd shoulder seam. Turn the work and slip the 1st stitch. Knit in the opposite direction to the 1st shoulder seam, turn, and slip the 1st stitch. At the end of each subsequent row, knit a few more stitches (= 1–2 cm) than were knitted in the previous one. Repeat the technique until all stitches are worked. Then knit all stitches straight until the width of the collar ends equals the length of the lower edge of the neckline with closed stitches. Then close the stitches of the collar. Sew the ends of the collar to the lower edge of the neckline: the outer end – with a mattress stitch, the inner end – with a whip stitch. Zipper closure with double strips The zipper on this jacket is sewn between the outer and inner details of the double strips, so the zipper tape is not visible when unzipped. 1. For the outer detail of the strip, cast on stitches along the front edge of the piece (based on 4 rows = 3 stitches). Make 1 purl row of purl stitches, 1 knit row, and 1 purl row of knit stitches, then close the stitches knitwise. 2. Then, on the inside, pull up 1 stitch from each cross yarn of the cast-on row of the outer detail of the strip (the number of stitches equals the number of stitches in the cast-on row). Knit the inner detail of the strip as the outer one. 3. For the second front piece, make the strip similarly. Pin the zipper, first sewing it to the outer details of the strips, and then sew the inner details to the zipper tape. Band for rectangular neckline Start casting on stitches for the band from the right shoulder edge: along the vertical side edges – based on 3 stitches on each section for 4 rows, along the lower horizontal edges – from each closed stitch 1 stitch (or from each open stitch if the stitches are not closed during knitting but left on an auxiliary thread). Knit 1 round of knit stitches and mark the corner stitches. Then alternate between 1 knit and 1 purl stitch, ensuring that knit stitches fall on the corner stitches (add 1 stitch if necessary and decrease accordingly). In each row of ribbing (for thick yarn in every 2nd row), slip the corner and previous stitches together as in knitting, knit the next stitch and pull the slipped stitches over it. After knitting the band to the required width, close the stitches, performing the corner decreases also when securing the stitches. Double band When knitting the neckline, it is important that the rounding line is smooth. After processing the knitted parts and making seams, cast on stitches along the edge of the neckline on the corresponding circular needles. The simplest method: divide the edge into sections of 10 cm in length and on each cast on stitches based on the number of stitches corresponding to the calculated knitting density, plus 3-4 stitches. For knitting the band in ribbing 2x2, the number of stitches must be a multiple of 4, and for ribbing 1x1 – a multiple of 2. After knitting the band to double the width, close the stitches loosely. Cut the yarn, leaving an end equal to three times the length of the neckline edge. Fold the band in half, turning the inside in, and pin it. Sew the closed edge of the band to the neckline edge with a whip stitch. Band with Italian edge Start as a double band in wide ribbing (see previous section), but knit alternating between 1 knit and 1 purl stitch. For the last 4 rows, use needles one size smaller. When knitting in the round in the 1st of the last 4 rows, slip each knit stitch as if to knit, pulling the yarn behind the stitch (see the lower photo), knit the purl stitches as purl. In the next row, slip each purl stitch as if to purl, pulling the yarn in front of the stitch, and knit the knit stitches as knit. Repeat these 2 rows once more. When knitting in both directions in the last 4 rows, slip the purl stitches as if to purl, and pull the yarn in front of the stitches, knitting the knit stitches as knit. Secure the stitches of the last row with a needle. Rolled band For the band at the edge of the neckline, cast on stitches as described for the double band. For the band that is knitted in the round, knit about 5 cm in knit stitches, then close the stitches loosely = the band rolls to the front side as a soft roll. For the band that is knitted in rows in both directions, knit about 5 cm in stockinette stitch. In the lower photo: double rolled band. Knit the first rolled band as described above. For the second band, cast on stitches on the cast-on row of the first band, but for each section of 10 cm, cast on 3 stitches less than for the first band, and knit similarly. After 6–6.5 cm, close the stitches. Band with corner knit stitches
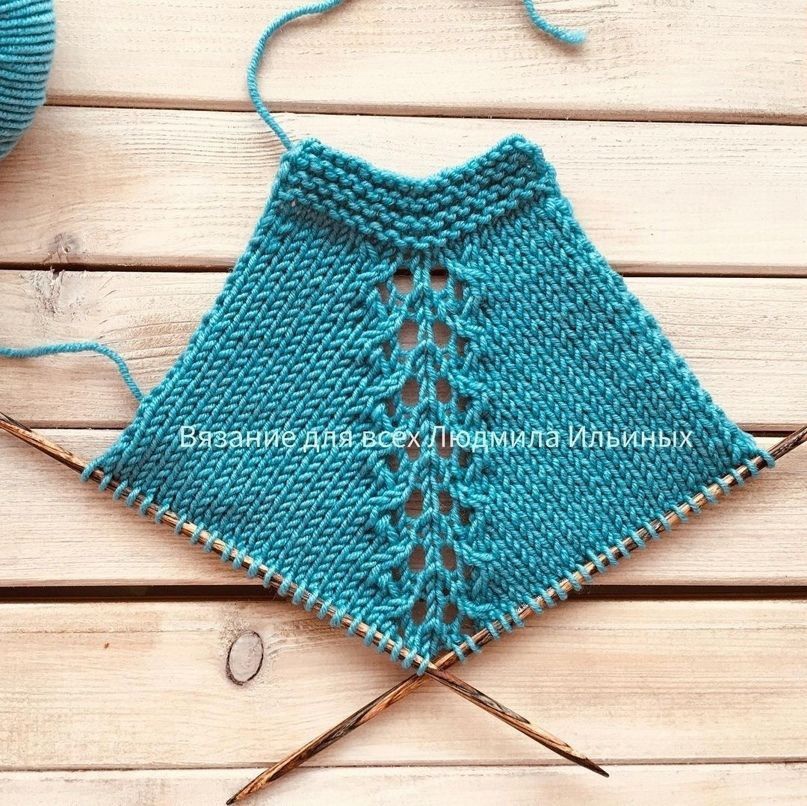
The number of stitches for the front must be odd. To form a V-neckline, transfer the middle stitch of the front to a safety pin and finish the left side first. For the slope, knit the 6th and 5th stitches before the middle stitch together purlwise, knit the next stitch purlwise, and 3 stitches before the middle stitch – knitwise. In the purl rows of this neckline style, repeat this decrease every 4th row. In the knit rows without decreases, knit purl stitches over the 2 purl stitches. Finish the right side symmetrically. After processing the knitted parts and making seams, cast on for the band on circular needles, starting from the shoulder seam, and join the stitch from the safety pin = the number of stitches is a multiple of 2. Knit 1 round of knit stitches. Then alternate between 1 knit and 1 purl stitch, while there should be 1 knit stitch over the middle stitch. In the 1st row of ribbing, slip the middle and previous stitches together as in knitting, knit the next stitch knitwise and pull both slipped stitches over it. Perform this decrease in every row (including when securing the stitches of the last row). Band with two corner knit stitches
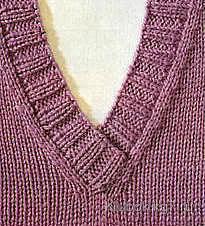
The number of stitches for the front must be even. To form a V-neckline, transfer the two middle stitches of the front to a safety pin and finish the left side first. For the slope, knit the 3rd and 2nd stitches before the middle stitches together purlwise, knit the next stitch purlwise. In the purl rows, knit the stitches according to the pattern. Repeat this decrease in every 4th row. In the knit rows without decreases, knit the last 2 stitches purlwise. Finish the right side symmetrically. After processing the knitted parts and making seams, cast on for the band on circular needles, starting from the shoulder seam, and cast on stitches (the number of stitches must be a multiple of 4). Knit 1 round of knit stitches, then alternate between 2 knit and 2 purl stitches, while there should be knit stitches over the middle 2 stitches. In the 1st row of ribbing, knit the 1st middle stitch and the previous stitch together knitwise, knit the 2nd middle stitch and the next stitch together with a left slant = slip the 2nd middle stitch as in knitting, knit the next stitch knitwise and pull the slipped stitch over it. Perform these decreases in every row (including when securing the stitches of the last row).


Category: Useful tips