Raglan sleeve. A collection of patterns, descriptions, explanations
Added: 24.01.2021 в 01:56 Views: 29902
Raglan sleeve. A collection of patterns, descriptions, explanationsKlubokhttp://klubok.work/1/203/8709/Klubokhttps://klubok.work/css/image/top-logo-en.png


 Work T, Lanovoy


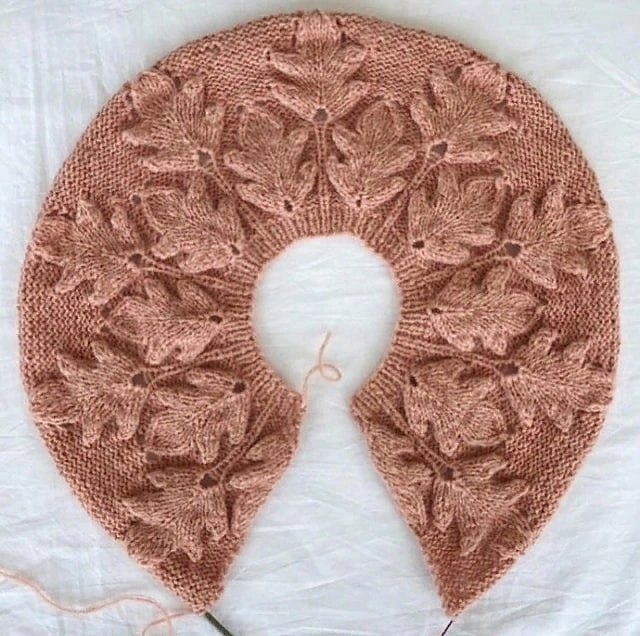
Top-Down Raglan Sleeve
Raglan sleeves are currently in vogue and look stylish and original in knitted items. In this case, increases are made along the shoulder line, which visually makes the whole look clearer and more confident.
Knitting a top-down raglan sleeve is no more difficult than a classic raglan. The calculations are done once at the beginning of the knitting. After that, everything is determined by fitting.
You can enrich it with other elements and make it more interesting. For example, you can introduce a pattern inside the sleeve. Or you can use an interesting textured yarn and stick to stockinette stitch.
At the same time, all the advantages of raglan knitting are preserved. The product turns out seamless and comfortable to try on. At any stage of work, you can stop and compare your calculations with reality. If something is not suitable, you can unravel a few rows instead of going back to the beginning of the work.
We offer to knit the simplest raglan sleeve without a pattern to master the technique. After knitting at least one sweater this way, you will be able to experiment and add interesting details to your product.
Necessary Materials
Yarn and needles of suitable size, marking rings.
In our case:
- yarn Alize Cotton Gold (shade 270 — khaki melange) — 2 skeins
- yarn Alize Cotton Gold Tweed (shade 02 — mustard) — 1 skein
- circular needles size 2
- circular needles size 2.5
- marking rings
Raglan Sleeve Knitting Chart and Technique Description
Any raglan sleeve is knitted according to the following principle. The first increases are made along the sleeve from the outside in every row. Then increases are made along the vertical lines of the raglan from the inside of the sleeve every other row. After knitting to the desired length, increases are made on both sides of the raglan line every other row.
Raglan Sleeve Calculation
Measure the neck circumference that you want to achieve.
Based on the knitting density, cast on the required number of stitches to start working. If desired, knit the neck or start knitting the raglan right away, leaving the neck knitting for the end of the work.
Divide the stitches evenly into 3 equal parts — front, back, and 2 sleeves. For example, the neck of our sweater consists of 78 stitches. 78: 3 = 26. If the number is not divisible by 3, round it off, and add the remainder to the front stitches.
So we have:
- Front — 26 stitches
- Back — 26 stitches
- Sleeve — 13 stitches each (total 26 stitches)
To raise the back of the product and make the neck more anatomical, we will knit a short row.
Short Row Calculation for Raglan Sleeve
Determine the height of the short row by eye, depending on how deep you want the neck opening to be.
We will knit a short row of 6 rows. During the knitting near the raglan lines in each row, we will make increases. Therefore, when we reach the front knitting, additional stitches will form on the needles. To ensure that the back and front are symmetrical, we adjust the calculations: subtract 6 stitches from the back stitches and add them to the front:
- Back 26 — 6 = 20 stitches
- Front 26 + 6 = 32 stitches
Now it is necessary to divide the sleeve into 3 approximately equal parts (over 6 rows we will knit each sleeve 3 times):
13: 3 = 4 + 4 + 5
Calculation Scheme
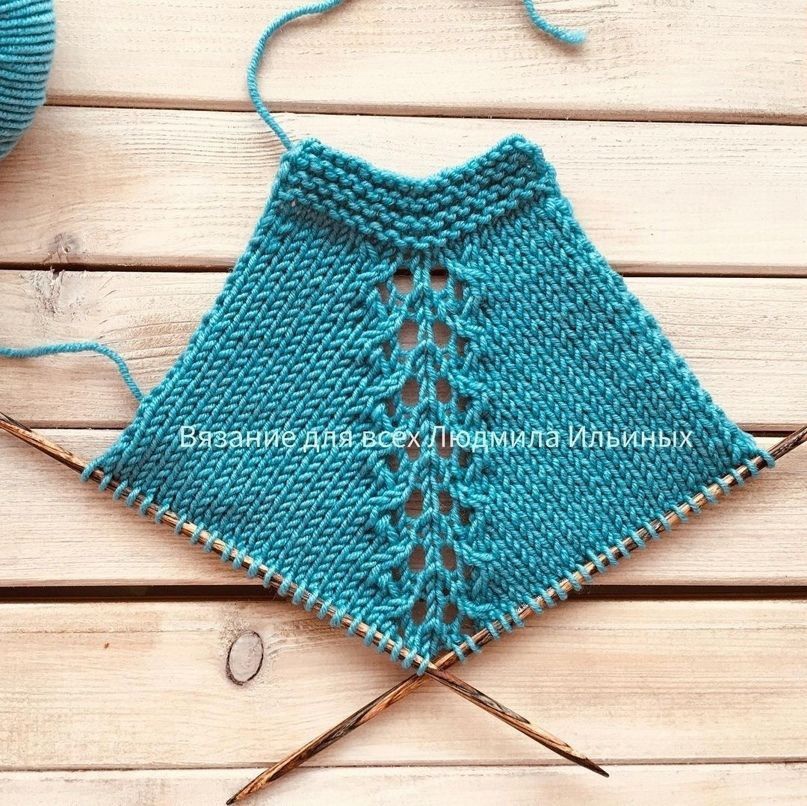
Knitting the Neckline and Short Row
The neckline is knitted at will. It can also be added at the end of the work. But we will knit it right away. This way the product will look neater.
On the needles, cast on 78 stitches and knit ribbing 1x1 for about 6 cm — 10 rows. Next, mark the raglan lines and the center of the back with marking rings.
We start knitting the short row with short rows, knitting all the back stitches and capturing new sleeve stitches each time according to the calculations we made earlier. On the outside of the sleeve, we make increases in every row from the yarn over.
The short row is equal to 6 rows for us. We start the first row of the sweater from the center of the back. On the right side, knit 10 stitches (half of the back), make 1 increase of a knit stitch from the yarn over of the previous row and knit 4 stitches of the sleeve.
Turn the product and on the wrong side knit 4 sleeve stitches, make another increase of a knit stitch from the yarn over of the previous row and knit 21 stitches of the back to the other sleeve, make 1 increase of a knit stitch from the yarn over of the previous row and knit 4 stitches of the other sleeve. Turn the product. Continue knitting this way until all sleeve stitches are in work.
Knitting the Front of the Neckline
To round the neckline, we continue knitting with short rows, capturing the front stitches in the following sequence: 2 times 1 stitch, 1 time — 2 stitches. At the same time, we make increases from the yarn overs of the previous row along the outer line of the sleeve in every row as we did before. Our short row is ready.
Next, knit circular rows only on the right side of the product along the entire neckline, making increases along the sleeves in every row.
The length of the sleeve should be 2/3 of the shoulder length. In our case approximately 6 cm.
Knitting the Vertical Raglan Lines
From the sleeve stitches, we begin to knit the sleeves. In every second row from the inner sides of the sleeves, we make increases from the yarn overs of the previous row. We knit this way until we reach the armpit. In our case about 13 cm.
Knitting the Underarm Line
Then we move on to knitting the underarm line. To do this, we make increases from the yarn overs of the previous row every other row on both sides of the raglan line. We knit this way until the width of the back and front matches the desired size. We got 40 cm.
We have knitted our product to the end of the armhole. Next, we divide the sweater onto separate needles — front, back, and sleeves. And knit everything separately to the desired length. The sweater is ready


Sizes:
S - M - L - XL - XXL - XXXL
You will need: DROPS KARISMA yarn 450-500-550-600-650-750 g, color 50, blue-green
Knitting density: 20 stitches and 26 rows of stockinette stitch = 10 x 10 cm.
Needles:
DROPS size 4.5 mm knitting needles.
DROPS size 4.5 mm circular needles, cable length 40 and 80 cm for stockinette stitch and pattern.
DROPS size 3.5 mm knitting needles.
DROPS size 3.5 mm circular needles, cable length 40 and 80 cm for ribbing.
Needle size is given as a recommendation. If the knitted sample has too many stitches over 10 cm, use larger needles. If the sample has too few stitches over 10 cm, use smaller needles.
-------------------------------------------------------
Explanations for knitting:
-------------------------------------------------------
Pattern:
See scheme A.1.
Even increases:
To calculate the rhythm of even increases, divide the total number of stitches on the needles (e.g., 12) by the number of increases that should be made (e.g., 4) = 3. In this example, make the increase using a yarn over after every 3rd stitch. In the next row, knit the yarn over as a twisted stitch to avoid holes.
Tip for making increases:
Increase 1 stitch before the marker:
Knit to the marker, with the right needle lift the yarn over between the last knitted and the next stitches and place it on the left needle, knit the yarn over (the yarn over should be twisted to avoid a hole and turned to the right), move the marker to the right needle.
Increase 1 stitch after the marker:
Knit to the marker, move the marker to the right needle, with the right needle lift the yarn over between the last knitted stitch and the next and place it on the left needle, knit the yarn over (the yarn over should be twisted to avoid a hole and turned to the left).
Decreases on the sleeves:
Decrease 1 stitch from each side of the marker as described below: Knit until 3 stitches remain before the marker, knit 2 together with a right tilt, knit 2 stitches (the marker will remain between these stitches), knit 2 together with a left tilt.
Tip for closing stitches:
To avoid a tight closed edge, use larger needles if necessary. If the edge is still tight, make a yarn over approximately after every 4th stitch, and close the yarn over like a regular stitch.
-------------------------------------------------------
Knitting description:
-------------------------------------------------------
Sweater, short description:
The item is knitted in the round, from top to bottom.
Stitches are added on the yoke for the shoulders, and then for the sleeves.
Then the yoke is divided into the body and sleeves, the body is knitted in the round. The sleeves are also knitted in the round, on double-pointed needles from top to bottom.
Neckline:
Cast on 96-104-104-112-120-128 stitches on size 3.5 mm circular needles with Karisma yarn.
Knit 1 row of knit stitches.
Then knit as described: 1 purl, *2 knit, 2 purl*, repeat the stitches between the asterisks until 3 stitches remain, 2 knit, 1 purl. Continue knitting ribbing to a height of 8.5 cm.
Change to size 4.5 mm circular needles.
Place a marker at the beginning of the row (center of the back). Leave the marker there. Measurements should now be taken from the marker!
Yoke:
In the next row, add stitches, knit according to the pattern and place 4 markers (between the stitches) as described below:
Knit according to scheme A.1 (= 4 stitches) on the next 16-20-20-20-20-24 stitches (= 4-5-5-5-5-6 repeats in width = half of the back), place 1 marker, knit 12-12-12-12-16-16 stitches knit and evenly add 4-4-8-8-8-8 stitches between these stitches (see explanations for knitting), place marker 2 (= shoulder), knit according to scheme A1 for the next 36-40-40-44-44-48 stitches (= 9-10-10-11-11-12 repeats in width = front), place marker 3, knit the next 12-12-12-12-16-16 stitches and evenly add 4-4-8-8-8-8 stitches on these stitches, place marker 4 (= shoulder) and knit according to scheme A.1 on the remaining 20-20-20-24-24-24 stitches (= 5-5-5-6-6-6 repeats in width = center of the back) = 104-112-120-128-136-144 stitches.
Increases on the shoulders:
Knit stockinette stitch between the markers marking the shoulders and the pattern according to scheme A1 on the front and back. In the next row, make increases on the shoulders as described below:
Increase 1 stitch before markers 1 and 3 and after markers 2 and 4 – see explanations for knitting (=4 stitches added). The number of shoulder stitches should remain unchanged. The added stitches are then knitted according to scheme A1. Scheme A1 is repeated in height.
Make increases this way in every row for a total of 20-20-24-24-28-28 times = 184-192-216-224-248-256 stitches. The height of the knitted section will be about 8-8-9-9-11-11 cm from the marker at the neckline.
Remember the knitting density!
Sleeve Increases:
Next, make increases to form the sleeves as described below:
Increase 1 stitch after markers 1 and 3 and before markers 2 and 4 (=4 stitches added). The number of shoulder stitches will increase by the number of increases made.
Make these increases every 2 rows for a total of 14-11-13-12-12-14 times = 240-236-268-272-296-312 stitches.
The height of the knitted section will be about 19-16-19-18-20-22 cm from the marker at the neckline.
Continue knitting stockinette stitch and the pattern as before, but without making increases until the height of the item reaches 19-17-19-19-20-22 cm from the marker at the neckline.
Now increase 1 stitch from each side of the markers as described below:
Knit until there is 1 stitch left before markers 1 and 3, increase 1 stitch, knit 1 stitch, move the marker to the right needle and increase 1 stitch after the marker.
Knit to markers 2 and 4, increase 1 stitch before the marker, move the marker to the right needle, knit 1 stitch and increase another stitch after the marker (=8 stitches added).
The stitches added at the front and back are knitted according to scheme A1, and on the sleeves — in stockinette stitch (the stitches between markers 1 and 2 and markers 3 and 4).
Make such increases every 2 rows for a total of 8-12-12-16-16-16 times = 304-332-364-400-424-440 stitches.
When all increases have been made, the height of the knitted section will be 25-26-28-30-32-34 cm from the marker at the neckline.
Now it is necessary to divide the knitting into the body and sleeves as described below:
Knit the first 44-52-56-60-64-68 stitches (= half of the back), transfer the next 60-62-70-76-80-84 stitches to a holder (=sleeve), cast on an additional 8-8-8-8-8-12 stitches for the underarm, knit 92-104-112-124-132-136 stitches (= front), transfer the next 60-62-70-76-80-84 stitches to a holder (=sleeve), cast on an additional 8-8-8-8-8-12 stitches for the underarm and knit the remaining 48-52-56-64-68-68 stitches (= half of the back).
The body and sleeves are then knitted separately.
Body:
On the needles = 200-224-240-264-280-296 stitches.
Continue knitting according to scheme A.1 as before, while knitting the 8-8-8-8-8-12 underarm stitches in stockinette stitch. Scheme A.1 is repeated 23-26-28-31-33-34 times in width on the front and back.
When 22-23-23-23-23-23 cm have been knitted from the division, change to size 3.5 mm circular needles and knit ribbing as described below: 1 purl, *2 knit, 2 purl*, repeat the stitches between the asterisks until 3 stitches remain, 2 knit, 1 purl. Then knit ribbing 2knit, 2purl to a height of 7 cm and close the stitches according to the pattern (see explanations for knitting).
Sleeve:
Transfer 60-62-70-76-80-84 stitches to size 4.5 mm double-pointed needles and pick up 1 stitch above each of the previously cast on 8-8-8-8-8-12 stitches for the underarm = 68-70-78-84-88-96 stitches. Place a marker in the middle of the underarm stitches. This will mark the places for decreasing stitches on the sleeve. Knit stockinette stitch in the round.
When 3 cm have been knitted from the division, decrease 1 stitch from each side of the marker – see explanations for knitting.
Repeat the decreases every 6-5-3-2-2-11/2 cm for a total of 5-5-8-10-11-14 times = 58-60-62-64-66-68 stitches.
Continue knitting stockinette stitch until 33-32-31-30-30-28 cm have been knitted from the division. Knit 1 row of knit stitches, evenly increasing 18-16-18-16-18-16 stitches = 76-76-80-80-84-84 stitches. Change to size 3.5 mm needles and knit ribbing (=2 purl, 2 knit) to a height of 5 cm. Close the stitches according to the pattern (see explanations for knitting).
Knit the second sleeve similarly.
Assembly:
Fold the neckline in half and sew it on the wrong side. To ensure the neckline does not tighten and roll outwards, it is important that the seam is elastic.