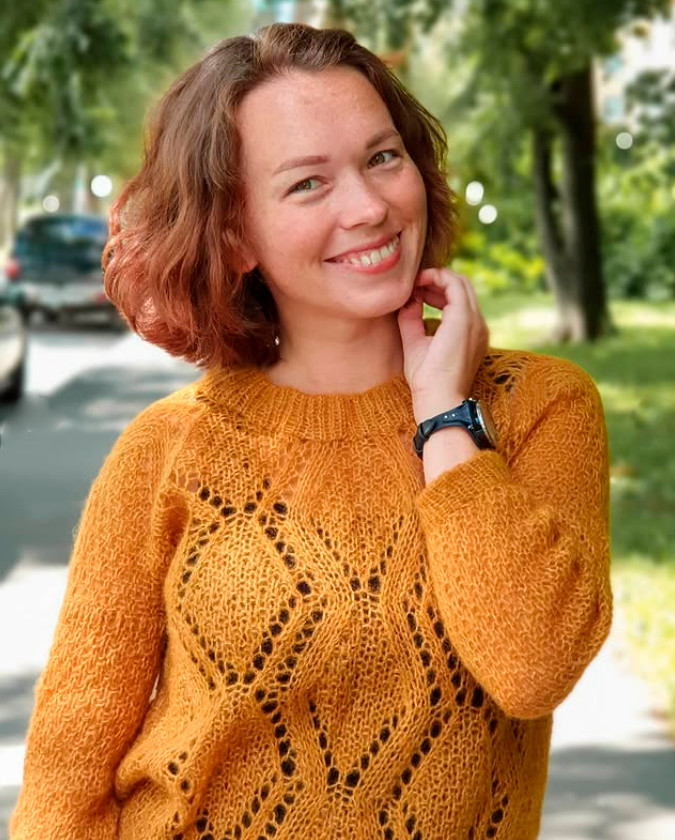
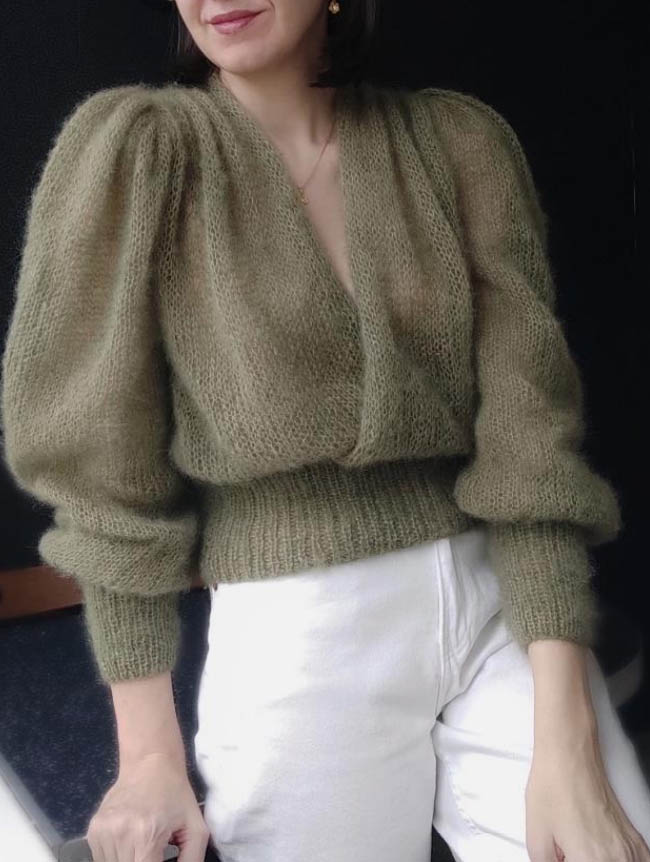
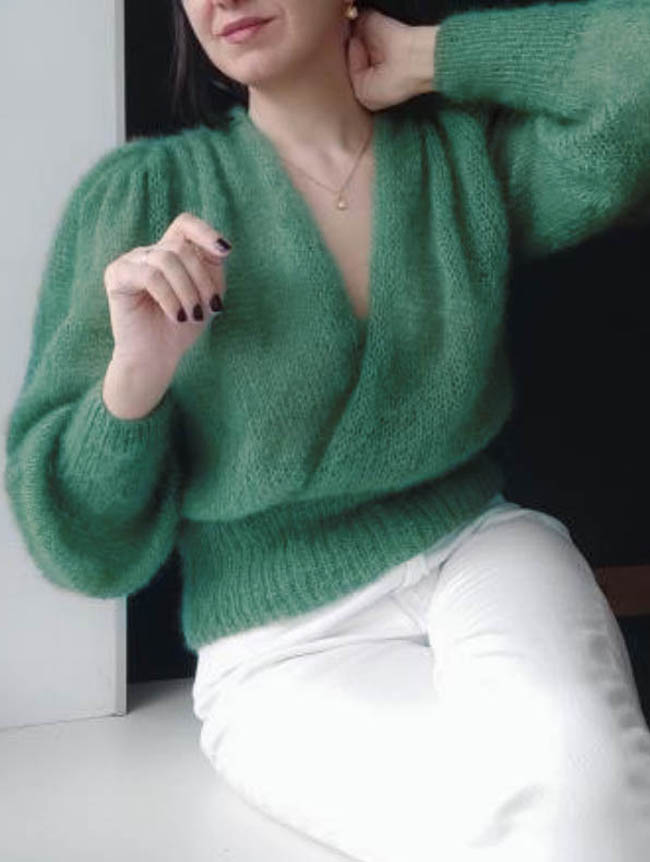
Knitted blouse with needles
Added: 11.08.2025 в 19:35 Views: 1327
Knitted blouse with needlesKlubokhttp://klubok.work/1/3/9018/Klubokhttps://klubok.work/css/image/top-logo-en.png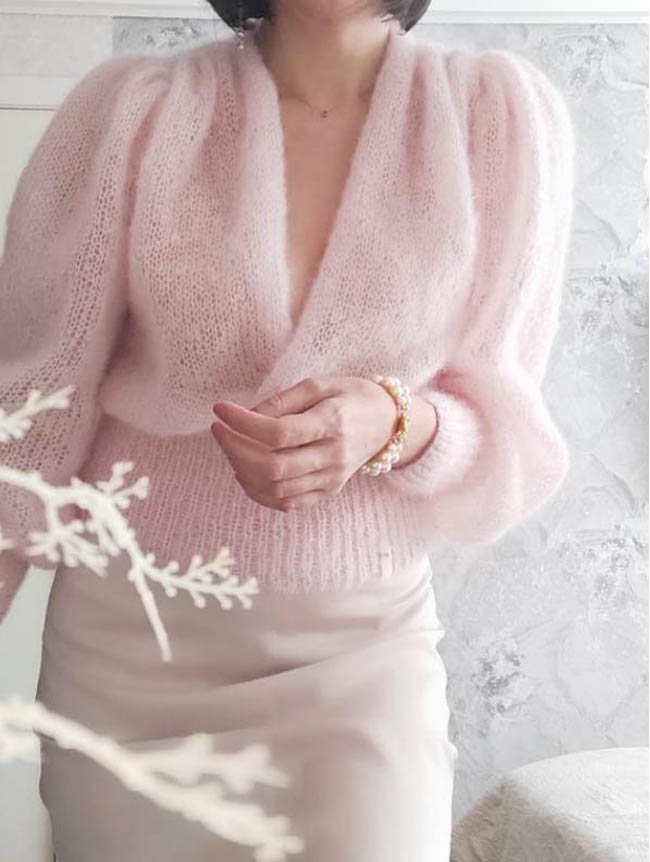
Required:
Yarn mohair on silk 500-600m/100g in one thread – 150g;
Mohair on silk 800-900m/100g in 2 threads - 200/225g;
Needles No. 6 for the main fabric, needles 3.5 for ribbing, (circular needles 40 and 80cm for knitting the body and using the magic loop method);
additional thread, circular needles or pins (for underarm stitches);
markers.
Sizes:
S-M, 42-44 (Bust up to 92cm).
M-L, 46-48 (Bust 93 - 100cm).
Sizes of the finished product, assuming the specified gauge is achieved, cm.
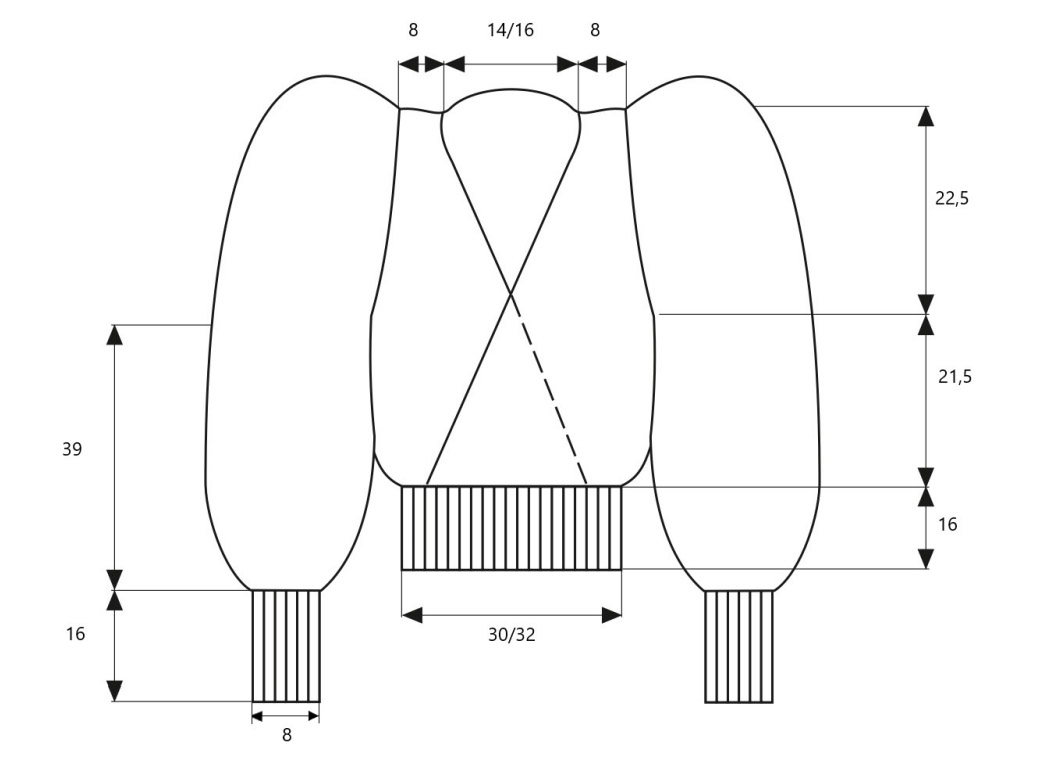
Figure 1
Knitting gauge sample in stockinette stitch.
Aim for 15 sts.× 16 rows = 10×10 cm after washing and blocking, in stockinette stitch, with needles No. 6. For ribbing, the gauge is 21 sts.× 23 rows in a non-stretched position. Considering that gauge and knitting characteristics vary for everyone, needle size should be adjusted individually, it is important to achieve the specified gauge.
Patterns, abbreviations, and explanations:
Stockinette stitch.
In circular knitting, all rows are knitted with knit stitches (K).
In flat knitting, the right side – knit stitches (K).
the wrong side – purl stitches (P).
Edge stitch - by default, the first stitch is slipped purlwise, the last is knitted as a purl.
1*1 Ribbing is knitted by alternating 1 knit and 1 purl stitch.
Beginning of row marker (BRM).
Decrease two knit stitches leaning to the left (2Kleft): knit 2 knit stitches together through the back loop.
Decrease two knit stitches leaning to the right (2Kright): knit 2 knit stitches together through the front loop.
Beginning of work.
Body of the blouse.
On needles No. 3.5 with a 40cm circular needle in 2 threads, not tightly, cast on 130(S-M)/140(M-L) stitches +1 stitch to close the knitting in the round (slip the first stitch from the left needle to the right and pull through the last stitch, return the stitch to the left needle), place the BRM.
S-M/M-L 1- 37 rows in 1*1 ribbing. Try it on, the ribbing should fit snugly at the waist and allow the finished item to be easily pulled over the head.
Next, with needles No. 6 in 1 thread, knit the body in flat rows K, until the underarms, previously knitting the overlap (hereafter referred to as overlap).
Distribution of stitches for knitting the overlap of the blouse.
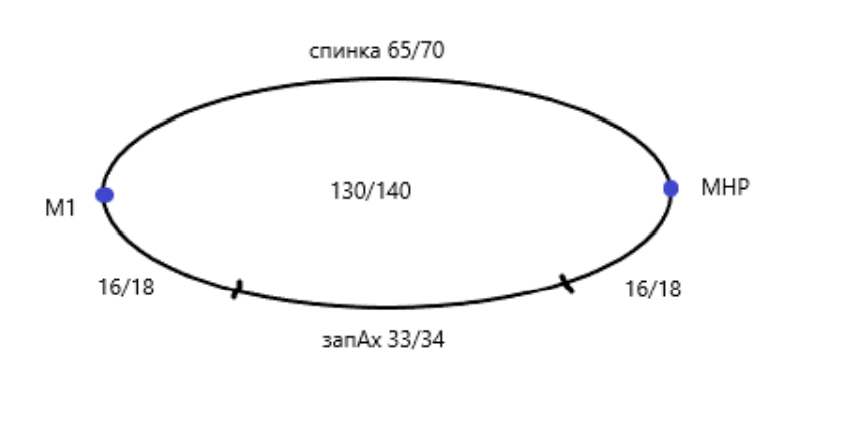
Figure 2
Row 1: BRM, 16/18K, then knit 33/34 overlap stitches, knitting 2 stitches from each stitch, through the front and back loops, thus doubling the number of stitches, then 16/18K, M1, 65/70K.
Row 2: BRM, 16/18K, the overlap stitches that were knitted through the front loop (these stitches form the outer part of the overlap) are knitted as knit stitches, while placing the stitches that were knitted through the back loop on a spare needle, do not knit them (these stitches form the inner part of the overlap). Turn the knitting to the wrong side.
Row 3: 33/34P overlap stitches, 16/18P, BRM, 65/70P back, M1, 16/18P, 33/34P from the spare needle. Turn the knitting to the right side.
Overlap formed.
Rows 4-33 knit in stockinette stitch.
Dividing the body of the blouse into fronts and back.
Divide the fronts, back, and underarms according to the diagram:
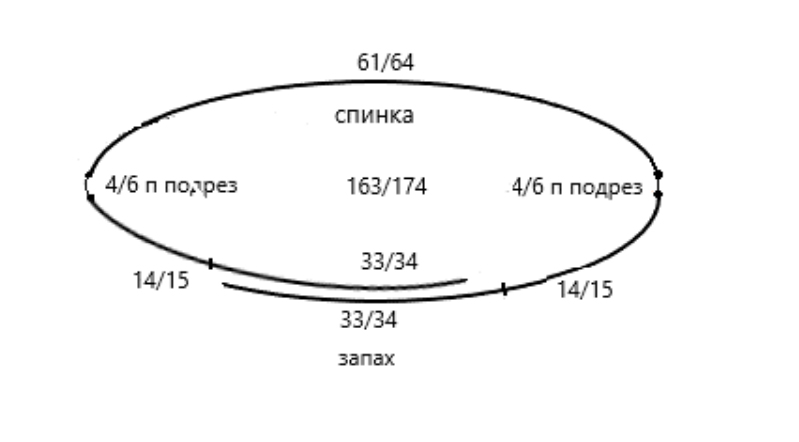
Figure 3
First, we will knit the right front, then join the yarn, knit the underarm stitches, place them on a pin and proceed to the back, then again join the yarn, knit the underarm stitches, place them on a pin and knit the left front.
On the needles, the right front (if looking at the garment, it is the left) will be knitted in flat rows in stockinette stitch, with decreases for the armhole. The stitches of the back, underarms, and the second front are placed on a spare circular needle or yarn, they are not participating in the knitting for now.
Row 1: 33/34 overlap stitches, 14/15K (33/34 overlap stitches and 14/15 side stitches form the front, a total of 47/49 stitches).
Row 2: as per pattern.
Row 3: 43/45K, before reaching 4 stitches from the end of the row, make a decrease 2Kleft, 2K.
Make decreases in the 5th knit row for S-M (a total of 2 decreases), for size M-L and in the 7th knit row (a total of 3 decreases). On the needles, 45/46 stitches, knit in stockinette stitch for 36 rows.
At the end of the 31st row, place a marker-pin, this is one of the control points (when sewing the body and sleeve, the points should match).
Next, we form the shoulder line.
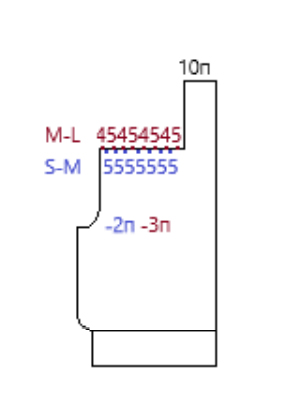
Figure 4
37th knit row: knit 10K of the band (do not close them), then 5Kleft, 5Kleft, 5Kleft, 5Kleft, 5Kleft, 5Kleft, 5Kleft/5Kleft, 4Kleft, 5Kleft, 4Kleft, 5Kleft, 4Kleft, 5Kleft, 4Kleft simultaneously closing these 35/36 stitches loosely. (the width of the shoulder after closing is 7/8cm).
Join the yarn to the remaining 10 stitches on the needle (from the wrong side), which will form the band-collar, knit them in stockinette stitch for 10/11 rows. Leave a yarn tail of 30-40cm, this yarn will be used to sew the open stitches of the band-collar.
Lift 4/6 underarm stitches and 61/64 back stitches onto the needles, join the yarn, knit 4/6 underarm stitches, place them on a pin. Knit the back in stockinette stitch, making decreases for the armholes at the beginning and end of rows 3 and 5 for S-M, and in rows 3, 5, 7 for M-L as follows: K, 1K, 2Kright, back stitches, before reaching 4 stitches from the end of the row make a decrease 2Kleft, 2K.
In total, knit 36 rows, remembering to mark the beginning and end of the 31st row with marker-pins (control points).
Next, we form the shoulders with decreases while simultaneously closing:
S-M 3Kright, 3Kright, 3Kright, 3Kright, 3Kright, 3Kright, 2Kright, 17K, 2Kleft, 3Kleft, 3Kleft, 3Kleft, 3Kleft, 3Kleft, 3Kleft.
M-L 3Kright, 2Kright, 3Kright, 2Kright, 3Kright, 2Kright, 3Kright, 2Kright, 18K, 2Kleft, 3Kleft, 2Kleft, 3Kleft, 2Kleft, 3Kleft, 2Kleft, 3Kleft.
The width of the back at the closed stitches is 30/32cm.
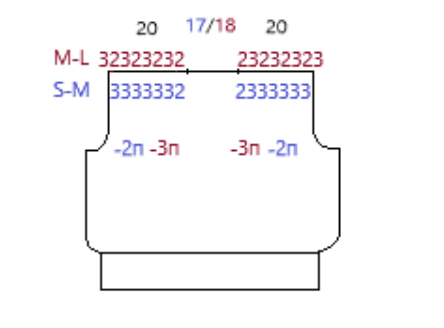
Figure 5
Leave a yarn tail of about 2.5m for sewing the back and fronts.
Lift the stitches of the second front and underarm onto the needle and join the yarn, knit 4/6 underarm stitches, place them on a pin. Knit the left front symmetrically, making decreases at the beginning and end of rows 3, 5 for S-M and 3, 5, 7 for M-L.
Row 1: 47/49K.
Row 2: as per pattern.
Row 3: K, 1K, 2Kright, 43/45K.
Make decreases in the 5th knit row (a total of 2 decreases), for size M-L and in the 7th knit row (a total of 3 decreases). On the needles, 45/46 stitches, knit in stockinette stitch for 36 rows.
At the beginning of the 31st row, place a marker-pin, this is one of the control points (when sewing the body and sleeve, the points should match).
Next, we form the shoulder line.
37th knit row: knit, simultaneously closing 5Kright, 5Kright, 5Kright, 5Kright, 5Kright, 5Kright, 5Kright/4Kright, 5Kright, 4Kright, 5Kright, 4Kright, 5Kright, 4Kright, 5Kright, 10K of the band (continue to knit these 10 stitches).
Knit the band in stockinette stitch for 10/11 rows, leave the stitches open. Sew the open stitches of the bands in any convenient way.
Fold the front and back pieces with the right sides together, sew the pieces together with a crochet hook stitch by stitch.
Sleeves.
Using needles No. 3.5, cast on 40/44 stitches +1 stitch to close the knitting in the round, in 2 threads. Place the BRM, knit the cuff for 1- 37 rows in 1*1 ribbing. Try it on, the cuff should fit snugly around the wrist.
Using needles No. 6, knit in the round in stockinette stitch in 1 thread, in 1 row from each knit stitch of the ribbing knit two stitches (knitting through the front and back loops), from each purl stitch one knit. On the needles, 60/66 stitches. Knit in stockinette stitch for 63 rows. Then close 4/6 underarm stitches.
Next, knit the sleeve in stockinette stitch in flat rows. In rows 3, 5/3, 5, 7, make decreases in the armhole, similarly to the decreases in the back. At the beginning and end of rows 17, 23/17, 23, 29, make increases from the yarn overs or twisted yarn over: K, 1K, +1, K stitches of the sleeve, not knitting 2 stitches to the end of the row +1, 1K, K. In total, knit 32 rows. On the needles, 56/60 stitches.
Mark the control points at the beginning and end of the 31st row with marker-pins. Next, knit the shoulder cap, closing stitches from each side according to the diagram:
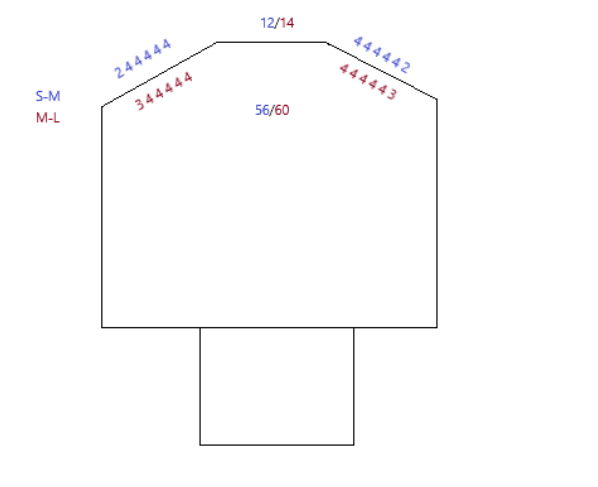
Figure 6
With a double thread needle, gather and tighten the shoulder cap, thus forming a "puff".
Similarly, knit the second sleeve.
Turning inside out, sew the sleeves to the body with a crochet hook stitch by stitch. The control markers, row stitches, and underarm stitches should match.
Hide the ends of the yarn in the seams, try it on and perform washing and blocking.
Recommendations for washing and caring for mohair items:
Delicate hand wash without soaking, using liquid detergents for wool items, in water at 30*, without rubbing and twisting.
Rinse in water of the same temperature.
Press by pressing the fabric with palms, wrapping it in a large towel that will absorb excess water.
Dry carefully laying it flat on a horizontal surface, placing fabric to absorb moisture, changing it several times and turning the item over.
Do not iron! To smooth out wrinkles, use a steam generator or hang it briefly in the bathroom and turn on the hot water.
Brush, lift the pile (without pressure) with a special mohair brush or a soft hairbrush.
For minor stains, do not wash the item right away, just treat the stained area with a brush or damp sponge, and to freshen up the item – steam it with a fabric steamer.