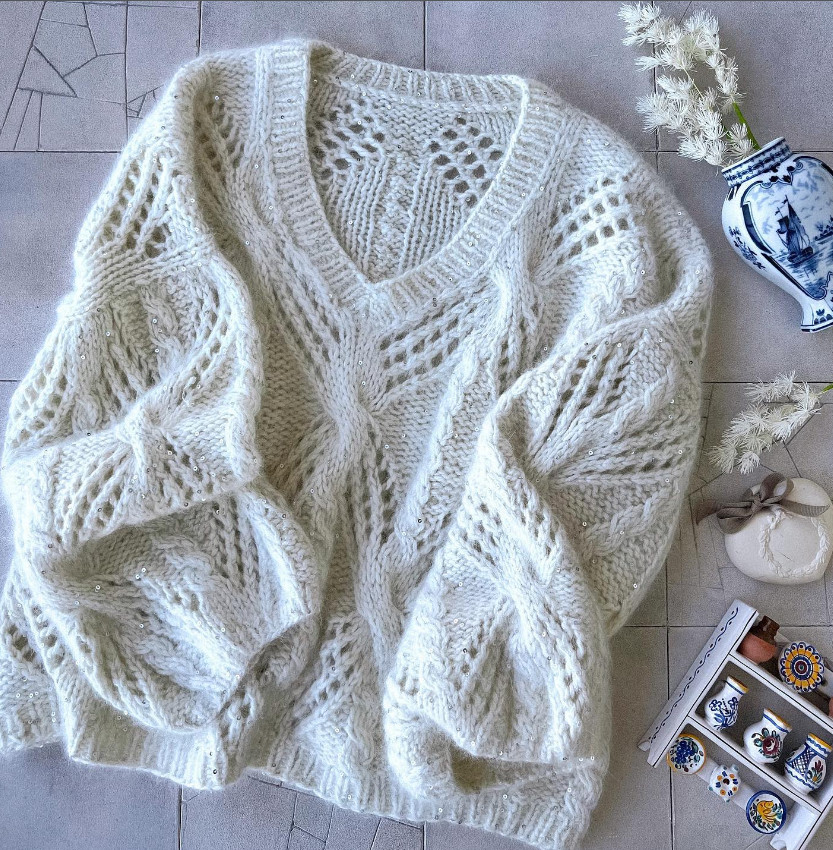
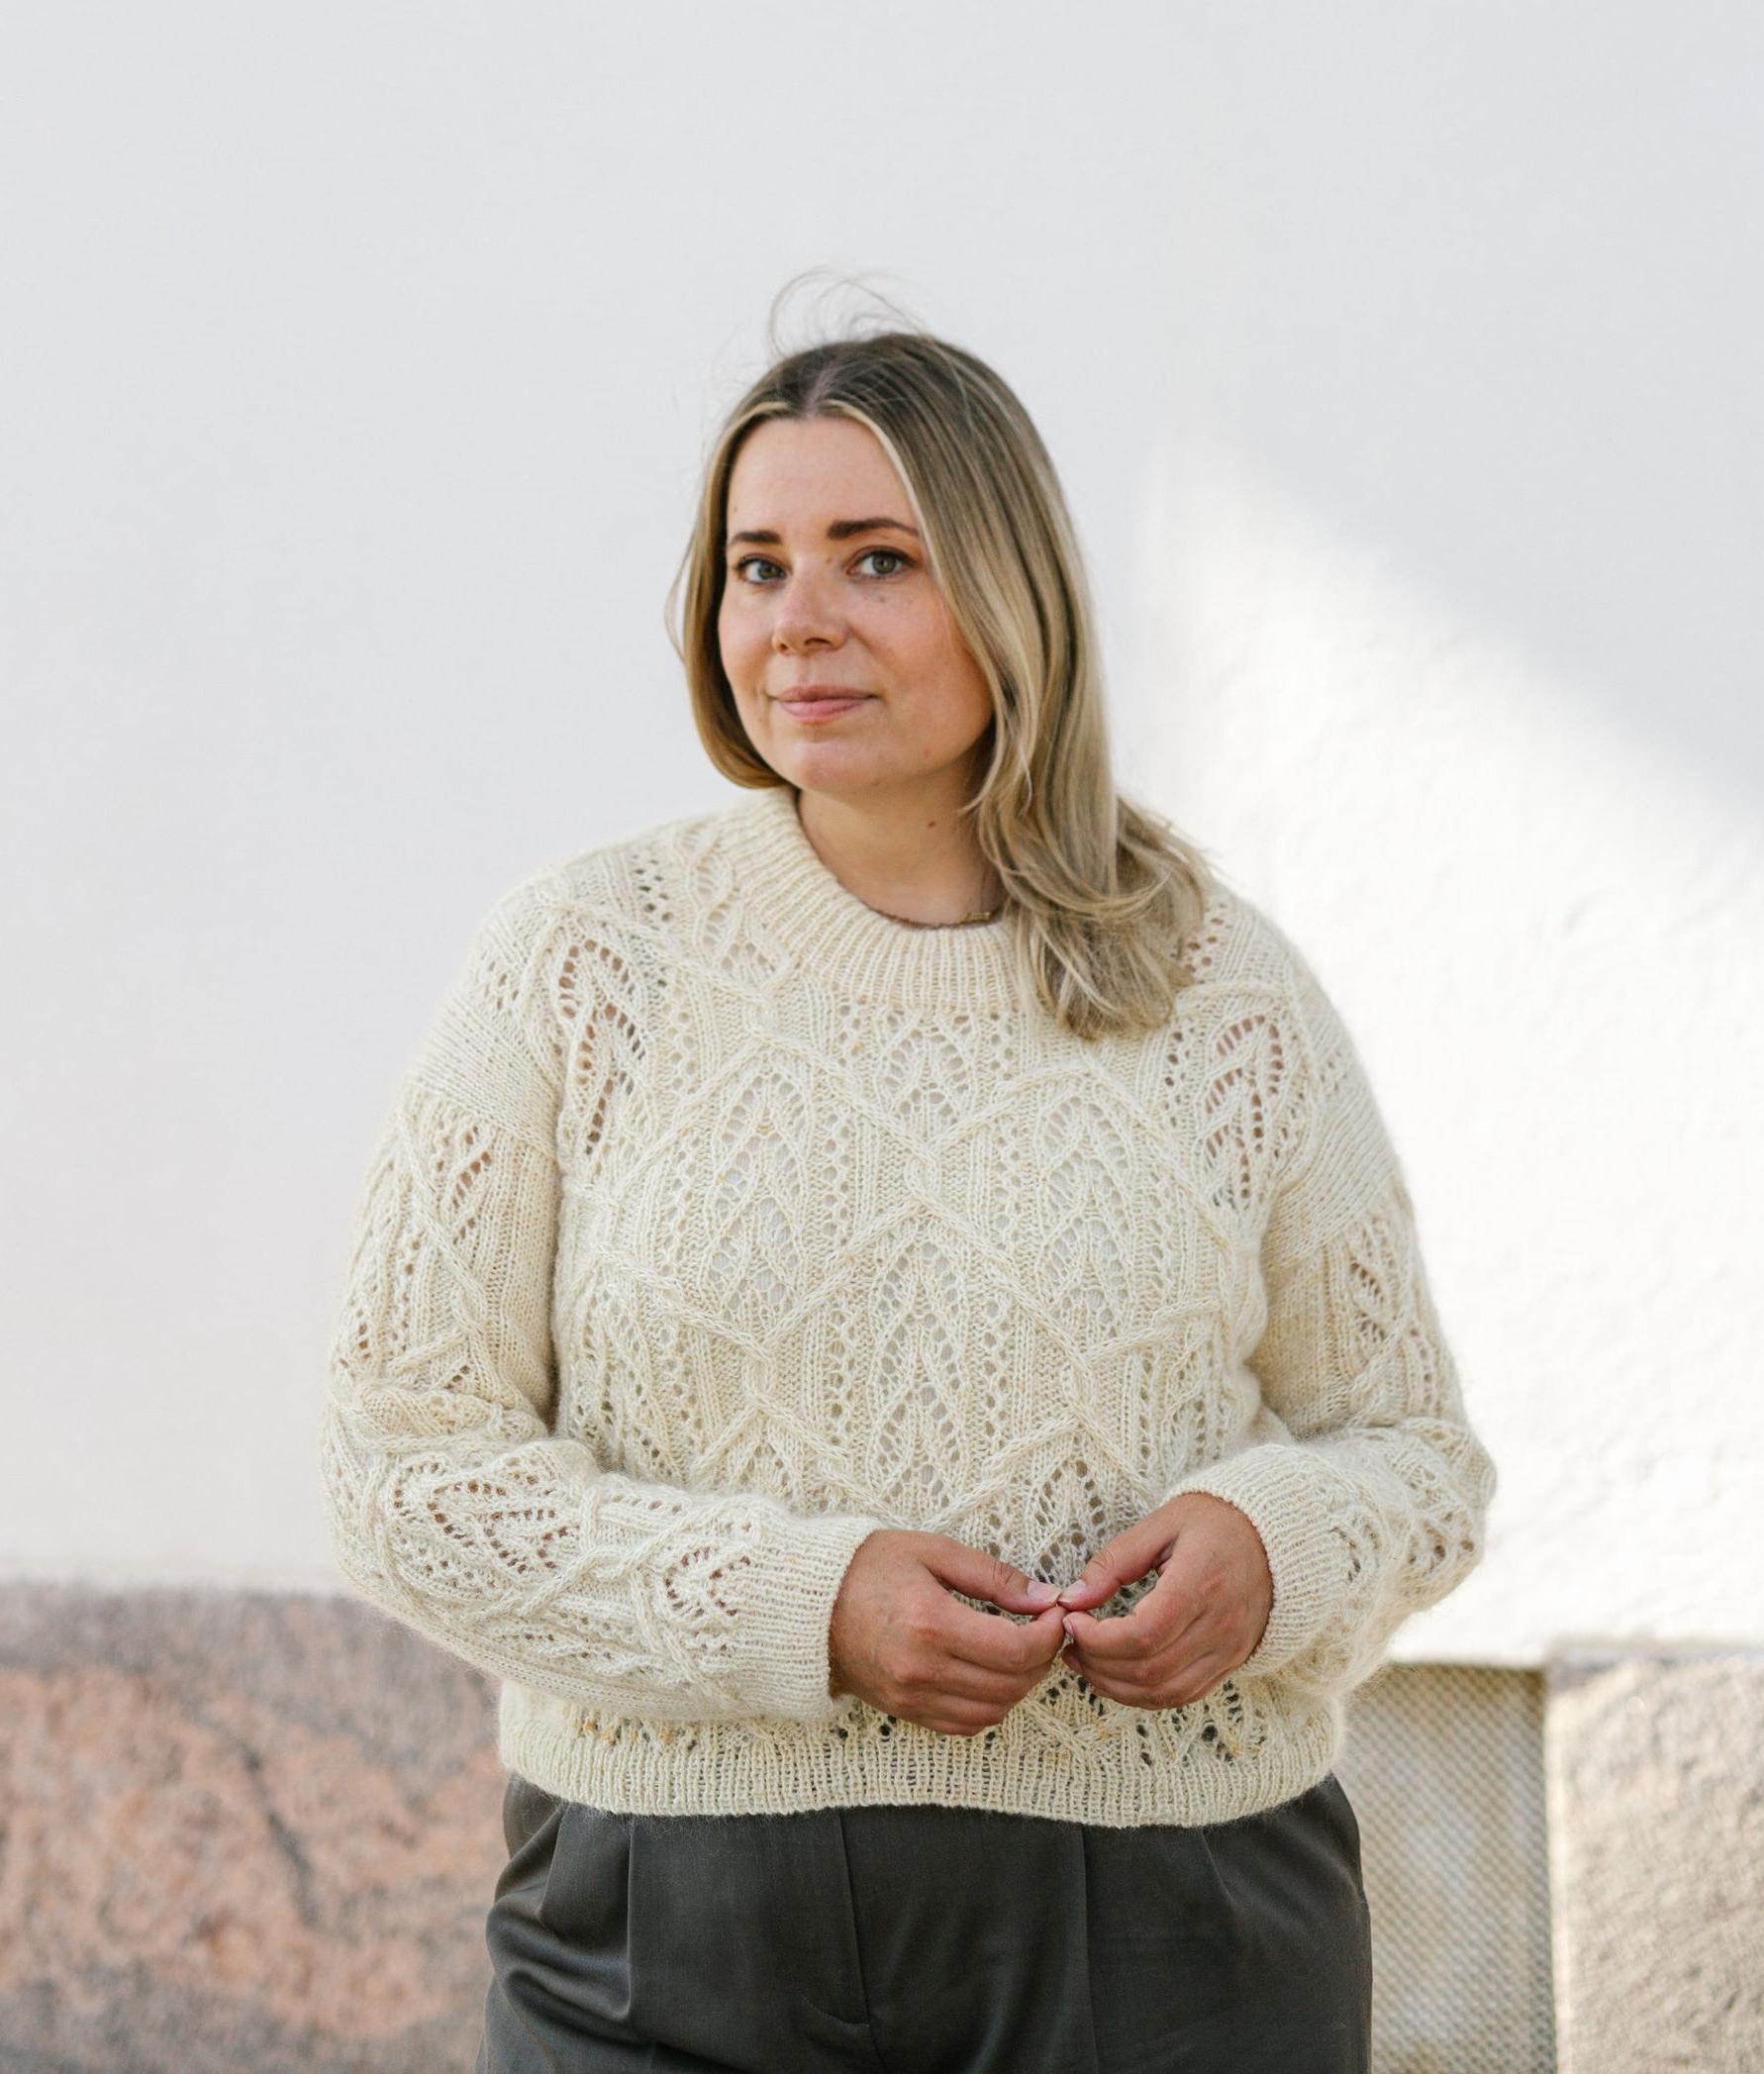
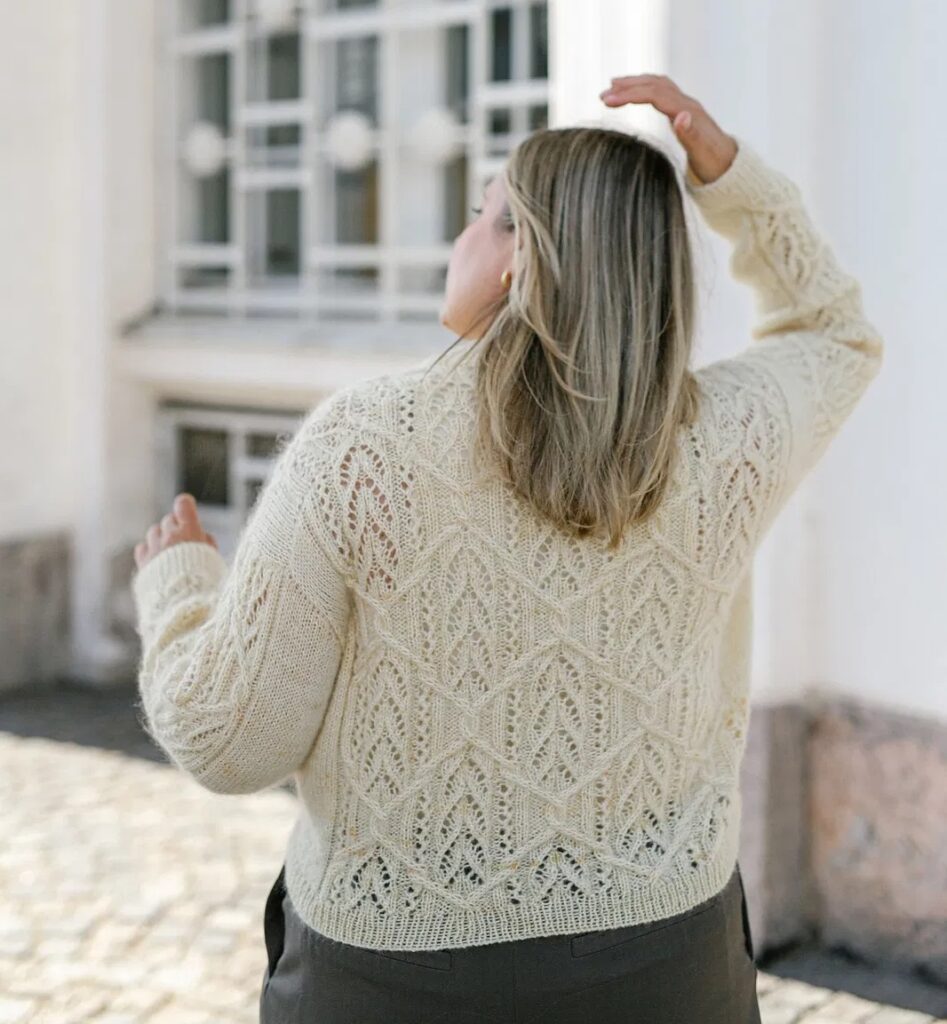
Knit Pullover
Added: 19.09.2025 в 12:17 Views: 394
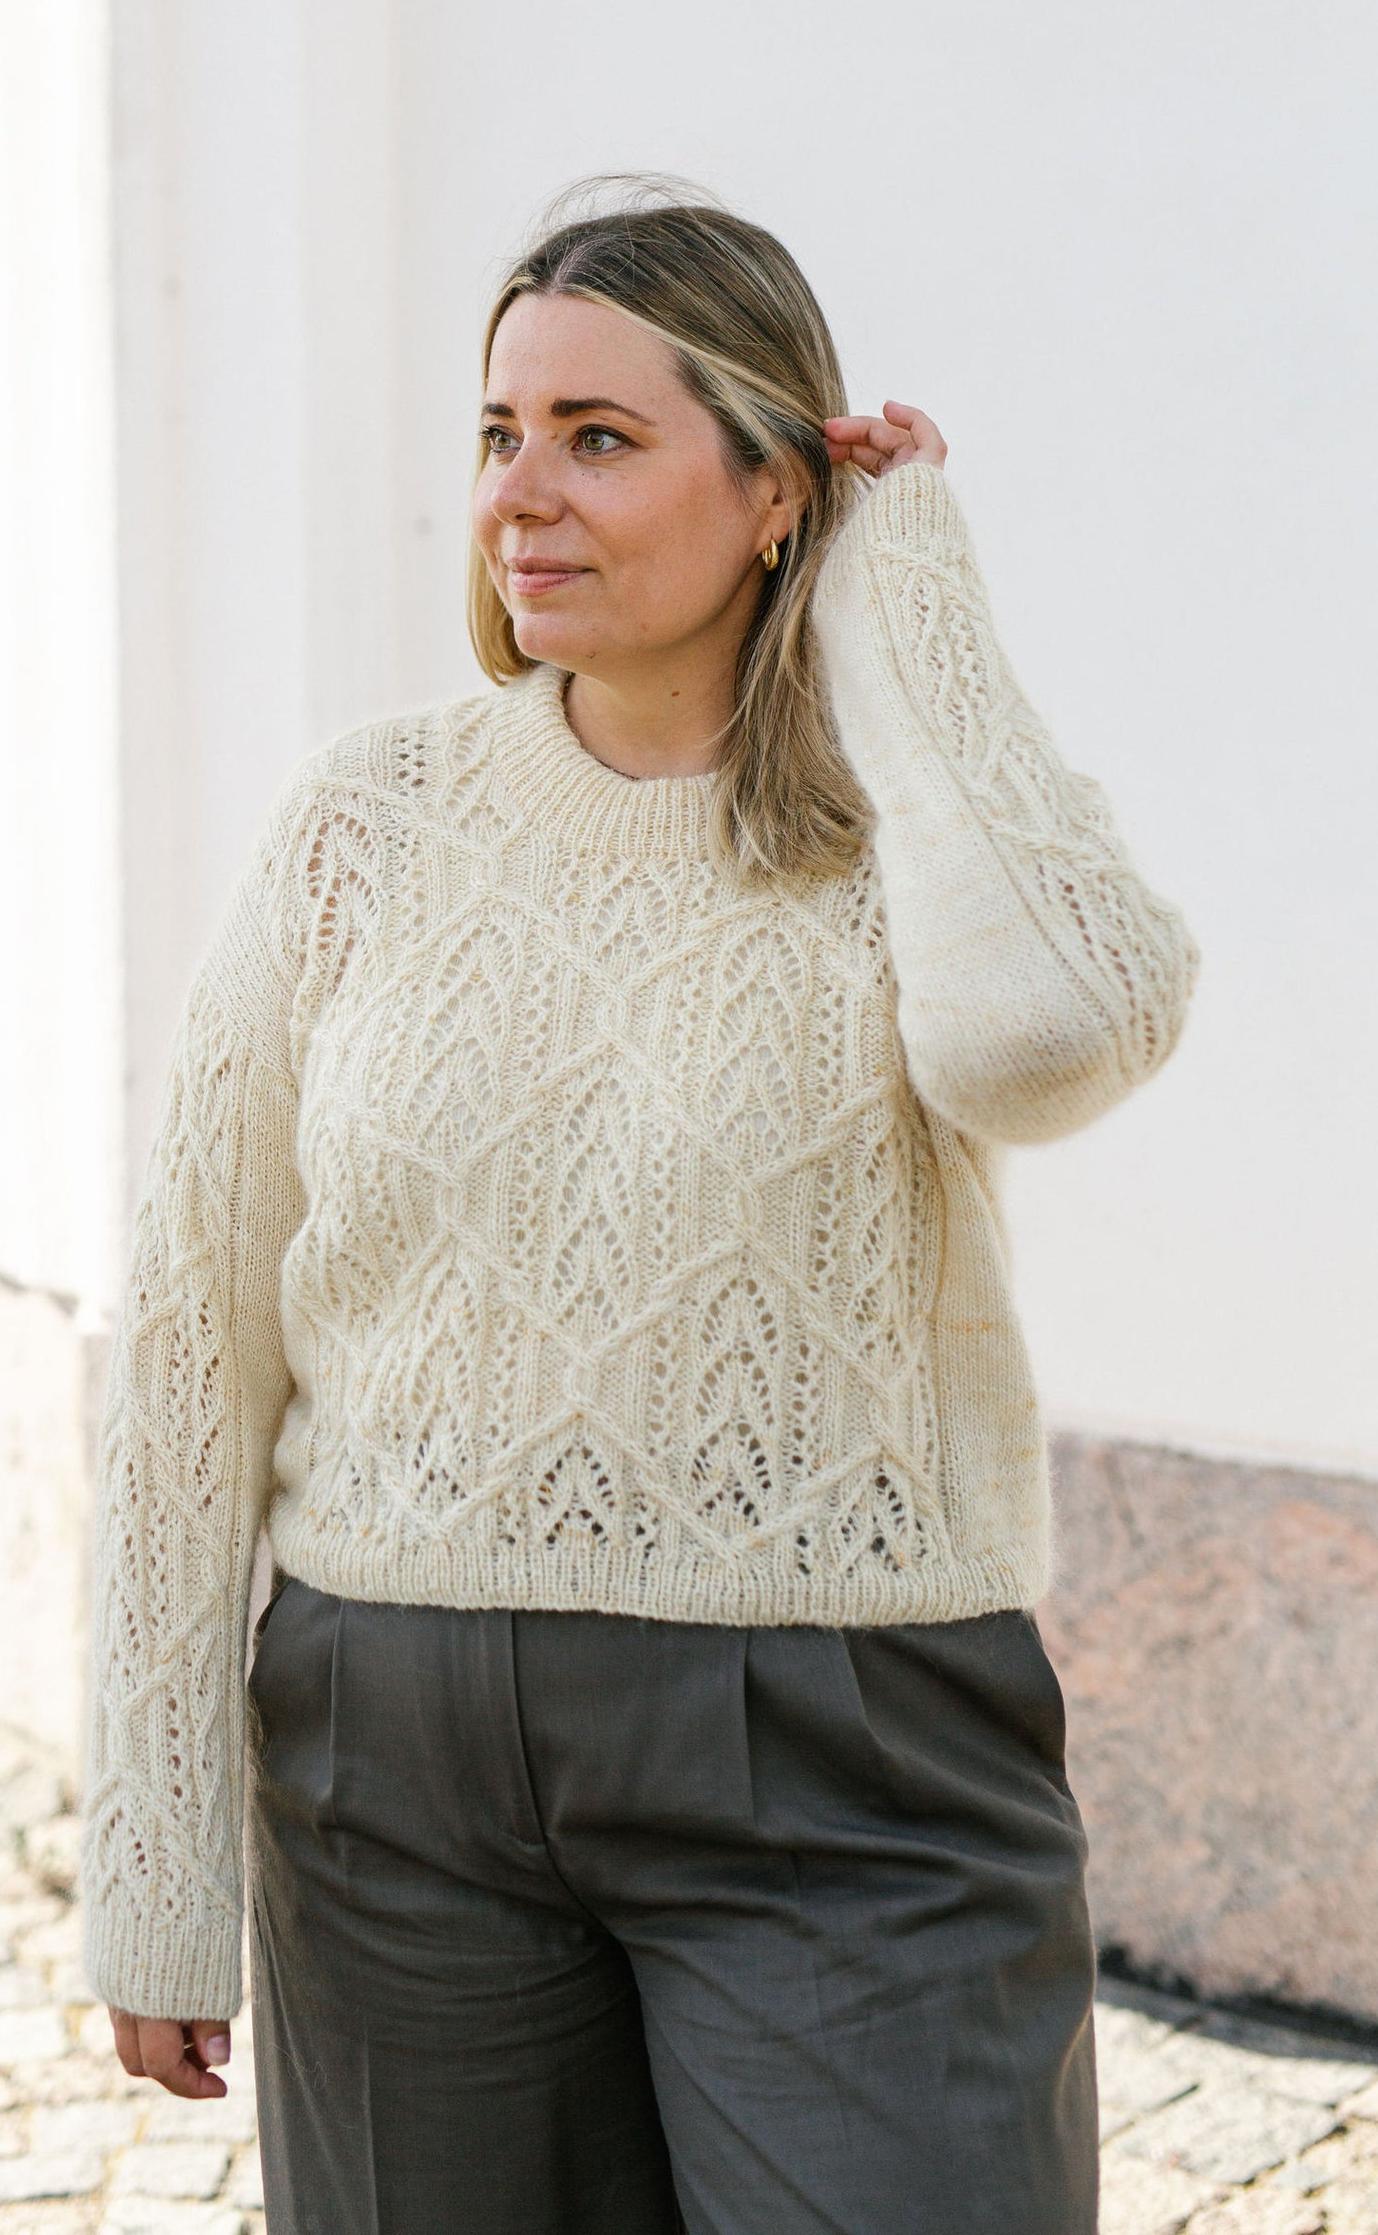
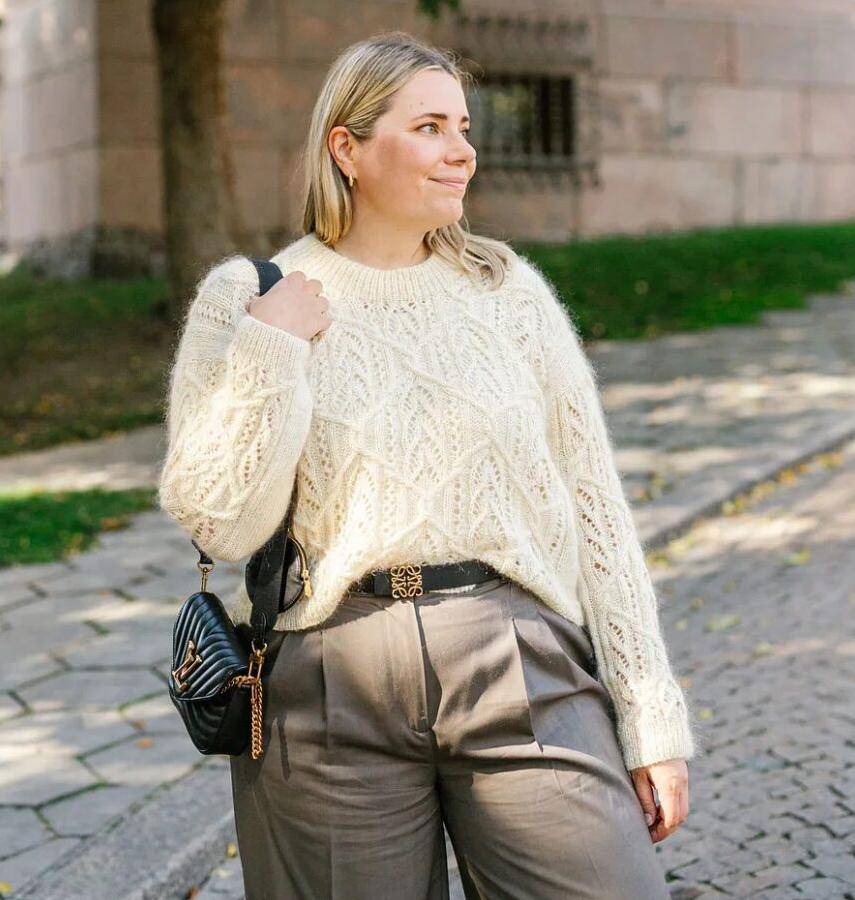
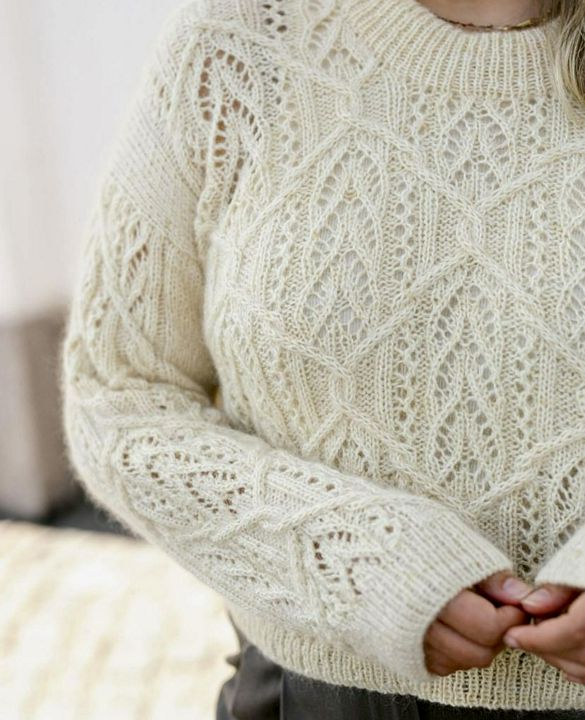
Knit PulloverKlubokhttp://klubok.work/1/3/9130/Klubokhttps://klubok.work/css/image/top-logo-en.pngThe Champagne pullover has a loose fit and dropped shoulders. It is knitted seamlessly from the top down in a lace pattern with braids on the front, back, and sleeves. The pullover starts with the back neckline and increases to the full width of the back. Increases for the braid pattern are fully charted. Then, stitches are cast on for the shoulders and knitted to form the front of the pullover. The front and back are joined at the underarms, and then the body is knitted in the round.
Sizes 1 (2, 3, 4, 5) (6, 7, 8, 9)
Final chest circumference: 95 (105, 115, 125, 135) (145, 155, 165, 175) cm / 37.5 (41.25, 45.25, 49.25, 53.25) (57, 61, 65, 69) inches, including an ease of 20 cm / 8 inches
Then stitches are picked up from the body for the sleeves and neckline. The sleeves feature several short rows that shape the sleeve caps for better fit. The lower edge and cuffs are finished with a tubular bind-off, providing a neat and stretchy edge that looks as if the stitches are rolled over to the other side of the ribbing.
At the end, the neckline band is folded in half. To enhance the patterns, I recommend choosing solid or slightly tonal colorways. The Champagne pullover is knitted using one strand of fingering weight yarn along with a strand of mohair on silk, but you can also knit it using one strand of DK weight yarn.
Length from the lower edge to the armhole (adjustable): 33 cm / 13 inches
Sleeve length from cuff to armhole (adjustable): 42 cm / 16 inches
Upper sleeve circumference: 34 (36, 38, 40, 43)(46, 49, 52, 55) cm / 13.25 (14.25, 15, 15.75, 16.75)(18.25, 19.25, 20.5, 21.75) inches
Note: The body and sleeve lengths can be easily adjusted according to your own measurements. I recommend trying on the sweater from time to time while working to ensure that you achieve the perfect length for your style. Please keep in mind that changing the length of the garment will also affect the amount of yarn needed to complete the project.
Yarn
Note: If you are using DK weight yarn for knitting, you will only need the stated amount for fingering weight yarn. Knit with one strand throughout the project. 910 (1000, 1100, 1210, 1330) (1470, 1610, 1770, 1860) m / 1000 (1100, 1210, 1330, 1610) (1770, 1950, 2050, 2050) yards of fingering weight yarn and 910 (1000, 1100, 1210, 1330) (1470, 1610, 1770, 1860) m / 1000 (1100, 1210, 1330, 1610) (1770, 1950, 2050, 2050) yards of mohair on silk
Sample in the photo: 3 (3, 4, 4, 4) (5, 5, 5, 6) skeins of Tôt Le Matin Tot Single Sock (100% merino; 366 m / 400 yards per 100 g) in the color Champagne and 5 (5, 5, 6, 6) (7, 8, 8, 9) skeins of Knitting for Olive Soft Silk Mohair (70% mohair, 30% silk; 225 m / 246 yards per 25 g) in the color Elderflower.
Needles
3 mm / US 2.5 – circular needles with a cable length of 40 cm / 16 inches for the neckline band 3 mm / US 2.5 – DPNs or circular needles with a cable length suitable for working small circumferences for knitting cuffs 3 mm / US 2.5 circular needles with a cable length of at least 80 cm / 32 inches for the lower ribbing 3.5 mm / US 4 DPNs or circular needles with a cable length suitable for working small circumferences for knitting sleeves 3.5 mm / US circular needles with a cable length of at least 80 cm / 32 inches for knitting the body
Gauge
20 sts and 28 rounds = 10 cm / 4 inches in stockinette stitch on larger needles, knitted in the round, after blocking
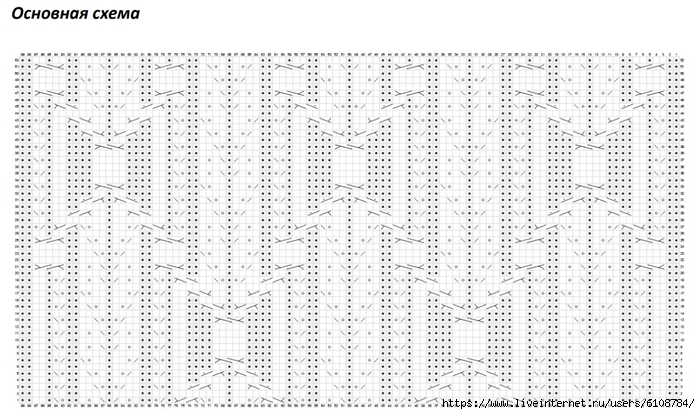
25 sts and 28 rounds = 10 cm / 4 inches in the pattern knitted according to the chart on larger needles in the round, after blocking
Note: Always use needles that allow you to achieve the correct gauge!
Additional Tools: 8 markers 6 removable markers cable needle for cables, if needed waste yarn tapestry needle blocking tools
Instructions
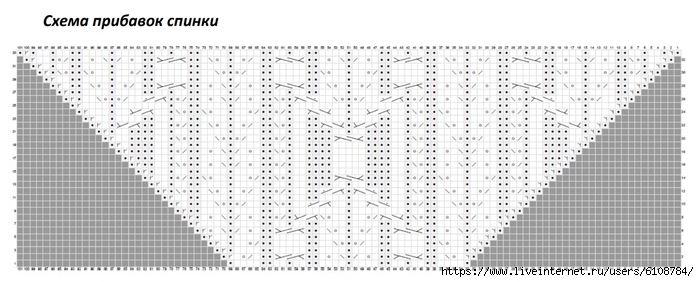
Back. Increases
Note: if you decide to work with a combination of yarns (e.g., fingering weight + mohair), knit both strands together throughout the project.
Cast on 37 sts for the back neckline on larger needles. Do not join. Place removable markers on the cast-on row below the first and last stitches in the row.
Note: When working from charts on the wrong side, remember to read them left to right and check any changed symbols when working on the wrong side.
Row 1 (WS): Knit Row 1 of the back increase chart.
Row 2 (RS): Knit Row 2 of the back increase chart.
Continue as established until you finish working the chart. 101 sts on the needles.
From this point, increases will be done in stockinette stitch, and the part indicated on the chart in the middle will be worked according to the Main chart.
Row 1 (RS): 1 purl, KLL, place marker, knit Row 1 of the Main chart until 1 st remains, place marker, KRP, 1 purl. 2 sts increased, 103 sts on the needles.
Row 2 (WS): 1 knit, KRP, 1 purl, move marker, knit Row 2 of the Main chart, move marker, 1 purl, KLL, 1 knit. 2 sts increased, 105 sts on the needles.
Only sizes 2-9:
Row 3 (RS): 1 purl, KLL, knit to next marker, move marker, knit Row 3 of the Main chart, move marker, knit until 1 st remains, KRP, 1 purl. 2 sts increased, 107 sts on the needles.
Row 4 (WS): 1 knit, KRP, purl to next marker, move marker, knit Row 4 of the Main chart, move marker, purl until 1 st remains, KLL, 1 knit. 2 sts increased, 109 sts on the needles.
Only sizes 3-9:
Row 5 (RS): 1 purl, KLL, knit to next marker, move marker, knit next Row of the Main chart, move marker, knit until 1 st remains, KRP, 1 purl. 2 sts increased.
Row 6 (WS): 1 knit, KRP, purl to next marker, move marker, knit next Row of the Main chart, move marker, purl until 1 st remains, KLL, 1 knit. 2 sts increased.
Repeat Rows 5-6 another — (-, 0, 3, 4) (7, 8, 11, 12) times. — (-, 113, 125, 129) (141, 145, 157, 161) sts on the needles.
All sizes:
Place removable markers on the first and last stitch of the row. These markers will assist you when casting on stitches for the front.
Next row (RS): Knit to next marker, move marker, knit next Row of the Main chart, move marker, knit to the end
Next row (WS): Purl to next marker, move marker, knit next Row of the Main chart, move marker, purl to the end
Continue knitting as established until the piece reaches 6 (4, 3.5, 3.5, 3) (3.5, 3, 3.5, 3.5) cm / 2.25 (1.5, 1.5, 1.5, 1.25) (1.5, 1.25, 1.5, 1.5) inches from the markers at the end of the increases, finishing with a row on the WS.
Record which row of the Main chart you finished on, as you will need this information for the front later. Place removable markers on the first and last stitch of the row. These markers will assist you when picking up stitches for the sleeves.
Next, begin making increases for the armholes as follows:
Row 1 (RS): 2 knit, KLL, knit to next marker, move marker, knit next Row of the Main chart, move marker, knit until 2 sts remain, KRP, 2 knit. 2 sts increased.
Row 2 (WS): Purl to next marker, move marker, knit next Row of the Main chart, move marker, purl to the end.
Repeat Rows 1-2 another 2 (5, 7, 7, 9) (9, 11, 11, 13) times. 111 (121, 129, 141, 149) (161, 169, 181, 189) sts on the needles.
Break the yarn and place the stitches on waste yarn.
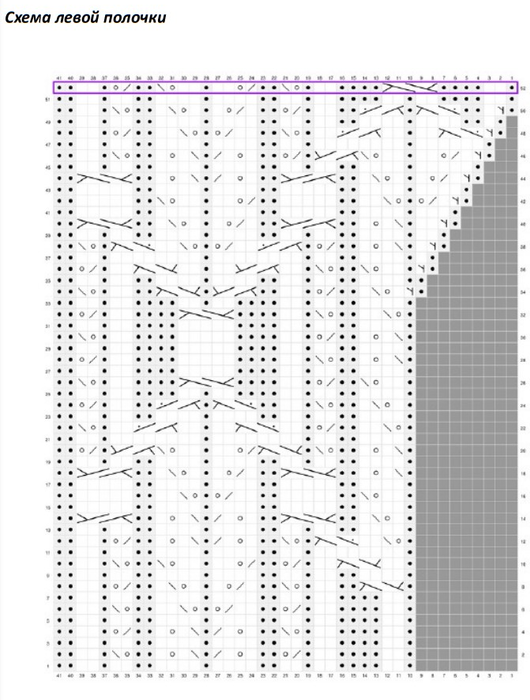
Left Shoulder
On the RS starting from the removable marker in the left corner of the back neckline cast-on row, pick up 35 (37, 39, 45, 47) (53, 55, 61, 63) sts (= 1 st for each row) along the left shoulder line to the removable marker at the end of the increases on the left shoulder. These markers on the left side can now be removed.
Row 1 (WS): 3 (5, 7, 13, 15) (21, 23, 29, 31) purl, place marker, knit Row 1 of the left front chart.
Row 2 (RS): Knit Row 2 of the left front chart, move marker, knit to the end.
Continue knitting as established until you finish row 51. Row 52 will only be knitted after completing the right front and casting on stitches for the neckline. Now you have 44 (46, 48, 54, 56) (62, 64, 70, 72) sts on the needles. Break the yarn and place the stitches on waste yarn.
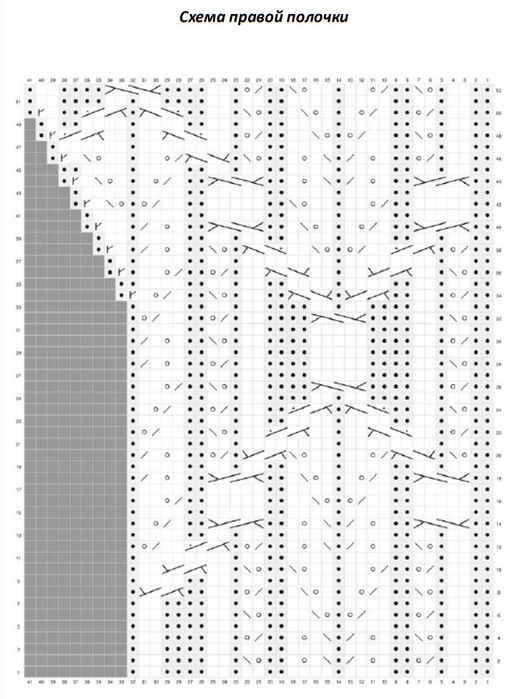
Right Shoulder
On the RS starting from the removable marker at the end of the right shoulder increases, pick up 35 (37, 39, 45, 47) (53, 55, 61, 63) sts (= 1 st for each row) along the right shoulder line to the removable marker at the right corner of the back neckline. These markers on the right side can now be removed.
Row 1 (WS): Knit Row 1 of the right front chart, place marker, purl to the end.
Row 2 (RS): Knit to next marker, move marker, knit Row 2 of the right front chart.
Continue knitting as established until you finish row 51. Now you have 44 (46, 48, 54, 56) (62, 64, 70, 72) sts on the needles.
Row 52 (RS): Knit to next marker, move marker, knit Row 52 of the right front chart.
Then cast on 17 sts, using backward loop or cable cast-on. Return the stitches from the left shoulder on to the needles, and knit Row 52 of the left front chart, move marker, knit to the end.
105 (109, 113, 125, 129) (141, 145, 157, 161) sts on the needles
Front
Next Row (WS): Purl to next marker, move marker, knit Row 8 of the Main chart, move marker, purl to the end.
Next Row (RS): Knit to next marker, move marker, knit next Row of the Main chart, move marker, knit to the end.
Continue as established until the front reaches a height of 24 (23, 23.5, 25.5, 26) (28.5, 29, 31.5, 31.5) cm / 9.5 (9, 9.25, 10, 10.25) (11.25, 11.5, 12.5, 12.5) inches from the shoulder line, and you are on the same row of the Main chart that you finished the back on before beginning the increases for the armholes.
Place removable markers on the first and last stitch of the row. These markers will assist you when casting on stitches for the sleeves. Then begin increasing stitches for the armholes as follows:
Row 1 (RS): 2 knit, KLL, knit to next marker, move marker, knit next Row of the Main chart, move marker, knit until 2 sts remain, KRP, 2 knit. 2 sts increased.
Row 2 (WS): Purl to next marker, move marker, knit next Row of the Main chart, move marker, purl to the end.
Repeat Rows 1-2 another 2 (5, 7, 7, 9) (9, 11, 11, 13) times. 111 (121, 129, 141, 149) (161, 169, 181, 189) sts on the needles.
Joining the front and back.
Next Row (RS): Knit to next marker, move marker, knit next Row of the Main chart, move marker, knit to the end, cast on 1 st, place side marker, and cast on another 2 sts for the armhole. Return the stitches from the back onto the needles. Knit to the next marker, move marker, knit the same Row of the Main chart that you knitted on the front, move marker, knit to the end.
Then cast on 1 st, place MNR, and cast on another 2 sts for the armhole. Join the stitches in the round. 228 (248, 264, 288, 304) (328, 344, 368, 384) sts on the needles.
Note: You will now be working from the charts in the round, so all rows of the charts will now be read from the RS right to left.
Next round: *Knit to next marker, move marker, knit next Row of the Main chart, move marker, knit to next marker, move marker; repeat from * to the end.
Continue working until the body measures 28 cm / 11 inches from the armholes or 5 cm / 2 inches shorter than your desired body length.
Lower Ribbing
Switch to smaller needles.
Ribbing Row: *1 knit, 1 purl; repeat from * to the end.
Continue as established until the ribbing reaches 5 cm / 2 inches or desired length.
Bind off all stitches in pattern. I recommend using a sewn tubular bind-off for the neatest finish.
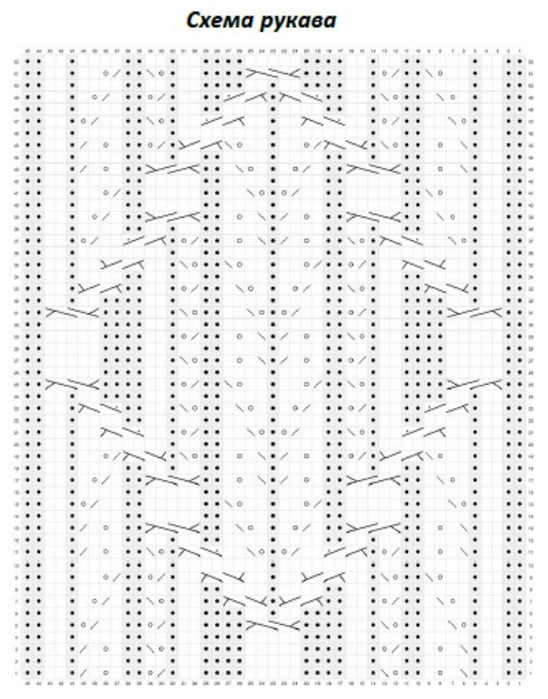
Sleeves
Use larger needles. Starting from the middle of the armhole cast-on edge, pick up 2 sts along the cast-on edge, then 6 (8, 10, 10, 14) (14,18, 18, 20) sts along the side to the first removable marker located on the increases, place marker. Then pick up 63 (63, 63, 67, 65) (71, 69, 75, 77) sts to the second removable marker, place marker. Pick up another 6 (8, 10, 10, 14) (14, 18, 18, 20) sts along the side of the armhole.
Pick up another 1 st from the cast-on edge of the armhole.
Place MNR and join the stitches in the round. 78 (82, 86, 90, 96) (102, 108, 114, 120) sts on the needles.
Short Row 1: Knit to next marker, move marker, then 9 (9, 9, 11, 10) (13, 12, 15, 16) knit, place marker, knit Row 1 of the sleeve chart, place marker, knit to next marker, remove marker and turn work.
Short Row 2 (WS): Slip 1 st, yarn forward and immediately make a yarn over on the needle, pull the working yarn back so that both “legs” of the slipped stitch are on the right needle, making it look like a double stitch. From this point, it will be referred to as a “double stitch.” Then purl to next marker, move marker, knit Row 2 of the sleeve chart, move marker, purl to next marker, remove marker and turn work.
Short Row 3 (RS):
Slip 1 st, yarn forward and immediately make a yarn over on the needle, pull the working yarn back as described above, then knit to next marker, move marker, knit the next row of the sleeve chart, move marker, knit to the next double stitch, knit the double stitch as a regular knit (through both legs together), 2 knit, turn work.
Short Row 4 (WS): Slip 1 st, yarn forward and immediately make a yarn over on the needle, pull the working yarn back as described above, then purl to next marker, move marker, knit the next row of the sleeve chart, move marker, purl to the next double stitch, knit the double stitch as a regular purl (through both legs together), 2 purl, turn work.
Repeat short Rows 3-4 another 2 (3, 4, 4, 6) (6, 8, 8, 9) times.
Short Row 5 (RS): Slip 1 st, yarn forward and immediately make a yarn over on the needle, pull the working yarn back as described above, then knit to the next marker, move marker, knit the next row of the sleeve chart, move marker, knit to the next double stitch, knit the double stitch as a regular knit (through both legs together), knit to MNR.
Next round: Continue knitting in the round (note that all rows of the chart are now knitted right to left). Knit to next marker and simultaneously knit remaining double stitches as knits. Move marker, knit next row of the sleeve chart, move marker, knit to the end.
Knit as established until the sleeve length measures 4.5 (3, 3, 3, 2) (2, 2, 2, 1) cm / 1.75 (1.25, 1.25, 1.25, 0.75) (0.75, 0.75, 0.75, 0.5) inches from the armhole, then begin making decreases for the sleeve as follows:
Decrease Row: 2 knit, 2 k2tog, knit to next marker, move marker, knit next row of the sleeve chart, move marker, knit until 3 sts remain to the end of the row, 2 k2tog, 1 knit. 2 sts decreased.
Repeat decreases every 4.5 (3, 3, 3, 2) (2, 2, 2, 2) cm / 1.75 (1.25, 1.25, 1.25, 0.75) (0.75, 0.75, 0.75, 0.75) inches another 6 (8, 8, 10, 13) (15, 16, 16, 17) times. 64 (64, 68, 68, 68) (70, 74, 80, 84) sts on the needles.
After completing all decreases, knit as established until the sleeve length measures 37 cm / 14 inches from the armhole or 5 cm / 2 inches shorter than your desired sleeve length.
Cuff
Switch to smaller needles.
Ribbing Row: *1 knit, 1 purl; repeat from * to the end.
Continue as established until the ribbing reaches 5 cm / 2 inches or desired length.
Bind off all stitches in pattern. I recommend using a sewn tubular bind-off for the neatest finish.
Knit the second sleeve similarly.
Neckline
Using smaller needles, starting from the right corner of the back neckline cast-on edge, pick up 35 sts along the back neckline, then approximately 34 sts along the left side of the neckline.
Then pick up 17 sts along the front neckline and another 34 sts along the right side of the neckline.
Place MNR and continue knitting in the round.
Approximately 120 sts on the needles, make sure that the stitch count is even.
Ribbing Row: *1 knit, 1 purl; repeat from * to the end.
Knit as established until the neckline measures 10 cm / 4 inches. Bind off all stitches loosely in pattern.
Fold the ribbing in half and loosely sew it to the inside of the pullover using a slip stitch.
Finishing
Weave in all remaining yarn ends.
Wet block to the desired dimensions.
Abbreviations
MNR – Marker for the beginning of the round
KLL — knit increase leaning left KRL — knit increase leaning right
KRP — knit increase leaning right
PIP — purl increase leaning right
RS – right side
WS— wrong side
2/2 LC — slip 2 sts to cable needle in front of work, knit 2, then knit 2 from cable needle.
2/2 RC — slip 2 sts to cable needle behind work, knit 2, then knit 2 from cable needle.
2/2 LCP — slip 2 sts to cable needle in front of work, purl 2, then knit 2 from cable needle
2/2 RCP — slip 2 sts to cable needle behind work, knit 2, then purl 2 from cable needle
2/3 LC— slip 2 sts to cable needle in front of work, knit 3, then knit 2 from cable needle.
2/3 RC— slip 3 sts to cable needle behind work, knit 2, then knit 3 from cable needle.