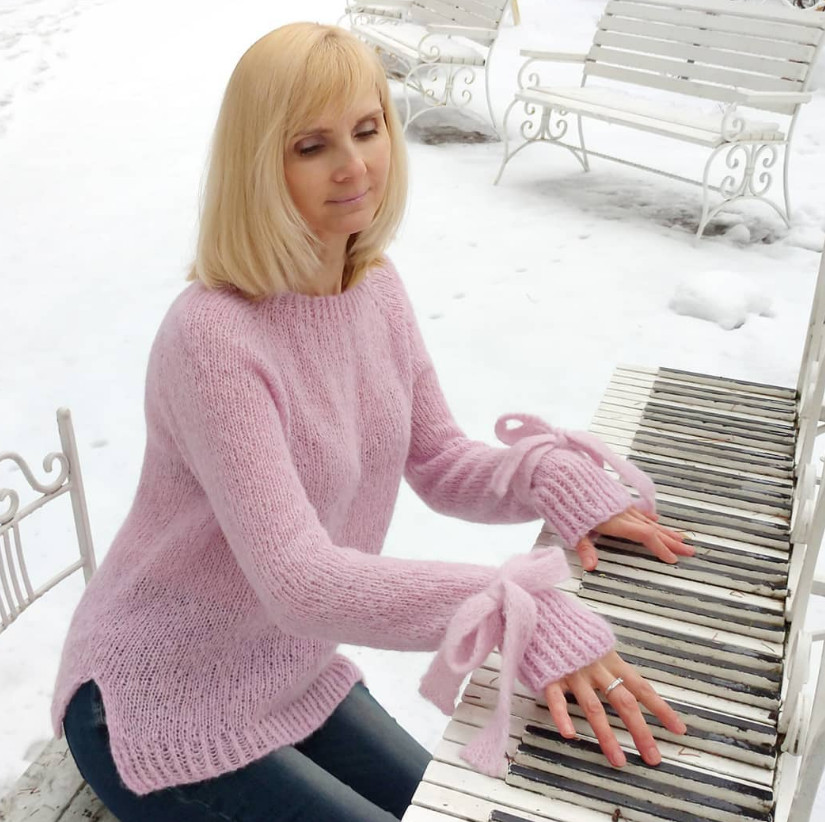
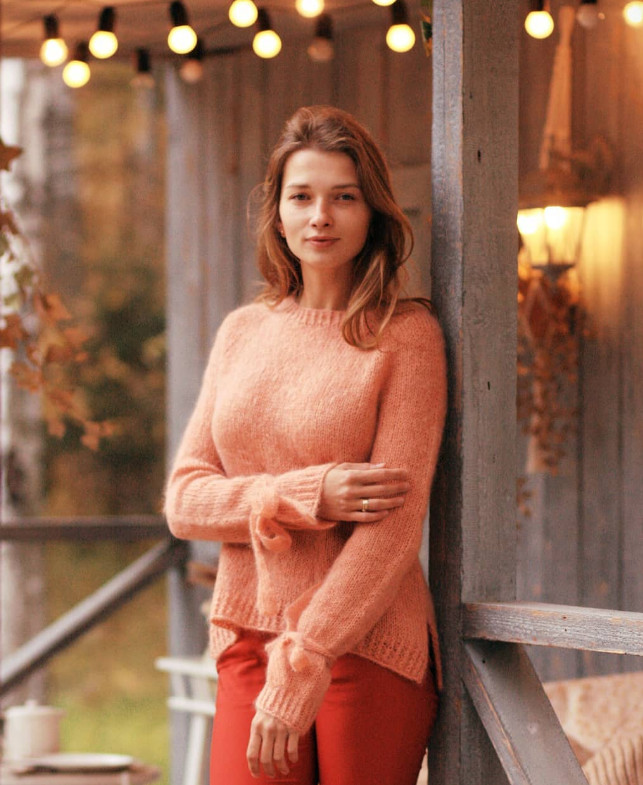
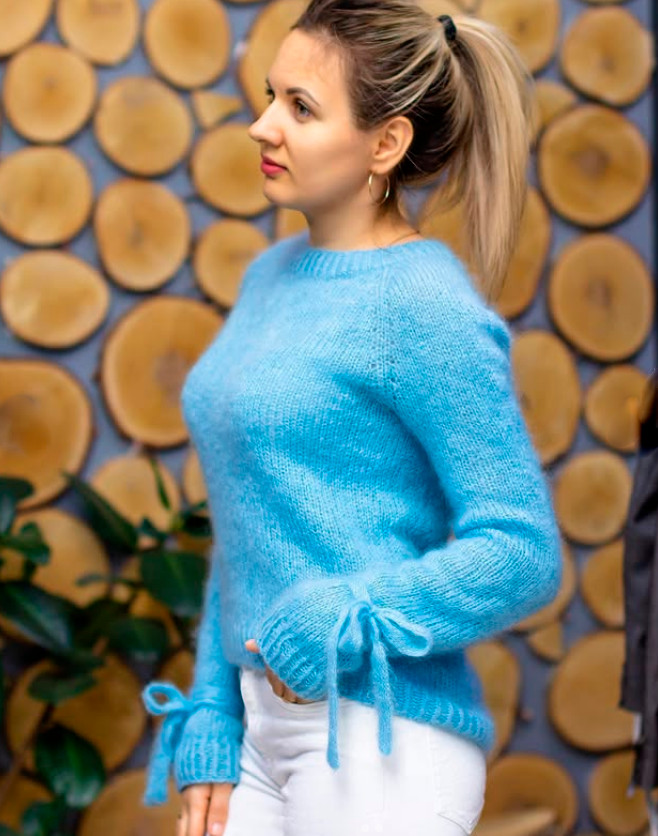
A knitted cardigan with interesting sleeves
Added: 14.12.2025 в 13:39 Views: 391
A knitted cardigan with interesting sleevesKlubokhttp://klubok.work/1/3/9331/Klubokhttps://klubok.work/css/image/top-logo-en.png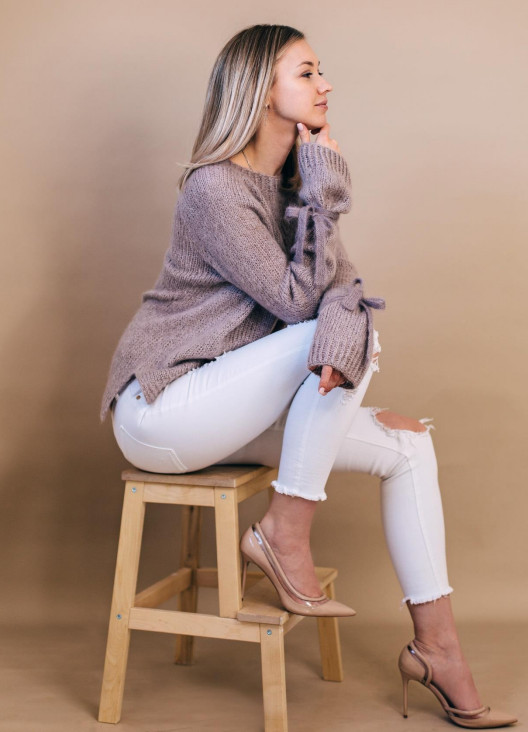
Sizes:
All values are given as a slash-separated range, corresponding to sizes: 38-40/42-44/46-48/50-52.
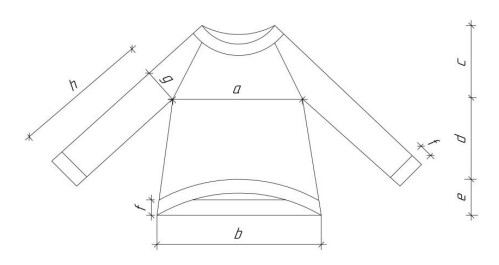
You can select the required garment size using the technical specifications provided in Table 1
Table 1: Technical characteristics of the garment (for height ~166 cm)
| Size | Bust, cm | a, cm | b, cm | c, cm | d, cm | e, cm | f, cm | g, cm | h, cm |
|---|---|---|---|---|---|---|---|---|---|
| 38-40 | 76-80 | 46 | 51 | 24 | 26 | 11 | 5 | 13.5 | 47 |
| 42-44 | 84-88 | 50 | 54.5 | 25 | 26 | 11 | 5 | 15 | 47 |
| 46-48 | 92-96 | 54 | 59 | 26 | 26 | 11 | 5 | 16.5 | 47 |
| 50-52 | 100-104 | 58 | 63 | 28 | 26 | 11 | 5 | 18.5 | 47 |
Materials and tools:
-
Mohair Kid Fason 75/25 m/g (in 1 ply) or Mohair Silk Premium 210/25 m/g (in 3 plies) Rodina Yarns - 250/250/275/300 g.
-
Circular needles 5.0 mm with a 40 cm cable for knitting the neckline;
-
Circular needles 6.0 mm with cords 40 cm and 80-100 cm long for knitting the main fabric and sleeves;
-
Straight needles or circulars 2.5 and 3.5 for knitting the ties;
-
Markers, 8 pcs;
-
Needle for wool with a large eye and blunt tip;
-
Measuring tape.
For knitting the ties, a fine yarn is absolutely required (!) (the original used mohair with a meterage of 210/25 m/g), knitted in 1 ply. Therefore, if you are knitting from another yarn and need ties, take any fine yarn of similar meterage and type. Usage ~10 g.
Construction:
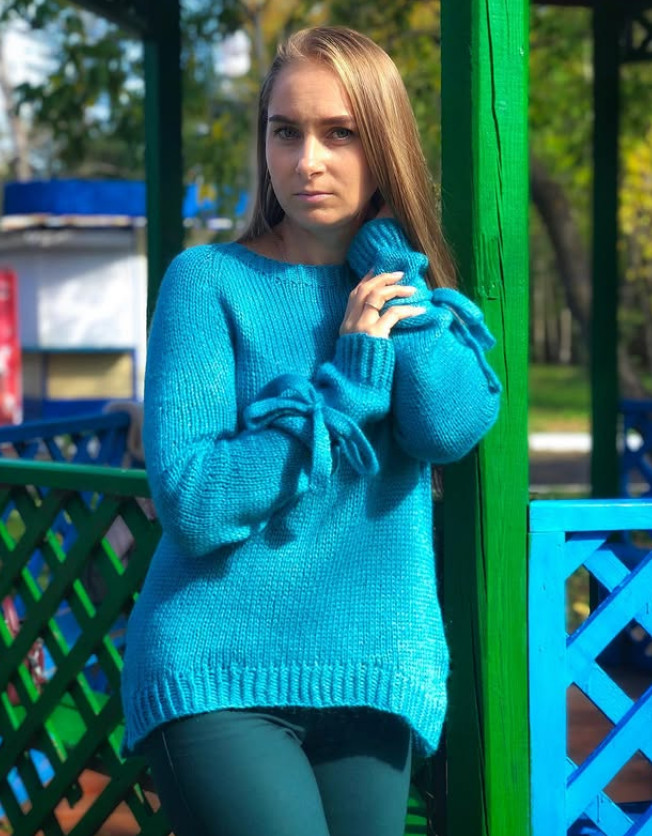
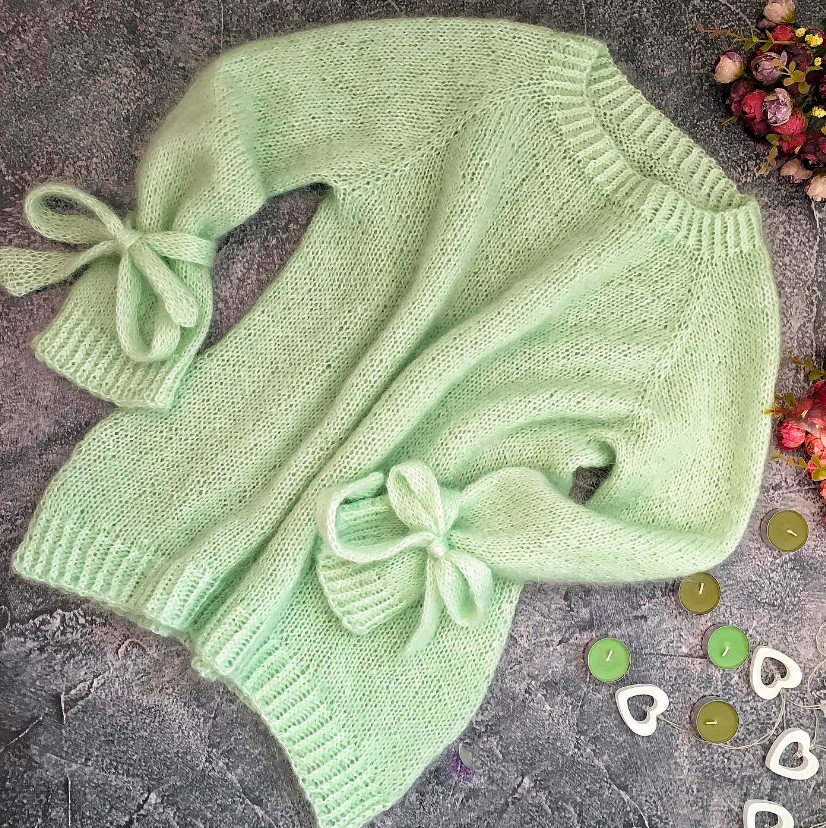
The garment features a lowered armhole, elongated sleeves, side slits, and a widening toward the bottom. It is knitted in one piece, without seams, with a top raglan.
Required skills:
Knitting knit and purl stitches; knitting in the round and turning rows; increases and decreases; careful reading.
Patterns:
Stockinette stitch: in turning (flat) knitting on knit rows — knit stitches, in purl rows — purl stitches. In circular knitting — all stitches knit.
Crossed rib 1×1: 1 knit, 1 purl, repeat from * to * to end of row, the stitches should be crossed.
Knitting gauge:
14 sts × 20 rows = 10 cm × 10 cm — stockinette on 6.0 mm needles after blocking.
To knit according to the finished measurements, you must maintain the specified gauge. Be sure to choose the needle size suitable for you!
Abbreviations:
Kr. – edge stitch;
Knit – knit stitch;
Purl – purl stitch;
MNR – marker for the start of the row;
M1, M2, M3, M4, M5, M6, M7 – markers;
PL – increase to the left of the marker;
PP – increase to the right of the marker;
r.p. – raglan stitches;
OP – wrap the stitch;
OPL – knit stitch with wrap on the knit side;
OPI – knit stitch with wrap on the purl side;
LNL – knit stitch + yarnover together with a left-leaning slope.
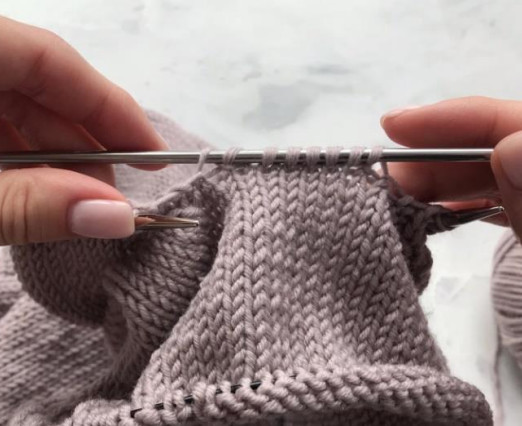
Short rows by the wrap-stitch method:
In the right-side (knit) row, work the required number of stitches up to a certain point (in the rise chart the point is indicated by dots), slip the next stitch onto the right needle, with the yarn behind the work, wrap the stitch and transfer it back to the left needle. Turn the knitting to the wrong side.
On the wrong side row, knit the required number of stitches up to the next section, slip the next stitch onto the right needle, bring the yarn to the front of the work, wrap the stitch and transfer it back onto the left needle. Turn the knitting to the right side.
On the right-side row, after knitting the stitches up to the wrapped stitch, you need to knit it together with the wrap so that the knitted stitch lies on top of the wrap and is not twisted. To do this, with the right needle moving away from you, catch the wrap, slide it onto the needle, and knit both stitches together. Then knit the next section in the same manner.
In the wrong-side row, the wrap is knitted together with the next stitch purlwise so that the stitch lies on top of the wrap. To do this, catch the wrap with the right needle moving toward you, slide it onto the left needle, and knit both stitches purlwise.
When transitioning to circular knitting, LNL is worked as follows: the yarn over and the stitch before it are knitted as a 2 together knit with a left-leaning slant, with the yarn over lying under the stitch.
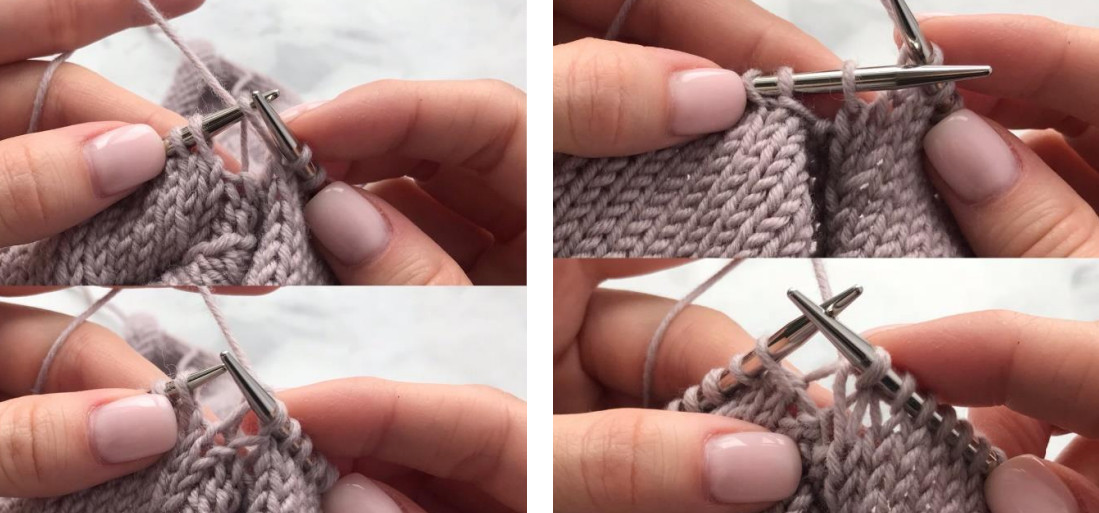
Increases and Raglan Line:
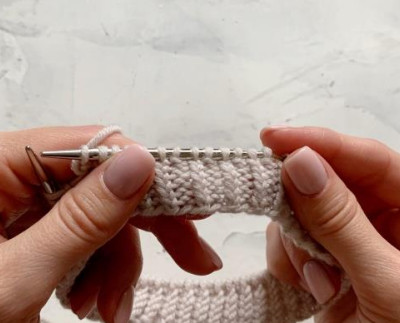
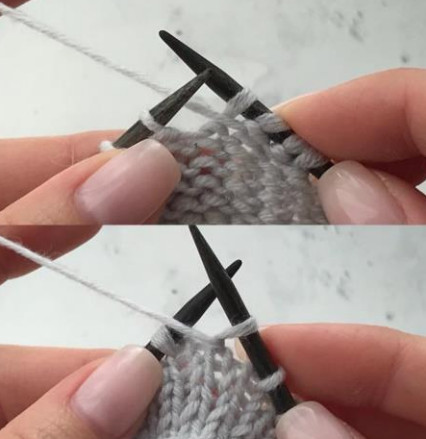
Right-side increase (RSI) from the marker (photo 1) is performed as follows:
Make a backward yarn over, in the next:
from the wrong-side row knit the wrapped stitch as a twisted purl (photo 4);
in the right-side row knit the wrapped stitch as a twisted knit.
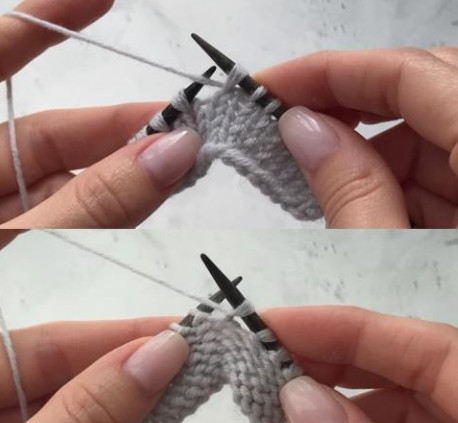
Left-side increase (LSI) from the marker (photo 2) is performed as follows:
Make a forward yarn over, in the next:
from the wrong-side row knit the wrapped stitch as a twisted purl (photo 3);
in the right-side row knit the wrapped stitch as a twisted knit.
The Raglan line consists of two knit stitches. When turning work (flat knitting): on the right-side row — knit stitches, on the wrong-side row — purl stitches. When knitting in the round — knit stitches. They are denoted as rp.
Work progress:
Please carefully read the technique for performing certain elements before starting the project.
With circular needles 5.0 mm and a 40 cm cable, cast on in the classic way 84/90/96/104 + 1 stitch, join the knitting in the round (to join in the round, transfer the last stitch from the right needle to the left and slip the very first stitch on the left needle over the transferred stitch).
Knit in twisted 1×1 rib for 3.5/3.5/4/4.5 cm. The ribbing should not be too loose; it will stretch to 3/3/3.5/4 cm.
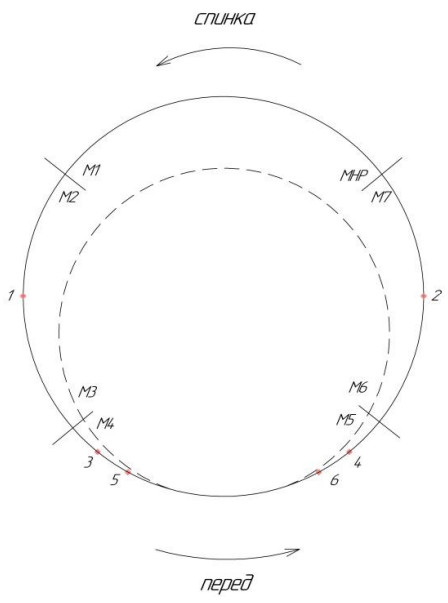
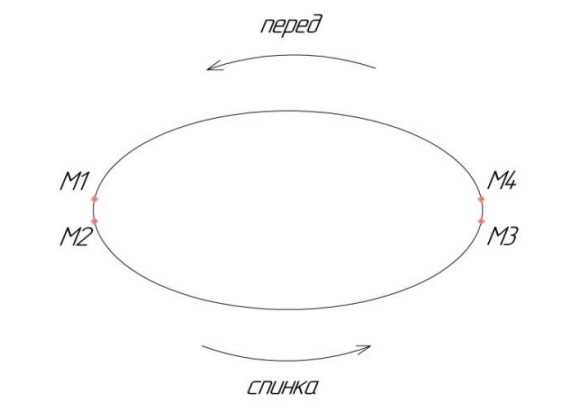
Switch to size 6.0 needles, place markers as follows:
MNR; 26/28/30/32 sts. (back); M1; 2 knit stitches (rp); M2; 11/12/13/15 sts. (sleeve); M3; 2 knit stitches (rp); M4; 28/30/32/34 sts. (front); M5; 2 knit stitches (rp); M6; 11/12/13/15 sts. (sleeve); M7; 2 knit stitches (rp).
Schematics of the yoke increases for all sizes:
1 row: MNR; 26/28/30/32 knit; M1; 2 rp; M2; 5/6/6/7 knit; wrap the stitch; turn 1.
2 row: 5/6/6/7 purl; M2; 2 rp; M1; 26/28/30/32 purl; MNR; 2 rp; M7; 5/6/6/7 purl; wrap the stitch; turn 2.
3 row: 5/6/6/7 knit; PP; M7; 2 rp; MNR; PLo; 26/28/30/32 knit; PP; M1; 2 rp; M2; PL; 5/6/6/7 knit; OPL; 5/5/6/7 knit; M3; 2 rp; M4; 3/3/3/3 knit; wrap the stitch; turn 3.
4 row: 3/3/3/3 purl; M4; 2 rp; M3; 12/13/14/16 purl; M2; 2 rp; M1; 28/30/32/34 purl; MNR; 2 rp; M7; 6/7/7/8 purl; OPI; 5/5/6/7 purl; M6; 2 rp; M5; 3/3/3/3 purl; wrap the stitch; turn 4.
5 row: 3/3/3/3 knit; PP; M5; 2 rp; M6; PLo; 12/13/14/16 knit; PP; M7; 2 rp; MNR; PL; 28/30/32/34 knit; PP; M1; 2 rp; M2; PL; 12/13/14/16 knit; PP; M3; 2 rp; M4; PL; 3/3/3/3 knit; OPL; 2/2/2/2 knit; wrap the stitch; turn 5.
6 row: 7/7/7/7 purl; M4; 2 rp; M3; 14/15/16/18 purl; M2; 2 rp; M1; 30/32/34/36 purl; MNR; 2 rp; M7; 14/15/16/18 purl; M6; 2 rp; M5; 4/4/4/4 purl; OPI; 2/2/2/2 purl; turn 6.
7 row: yarn over; 7/7/7/7 knit; PP; M5; 2 rp; M6; PLo; 14/15/16/18 knit; PP; M7; 2 rp; MNR; PL; 30/32/34/36 knit; PP; M1; 2 rp; M2; PL; 14/15/16/18 knit; PP; M3; 2 rp; M4; PL; 7/7/7/7 knit; OPL; 14/16/18/20 knit; LNL; finish with 8/8/8/8 knit up to M5.
8 row and all subsequent even rows are worked without increases. The following distribution of stitches emerges:
8 row: M5; 2 rp; M6; 16/17/18/20 knit (sleeve); M7; 2 rp; MNR; 32/34/36/38 knit (back); M1; 2 rp; M2; 16/17/18/20 knit (sleeve); M3; 2 rp; M4; 32/34/36/38 knit (front).
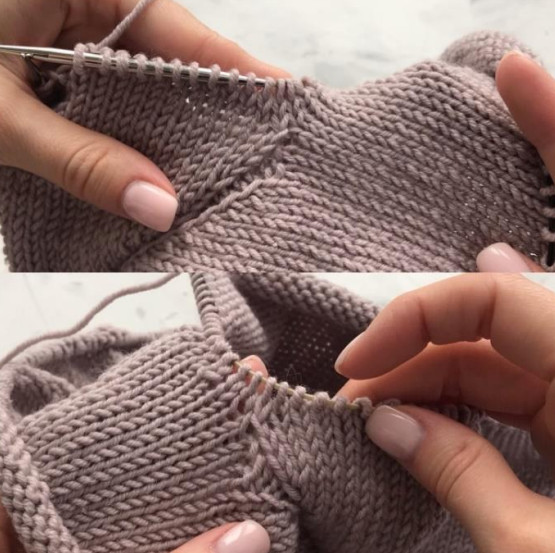
Now you can remove all markers except M5. The project moves to circular knitting. Rows with increases and rows without increases start to the right of marker M5, i.e., in the front part of the garment (the cardigan/front piece).
If this is a row with an increase, first perform the increase on the front piece, knit 2 raglan stitches, increases in the left sleeve, back, right sleeve, and finish with the second increase on the front piece.
Next, be careful!
Below is a consolidated table with the total number of stitches, including increases. Only odd-numbered rows with increases are shown. Even rows are knitted with the same number of stitches. The first and last rows in the table, highlighted in red bold type, are provided for reference.
Carefully monitor that the frequency of increases in the sleeves, back, and front will vary.
The colored cell in the table indicates that there is no increase in this row for this part of the garment.
Table 2. Size 38-40
| row | sleeve | back | front | raglan loops | total |
|---|---|---|---|---|---|
| 8 | 16 | 32 | 32 | 8 | 104 |
| 9 | 18 | 34 | 34 | 8 | 112 |
| 11 | 20 | 36 | 36 | 8 | 120 |
| 13 | 20 | 38 | 38 | 8 | 124 |
| 15 | 22 | 40 | 40 | 8 | 132 |
| 17 | 22 | 40 | 40 | 8 | 132 |
| 19 | 24 | 42 | 42 | 8 | 140 |
| 21 | 24 | 42 | 42 | 8 | 140 |
| 23 | 26 | 44 | 44 | 8 | 148 |
| 25 | 26 | 44 | 44 | 8 | 148 |
| 27 | 28 | 46 | 46 | 8 | 156 |
| 29 | 28 | 46 | 46 | 8 | 156 |
| 31 | 30 | 48 | 48 | 8 | 164 |
| 33 | 30 | 48 | 48 | 8 | 164 |
| 35 | 32 | 50 | 50 | 8 | 172 |
| 37 | 32 | 52 | 52 | 8 | 176 |
| 39 | 34 | 54 | 54 | 8 | 184 |
| 41 | 34 | 56 | 56 | 8 | 188 |
| 42 | 34 | 56 | 56 | 8 | 188 |
Table 3 Size 42-44
| Row | Sleeve | Back | Front | Raglan stitches | Total |
|---|---|---|---|---|---|
| 8 | 17 | 34 | 34 | 8 | 110 |
| 9 | 19 | 36 | 36 | 8 | 118 |
| 11 | 21 | 38 | 38 | 8 | 126 |
| 13 | 23 | 40 | 40 | 8 | 134 |
| 15 | 23 | 40 | 40 | 8 | 134 |
| 17 | 25 | 42 | 42 | 8 | 142 |
| 19 | 25 | 42 | 42 | 8 | 142 |
| 21 | 27 | 44 | 44 | 8 | 150 |
| 23 | 27 | 44 | 44 | 8 | 150 |
| 25 | 29 | 46 | 46 | 8 | 158 |
| 27 | 29 | 46 | 46 | 8 | 158 |
| 29 | 31 | 48 | 48 | 8 | 166 |
| 31 | 31 | 48 | 48 | 8 | 166 |
| 33 | 33 | 50 | 50 | 8 | 174 |
| 35 | 33 | 52 | 52 | 8 | 178 |
| 37 | 35 | 54 | 54 | 8 | 186 |
| 39 | 35 | 56 | 56 | 8 | 190 |
| 41 | 37 | 58 | 58 | 8 | 198 |
| 43 | 37 | 60 | 60 | 8 | 202 |
| 44 | 37 | 60 | 60 | 8 | 202 |
Table 4 Size 46-48
| row | sleeve | back | front | raglan stitches | total |
|---|---|---|---|---|---|
| 8 | 18 | 36 | 36 | 8 | 116 |
| 9 | 20 | 38 | 38 | 8 | 124 |
| 11 | 22 | 40 | 40 | 8 | 132 |
| 13 | 24 | 42 | 42 | 8 | 140 |
| 15 | 26 | 44 | 44 | 8 | 148 |
| 17 | 26 | 46 | 46 | 8 | 152 |
| 19 | 28 | 48 | 48 | 8 | 160 |
| 21 | 28 | 48 | 48 | 8 | 160 |
| 23 | 30 | 50 | 50 | 8 | 168 |
| 25 | 30 | 50 | 50 | 8 | 168 |
| 27 | 32 | 52 | 52 | 8 | 176 |
| 29 | 32 | 52 | 52 | 8 | 176 |
| 31 | 34 | 54 | 54 | 8 | 184 |
| 33 | 34 | 54 | 54 | 8 | 184 |
| 35 | 36 | 56 | 56 | 8 | 192 |
| 37 | 36 | 58 | 58 | 8 | 196 |
| 39 | 38 | 60 | 60 | 8 | 204 |
| 41 | 38 | 62 | 62 | 8 | 208 |
| 43 | 40 | 64 | 64 | 8 | 216 |
| 45 | 40 | 66 | 66 | 8 | 220 |
| 46 | 40 | 66 | 66 | 8 | 220 |
Table 5 Size 50-52
| row | sleeve | back | front | raglan stitches | total |
|---|---|---|---|---|---|
| 8 | 20 | 38 | 38 | 8 | 124 |
| 9 | 22 | 40 | 40 | 8 | 132 |
| 11 | 24 | 42 | 42 | 8 | 140 |
| 13 | 26 | 44 | 44 | 8 | 148 |
| 15 | 28 | 46 | 46 | 8 | 156 |
| 17 | 30 | 48 | 48 | 8 | 164 |
| 19 | 32 | 50 | 50 | 8 | 172 |
| 21 | 34 | 50 | 50 | 8 | 176 |
| 23 | 34 | 52 | 52 | 8 | 180 |
| 25 | 36 | 52 | 52 | 8 | 184 |
| 27 | 36 | 54 | 54 | 8 | 188 |
| 29 | 38 | 54 | 54 | 8 | 192 |
| 31 | 38 | 56 | 56 | 8 | 196 |
| 33 | 40 | 56 | 56 | 8 | 200 |
| 35 | 40 | 58 | 58 | 8 | 204 |
| 37 | 42 | 60 | 60 | 8 | 212 |
| 39 | 42 | 62 | 62 | 8 | 216 |
| 41 | 44 | 64 | 64 | 8 | 224 |
| 43 | 44 | 66 | 66 | 8 | 228 |
| 45 | 46 | 68 | 68 | 8 | 236 |
| 47 | 46 | 70 | 70 | 8 | 240 |
| 48 | 46 | 70 | 70 | 8 | 240 |
The height of the yoke in stockinette stitch, including the ribbing, is 24/25/26/28 cm.
If you feel that the height of the yoke should be increased — do it at your own discretion. Accordingly, the width of the sleeve, the front and back will increase.
If you need to change the height of the yoke and not change the width — do not make increases. And conversely, if you need to increase the width — perform increases in the same way.
Shaping and the body of the sweater:
Remove all markers. Distribute the raglan stitches between the front and back, then knit them as knit stitches. Bind off the left sleeve stitches, pick up 5/6/7/7 stitches along the underarm using a provisional thread, knit the back stitches. Bind off the right sleeve stitches, pick up 5/6/7/7 stitches at the underarm, knit the front stitches. On needles 130/140/154/162 stitches.
Now you need to decide what your sweater's body will be: an A-line silhouette or straight.
Depending on height, the body length to the split is as follows:
| Height*, cm | Body height from underarm to split, cm | Number of rows |
|---|---|---|
| 160 and below | ~23 | 46 |
| ~166 | ~26 | 52 |
| 170 and above | ~28 | 56 |
The body height of the sweater you can tailor to yourself. In the original, the stockinette ends at the level of the pelvic bones; then 6 cm are added at the center front and 11 cm at the back. If the height is not enough, you can knit a few more rows of stockinette.
A - silhouette:
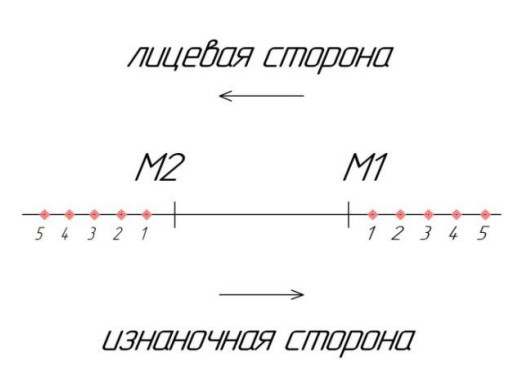
Place markers M1, M2, M3, M4 as follows: between markers M1 and M2, M3 and M4 lie the central 1/2/1/1 underarm stitches, relative to which increases will be made.
Below I provide a consolidated table showing the number of rows between increases depending on height and size. The initial values represent the number of rows before the first pair of increases; then comes the row with increases and, after the slash, the number of rows until the next pair of increases. You just need to choose your size and height and, according to the values given, perform the increases. At your discretion you can reduce the number of increases.
The first increases are made in the left part of the garment, before marker M1.
| Size | Bottom width after stitch increases (only for A-silhouette), cm | Number of increase pairs (on each side) | Number of rows between increases for height 160 cm | Number of rows between increases for height 166 cm | Number of rows between increases for height 170 cm |
|---|---|---|---|---|---|
| 38-40 | 51 | 3 | 10/11/11/11 | 12/12/12/13 | 13/13/13/14 |
| 42-44 | 54.5 | 3 | 10/11/11/11 | 12/12/12/13 | 13/13/13/14 |
| 46-48 | 59 | 4 | 8/8/8/9/9 | 9/9/10/10/10 | 10/10/10/11/11 |
| 50-52 | 63 | 4 | 8/8/8/9/9 | 9/9/10/10/10 | 10/10/10/11/11 |

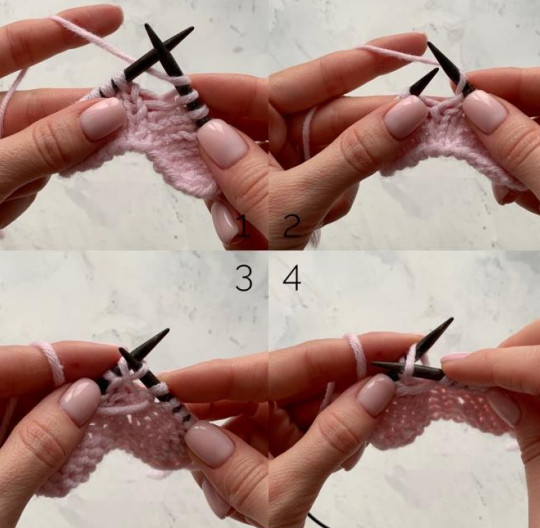
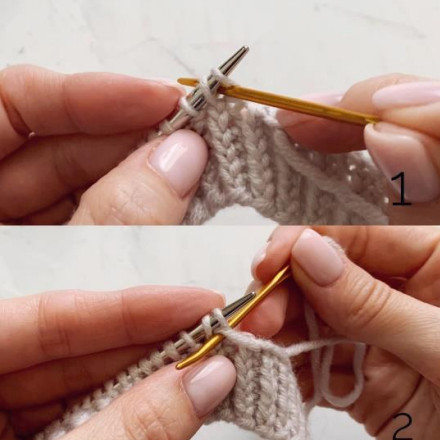
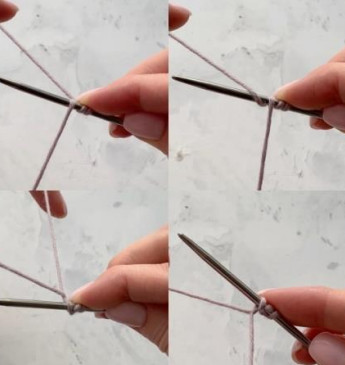
Increases are performed using a backward wrap and a forward wrap.
Knit the required number of rows. At the end of the last knitted row, perform a backward wrap before marker M1 (photo 1), move M1 to the right needle, knit 1/2/1/1 knit stitches, move M2 to the right needle, perform a forward wrap (photo 2). Knit with knit stitches up to marker M3, perform a backward wrap before marker M3 (photo 1), move M3 to the right needle, knit 1/2/1/1 knit stitches, move M4 to the right needle, perform a forward wrap (photo 2). Knit with knit stitches up to marker M1.
In the next row, the wraps are worked twisted.
Thus, the first increase is made at the end of the row, and the second — at the beginning of the new row. In this case, there will be no jog between increases.
Knit the body of the sweater to the desired height and in the last row redistribute the stitches and markers as follows:
In sizes 38-40/46-48/50-52, knit to M1 and transfer it to the right needle, 1/1/1 knit, remove M2, knit the stitches to M3 and transfer it to the right needle, 1 knit, remove M4 and knit stitches to M1. Divide the body of the sweater into 2 parts; the stitches of each part lie between markers M1 and M3. On the needles there are 71/85/89 stitches. Remove all markers.
In size 42-44, knit to M1 and shift it one stitch to the left, move M1 to the right needle, 1 knit, remove M2, knit the stitches to M3, shift it one stitch to the left and then transfer to the right needle, 1 knit, remove M4 and knit stitches to M1. Divide the body of the sweater into two parts, the stitches of each part lie between markers M1 and M3. On the needles 76 stitches. Remove all markers.
For all sizes, continue by knitting the back and the front separately as follows:
Back:
Knit in turning rounds 12 rows, starting from the right side. In the 13th row switch to crossed 1×1 rib, watching the crossing closely! In all rows the first edge stitch is slipped, the last stitch is knitted as per the pattern. Knit 5/5/5/5 cm of rib on the same needle size, end with a wrong-side row. On the right side bind off stitches with an elastic method (see page 17); all stitches must be crossed. It is very important that the edge is not too tight; monitor the yarn tension.
Front:
Attach a thread from a new skein, place markers M1 and M2 as follows: edge; 23/25/27/29 knit; M1; 23/24/29/29 knit; M2; 23/25/27/29 knit; edge. Knit starting from the right side. In all rows the first edge stitch is slipped, the last is knitted according to the pattern.
From the 1st row, perform short rows with wrap-and-turn as follows:
Right side:
1 row: edge; 22/24/26/28 knit; OP; turn 1;
2 row: 22/24/26/28 purl; edge;
3 row: edge; 18/19/21/23 knit; OP; turn 2;
4 row: 18/19/21/23 purl; edge;
5 row: edge; 14/14/16/17 knit; OP; turn 3;
6 row: 14/14/16/17 purl; edge;
7 row: edge; 9/9/11/11 knit; OP; turn 4;
8 row: 9/9/11/11 purl; edge;
9 row: edge; 4/4/5/5 knit; OP; turn 5;
10 row: 4/4/5/5 purl; edge;
11 row: knit with knit stitches to the end of the row, knitting all wrapped stitches.
Left side:
1 row: edge; 22/24/26/28 purl; OP; turn 1;
2 row: 22/24/26/28 knit; edge;
3 row: edge; 18/19/21/23 purl; OP; turn 2;
4 row: 18/19/21/23 knit; edge;
5 row: edge; 14/14/16/17 purl; OP; turn 3;
6 row: 14/14/16/17 knit; edge;
7 row: edge; 9/9/11/11 purl; OP; turn 4;
8 row: 9/9/11/11 knit; edge;
9 row: edge; 4/4/5/5 purl; OP; turn 5;
10 row: 4/4/5/5 knit; edge;
11 row: knit purl to the end of the row, knitting all wrapped stitches.
In the next 13th knit row switch to crossed 1×1 rib on the same needle size, making sure to watch the crossing! Knit 5/5/5/5 cm of rib, end with a purl row. On the knit row, bind off stitches with an elastic method (see page 17); all stitches must be crossed. It is very important that the edge is not pulled tight; monitor the yarn tension.
Straight silhouette:
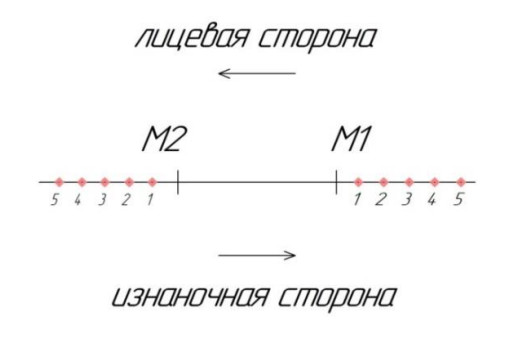
Distribute the underarm stitches and markers M1 and M2 as follows:
on the left underarm 2/3/3/3 knit; M1; 3/3/4/4 knit;
on the right underarm 3/3/4/4 knit; M2; 2/3/3/3 knit.
Knit without changing width to the required height until division. In the last row, divide the sweater body into two parts; front and back stitches are between markers M1 and M2, on needles 65/70/77/81 sts. Remove all markers.
Back:
Knit in turning rounds 12 rows, starting from the right side. In the 13th row switch to crossed 1×1 rib, watching the crossing closely! In all rows the first edge stitch is slipped, the last is knitted as per the pattern. Knit 5/5/5/5 cm of rib using the same needle size, end with a wrong-side row. On the right side bind off stitches with an elastic method (see page 17); all stitches should be crossed. It is very important that the edge is not pulled tight; monitor the yarn tension.
Front:
Attach a thread from a new skein, place markers M1 and M2 as follows:
edge; 21/23/24/26 knit; M1; 21/22/27/27 knit; M2; 21/23/24/26 knit; edge.
Knit from the right side. In all rows the first edge stitch is slipped, the last stitch is knitted as per the pattern.
From the 1st row, perform short rows as follows:
Right side:
1 row: edge; 20/22/23/25 knit; OP; turn 1;
2 row: 20/22/23/25 purl; edge;
3 row: edge; 16/18/19/20 knit; OP; turn 2;
4 row: 16/18/19/20 purl; edge;
5 row: edge; 12/14/14/15 knit; OP; turn 3;
6 row: 12/14/14/15 purl; edge;
7 row: edge; 8/9/9/10 knit; OP; turn 4;
8 row: 8/9/9/10 purl; edge;
9 row: edge; 4/4/4/5 knit; OP; turn 5;
10 row: 4/4/4/5 purl; edge;
11 row: knit to the end of the row, knitting all wrapped stitches.
Left side:
1 row: edge; 20/22/23/25 purl; OP; turn 1;
2 row: 20/22/23/25 knit; edge;
3 row: edge; 16/18/19/20 purl; OP; turn 2;
4 row: 16/18/19/20 knit; edge;
5 row: edge; 12/14/14/15 purl; OP; turn 3;
6 row: 12/14/14/15 knit; edge;
7 row: edge; 8/9/9/10 purl; OP; turn 4;
8 row: 8/9/9/10 knit; edge;
9 row: edge; 4/4/4/5 purl; OP; turn 5;
10 row: 4/4/4/5 knit; edge;
11 row: knit purl to the end of the row, knitting all wrapped stitches.
In the next 13th knit row switch to crossed 1×1 rib on the same needle size, watching the crossing closely! Knit 5/5/5/5 cm of rib, end with a purl row. On the knit row bind off stitches with an elastic method (see page 17); all stitches must be crossed. It is very important that the edge is not pulled tight; monitor the yarn tension.
Sleeves:
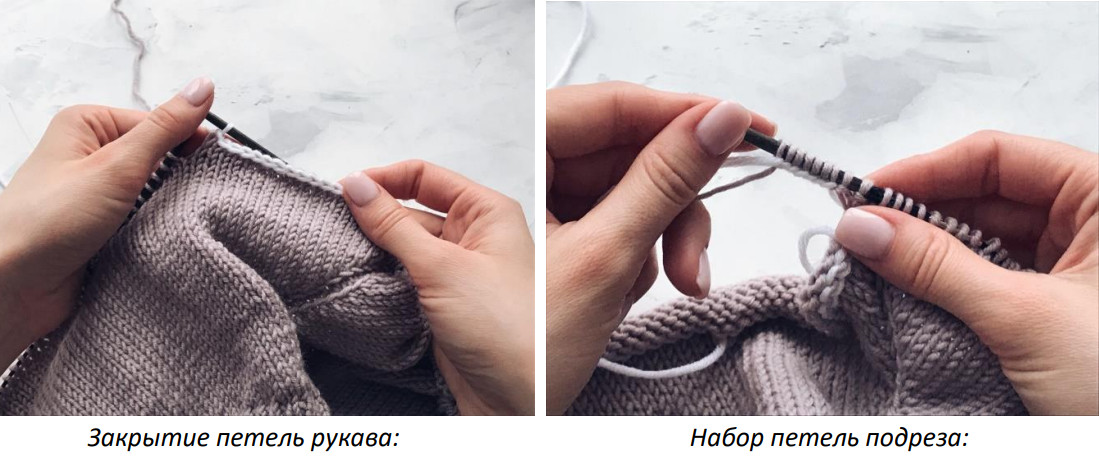
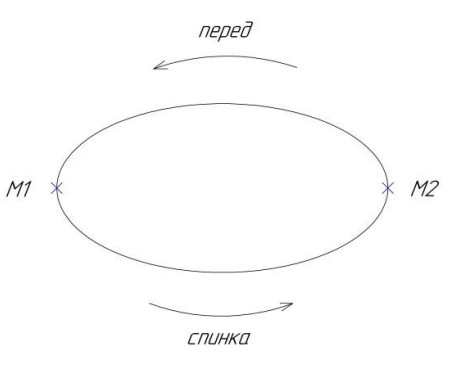
Release the provisional cast-on, transfer to needles 6.0 (or your main needle size) 34/37/40/46 sleeve stitches, and pick up the opened underarm stitches on an additional needle, including the edge-half stitches. On the additional needle 6/7/8/8 stitches, including the half-stitches.
In the photo, the picked-up stitches from the underarm for sizes 46–48/50–52.
The start of the round is located at the center of the underarm seam. Join the working yarn and knit the first round in the round, knitting the first half-stitch together with the first sleeve stitch with a right-leaning slant (photo left), and the last sleeve stitch together with the second half-stitch with a left-leaning slant (photo right).
The sleeve and underarm seam should be joined without holes. If elongated loops appear at the join, you can distribute the extra length of the loops among neighboring stitches.
On needles 38/42/46/52 stitches. Knit the sleeve until the stockinette reaches the place where the thumb and palm split. On the same needle size, knit a crossed 1×1 rib, height 5/5/5/5 cm. Bind off the stitches with an elastic method (see page 17), making sure the stitches are crossed. It is very important that the edge is not too tight; watch the tension of the yarn.
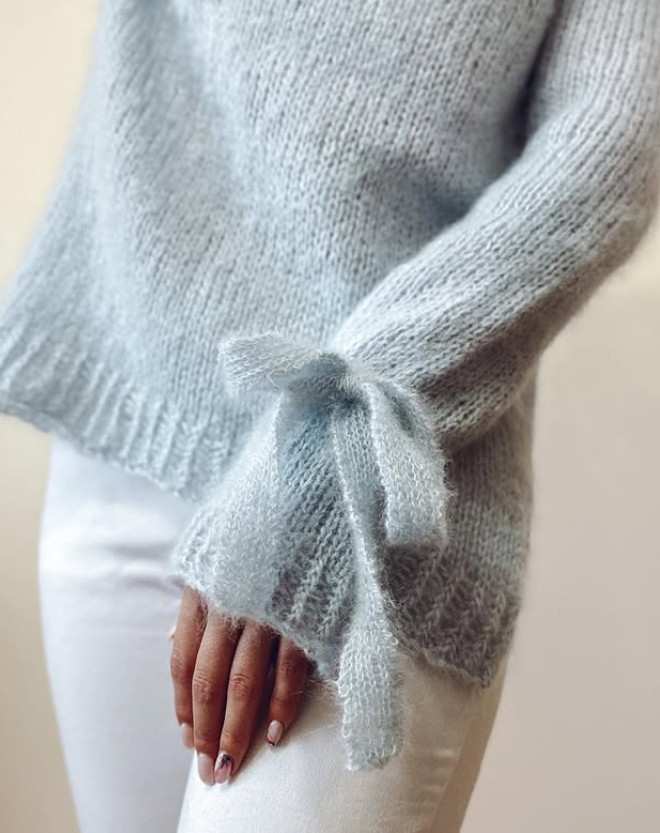
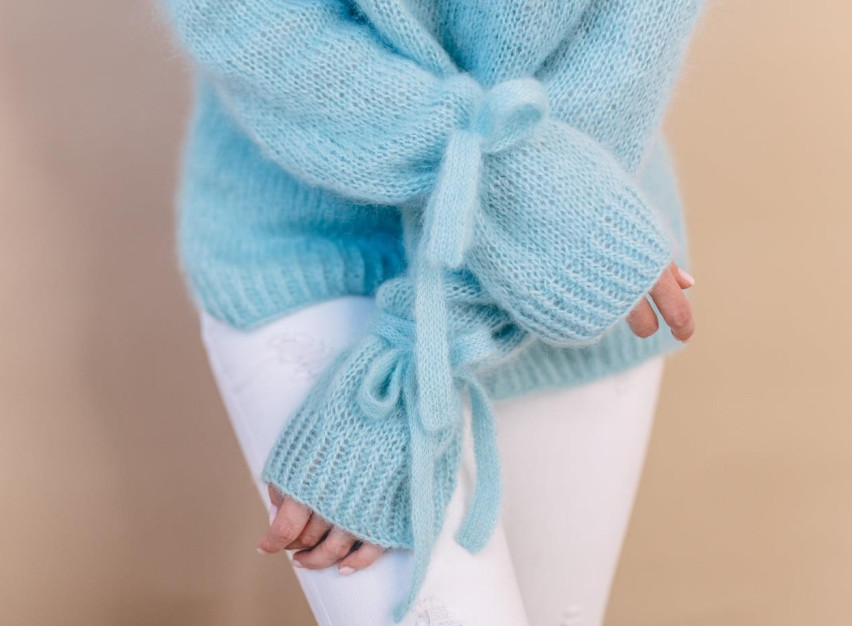
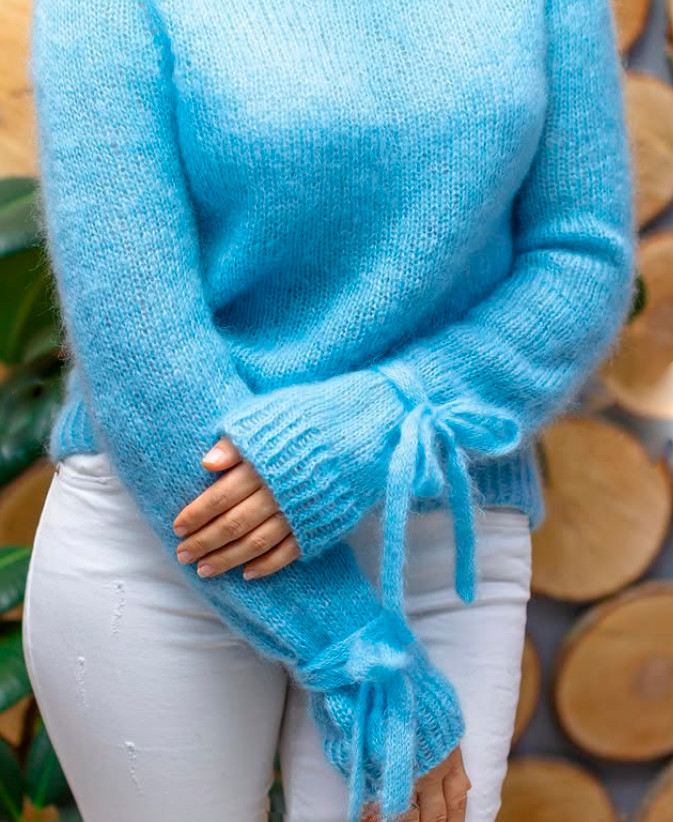
If you plan to wear drawstrings, it makes sense to make the sleeves longer as above. Otherwise, with a short sleeve, the drawstrings will not look harmonious.
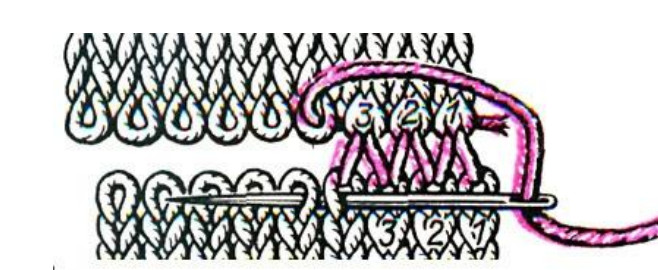
Elastic closure of crossed ribbing:
At the start of the round, insert the needle into the second stitch on the left needle from front to back, pull the yarn and bring the needle through the previous stitch from back to front under the working yarn, pull the yarn, slip the stitched stitch off the needle.
Next, insert the needle into the next stitch after the stitched stitch moving from front to back, bring it through the stitched stitch moving from back to front under the working yarn. Continue the actions to the end of the row.
The stitches are then worked crossed. For convenience, before binding off you can lay the stitches in the desired direction.
Drawstrings:
Drawstrings are knitted in one strand of fine mohair. Drawstring width ≈ 1.7–2 cm. When casting on stitches, the short end of the yarn is on the thumb side.
On needles 2.5 mm, cast on 10–12 stitches using the Italian method in the following order: кр.; изн.; лиц.; repeat from * to * another 3–4 times; кр. The last selvedge stitch cast on in the traditional way.
Purl stitch:
Slip the yarn over the needle, moving from the top down catch the yarn from the index finger side, then catch the yarn from the thumb side, make a cross in front of the needle.
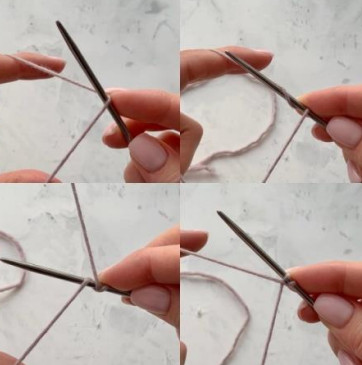
Knit stitch:
Catch the yarn from the thumb side, then bring the needle under the yarn from the index finger side, make a cross behind the needle and pull down.
Change needles to 3.5 mm and knit hollow ribbing using the following scheme: the first edge stitch is slipped, all purl stitches are transferred to the right needle without being worked, yarn in front of the work, all knit stitches are worked as usual, the last edge stitch is knitted. Knit until the length of the drawstring becomes at least 90 cm.
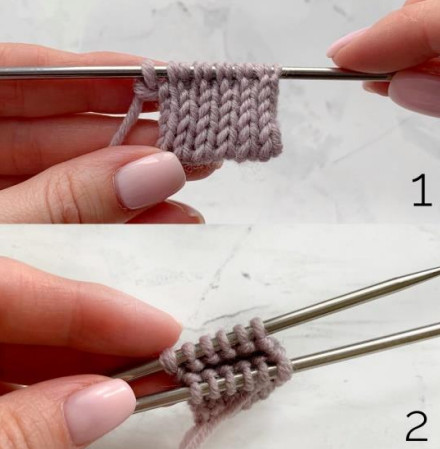
As a result, the fabric is as in photo 1. The wider the drawstring, the longer it should be.
Having knitted the required length, distribute the stitches onto 2 needles (photo 2) and sew them together with a stockinette stitch.
Blocking (wet blocking):
Secure and hide all ends. Do a hand wash in cool water with a wool-specific detergent. Rinse in water at the same temperature. Gently squeeze out the water by hand, do not wring. Wrap in a towel to absorb excess water for about 30 minutes.
Carefully lay out on a dry towel on a flat horizontal surface. If the item has stretched in length, pull it to the desired width. After it is completely dry, you may steam the item, keeping the iron raised.
Wear with love and great pleasure.