Rudolph the Reindeer
Added: 13.03.2014 в 12:15 Views: 144950
Rudolph the ReindeerKlubokhttp://klubok.work/1/33/4621/Klubokhttps://klubok.work/css/image/top-logo-en.png
.
So, we will need yarn of the following colors: 100 grams of walnut (main yarn for the body), chocolate, oatmeal, red, and green, 25 grams of golden, and a little black. The thickness of the yarn is 280m/100g.
Needles 3 mm, 50 g of filler, 5 drinking straws, 5 pieces of chenille wire 30 cm each, cardboard, glue. (I replaced the chenille wire with extra cocktail straws.)
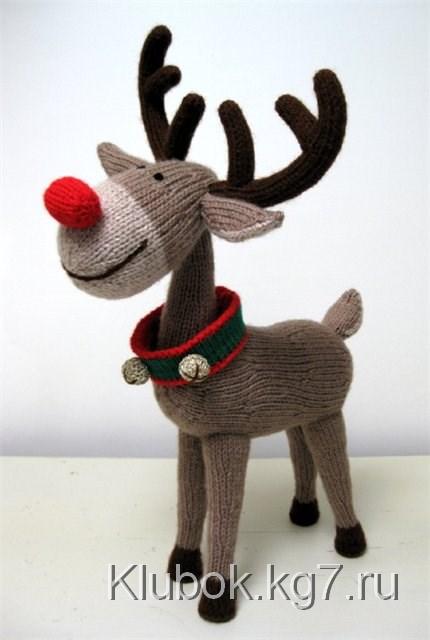
This is the deer I created. The height of the toy, including the antlers, is 29 cm. I knitted with acrylic, thread thickness 230m/100g, needles No. 3.
Stage one. Body.
Cast on 10 stitches with walnut yarn. Knit 2 rows in stockinette stitch.
Next row: increase in each stitch = 20 stitches.
Next row: purl stitches.
Next row: (increase, 1 knit) to the end of the row = 30 stitches.
3 rows in stockinette stitch.
Next row: (1 knit, increase, 1 knit) to the end of the row = 40 stitches.
3 rows in stockinette stitch.
Next row: (1 knit, increase, 2 knit) to the end of the row = 50 stitches.
9 rows in stockinette stitch (mark the last row - this will be where the front legs are attached).
Next row: 3 knit, (increase, 5 knit) 2 times, (decrease, 4 knit) 4 times, increase, 5 knit, increase, 4 knit. = 50 stitches.
Next row: purl stitches.
Next row: 3 knit (increase, 5 knit) 2 times, (decrease, 4 knit) 4 times, increase, 5 knit, increase, 4 knit, = 50 stitches.
11 rows in stockinette stitch. (mark the last row - this will be where the back legs are attached).
Next row: (2 knit, decrease, 1 knit) to the end of the row = 40 stitches.
3 rows in stockinette stitch.
Next row: (1 knit, decrease, 1 knit) to the end of the row = 30 stitches.
3 rows in stockinette stitch.
Next row: (1 knit, decrease) to the end of the row = 20 stitches.
Next row: purl stitches.
Next row: (decrease) to the end of the row = 10 stitches.
Cut the yarn, leaving a long end. Pull the yarn tight and secure it.
Assembly: Starting from the gathered back edge, sew the body seam, ending 5 cm from the front edge. Stuff firmly, finish the longitudinal seam. Then gather all the stitches of the front edge onto a thread, pull tight and secure. The longitudinal seam will go along the bottom of the body. 
Let's summarize and continue!
Safi, stage 1
Luna, stage 1
lenkorns, stage 1
Galina, stage 1
Tat'yanka, stage 1
kisa71, stage 1
mnn-16, stage 1
gvozdika325, stage 1
yanushka, stage 1
hilda
toma. stage 1
lazarina
kainann
Nafanka
irinadolina
Girls, if I missed anyone, remind me, and I will add. 4
Stage 2
Head
Start with the back of the head. Cast on 11 stitches with walnut yarn.
2 rows in stockinette stitch
Next row: increase in each stitch = 22 stitches.
7 rows in stockinette stitch.
Next row: (increase, 1 knit) to the end of the row = 33 stitches.
7 rows in stockinette stitch.
Next row: (1 knit, increase, 1 knit) to the end of the row = 44 stitches.
5 rows in stockinette stitch.
Change to oatmeal color for the snout
10 rows in stockinette stitch.
Next row: (1 knit, decrease, 1 knit) to the end of the row = 33 stitches.
3 rows in stockinette stitch.
Next row: (1 knit, decrease) to the end of the row = 22 stitches.
Next row: purl stitches.
Next row: (decrease) to the end of the row = 11 stitches.
Cut the yarn, leaving a long end, pull through the remaining stitches, tighten and secure.
Assembly: Starting from the gathered back edge, sew the body seam, ending 5 cm from the front edge. Stuff firmly, finish the longitudinal seam. Then gather all the stitches of the front edge onto a thread, pull tight and secure. The longitudinal seam will go along the bottom of the head. 
Neck.
Start from the bottom edge in front. Cast on 8 stitches with walnut yarn.
2 rows in stockinette stitch.
Next row: increase, 6 knit, increase = 10 stitches.
Next row: purl stitches.
Next row: increase, 8 knit, increase = 12 stitches.
Next row: purl stitches.
Next row: increase, 10 knit, increase = 14 stitches.
Next row: purl stitches.
Next row: increase, 12 knit, increase = 16 stitches.
Next row: purl stitches.
Cast on 4 stitches at the beginning of the next 2 rows = 24 stitches.
4 rows in stockinette stitch.
Next row (2 knit, decrease, 2 knit) 4 times = 20 stitches.
7 rows in stockinette stitch.
Next row: (2 knit, decrease, 1 knit) 4 times = 16 stitches.
5 rows in stockinette stitch.
Next row: 6 knit, turn and work only on these stitches.
Next row: 6 purl
Next row: 4 knit, decrease = 5 stitches.
Next row: purl stitches.
Next row: 3 knit, decrease = 4 stitches.
Next row: purl stitches
Close the stitches.
Join the yarn to the remaining 10 stitches. Close the first 4 stitches, knit 6 stitches = 6 stitches.
Next row: purl stitches.
Next row: left decrease, 4 knit. = 5 stitches.
Next row: purl stitches.
Next row: left decrease, 3 knit.= 4 stitches.
Next row: purl stitches.
Close the stitches. 
Assembly: Perform a longitudinal seam. Cut a 15 cm drinking straw (for the neck frame), then fold one of the chenille wires in half and insert it into the drinking straw to add stiffness. (I did not use chenille wire, more on that below). Wrap the frame with filler, holding it in place with a drop of glue, then insert the frame into the neck and finish stuffing with tweezers. Take a large needle (or a knitting needle), insert it into the head through the lower longitudinal seam at row 11 level (the second increase row), carefully widen the hole in the neck. Drop a little glue on the straw sticking out from the top of the neck, carefully insert the straw into the created hole to a depth of about 2.5 cm. Turning the neck so that the seam is centered at the back, sew the upper edge of the neck to the bottom of the head.
Find the central line of the back on the body, then use a needle to make a hole for the straw at the intersection of this line with the last increase row on the front of the body. Insert the straw from the bottom edge of the neck. Sew the lower edge of the neck to the body, aligning the front edge of the neck with the gathering point at the front of the body.
Girls, the assembly description seems complicated at first glance. In fact, it's not difficult at all. I didn't even count the rows, I just tried the position of the neck on the body (don’t forget that the seam on the body is at the bottom). I reinforced the straws not with chenille wire. For this, I used extra straws. I split 3 straws lengthwise. I twisted one split straw a little and inserted it inside the whole straw. I did the same with 2 more. It's easier to show than to describe! 


Stage
Legs. Start from the top edge. Cast on 24 stitches with walnut yarn.
8 rows in stockinette stitch.
Next row: (2 knit, decrease, 2 knit) 4 times = 20 stitches.
7 rows in stockinette stitch.
Next row: (2 knit, decrease, 1 knit) 4 times = 16 stitches.
7 rows in stockinette stitch.
Next row: (1 knit, decrease, 1 knit) 4 times = 12 stitches.
7 rows in stockinette stitch.
Change to chocolate yarn for the hoof.
2 rows in stockinette stitch.
Next row: (1 knit, increase, 2 knit) 3 times = 15 stitches.
3 rows in stockinette stitch.
Next row: (2 knit, increase, 2 knit) 3 times = 18 stitches.
3 rows purl to create a fold.
Next row: (decrease) 9 times = 9 stitches.
Cut the yarn, leaving a long end, pull through the remaining stitches, tighten and secure.
Assembly: Use a compass to draw 4 circles with a diameter of 2 cm on a piece of cardboard and cut them out. (I used plastic and a ruble coin for the template) This will be the insert for the hoof. 
Prepare 4 straws for the leg frame (as for the neck)
Take each leg piece and start sewing from the hoof. Glue the cardboard (or plastic) circle inside the hoof immediately after sewing the hoof itself. Then on the prepared straw, apply glue to one end, attach a little filler. 
Then apply glue on top of the attached filler and attach the straw to the insert in the hoof. We do this so that our straw does not move around the cardboard or plastic, but holds our deer securely.
Next, sew the remaining seam of the leg, stuffing the leg with filler as you sew. Be careful to keep the frame centered at all times. Prepare all 4 legs this way. The straw should stick out by 2-2.5 cm. (In the photo, I haven't trimmed the excess yet) 
Using pins, mark the attachment points of the legs to the body at marked places 4 stitches away from the longitudinal seam of the body on both sides. Use a thick needle to make holes for inserting the straws. (Carefully separate the threads to avoid tearing them) Then sew the legs, ensuring that the longitudinal seam of the leg is centered at the back. I first marked the places for the legs, prepared the holes. I fitted all 4 legs. You may need to adjust the leg positions slightly. Then I sewed the legs one at a time, temporarily removing the others. And to ensure I didn’t lose the marked holes, I pinned them with pins.


 So, stage 4. Antlers-ears.
Main antlers. (2 pieces)
Start from the bottom edge. Cast on 10 stitches with chocolate yarn. Knit 41 rows in stockinette stitch. Cut the yarn, leaving a long end, pull through the remaining stitches, tighten and secure.
Large side antlers (2 pieces)
Start from the bottom edge. Cast on 10 stitches with chocolate yarn. Knit 15 rows in stockinette stitch. Cut the yarn, leaving a long end, pull through the remaining stitches, tighten and secure.
Small side antlers. (2 pieces).
Start from the bottom edge. Cast on 10 stitches with chocolate yarn. Knit 9 rows in stockinette stitch. Cut the yarn, leaving a long end, pull through the remaining stitches, tighten and secure.
Assembly. Starting from the upper gathered edge, connect the side edges of each main antler piece, tightening the sewing thread to slightly round the antler (stuff the antlers as you sew). Then, starting from the gathered upper edge, sew and stuff the large and small side antlers. (do not tighten the thread) Next, mark the position for the antlers. For the author - between the first and second increase rows, 7 stitches apart. Based on the photo, find the best position for the side antlers (for the author - the small side antler on row 24 from the base, the large side antler on row 4 from the base). And also, I forgot to mention, stuff the antlers very tightly. The author in the original suggests that after assembling the antlers, sew the parts together (but not to the head), cover the antlers with hair spray, and leave them to dry on a flat surface. When dry, sew to the head. I didn't do that, but maybe someone will want to try that. 
Start from the bottom edge. Cast on 7 stitches with walnut yarn.
2 rows in stockinette stitch.
Next row: increase, 5 knit, increase = 9 stitches.
Next row: purl stitches.
Next row: increase, 7 knit, increase = 11 stitches.
7 rows in stockinette stitch.
Next row: decrease, 7 knit, decrease = 9 stitches.
Next row: purl stitches.
Next row: decrease, 5 knit, decrease = 7 stitches.
Next row: purl stitches.
Next row: decrease, 3 knit, decrease = 5 stitches.
Next row: purl stitches.
Next row: decrease, 1 knit, decrease = 3 stitches.
Next row: purl stitches.
Next row: slip 1 stitch, knit 2 together, place the slipped stitch over the knitted one. Cut the yarn and pull through the stitch.
Inner ear (2 pieces)
Knit as for the ear, but with oatmeal yarn.
Assembly: sew the outer and inner pieces together, leaving the base open. Sew the top of both sides of the lower edge, then fold the lower edge in half and sew it at the top as well. Sew the ears to the head, with the fold facing up, just in front of the antlers. (I have a photo for example - still with pins.)
Good luck everyone, waiting for your reports! 4 
Stage.
Top of the tail.
Start from the bottom edge. Cast on 8 stitches with walnut yarn.
2 rows in stockinette stitch.
Next row: increase, 6 knit, increase = 10 stitches.
7 rows in stockinette stitch.
Next row: decrease, 6 knit, decrease = 8 stitches.
Next row: purl stitches.
Next row: decrease, 4 knit, decrease = 6 stitches.
Next row: purl stitches.
Next row: decrease, 2 knit, decrease = 4 stitches.
Next row: purl stitches.
Close the stitches.
Bottom of the tail.
Knit as for the top of the tail, but with oatmeal yarn.
Assembly: sew the upper and lower tail pieces together, leaving the base open. Lightly stuff and sew to the back of the body at the level of the second decrease row. Sew tightly so that the tail can stand vertically.
Nose.
Cast on 8 stitches with red yarn (side edge).
2 rows in stockinette stitch.
Next row: increase in each stitch = 16 stitches.
9 rows in stockinette stitch.
Next row: (decrease) 8 times = 8 stitches.
Cut the yarn, leaving a long end, pull through the remaining stitches, tighten and secure.
Assembly: starting from the gathered edge, perform a longitudinal seam, stopping 12 mm from the opposite, cast-on edge. Use tweezers to stuff the piece, finish the seam. Then gather the cast-on edge onto a thread, tighten and secure. Sew the nose to the center of the head 5 rows from the beginning of the light part, positioning the longitudinal seam of the nose horizontally.
Collar.
Start from the center of the lining. Cast on 48 stitches with red yarn.
3 rows in stockinette stitch, (starting with the knit row)
Next row - knit for the fold.
Change to green yarn.
6 rows in stockinette stitch (starting with the knit row).
Change to red yarn. Knit 2 rows in stockinette stitch (for the fold)
3 rows in stockinette stitch, starting with the knit row.
Close the stitches (again, the middle line of the lining).
Bells – 3 pieces.
Start from the center of the lining. Cast on 13 stitches with golden yarn.
3 rows in stockinette stitch (starting with the knit row)
Row of knit stitches for the fold.
3 rows in stockinette stitch (starting with the knit row)
Cut the yarn, leaving a long end, pull through the remaining stitches, tighten and secure.
Assembly: fold the piece along both knit lines of the fold and sew the cast-on edge to the closed edge at the top. Starting from the gathered edge, perform a longitudinal seam on the bells, stuffing with tweezers. Then gather the upper edge onto a thread, tighten and secure. Pull one of the 3 strands from a piece of chocolate yarn, and use this thread to embroider a cross on the lower part of each bell. Sew one bell in the center of the collar, and one more bell 8 stitches away on each side from the center. Wrap the collar around the neck and sew the edges together. Attach the collar to the deer behind the neck with a few stitches.
Eyes. Mark the position of the eyes with pins, placing them on the third increase row from the back edge of the head and 3 stitches apart. You can embroider the eyes with black thread (using a circle of 5 stitches in chain stitch for each eye), sew on beads, or use ready-made eyes.
This is what my deer turned out to be in the end. Now I’m waiting for your beauties!!!
Author - Elena Makarchuk