Slippers with knitting needles, description, step-by-step master class
Added: 10.08.2018 в 13:35 Views: 27031
Slippers with knitting needles, description, step-by-step master classKlubokhttp://klubok.work/1/53/7301/Klubokhttps://klubok.work/css/image/top-logo-en.png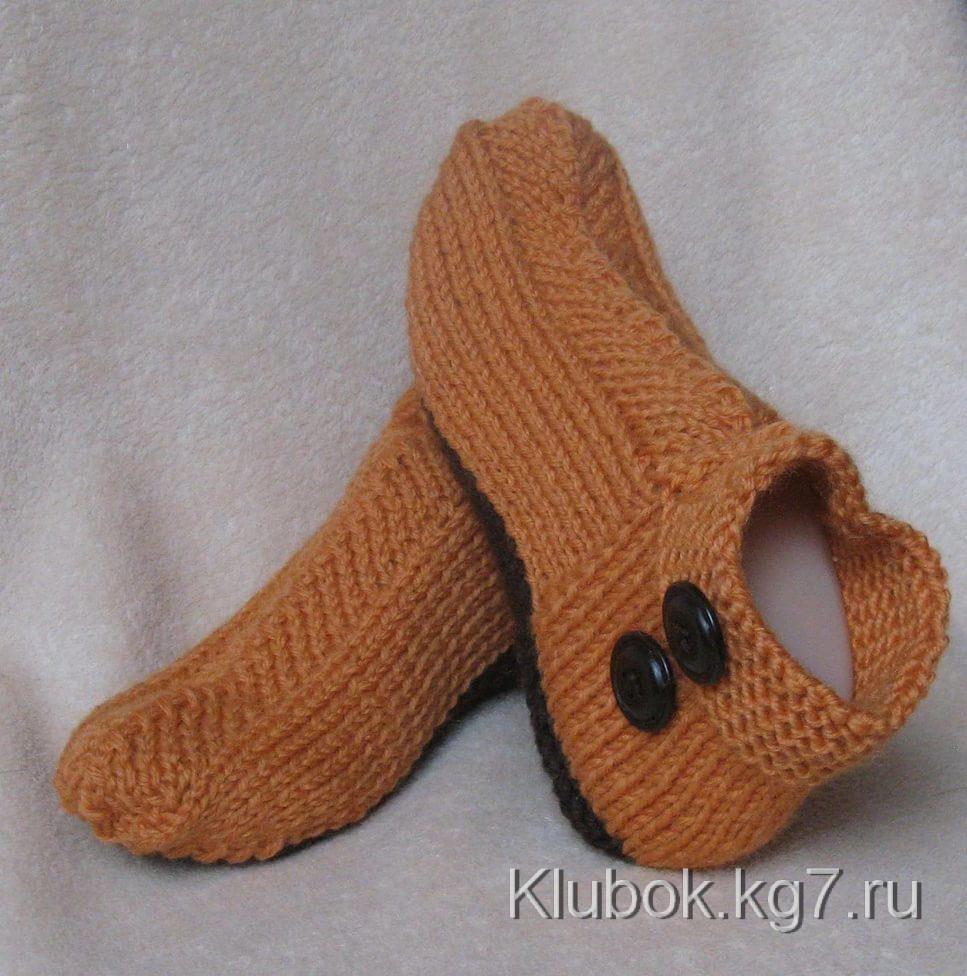
Author's diary: Evgenia_70

Slipper-socks - quickly (3-4 hours per pair) and very simple. One slipper can be knitted in an hour and a half. My husband is as happy as a hippo. Step one, cast on 40 stitches and knit 20 rows of 1:1 ribbing, so that there are 10 edge stitches (calculated for thick yarn, approximately 6cm)

It's better to knit two slippers at once (cast on twice, 40 stitches each, from two balls of yarn) - this way it's easier, you don't have to remember where you decreased. And the tension will be the same (I, for example, knit tighter when I'm in a bad mood). Now we will make the heel. For this, we divide our 40 stitches into three sections: 13:14:13 stitches. We will work on the middle section of 14 stitches. The stitches on the sides will decrease until only 14 stitches are left. Step two: Knit 13 stitches, then another 13 stitches, and knit stitches 14 and 15 together. Turn to the purl side (Attention! The heel that we are starting to form is knitted on one slipper, while the other rests as ballast on the needle. Then we will knit the second slipper. If you are not knitting two socks, then this information is not crucial for you). So, we are on the purl side: slip the first stitch, knit 12 purl stitches (13 total with the first slipped stitch), and knit stitches 14 and 15 together as purl. Turn to the knit side. Slip the first stitch, knit 12 knit stitches = 13 stitches, knit 14 and 15 together. Turn to the purl side. And so on until only 14 stitches remain on the needle.

We continue knitting the slippers. Carefully examining the resulting structure, we find 10 edge stitches on the ribbing (they were created from 20 rows of 1:1 ribbing), inserting the needle into the edge stitches one by one, we pull out 10 stitches (following the pattern; if you are on the purl side, pull out purl stitches, if on the knit side, pull out knit stitches). Then we return along the pattern and pull out another 10 stitches from the other side through the edge stitches. In the end, we get this structure and 34 stitches on the needles.

We continue knitting straight to the base of the little toe (as they say in books), but actually they knit to this line.

Try them on while pulling; the slipper should be slightly smaller to fit well on the foot. We get this result and start decreasing stitches.

I got 26 rows from the heel to the decrease (size 40 shoe); I knitted 30 for my husband in size 43. For my daughter and mother-in-law in sizes 38-39, I knitted 24 rows. Now we will decrease stitches to get the toe of our slipper (We knit on the knit side): Slip the first stitch (later these will be edge stitches through which we will pull out new stitches), knit the second and third stitches together as knit, then continue to knit, for the last three stitches of the row: knit 2 together, and the last one is purl (in this row we closed two stitches). Turn to the purl side. Slip the first stitch, knit the entire rest of the row in purl. Turn to the knit side: slip the first stitch, knit the second and third stitches together, knit the rest as knit, for the last three stitches: knit two together, last one is purl. Turn to the purl side, knit purl. And so on until only 18 stitches remain on the needles. I marked the edge stitches with black pins (check yours carefully from both sides), the red pin is in the middle, 18:2=9, through nine stitches (mark the middle of the toe). Now for the separating row: slip the first stitch, knit the second and third together, knit the 4th, 5th, 6th, and 7th stitches as knit, knit the 8th and 9th together as knit; (half a row knitted) knit the 10th and 11th together as knit, knit the 12th, 13th, 14th, and 15th as knit, knit the 16th and 17th together, and the 18th is purl. Turn and knit all stitches as purl. 14 stitches remain on the needles. One pin is in the center where we closed two stitches, and the other pin is in the edge stitch, through which we will pull out a new stitch. We continue to knit the top of the slipper: *Pull out a stitch from the edge stitch then knit 1, 2, 3, 4, 5 stitches as knit (with the stitch from the edge stitch, it became 6 stitches). Knit the 6th and 7th together, the 8th and 9th together; knit the 10th, 11th, 12th, 13th, and 14th (last) as knit, pull out a stitch from the edge stitch. Turn, slip 1 (from the edge stitch), knit the rest as purl.* Repeat from * to *, always 14 stitches on the needles, with 7 on each half until the desired depth of the slipper (I like them deep, so I knit almost to the ribbing, leaving only 2-3 edge stitches). We close the stitches, inserting a hook into the last one and crocheting the sides and ribbing, leaving the front part untouched, securing the thread. Put them on and wear them, although if you have a lot of patience, you can wash and dry them. But the wash from the socks won't run away, so I will wear them first. Yes, I didn’t bother with the methods of closing stitches. Those who want a perfect option can close two together on one half and on the other by pulling through (slip 1, knit the second as knit, pull it through the first). The stitches will turn towards each other. But this is not necessary; if you don’t want to, then don’t torture yourself. It will still look beautiful. I knit the ribbing and heel with smaller needles, then switch to larger ones.
Category: Slippers, socks, knee socks