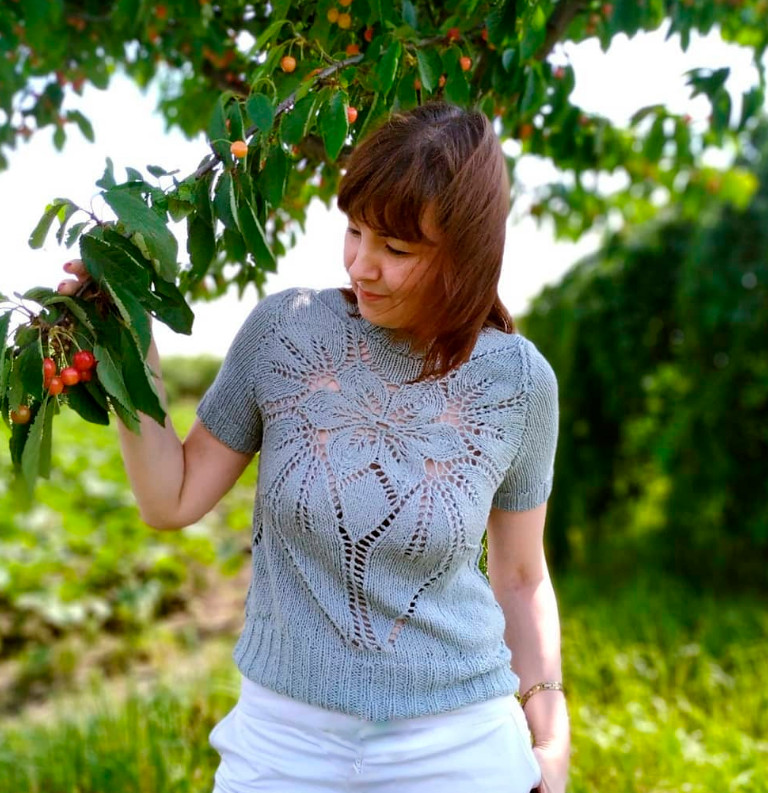
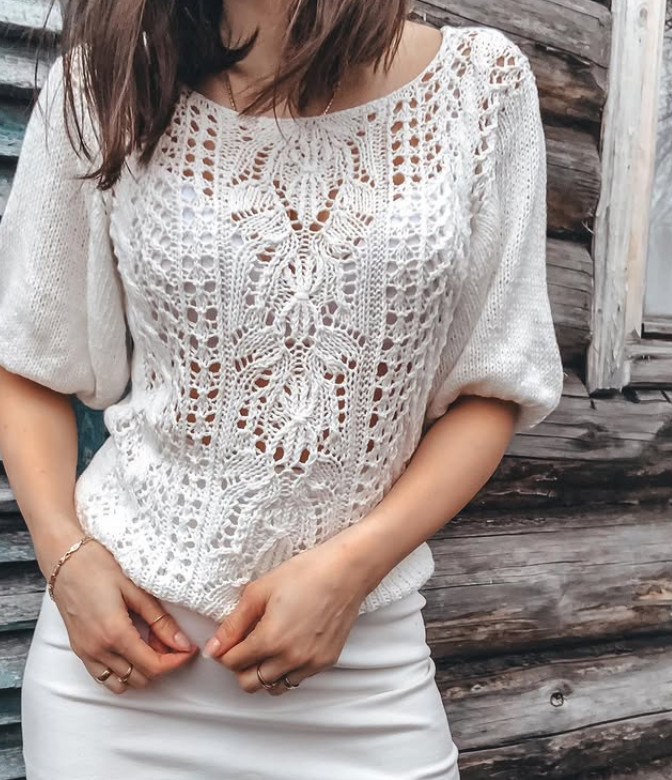
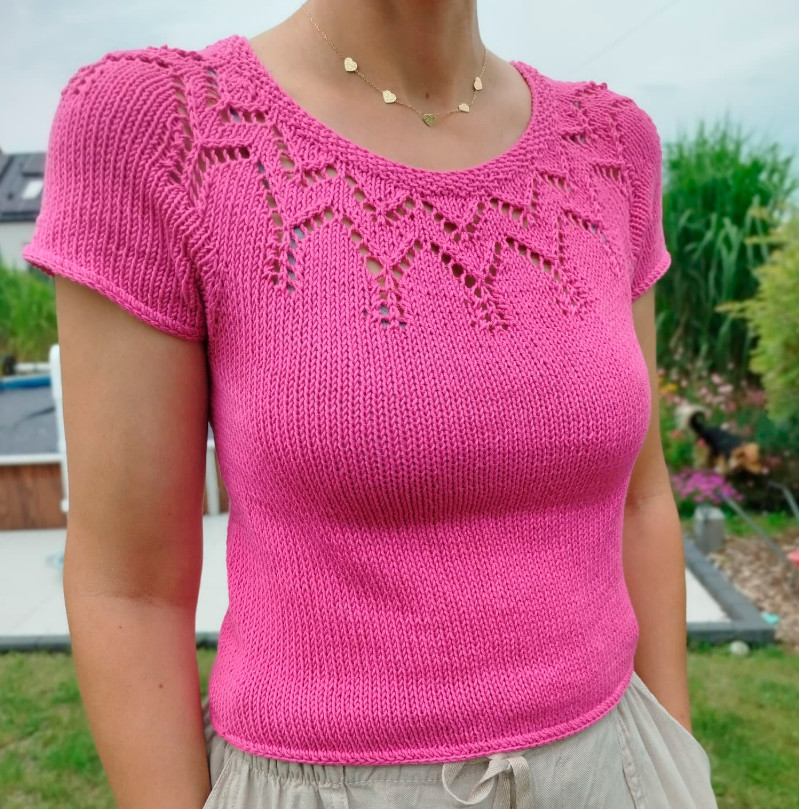
Top with knitting needles
Added: 29.07.2025 в 15:52 Views: 1072
Top with knitting needlesKlubokhttp://klubok.work/1/82/8957/Klubokhttps://klubok.work/css/image/top-logo-en.png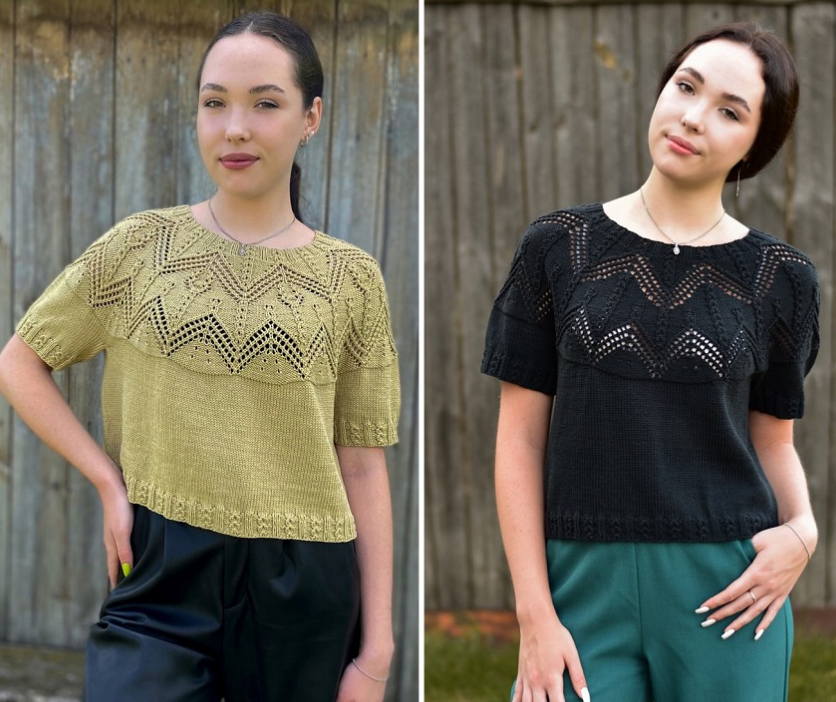
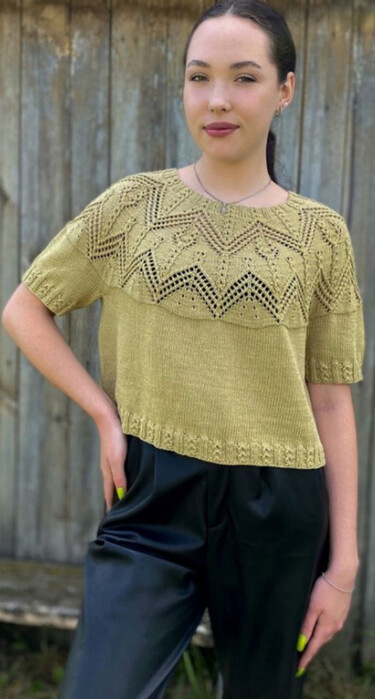
Materials and tools Yarn in original: Gazzal Giza Matte, 100% cotton, 250m/100g. Circular needles: No. 3.25 (or selected individually according to density). Yarn consumption for size No. 1 (S) – 3.5-4 skeins, for size No. 2 (L) – 4-4.5 skeins. Size range. The description is provided in two sizes - No. 1/No. 2, which corresponds to sizes S/L with a knitting density (stockinette stitch) of 24 stitches x 32 rows in a 10x10cm square. However, when changing the knitting density (from 20 to 25 stitches in 10cm), i.e., when choosing another yarn, sizes from XS to XXL are possible (for bust 78-118cm).
More details below in the Size Chart.
Construction and main techniques – seamless model; – straight silhouette; – knitting direction – top down; – round yoke; – lace patterns; – short rows for the back and front; – underarm gussets.
Size Chart To begin, you need to determine the size and knitting density according to the chart below. When selecting a size, focus not so much on measurements as on the width of the garment in cm!
Size Bust circumference, cm Width of the product, cm Size according to the description (stitch density) – actual width of the product in cm XS 78-83 45 No. 1 (25) - 46 S 84-89 48 No. 1 (24) – 48 M 90-95 51 No. 1 (23) – 50; No. 1 (22) – 52; No. 2 (25) – 52.5 L 96-101 54 No. 1 (21) – 54.5; No. 2 (24) – 54.5 XL 102-107 57 No. 1 (20) – 57.5; No. 2 (23) – 57 XXL 108-118 60-62 No. 2 (22) – 59.5; No. 2 (21) – 62.5 That is, you have a choice in what density to knit the product. For example, for size L you can choose a density of 21 stitches and knit according to the description of size No. 1; as a result, the width of the product will be 54.5cm. Or choose a density of 24 stitches and knit according to the description of size No. 2; as a result, the width of the product will also be 54.5cm. And also for other sizes, all possible options are presented in the table. 
Work process On needles No. 3.25, cast on in a standard way 128 stitches (for all sizes) + 1 stitch to join in a circle. Join the knitting in a circle. Then knit according to the charts below (Chart 1 – Chart 2 – Chart 3).
/The start of the row is the middle of the back; mark with a marker! Each of the charts shows 1 repeat of the pattern. Stitches marked in red do not count in the repeat (these are the stitches before the repeat)! Repeat the pattern the necessary number of times to the end of the row.
Charts are read from right to left.
Legend:
1. Empty cell – knit stitch (if marked in red – does not count in the repeat! That is, this is a stitch before the repeat)
2. Gray cell – no stitch
3. o – yarn over (where marked in yellow, can be replaced with a twisted purl stitch from the yarn over, to avoid "holes")
4. / - 2 together knit with a right slant
5. \ - 2 together knit with a left slant
6. arrow up - 3 together knit (the central stitch from below)
7. - - purl stitch - pass the third stitch over the 2 previous ones, and knit them *knit, yarn over, knit* - pass the third stitch over the 2 previous ones, and knit them knit (without yarn over!)
8. - from one stitch make 3 - *knit, yarn over, knit
9. - pass the third stitch over the 2 previous ones, and knit them knit (without yarn over!) - from one stitch make 3 - *knit, yarn over, knit* - purl
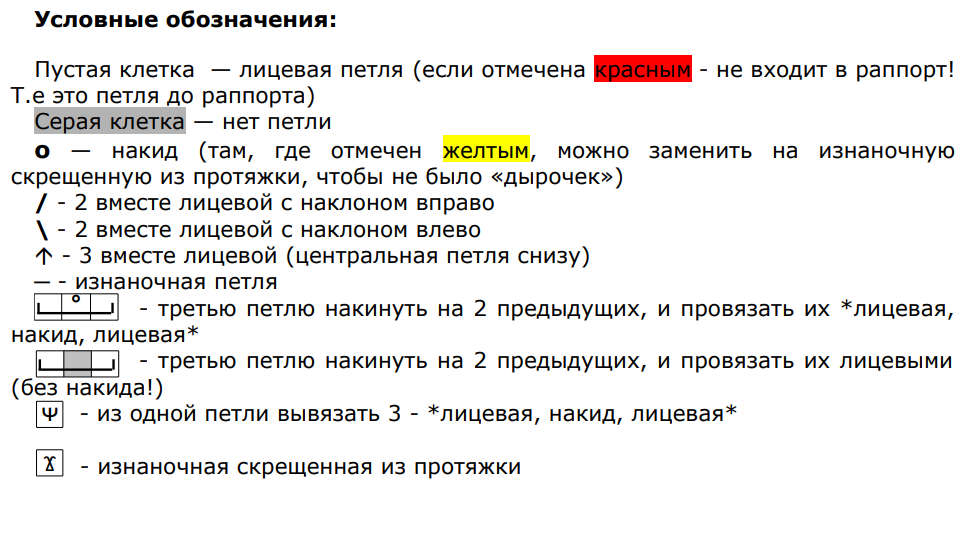
Chart 1 (for all sizes)
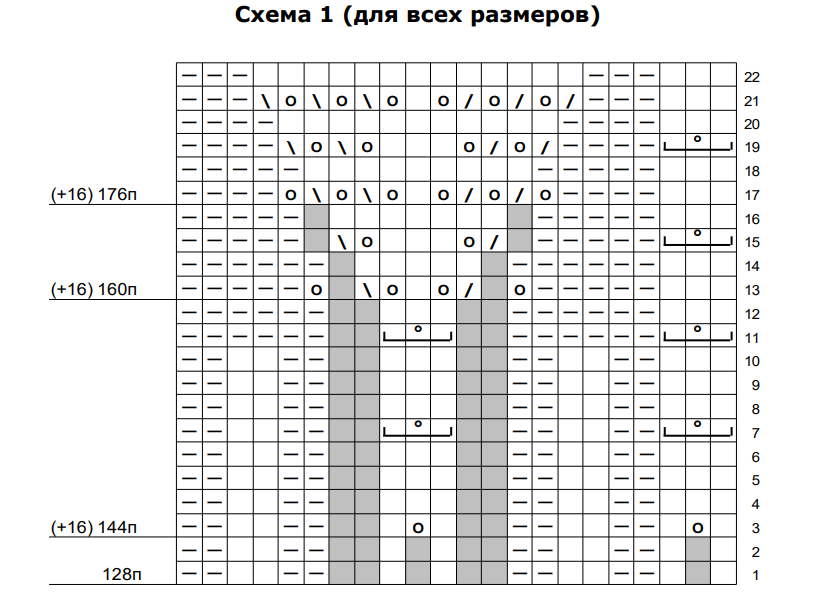
Chart 2 (for all sizes, pattern chart as on the olive top)
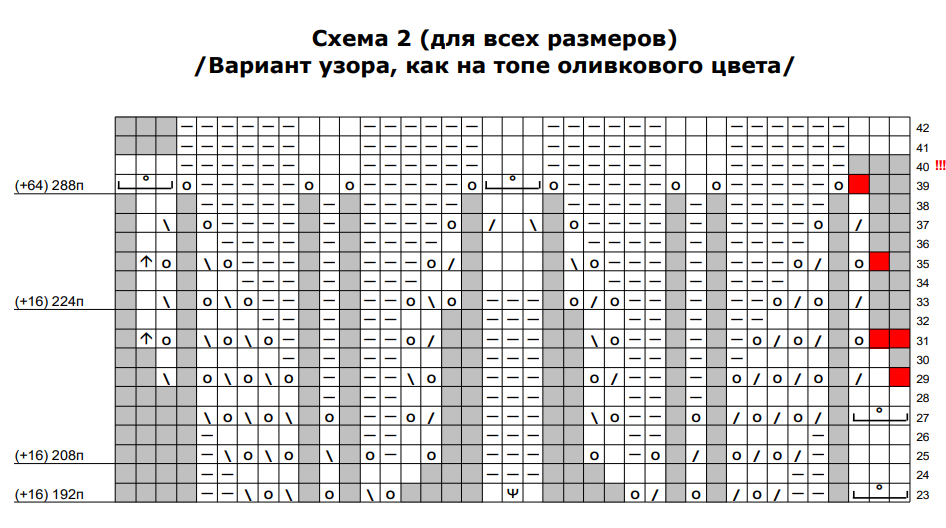
!!! 40th row. Do not finish the last 3 stitches of the row (not the repeat, but the row!), and move the marker to this place. 29,31,35,39 rows. Remove the marker, knit as many stitches as marked in red, knit; place the marker and count this place as the start of the row.
Chart 2 (pattern chart as on the black top)
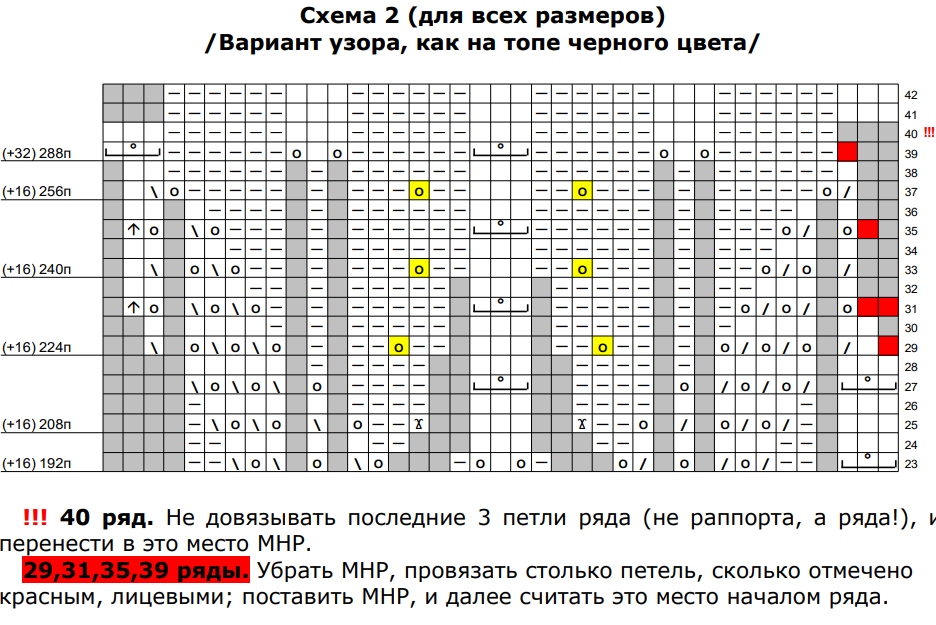
!!! 40th row. Do not finish the last 3 stitches of the row (not the repeat, but the row!), and move the marker to this place. 29,31,35,39 rows. Remove the marker, knit as many stitches as marked in red, knit; place the marker and count this place as the start of the row.
Chart 3 (for size 1)
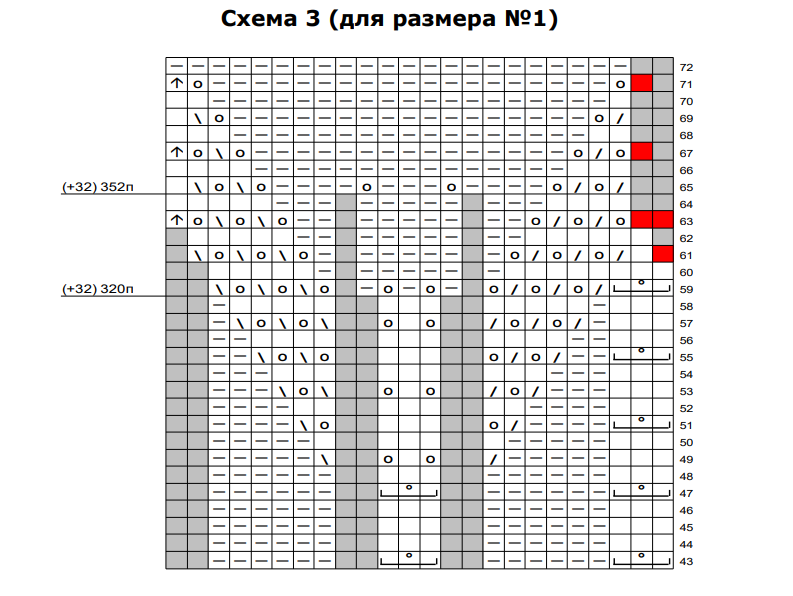
61,63,67,71 rows. Remove the marker, knit as many stitches as marked in red, knit; place the marker and count this place as the start of the row.
Chart 3 (for size 2)
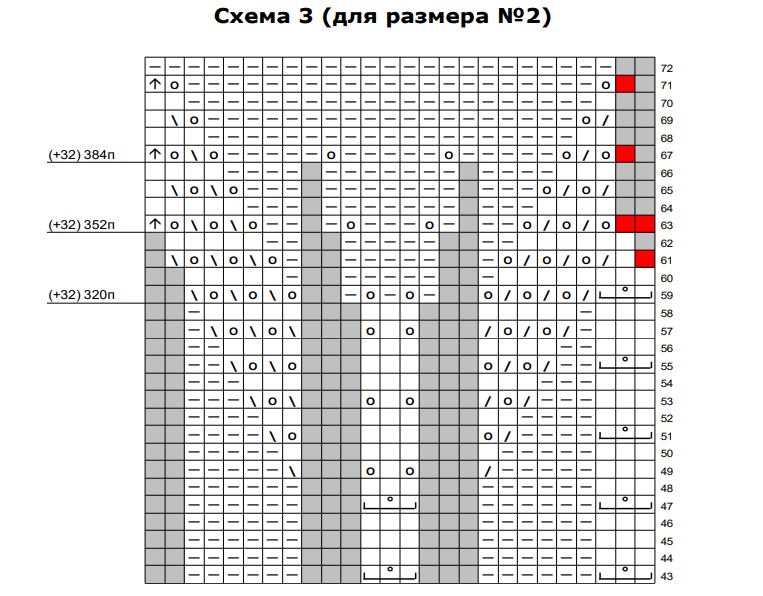
61,63,67,71 rows. Remove the marker, knit as many stitches as marked in red, knit; place the marker and count this place as the start of the row. After knitting all the rows of the chart, there should be 352/384 stitches on the needles.
Growth
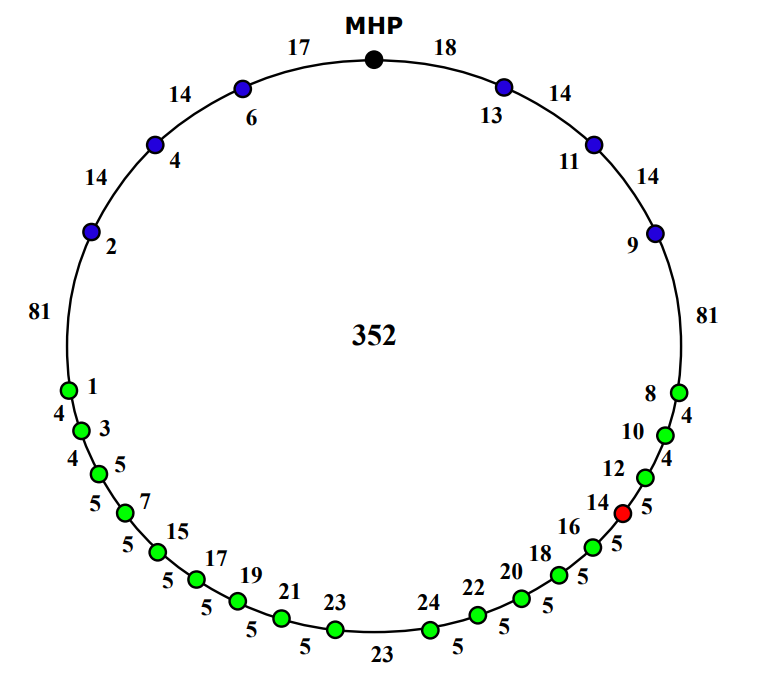
Next, knit the growth with short rows (German method) according to the charts below. No increases are made in the growth. /The growth is knitted both for the back and for the front/ All turning points (colored dots on the chart) must be marked with markers! After making the turn, remove the marker. Growth chart. Size No. 1
!After the 14th turn (marked in red) knit to the marker. Then you need to separate the sleeves and simultaneously continue to knit the growth according to the chart. /For more details see below How to read the chart/
Growth chart. Size 2
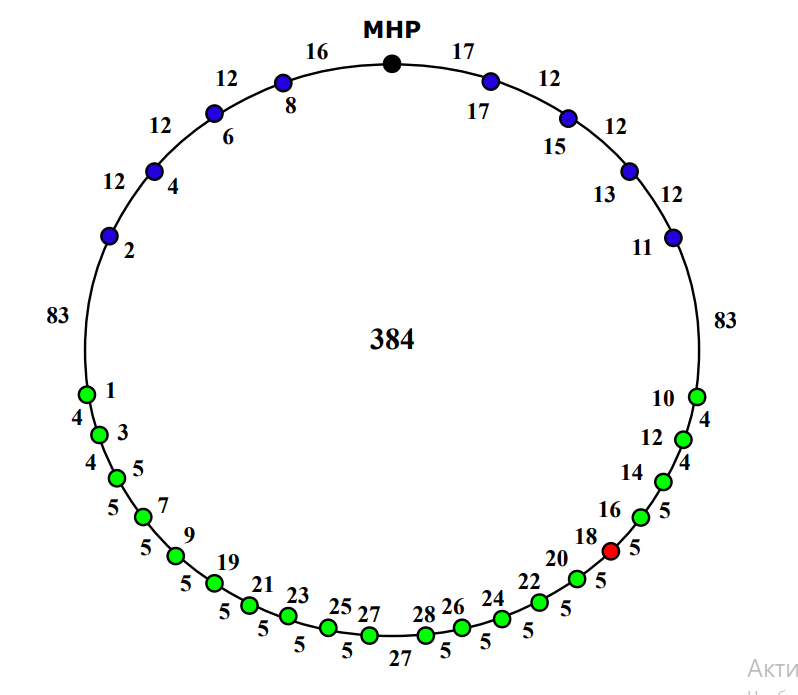
How to read the chart. Along the edge of the circumference inside are the turning points in order, outside – the number of stitches between them, in the center – the total number of stitches. We start knitting from the start of the row marker (moving left on the chart), i.e. we knit (17+14+14+81)/(16+12+12+12+83) knit stitches and find ourselves at the 1st turning point. Turn the work to the purl side. Slip the 1st stitch as a purl, pulling the working yarn towards yourself until 2 stitches (a double stitch) form on the needle, knit the remaining stitches purl until the second turning point (80/82 stitches). Turn the work to the knit side. Slip the 1st stitch as a knit, pulling the working yarn towards yourself until 2 stitches (a double stitch) form on the needle, knit the remaining stitches knit until the third turning point. And so on. !Double stitches are knitted on the knit side – knit, on the purl side – purl through the back loop.
After the 7th/9th turn, knit to the marker. Then continue knitting on the purl side (moving right on the chart), knit (18+14+14+81)/(17+12+12+12+83) purl stitches to the 8th/10th turning point. Turn the work to the knit side. Slip the 1st stitch as a knit, pulling the working yarn towards yourself until 2 stitches (a double stitch) form on the needle, knit the remaining stitches knit until the 9th/11th turning point (80/82 stitches). Turn the work to the purl side. Slip the 1st stitch as a purl, pulling the working yarn away from yourself until 2 stitches (a double stitch) form on the needle, knit the remaining stitches purl until the 10th/12th turning point. And so on until the 14th/18th turn. !After the 14th/18th turn (marked in red on the chart) knit to the marker. Then you need to separate the sleeves and simultaneously continue to knit the growth. Stitch distribution see in the charts below. Marker, 49/56 knit stitches (half of the back); close the next 73/75 stitches (sleeve stitches) with an additional yarn, leaving a "tail" ~30cm at the beginning; for the underarm, cast on with the main and additional yarn 12/14 stitches;
then knit knit stitches to the 15th/19th turning point (to the marker); turn to the purl side (as before through the double stitch); knit purl stitches to the marker (including the underarm stitches). Continue on the purl side: marker, 50/57 purl stitches (the second half of the back); close the next 73/75 stitches (sleeve stitches) with an additional yarn, leaving a "tail" ~30cm at the beginning; for the underarm, cast on with the main and additional yarn 12/14 stitches; then knit purl stitches to the 16th/20th turning point (to the marker); turn to the knit side (as before through the double stitch); knit knit stitches to the marker. The sleeves are separated. Then continue knitting the growth as before, according to the charts above. After the last (24th/28th) turn, knit to the marker, and then knit the body in the round with knit stitches to the desired length of the product (to the ribbing). /!!! In the first round, do not forget about the double stitches! Knit the first one as a knit, the second – knit through the back loop. There should be 230/262 stitches on the needles.
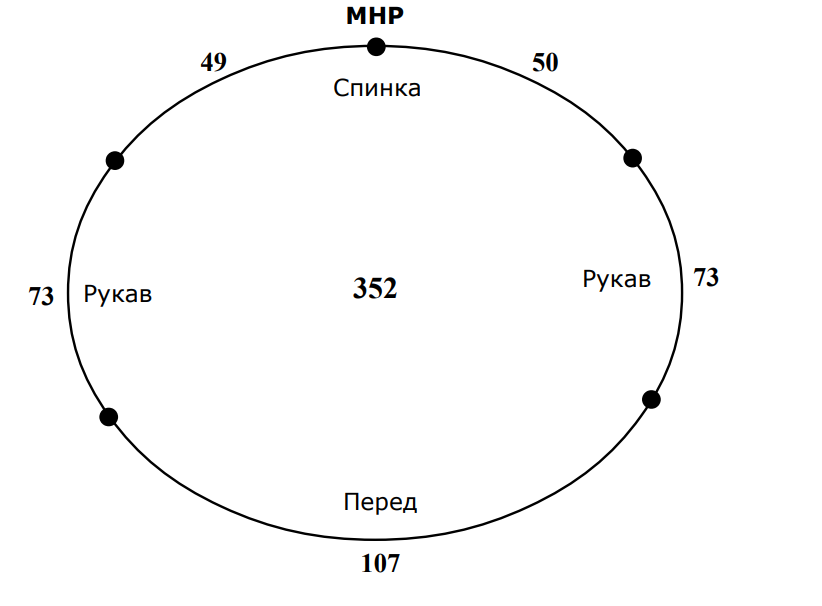
Stitch distribution chart. Size 1
Stitch distribution chart. Size 2
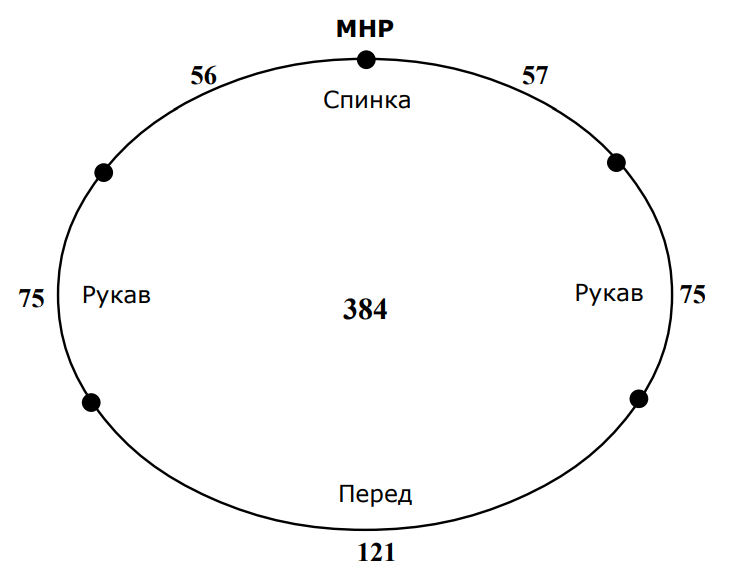
Stitch distribution (body of the product without sleeves)

Finish knitting the body of the product with ribbing according to the chart below as follows: Size 1. 19 repeats + stitches after the repeat (5 stitches) + 6 repeats (19x9+5+6x9=230 stitches). /These 5 stitches should be at the level of the underarm, so that it is not noticeable in the product/ Size 2. 29 repeats (29x9=261 stitches). But! Since we are working with 262 stitches, we need to decrease 1 stitch at the beginning of the first ribbing row.
Ribbing chart
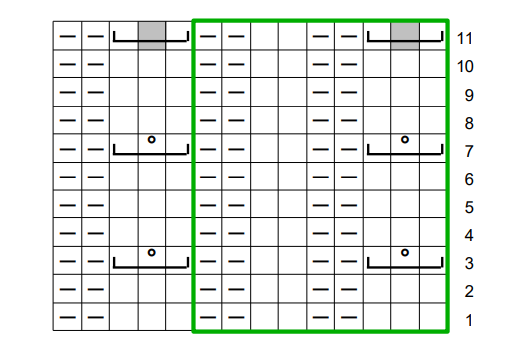
*the pattern repeat is highlighted in green After 11 rows of ribbing, close the stitches in the usual way, knitting knit stitches over knit stitches – knit, and over purl stitches – purl.
Unravel the additional yarn and gather all the stitches on the needles. ! In the area of the underarm, there should be 1 stitch more than originally cast on, i.e. 13/15 stitches (the first and last stitches are marked in red in the photo).

Start of the row – before the underarm stitches. Row 1: 12/14 knit stitches; the last underarm stitch to be knitted together with 1 additional stitch. 73/75 knit stitches; knit the 2nd additional stitch together with the 1st stitch of the next row. Knit another 5/6 stitches and then count this place (the middle of the underarm) as the start of the row (you can place a marker). ! If a "hole" formed at the start of the row (at the point of joining the yarn), carefully tighten it from the purl side with a needle. In total, there should be 86/90 stitches on the needles. The next 16-18 rows – all knit. (Can be more – as desired). Finish knitting ribbing according to the same scheme as before, as follows: Size 1. 9 repeats + stitches after the repeat (9x9+5=86 stitches). Size 2. 10 repeats (9x10=90 stitches). Close the stitches the same way as at the bottom of the product. The second sleeve is knitted similarly.