Top with needles
Added: 17.09.2025 в 16:41 Views: 1014
Top with needlesKlubokhttp://klubok.work/1/82/9101/Klubokhttps://klubok.work/css/image/top-logo-en.png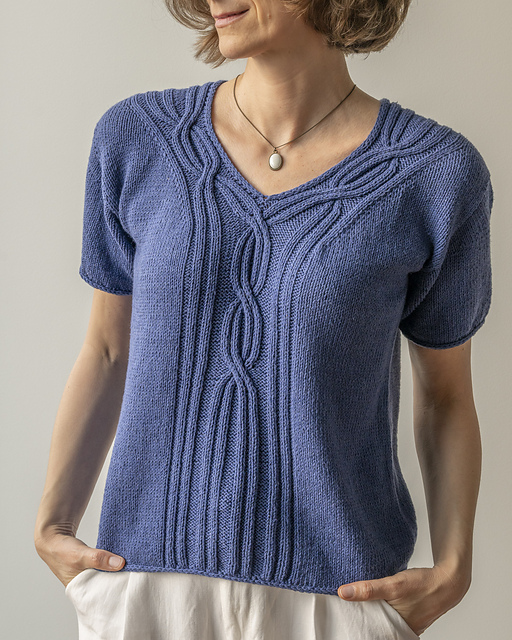
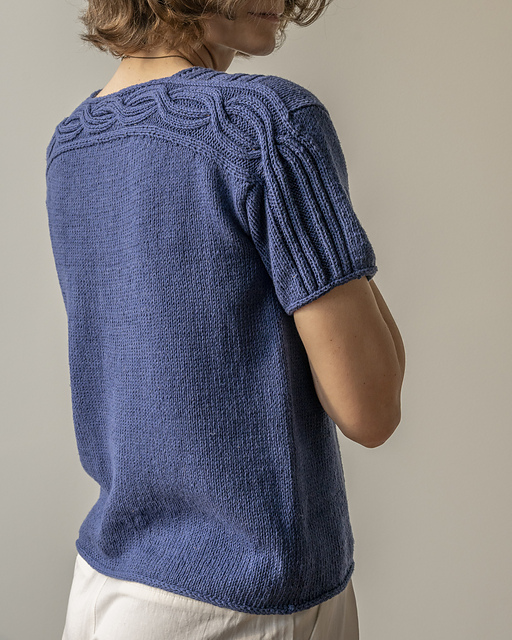
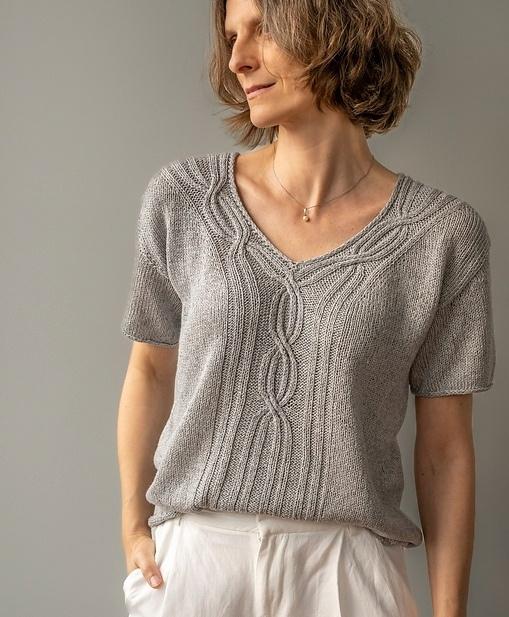
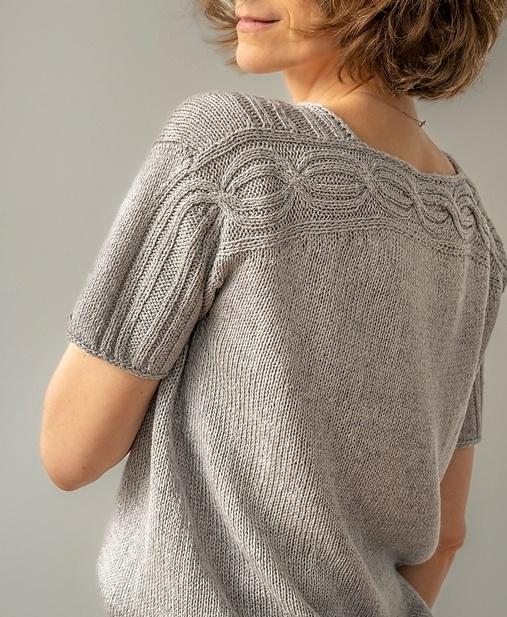
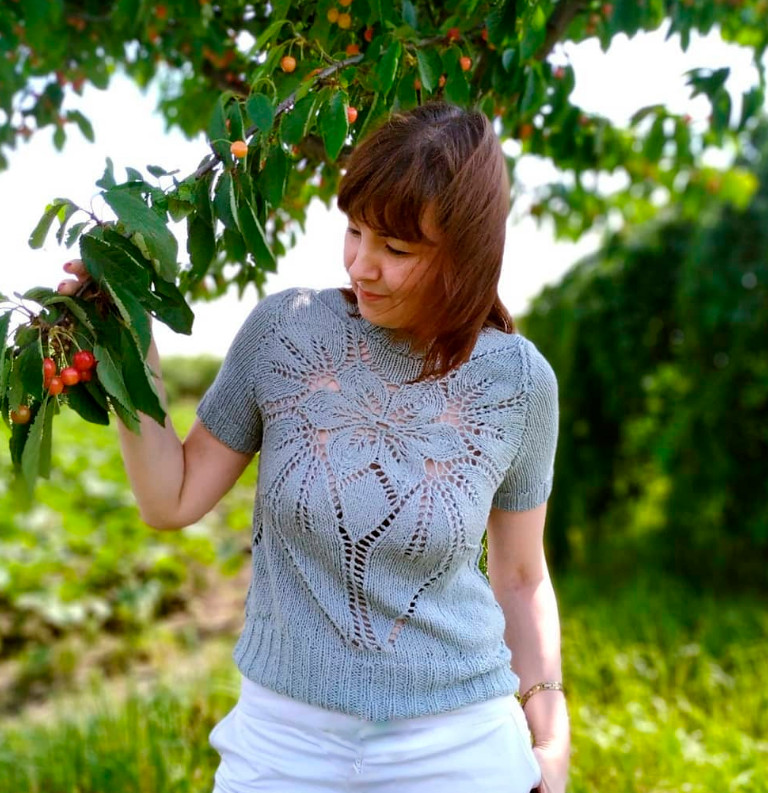
The Sylvan T-shirt features a beautiful, unusual braid line that intertwines and sways across the back, neckline, and sleeves. The T-shirt is easy to put on or take off, stylish, and interesting. Thoughtful details and finishes give it a modern look with a touch of elegance. Its name, "forest," is related to the way the braids seem to flow throughout the design, reminiscent of the intertwining branches and roots of trees.
The Sylvan T-shirt is knitted from the top down without seams. The modified dropped shoulder construction and European shoulder seam that retreats from the natural shoulder line provide the best fit. The T-shirt is knitted both in rows and in the round.
Sizes: 1 (2/ 3/ 4/ 5) (6/ 7/ 8/ 9) are designed to be worn with an ease allowance of about 10–20 cm.
Chest circumference of the finished item (including ease allowance): 97 (102.5/ 108.5/ 114/119.5) (125.5/ 133/ 139/ 145) cm
Gauge: 21 sts x 29 rows = 10 x 10 cm in stockinette stitch in rows and rounds after blocking on 4 mm needles or achieving the specified gauge
Recommended needles: 4 mm circular needles (main needles) 3.75 mm circular needles for I-cord
Yarn used in the project: Kinu and So Asa from ITO held together Kinu (100% silk) (425 m in a 50 g skein), So Asa (70% linen, 17% cotton, 13% silk) (210 m in a 50 g skein) Alternative yarn options are on the last page.
Approximate yarn usage (of each yarn): 800 (850/ 930/ 970/ 1050) (1100 / 1200/ 1250/ 1300) m
Tools: markers, cable needle, 2 stitch holders (optional), tapestry needle
FIGURE 1
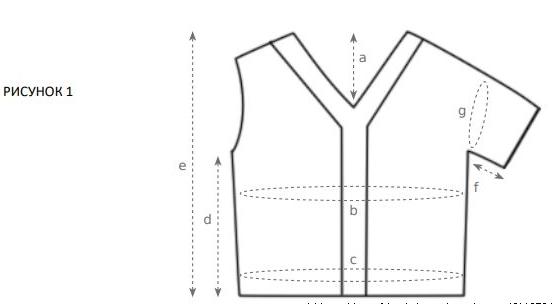
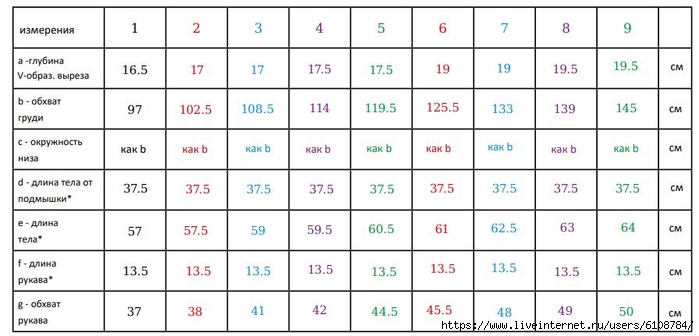
*the length of the body and sleeves is easily adjustable
DESCRIPTION
ABBREVIATIONS:
[...] repeat the instructions in [brackets] as many times as indicated after the brackets
3-st. CL(3-stitch cable with a left twist): slip 2 sts onto the cable needle and leave in front of work, knit 1 st., then knit 2 sts from the cable needle
3-st. CR (3-stitch cable, with a right twist): slip 1 st. onto the cable needle behind the work, knit 2 sts, then knit 1 st. from the cable needle.
12-st. CL (12-stitch cable, with a left twist): slip 6 sts onto the cable needle and leave in front of work, knit 2 sts, 2 knit, 2 st., then knit 2 sts, 2 knit, 2 sts from the cable needle
12-st. CR (12-stitch cable, with a right twist): slip 6 sts onto the cable needle behind the work, knit 2 sts, 2 knit, 2 sts, then knit 2 sts, 2 knit, 2 sts from the cable needle
MN: marker of the beginning of the round
dec: decrease
DP: double stitch (see German short rows technique)
NSR: German short rows (see techniques)
inc: increase
K: knit stitch
2K2tog: (decrease right-leaning) knit two stitches together.
3K2tog: (double decrease right-leaning) knit 3 stitches together.
LS: left needle
M: marker
1K right-leaning increase on the left needle: insert the left needle from back to front under the bar between the stitches and knit it frontwise through the front loop.
1P left-leaning increase on the left needle: insert the left needle from front to back under the bar between the stitches and knit it frontwise through the back loop
1Li left-leaning increase on the knit side. Insert the left needle from front to back under the bar and knit it purlwise through the back loop.
1Pi right-leaning increase on the purl side. Insert the left needle from back to front under the bar and knit it purlwise through the front loop
P: purl stitch
2P: 2 together purlwise
r. : row
RS: right side
sl. : slip stitch
pMN: reposition the beginning of round marker
2K2togL: (decrease left-leaning) knit 2 together left-leaning
3K2togL: (double decrease left-leaning) knit 3 together left-leaning pM: reposition marker
st: stitch(es)
bbl: through the back loop of stitch
W&T: wrap and turn (see techniques)
WS: wrong side
yarn front: yarn before the work
KNITTING STITCH:
stockinette stitch (in rows):
1 row (RS): all stitches knit
2 row (WS): all stitches purl.
TECHNIQUES:
provisional cast on stitches from a crochet chain
German short rows (GSR)
turning knit stitch: turn the work, slip the next stitch purlwise with yarn in front, wrap the yarn over the right needle and pull back until the stitch becomes double (DP: double stitch). Later you will knit both loops of the double stitch together as if it were a single stitch.
turning purl stitch: turn the work, wrap the yarn in front, slip the next stitch purlwise with yarn in front, wrap the yarn over the right needle and pull back until the stitch becomes double (DP: double stitch). Later you will knit it purlwise through both loops of the double stitch as if it were a single stitch.
to cast on a double twisted stitch
wrap and turn (W&T) short rows
Bring the working yarn in front of the work, slip the next stitch purlwise from the left needle to the right, bring the working yarn back, slip the stitch purlwise from the right needle to the left.
The working yarn is now wrapped around the stitch. Turn the work and continue knitting. When you reach the wrapped stitch, knit it like a regular stitch (knit or purl).
stitch cast on STITCH FROM STITCH
IMPORTANT NOTES:
• Be sure to wash and block the swatch.
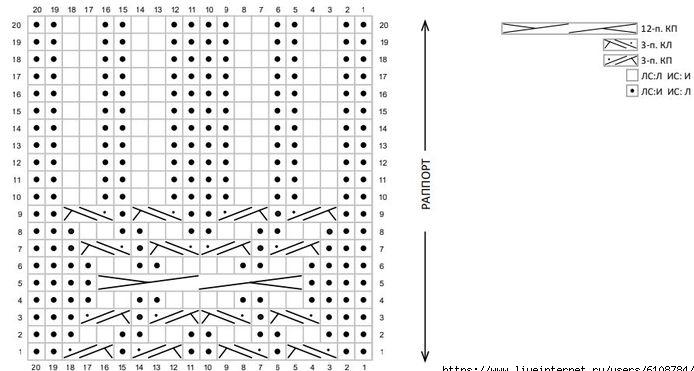
• Braids can be knitted both from the chart and from the written instructions (see the last page).
• Note the difference in repeat notations: [1K, 1P] 3 times – means that you knit 1K, 1P a total of 3 times
*1K, 1P* knit from *to* 3 more times – means that you knit 1K, 1P a total of 4 times
• Each chart can be worked both in rows and in rounds, depending on which part of the T-shirt you are knitting.
When knitting flat: On RS rows, read the chart from right to left. On WS rows, read the chart from left to right.
When knitting in the round: always read the chart from right to left• working from the chart means that you knit the stitches following the chart and stitch markings on both sides (double stockinette or knit/purl stitches)
• When you pick up 5 stitches from 7 rows, you first pick up 3 stitches from 4 rows, and then 2 stitches from 3 rows.
CONSTRUCTION NOTES:
The T-shirt is knitted from the top down and features modified dropped shoulder construction and the so-called European shoulder seam, which departs from the natural shoulder line.
• First, knit the strip with the cable.
• Pick up stitches for the back from the cable strip and knit the back in rows, forming the shoulders with short rows and making increases for the armholes.
• Pick up stitches from the cable strip and knit the left and right fronts separately. Shape the V-neck with increases. No additional finishing of the V-neck is required, as you knit the edges in double (reversible) stockinette. At the bottom of the V-neck, join both fronts.
• At the base of the armhole, join the front and back and knit the body in the round, finishing with I-cord.
• Pick up stitches for the sleeves and knit them in the round, finishing with I-cord.
CABLE STRIP
First, you will knit a strip with the cable. Initially, you will knit double stockinette from one edge (edge A) (this means on RS: 1K, sl. 1 yarn front, 1K; on WS: sl. 1 yarn front, 1K, sl. 1 yarn front). From the other edge (edge B), you will knit purl or knit all edge stitches. Later you will knit purl or knit all edge stitches from both edges. The edge stitches consist of 3 sts from each edge. NOTE: the final dimensions of the strip are indicated on the page below (right column).
After making a provisional cast on (see techniques), cast on 26 sts on the main size needles.
Knit the cable strip, starting with the knit row:
1 row (RS): 3K (= edge B), [2P, 2K] twice, 4P, [2K, 2P] twice, 1K, sl. 1 yarn front, 1K (= edge A/double stockinette)
2 row (WS): sl. 1 yarn front, 1K, sl. 1 yarn front, [2K, 2P] twice, 4K, [2P, 2K] twice, 3P
3-4 rows: knit as rows 1-2
5 row (RS): knit as row 1
6 row (WS): sl. 1 yarn front, 1K, sl. 1 yarn front, place M, knit stitches as they appear to the last 3 sts, place M, 3P
Next, you will follow chart A between the markers (starting with the 1st row of the chart), continuing to knit double stockinette for edge A and knitting all edge stitches for edge B.
Knit:
1 row (RS): 3K, place M, knit according to chart A until M (next 20 sts), place M, 1K, sl. 1 yarn front, 1K
2 row (WS): sl. 1 yarn front, 1K, sl. 1 yarn front, place M, knit according to chart A until M (next 20 sts), place M, 3P
Only for size 1 (-/ -/ -/ -) (-/ -/ -/ -)
3-14 rows: knit as established (continuing chart A)
Place a removable marker (M1) directly on the fabric at edge A (see figure 2 on page 6)
Next, you will continue to follow chart A between the markers and will knit knit or purl stitches on both edges (edge A and edge B).
15 row (RS): 3K, place M, knit according to chart A until M, place M, 3K
16 row (WS): 3P, place M, knit according to chart A until M, place M, 3P
17-20 rows: knit as established (continuing chart A)
Proceed to instructions for ALL sizes.
Only for sizes – (2/ 3/ 4/ 5) (-/ -/ -/ -)
3-20 rows: knit as established (continuing chart A)
Place a removable marker (M1) directly on the fabric at edge A (see figure 2 on the page below)
Proceed to instructions for ALL sizes.
CHART A
When knitting flat, on RS rows: read the chart from right to left, on WS rows: read the chart from left to right. When knitting in the round, always read the chart from right to left
Only for sizes - (-/ -/ -/ -) (6/ 7/ 8/ 9)
3-20 rows: knit as established (continuing chart A)
1-2 rows: knit as established (starting chart A from the 1st row)
Place a removable marker (M1) directly on the fabric at edge A (see figure 2 below)
Next, you will continue to follow chart A between the markers and will knit knit or purl stitches on both edges (edge A and edge B).
3 row (RS): 3K, place M, knit according to chart A until M, place M, 3K
4 row (WS): 3P, place M, knit according to chart A until M, place M, 3P
5-20 rows: knit as established (continuing chart A)
Proceed to instructions for ALL sizes.
ALL sizes
Next, you will continue to follow chart A between the markers (starting with the 1st row) and will knit knit or purl stitches on both edges (edge A and edge B).
1 row (RS): 3K, place M, knit according to chart A until M, place M, 3K
2 row (WS): 3P, place M, knit according to chart A until M, place M, 3P
3-20 rows: knit as established (continuing chart A)
Knit rows 1-20 one more (1/ 1/ 1/ 1) (0/ 0/ 0/ 0) times.
Next, you will knit only part of chart A, depending on your size.
Only for size 1 (-/ -/ -/ -) (-/ -/ -/ -)
Knit rows 1-4 once.
Proceed to instructions for ALL sizes.
Only for sizes – (2/ 3/ -/ -) (-/ -/ -/ -)
Knit rows 1-8 once.
Proceed to instructions for ALL sizes.
Only for sizes – (-/ -/ 4/ 5) (-/ -/ -/ -)
Knit rows 1-10 once.
Proceed to instructions for ALL sizes
Only for sizes - (-/ -/ -/ -) (6/ 7/ -/ -)
Knit rows 1-16 once.
Proceed to instructions for ALL sizes.
Only for sizes - (-/ -/ -/ -) (-/ -/ 8/ 9)
Knit rows 1-20 once.
Proceed to instructions for ALL sizes.
ALL sizes
NOTE:

Move the stitches to a stitch holder or waste yarn.
Cut the yarn. Leave M1 in the fabric. Remove other markers.
Using new yarn with RS, pick up 26 sts from the provisional cast on (see techniques) and knit the cable strip in the opposite direction, starting with a purl row:
1 row (WS): 3P (= edge B), [2K, 2P] twice, 4K, [2P, 2K] twice, sl. 1 yarn front, 1K, sl. 1 yarn front (= edge A)
2 row (RS): 1K, sl. 1 yarn front, 1K, place M, [2P, 2K] twice, 4P, [2K, 2P] twice, place M, knit to the end
3-6 rows (4 rows): knit as rows 1-2 twice
7 row (WS): 3P, place M, knit as stitches appear to the last 3 sts, place M, sl. 1 yarn front, 1K, sl. 1 yarn front
Next, you will follow chart A between the markers (starting with the 1st row of the chart), continuing to knit double stockinette for edge A and knitting all edge stitches for edge B.
Knit:
1 row (RS): 1K, sl. 1 yarn front, 1K, place M, knit according to chart A until M (next 20 sts), place M, 3K
2 row (WS): 3P, place M, knit according to chart A until M (next 20 sts), place M, sl. 1 yarn front, 1K, sl. 1 yarn front
Only for size 1 (-/ -/ -/ -) (-/ -/ -/ -)
3-14 rows: knit as established (continuing chart A)
Place a removable marker (M1) directly on the fabric at edge A (see figure 2)
Next, you will continue to follow chart A between the markers and will knit knit or purl stitches on both edges (edge A and edge B).
15 row (RS): 3K, place M, knit according to chart A until M, place M, 3K
16 row (WS): 3P, place M, knit according to chart A until M, place M, 3P
17-20 rows: knit as established (continuing chart A)
Proceed to instructions for ALL sizes.
Only for sizes – (2/ 3/ 4/ 5) (-/ -/ -/ -)
3-20 rows: knit as established (continuing chart A)
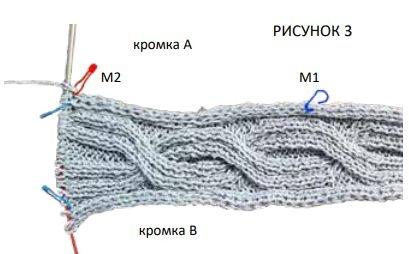
Place a removable marker (M2) directly on the fabric at edge A (see figure 3)
Proceed to instructions for ALL sizes.
Only for sizes - (-/ -/ -/ -) (6/ 7/ 8/ 9)
3-20 rows: knit as established (continuing chart A)
1-2 rows: knit as established (starting chart A from the 1st row)
Place a removable marker (M2) directly on the fabric at edge A (see figure 3)
Next, you will continue to follow chart A between the markers and will knit knit or purl stitches on both edges (edge A and edge B).
3 row (RS): 3K, place M, knit according to chart A until M, place M, 3K
4 row (WS): 3P, place M, knit according to chart A until M, place M, 3P
5-20 rows: knit as established (continuing chart A)
Proceed to instructions for ALL sizes.
ALL sizes
Next, you will continue to follow chart A between the markers (starting with the 1st row) and will knit knit or purl stitches on both edges (edge A and edge B).
1 row (RS): 3K, place M, knit according to chart A until M, place M, 3K
2 row (WS): 3P, place M, knit according to chart A until M, place M, 3P
3-20 rows: knit as established (continuing chart A)
Knit rows 1-20 one more (1/ 1/ 1/ 1) (0/ 0/ 0/ 0) times.
Next, you will knit only part of chart A, depending on your size. You will finish on the row indicated in the table below (just as before when knitting in the other direction):

Move the stitches to a stitch holder or waste yarn.
Cut the yarn. Leave M1 and M2 in the fabric. Remove other markers.
The cable strip should be about 8 cm wide and 50 (53/ 53/ 55/ 55) (59.5/ 59.5/ 62.5/ 62.5) cm long.
Both halves of the cable strip should be the same length.
The 12-stitch cable is knitted 6 (8/ 8/ 8/ 8) (8/ 8/ 8/ 8) times.
BACK
Using smaller needles, with new working yarn on RS, evenly pick up 100 (106/ 106/ 108/ 108) (116/ 116/ 122/ 122) sts along edge B of the cable strip (about 5 sts from every 7 rows, see important notes and figure 4 below).
Switch to main needles.
Knit:
next row (WS): 35 (35/ 35/ 36/ 36) (39/ 39/ 41/ 41) P, place M3, 30 (36/ 36/ 36/ 36) (38/ 38/ 40/ 40) P, place M4, purl to the end (see figure 4)
Next, you will shape the shoulders using German short rows.
Knit:
1 row (RS): [knit to M, place M] twice, 1K, turn
2 row (WS): DP, remove M3, purl to M, remove M4, 1P, turn
3 row (RS): DP, knit to DP, knit DP knitwise, 3K, turn
4 row (WS): DP, purl to DP, knit DP purlwise, 3P, turn
Knit rows 3-4 for another 8 (8/ 8/ 8/ 8) (9/ 9/ 9/ 9) times.
next row (RS): DP, knit to DP, knit DP knitwise, knit to the end
next row (WS): purl to DP, knit DP purlwise, purl to the end
Short rows are finished.
Knit 20 (22/ 22/ 22/ 22) (22/ 22/ 22/ 22) rows in stockinette stitch and finish with a WS row. (always knit the first and last stitch on RS and purl on WS).

Only for sizes 1 (2/ -/ -/ -) (-/ -/ -/ -)
You have 100 (106/ -/ -/ -) (-/ -/ -/ -) sts for the back.
Proceed to instructions for ALL sizes.
Only for size – (-/ 3/ -/ -) (-/ -/ -/ -)
Next, you will make increases for the armholes in the 1st row.
Knit:
1 row (RS): 2K, 1K1L, knit to the last 2 sts, 1P1P, 2K (2 sts increased)
2 row (WS):all sts purlwise
You have – (-/ 108/ -/ -) (-/ -/ -/ -) sts for the back.
Proceed to instructions for ALL sizes.
Only for sizes – (-/ -/ 4/ 5) (6/ 7/ 8/ 9)
Next, you will make increases for the armholes in every row (RS and WS).
Knit:
1 row (RS): 2K, 1K1L, knit to the last 2 sts, 1P1P, 2K (2 sts increased)
2 row (WS): 2P, 1P1Pi, purl to the last 2 sts, 1K1Li, 2P (2 increases)
Knit rows 1-2 another – (-/ -/ 1/ 1) (1/ 2/ 2/ 3) times.
(– (-/ -/ 4/ 4) (4/ 8/ 8/ 12) increases)
You have – (-/ -/ 116/ 116) (124/ 128/ 134/ 138) sts for the back.
Proceed to instructions for ALL sizes.
ALL sizes
Cut the yarn. Place the stitches on a spare cable or waste yarn.
You have 100 (106/ 108/ 116/ 116) (124/ 128/ 134/ 138) sts for the back.
FRONT
LEFT FRONT
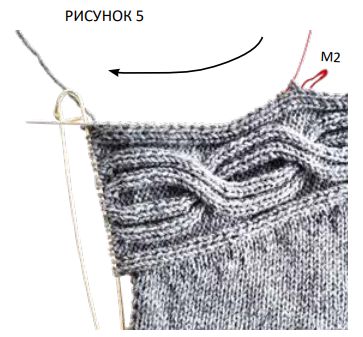
Using smaller needles, with new working yarn on RS, evenly pick up 35 (35/ 35/ 36/ 36) (39/ 39/ 41/ 41) sts (about 5 sts from every 7 rows) along edge A of the cable strip, starting from M2, ending at the stitch holder (see figure 5). Remove M2.
Switch to main needles.
Knit (starting with a WS row):
1 row (WS): 12 (12/ 12/ 13/ 13) (16/ 16/ 18/ 18) P, place M, [2K, 2P] twice, 4K, [2P, 2K] twice, place M, sl. 1 yarn front, 2K, sl. 1 yarn front
2 row (RS): 1K, sl. 1 yarn front, 1K, place M, [2P, 2K] twice, 4P, [2K, 2P] twice, place M, knit to the end
3 row (WS): purl to M, place M, [2K, 2P] twice, 4K, [2P, 2K] twice, place M, sl. 1 yarn front, 1K, sl. 1 yarn front
Knit rows 2-3 another 6 (5/ 5/ 6/ 6) (7/ 7/ 7/ 7) times.
Next, you will make increases for the V-neck.
NOTE: increases are made after the wide cable strip. Its width remains the same throughout.
Therefore, at first, it seems that the increases are made at the armhole.
Knit:
1 row (RS): 1K, sl. 1 yarn front, 1K, place M, knit as stitches appear to M, place M, 2K, 1K1L, knit to the end (1 increase)
2 row (WS): purl to M, place M, knit as stitches appear to M, place M, sl. 1 yarn front, 1K, sl. 1 yarn front
Knit rows 1-2 another 4 (7/ 7/ 7/ 7) (8/ 8/ 9/ 9) times (4 (7/ 7/ 7/ 7) (8/ 8/ 9/ 9) increases)
You have 40 (43/ 43/ 44/ 44) (48/ 48/ 51/ 51) sts for the left front
Next, you will follow chart A between the markers (starting with the 1st row) and continue to make increases for the V-neck (in knit rows).
Knit:
1 row (RS): 1K, sl. 1 yarn front, 1K, place M, knit according to chart A until M (next 20 sts), place M, 2K, 1K1L, knit to the end (1 increase)
2 row (WS): purl to M, place M, knit according to chart A until M (next 20 sts), place M, sl. 1 yarn front, 1K, sl. 1 yarn front
3-20 rows: knit as rows 1-2 another 9 times, continuing to knit chart A to the end (9 increases)
Knit rows 1-16 one more time (8 increases). Finish with a purl row.
You have 58 (61/ 61/ 62/ 62) (66/ 66/ 69/ 69) sts for the left front.
Cut the yarn. Place the stitches on a spare cable or waste yarn.
RIGHT FRONT
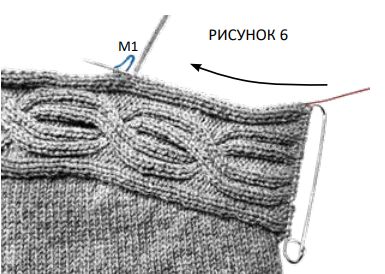
Using smaller needles, with new working yarn on RS, evenly pick up 35 (35/ 35/ 36/ 36) (39/ 39/ 41/ 41) sts (about 5 sts from every 7 rows) along edge A of the cable strip, starting from the stitch holder, ending at M1 (see figure 6). Remove M1.
Switch to main needles.
Knit (starting with a WS row):
1 row (WS): sl. 1 yarn front, 1K, sl. 1 yarn front, place M, [2K, 2P] twice, 4K, [2P, 2K] twice, place M, purl to the end
2 row (RS): knit to M, place M, [2P, 2K] twice, 4P, [2K, 2P] twice, place M, 1K, sl. 1 yarn front, 1K
3 row (WS): sl. 1 yarn front, 1K, sl. 1 yarn front, place M, [2K, 2P] twice, 4K, [2P, 2K] twice, place M, purl to the end.
Knit rows 2-3 another 6 (5/ 5/ 6/ 6) (7/ 7/ 7/ 7) times.
Next, you will make increases for the V-neck.
NOTE: increases are made before the wide cable strip. Its width remains the same throughout.
Therefore, at first, it seems that the increases are made at the armhole.
Knit:
1 row (RS): knit to the last 2 sts before M, 1P1P, 2K, place M, knit as stitches appear to M, place M, 1K, sl. 1 yarn front, 1K (1 increase)
2 row (WS): sl. 1 yarn front, 1K, sl. 1 yarn front, place M, knit as stitches appear, place M, purl to the end.
Knit rows 1-2 another 4 (7/ 7/ 7/ 7) (8/ 8/ 9/ 9) times.
(4 (7/ 7/ 7/ 7) (8/ 8/ 9/ 9) increases)
You have 40 (43/ 43/ 44/ 44) (48/ 48/ 51/ 51) sts for the right front.
Next, you will follow chart A between the markers (starting with the 1st row) and continue to make increases for the V-neck (in knit rows).
Knit:
1 row (RS): knit to the last 2 sts before M, 1P1P, 2K, place M, knit according to chart A until M (next 20 sts), place M, 1K, sl. 1 yarn front, 1K (1 increase)
2 row (WS): sl. 1 yarn front, 1K, sl. 1 yarn front, place M, knit according to chart A until M (next 20 sts), place M, purl to the end.
3-20 rows: knit as rows 1-2 another 9 times, continuing to knit chart A to the end (9 increases)
Knit rows 1-16 one more time (8 increases). Finish with a purl row. Do not cut the yarn.
You have 58 (61/ 61/ 62/ 62) (66/ 66/ 69/ 69) sts for the right front.
Next, you will JOIN both fronts
Place the stitches of the left front onto the main needle behind the stitches of the right front so that the cable stripes are next to each other.
Knit:
1 row (RS):
• knit the stitches of the right front: knit to the last 2 sts before M, 1P1P, 2K, place M, [2P, 2K] twice, 4P, [2K, 2P] twice, remove M, 3K2tog (2 decreased, 1 increased)
• with the same yarn knit the stitches of the left front: 3K2tog, remove M, [2P, 2K] twice, 4P, [2K, 2P] twice, place M, 2K, 1K1L, knit to the end (2 decreased, 1 increased)
You have 114 (120/ 120/ 122/ 122) (130/ 130/ 136/ 136) sts for the front.
2 row (WS): purl to M, place M, [2K, 2P] twice, 4K, [2P, 2K] twice, 2P, [2K, 2P] twice, 4K, [2P, 2K] twice, place M, purl to the end.
3 row (RS): knit to the last 2 sts before M, 1P1P, 2K, place M, [2P, 2K] twice, 4K, 2K, 2P, 2K, 1P, [2P2tog] twice, 1P, 2K, 2P, 2K, 4K, [2K, 2P] twice, place M, 2K, 1K1L, knit to the end (2 decreased, 2 increased)
4 row (WS): purl to M, place M, [2K, 2P] twice, 4K, [2P, 2K, 2P, 4K] twice, [2P, 2K] twice, place M, purl to the end.