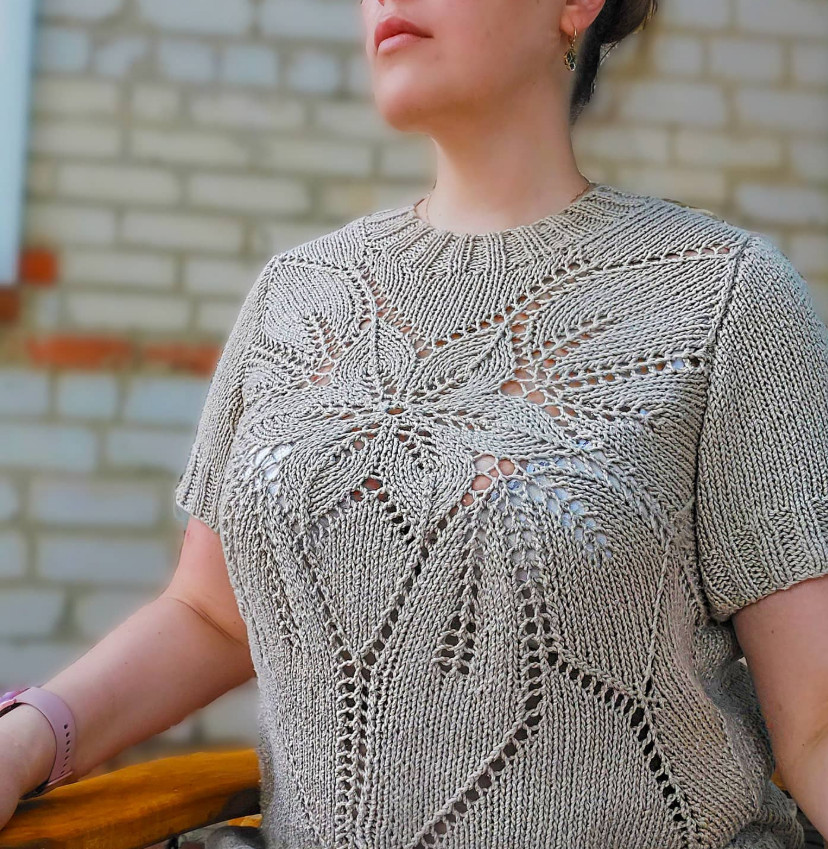
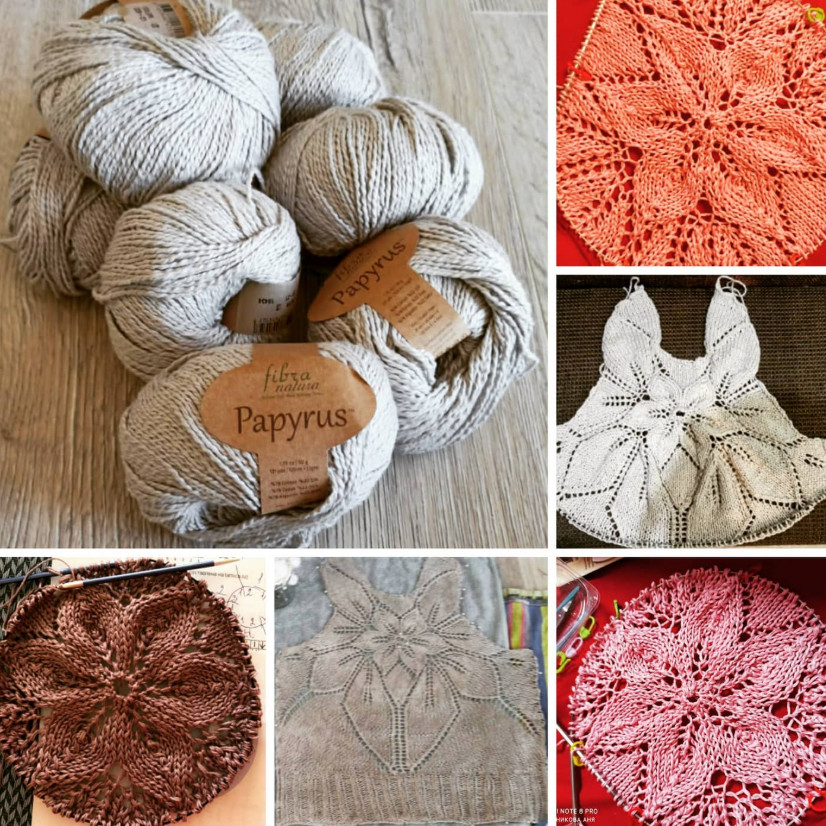
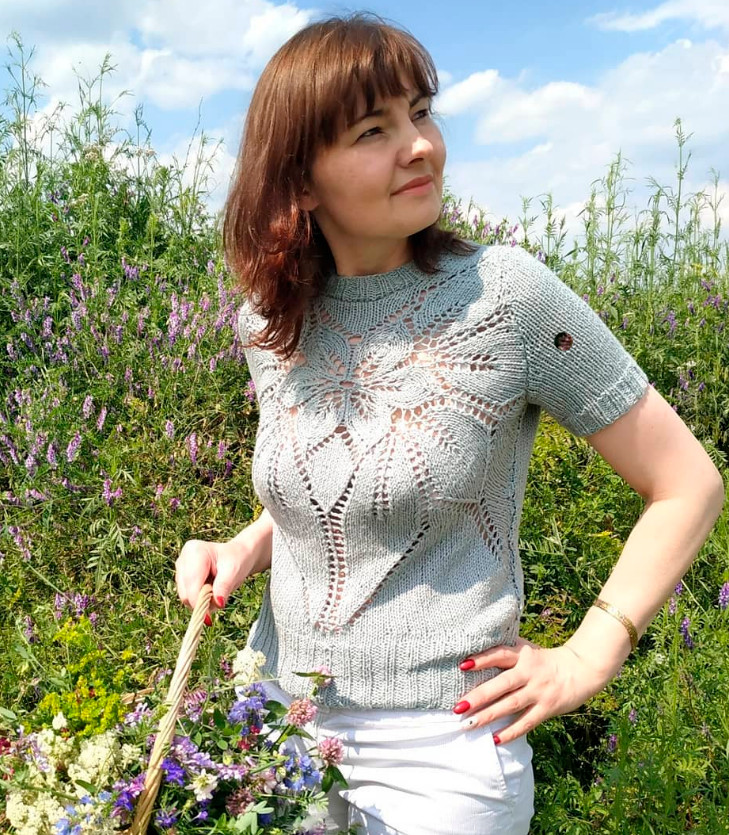
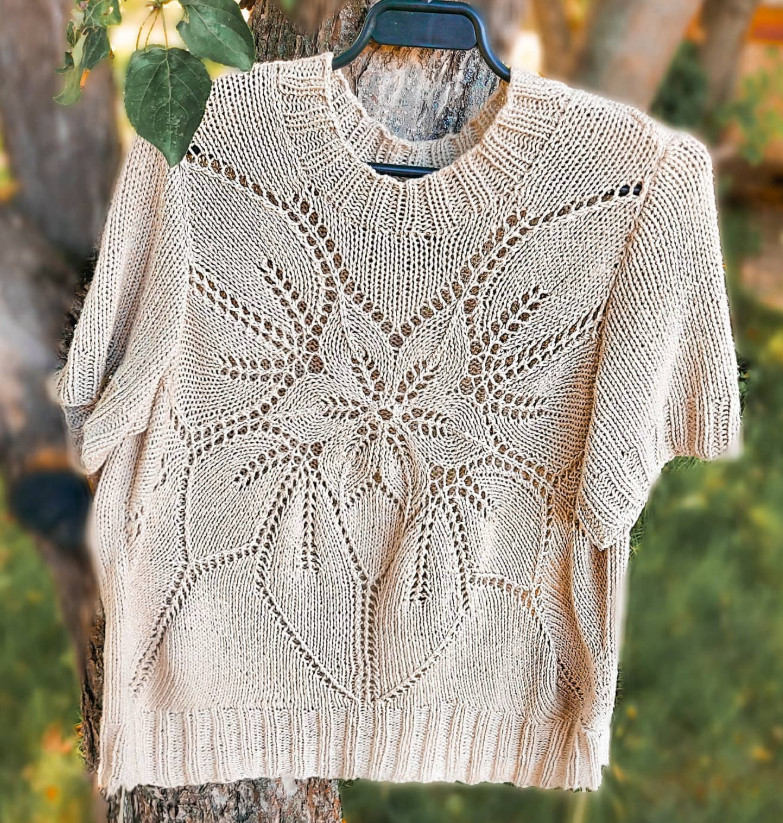
For knitting this model I used Fibra Natura Papyrus yarn, composition: 78% cotton, 22% silk.
120 m/50 g. You will need 4/4/5/5 skeins for sizes 42-44/46-48/50-52/54-56 respectively.
Needles No. 4.5 and No. 3.5, crochet hook No. 3.5, plastic needle.
Attention! This master class is designed and calculated taking into account standard average size indicators
and does not take into account the features of your figure. For a perfect fit it is recommended to make
several fittings during the process of creating the garment and make the necessary adjustments.
I knit in a classic way, so all patterns and technical techniques are described for this
method of knitting.
This description is designed for sizes 42-44 (46-48) 50-52 (54-56). In the description of each knitting stage
you will
encounter a row of numbers written exactly as I have written the sizes. You need to choose
exactly the number that corresponds to your size. The numbers will denote not only stitches,
but also centimeters.
Your task:
-
To achieve an exact match to my gauge. For this, knit several swatches with different needle sizes
-
size and choose those needles with which you managed to hit the gauge.
-
During knitting, take control measurements to verify your gauge.
-
Pay attention to the number of centimeters indicated in the description.
-
If your row count matches, but the centimeters differ, it means you have made an error somewhere.
-
Remember – the centimeter measurement is more important.
You can independently calculate the required number of stitches and rows, based on the indicated
centimeters and your knitting gauge. To do this, calculate how many stitches you have in 1 centimeter and
how many rows. Multiply this number by the centimeters of width and length indicated by me respectively.
Table of contents.
For navigation, click on the section name.
How to determine size
Sample
Back
Sleeves
Washing and blocking
Garment assembly
Neckline
Armhole edging for a sleeveless top
How to determine your size?
Below is a table of size indicators that were used in developing this model.
If your measurements do not match the table, you can choose any size close in value.
I recommend choosing a size up if you want the garment to fit loosely.
And a smaller size if you prefer fitted garments.

Size indicator/size
42-44 46-48 50-52 54-56
Bust circumference 84-88 92-96 100-104 108-112
Waist circumference 63-67 71-76 80-84 89-94
Hip circumference 92-96 100-104 108-112 116-120
Swatch.
Knitting gauge 15 stitches x 26 rows (10x10 cm).
Since this master class is stitch-based, you need to hit the indicated gauge.
Therefore, pay close attention to the preparatory stage – knitting the swatch.
You may need to knit several swatches before you hit the specified gauge.
So you need to knit a stockinette swatch measuring 15x15 cm.
First and last 4 rows of the swatch are worked in garter stitch, the first and last 3-4 stitches of each row
are worked in knit stitches.
To obtain a swatch of the required size, cast on 27 stitches and knit 40 rows.
Take measurements after washing and blocking, in the center of the swatch – that is where the fabric is least deformed.
If you have a stitch count greater than mine, choose larger needles.
If the stitches per 10 cm are less than mine – choose smaller needles.
Back.
Cast on on needles No. 4.5 (or use the needles with which you hit the gauge) 66/74/78/86 stitches
(43/47/51/55 cm) With a classic cast-on. (The number of stitches includes the selvage stitches).
Knit 2x2 rib for 24+1 rows (12 cm). Then continue in stockinette straight for 60/64/68/72 rows
(29, 31, 32, 33 cm in height respectively). In total, including the rib, there should be 84/88/92/96 rows,
not counting the cast-on edge and the initial rib row – we knitted it so that the knit rows would be odd.
Proceed to knitting the armholes.
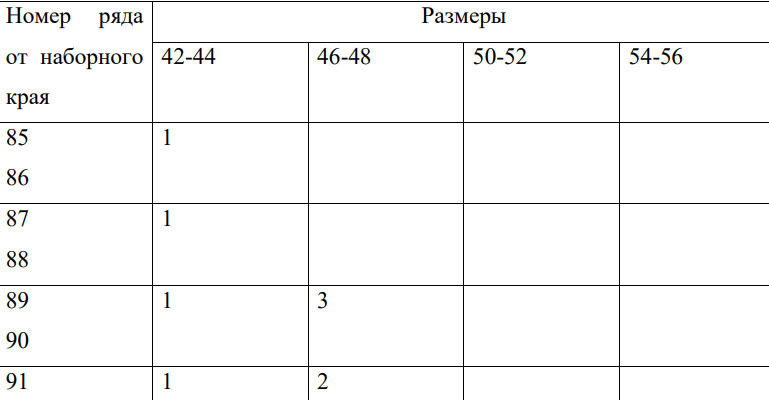
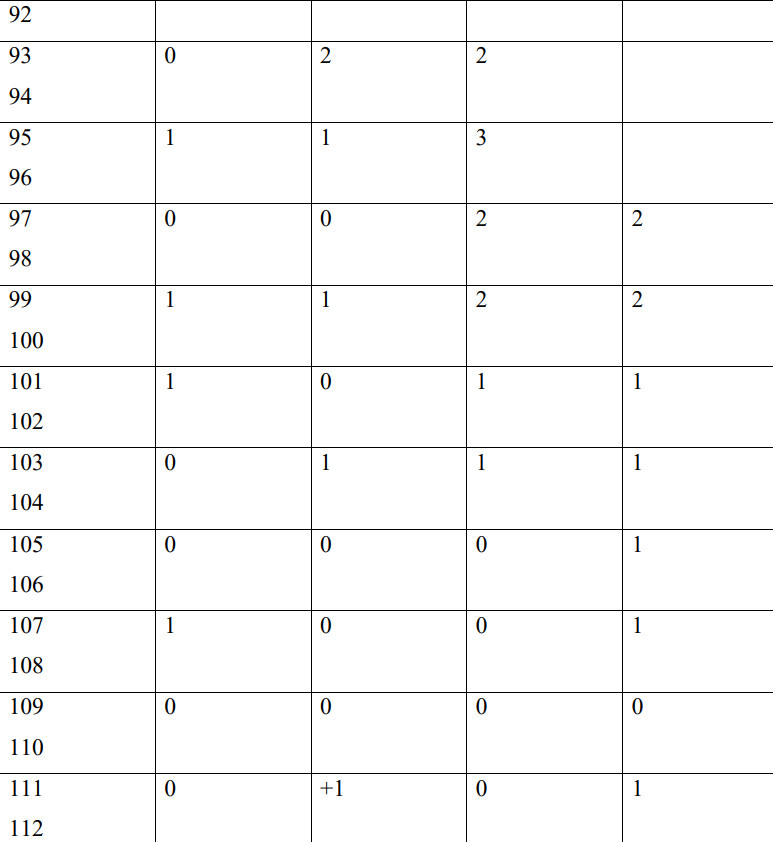
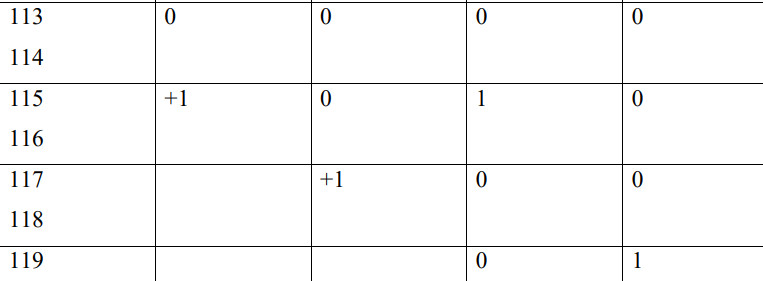
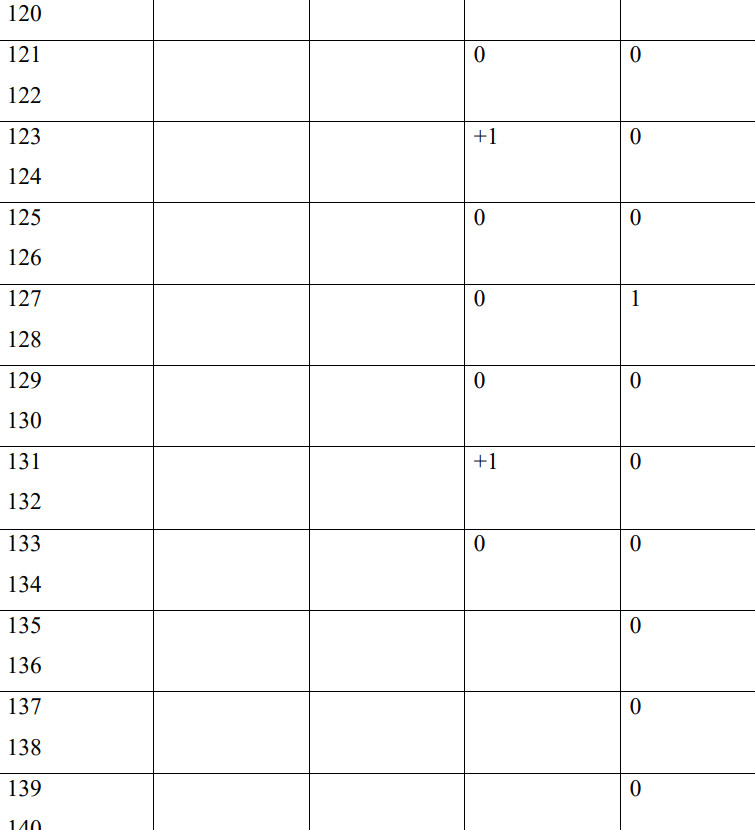
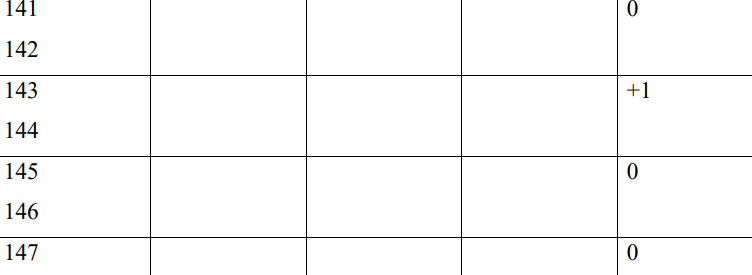
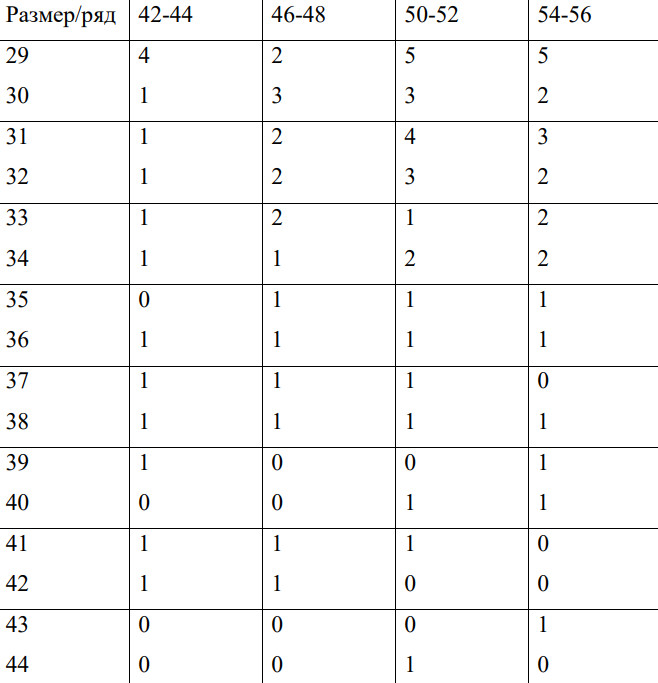
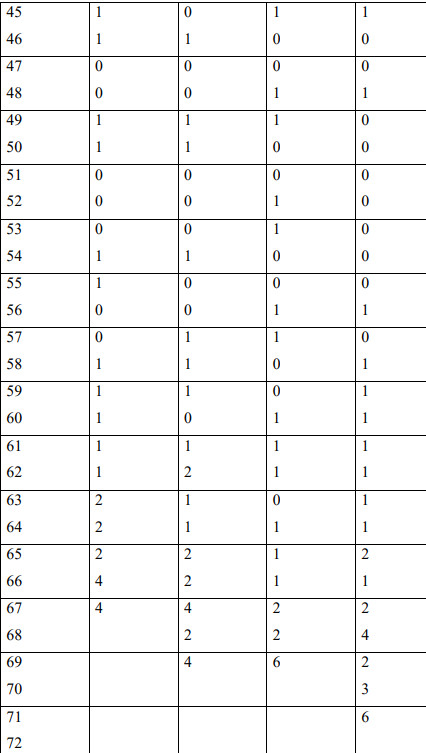
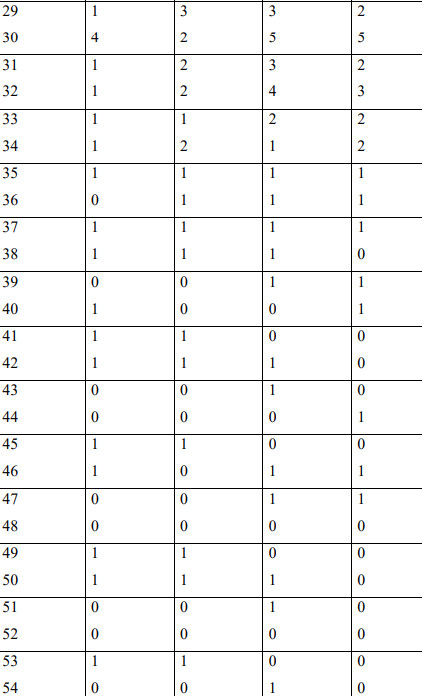
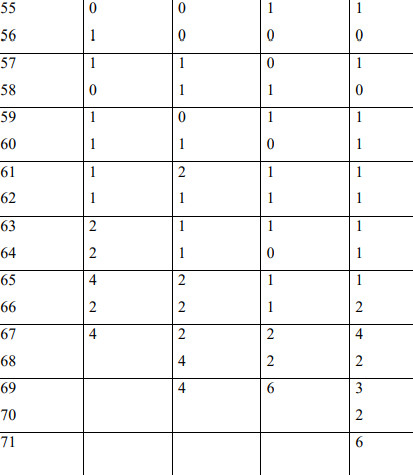
Table of decreases for the armhole. In the cells is the number of stitches that need to be removed in this row.
Attention! Decreases are listed for pairs of rows. This means decreases are made at the beginning of each
row indicated in the left column. For example, in the column it shows 85, 86, and in the cell for your size is indicated
the number 1 – this means you should bind off 1 stitch at the beginning of the 85th row, and 1 stitch at the beginning of the 86th row.
If a plus sign precedes the number, it means you need to increase a stitch.

Divide all the stitches in half. You should have 26/29/29/33 stitches on each needle.
Shoulder shaping and neckline.
First, we knit the right half. The piece is placed with the right side facing up. The working yarn is located
on the right side(on the armhole side).
Row number from the cast-on edge
Sizes

Cut the working yarn and thread it through the last stitch. Tighten the knot.
Moving on to the left half.
Turn the work with the wrong side facing up and attach the yarn on the right (on the armhole side).
Perform decreases following the same scheme as for the right half.
But now the purl stitches will appear on the odd rows.
Front.
Knit the front in the round. First on double-pointed needles, then, when there are more stitches, switch to a circular needle.
onto a circular needle.
Cast on 12 stitches on needles No. 4.5, plus 1 for joining in the round.
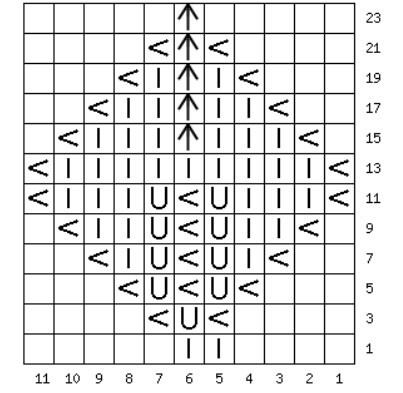
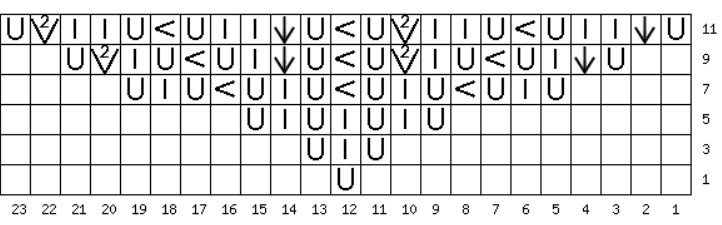
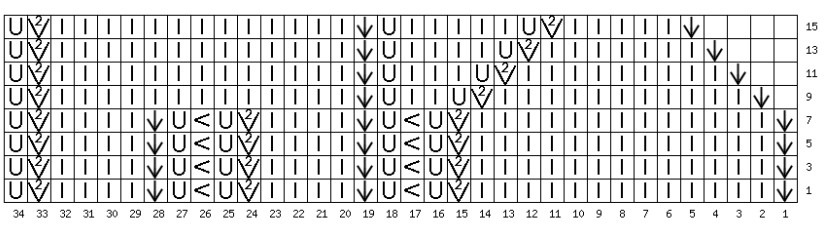
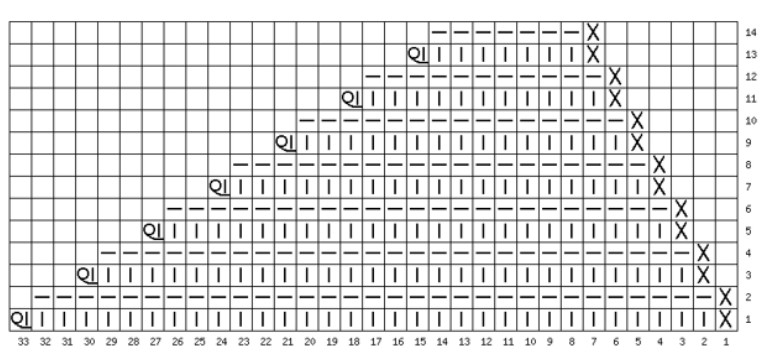
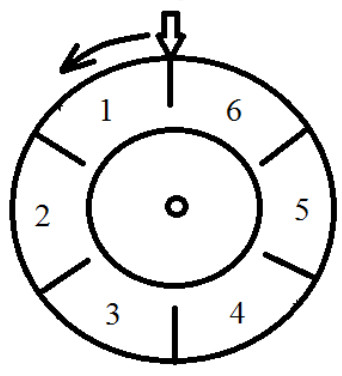
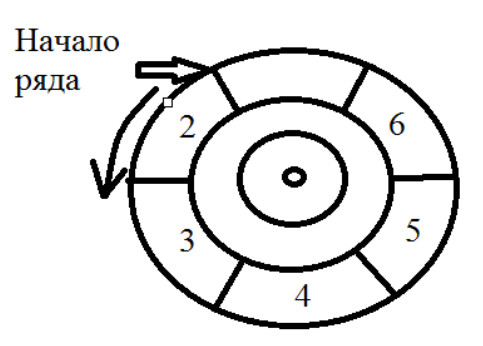
Knit according to Chart 1. The chart shows only one repeat.
Repeat it 6 times.
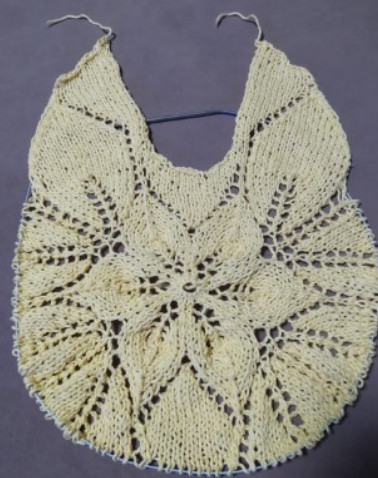
Beginning of knitting.
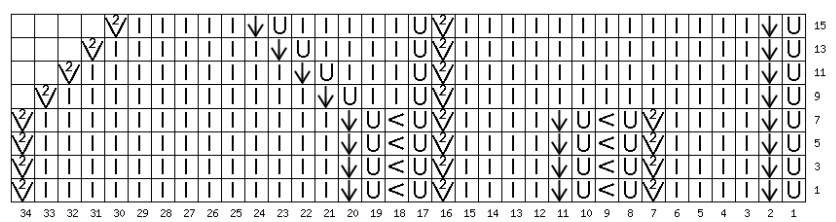
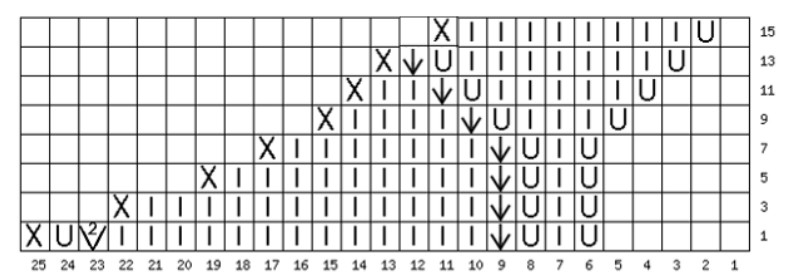
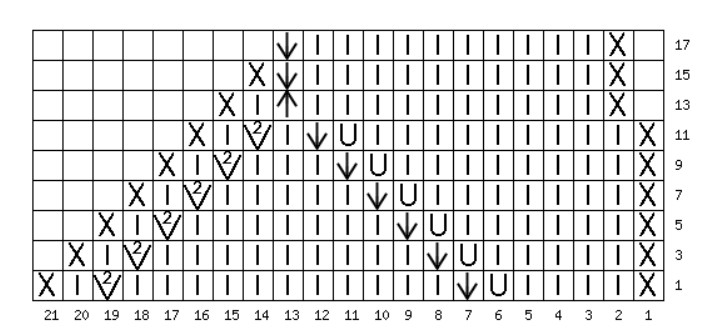
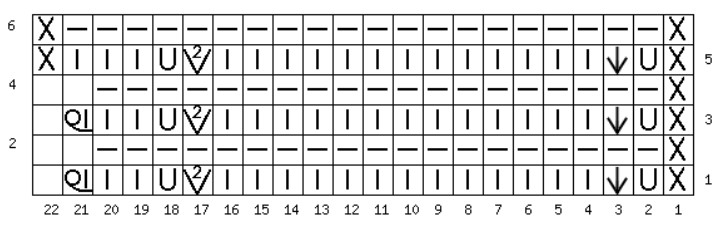
Starting from the 13th row after each repeat of Chart 1, knit a row from Chart 2
or 3 according to the specified order: Chart 2, Chart 3, Chart 3, Chart 2, Chart 3, Chart 3.
Note: empty squares in the charts mean that there is no stitch there. Do not pay attention to them,
knit only the squares where there are markings.
Stage 2. Second half of the central flower.
It looks schematically like this:
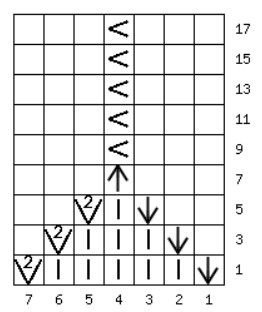
Chart 1

 slip 2 stitches together knitwise, knit the third stitch and pass the slipped stitches over
 лицeвая скрещенная
 лицевая
 накид
накид
 1 протяжка- 1 петлю снять как лицевую, 1 лиц. и протянуть ее через снятую петлю
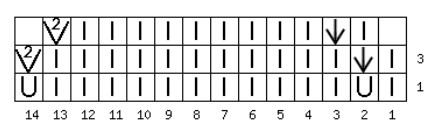
Chart 2
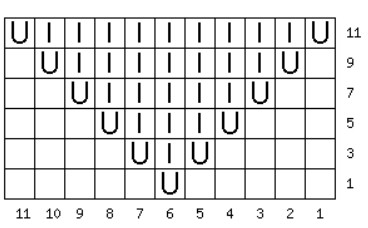
Chart 3

 2 петли провязать вместе
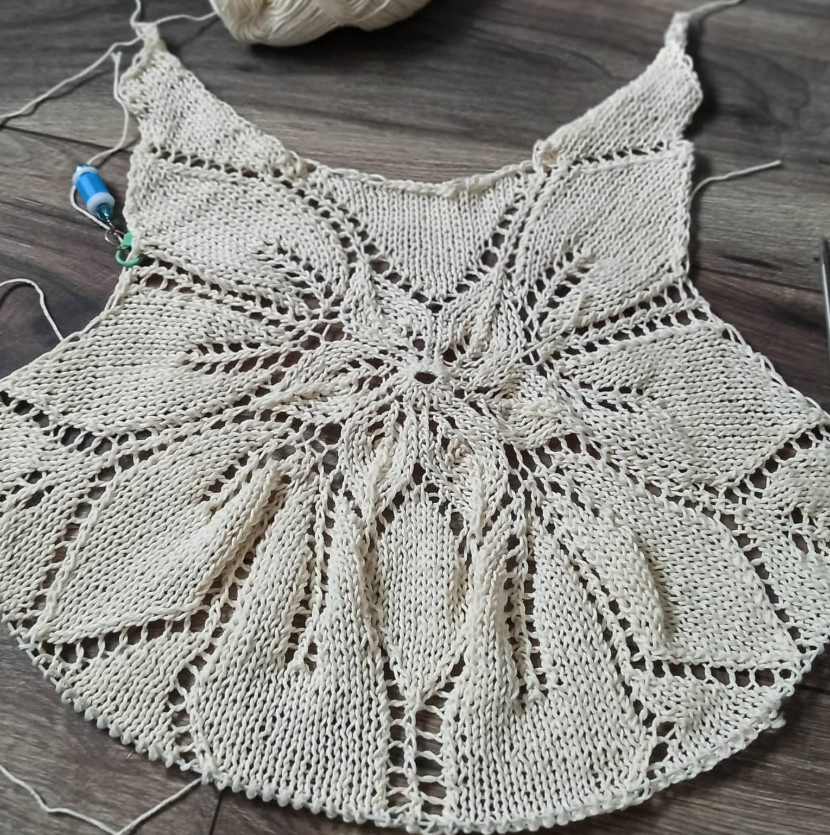
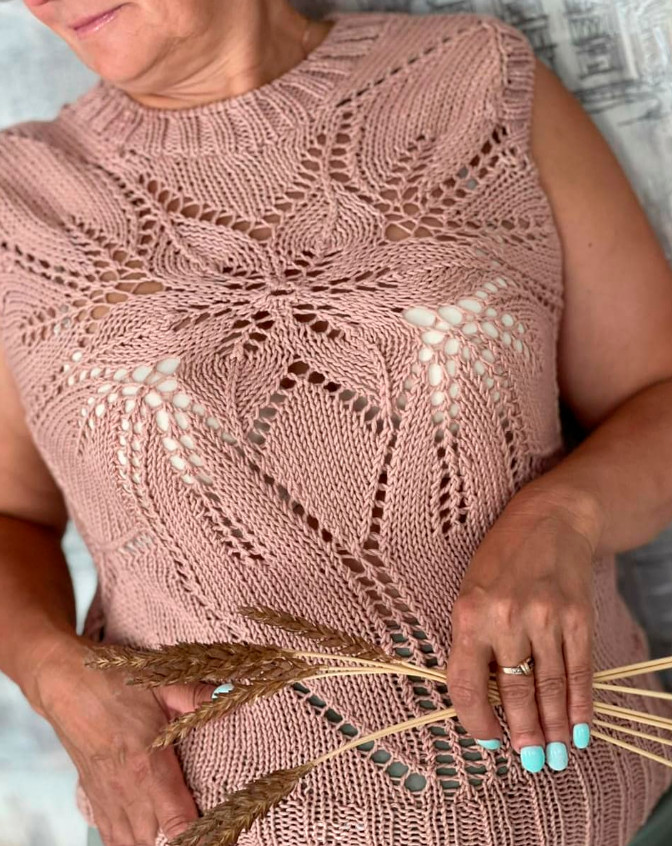
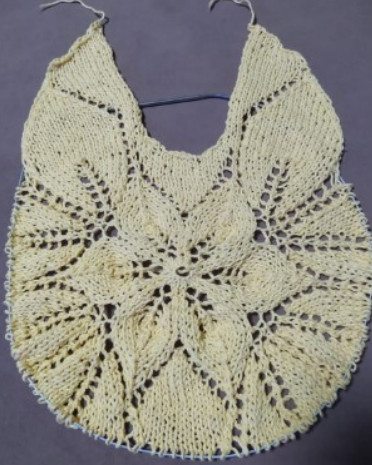
Central flower is finished.
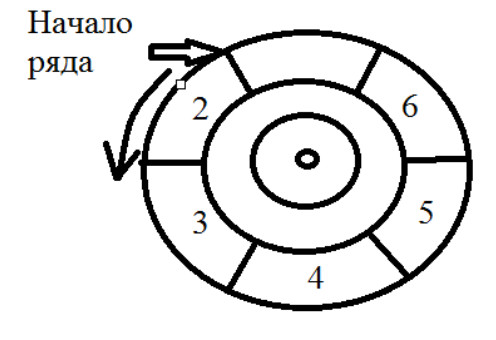
Далее вяжем следующим образом. Для удобства весь рисунок разбит на 6 секторов – 1, 2, 3, 4, 5 и 6.
Schemes are given in sections step by step. In the header of each chart the ordinal numbers are written.
For example, 1, 4 means that you knit this chart at the beginning, then you knit the chart where the numbers 2 and 3 are written
and then return to this chart again. After that you knit charts number 5 and 6.
One chart can have several numbers.
If the numbers are consecutive, for example 2,3, then you knit first chart 1, and then this chart twice in a row.
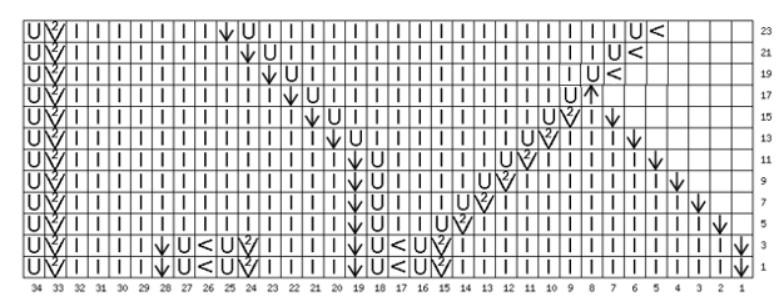
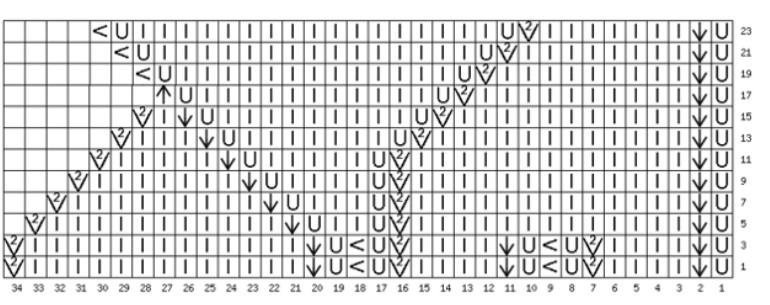
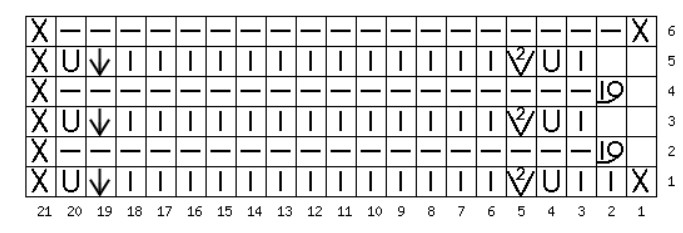
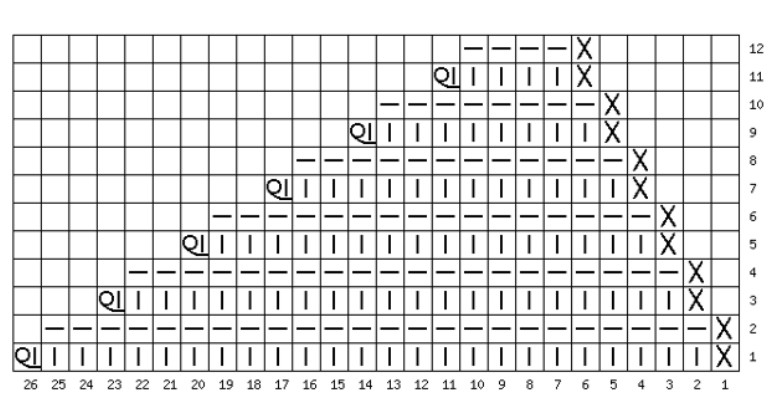
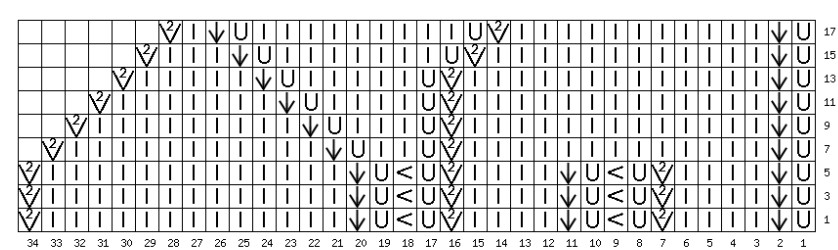
Stage 2. Part 2. The central pattern after the flower.
It looks schematically like this:
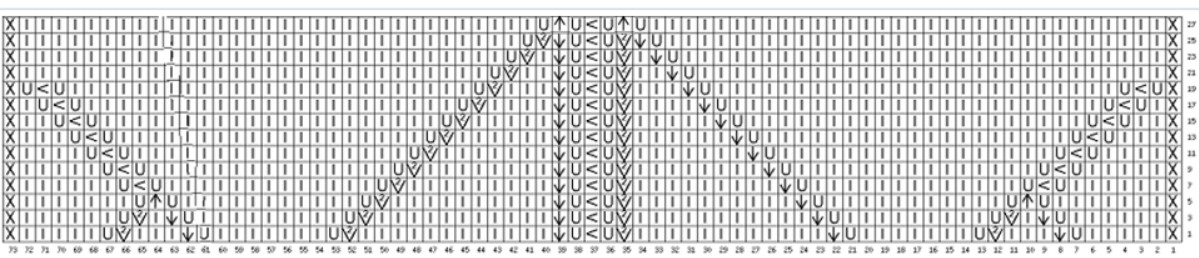
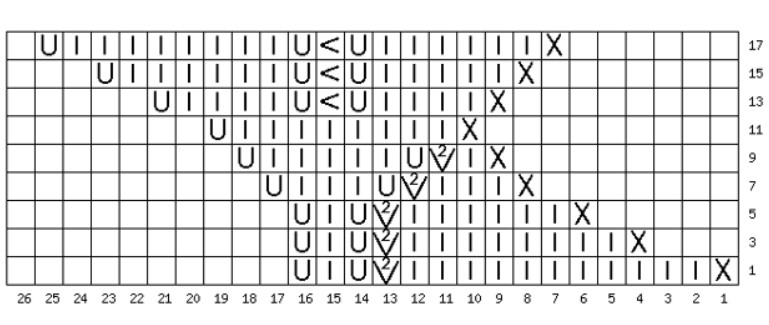
Size 42-44
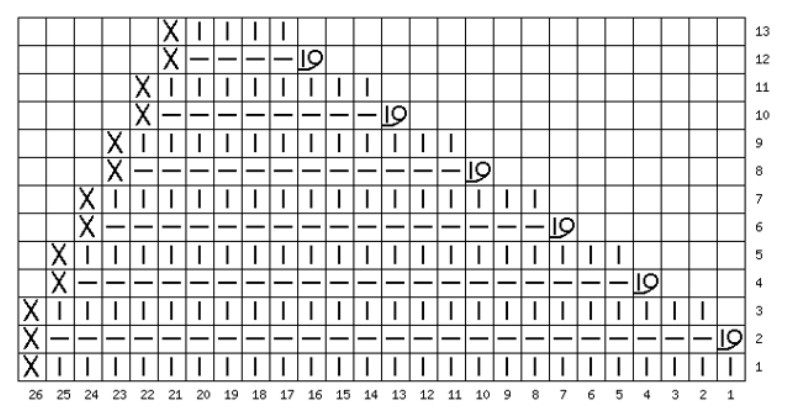
Notes to the charts below:
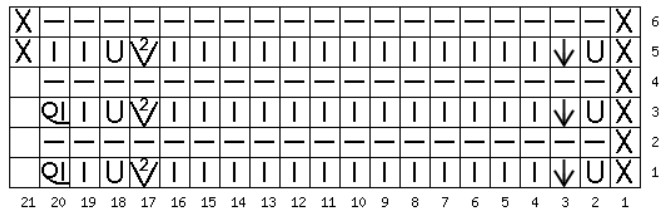
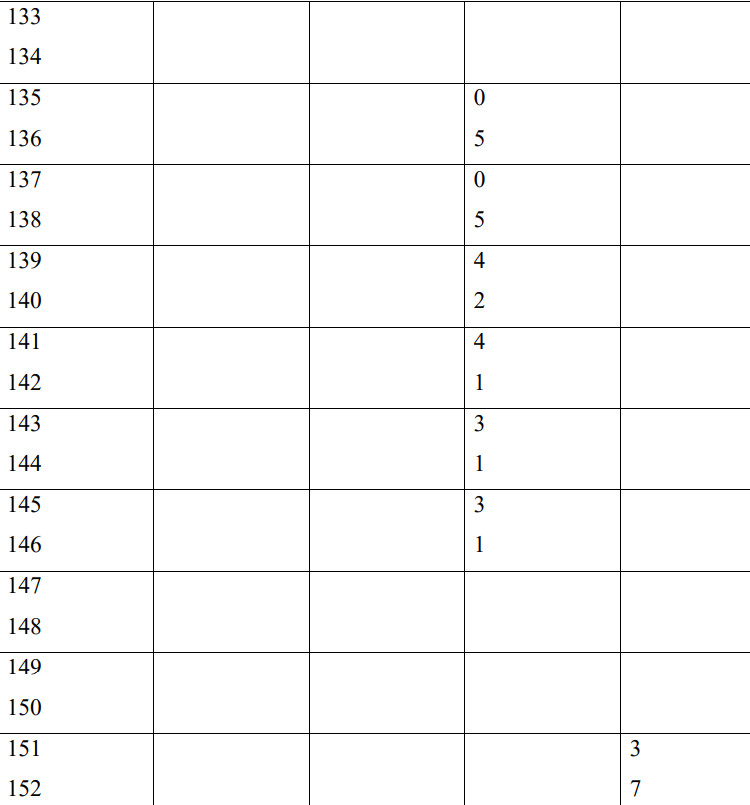
Row 3 – bind off 5 stitches in the center of Chart 1 (the chart marks empties with empty squares.
Row 4 – bind off 3 stitches at the beginning of the row.
Row 5 – bind off 3 stitches at the beginning of the row.
In Chart 4, in the 3rd row, knit the previous knit stitch together with the stitch over the yarn over on the right.
At the end of the chart, also knit the yarn-over stitch together with the central knit stitch.
Accordingly, for Chart 5 we no longer knit the first stitch and begin with a yarn over in the 3rd and subsequent rows.
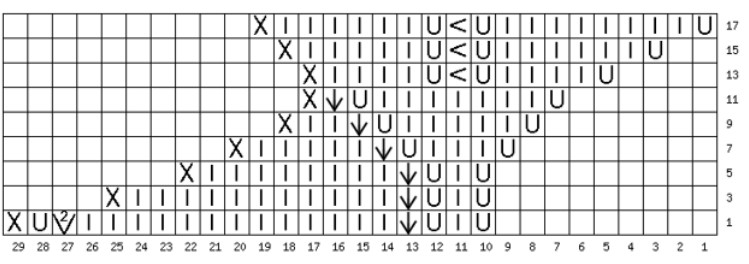
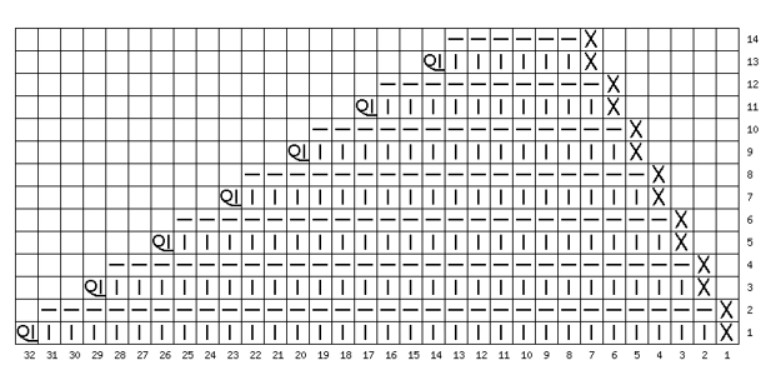
Chart 1.
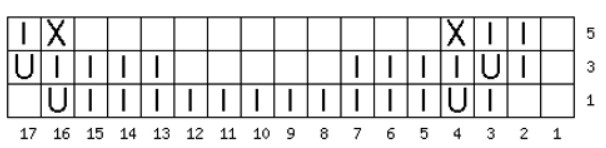
X- selvage
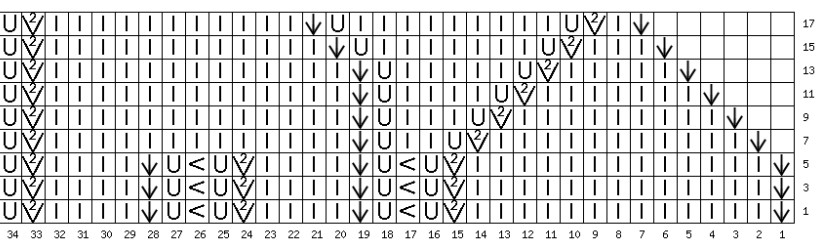
Charts 2, 3, 6.

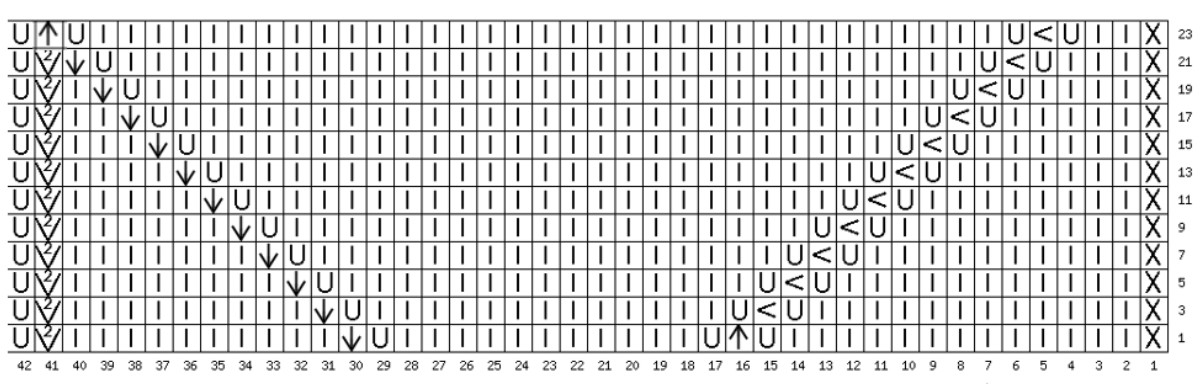
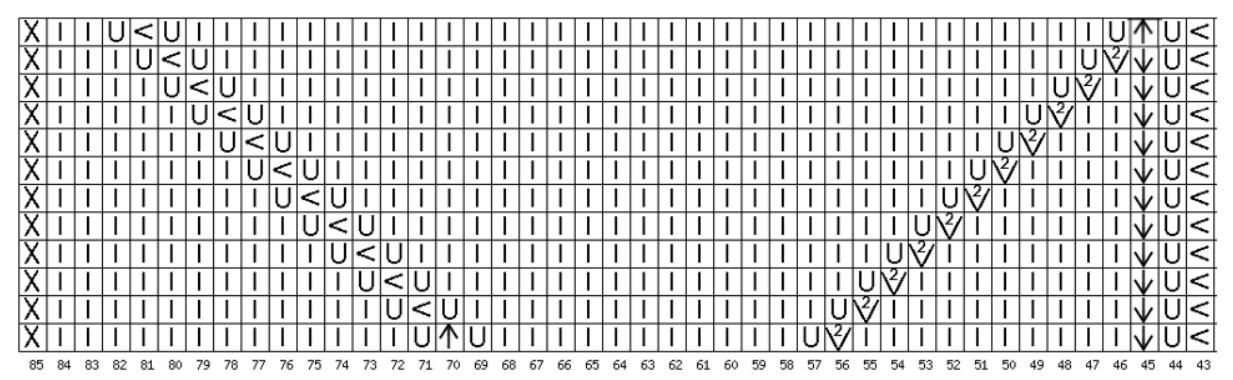
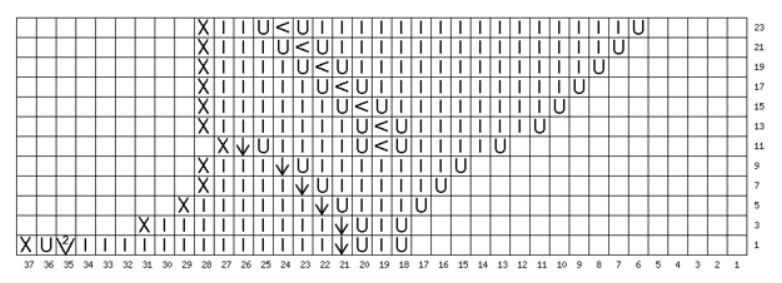
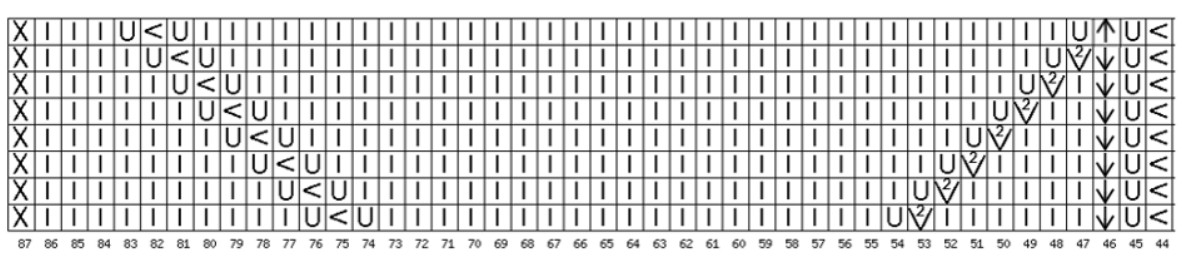
Diagram 5

Diagram 4
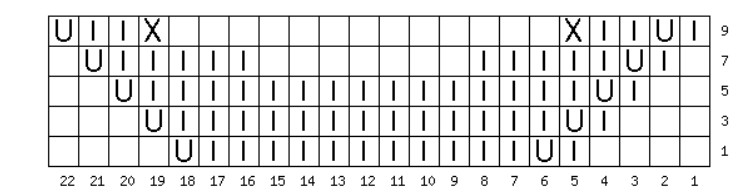
On the left and right of the neckline (the first and last stitches of the row) slip 20 stitches each.
On the left side, to the left of the stitches (to the left, respectively, on the right – between the slipped stitches and the remaining
stitches) pick up one additional stitch from the running thread. Next, we will knit them
separately according to the diagrams shown below.
Pick up one additional stitch.
Next, we will knit them separately according to the diagrams shown below.
The division runs through the center of Diagram 2. The stitch over the yarn over is attributed to the shoulder stitches,
and the central stitch to the stitches of the lower part.

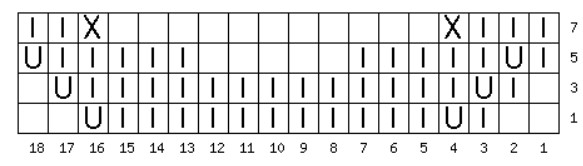
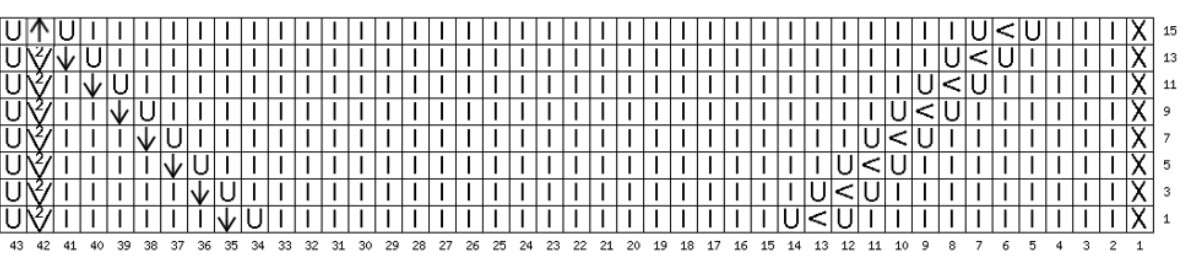
The first 6 rows are short rows. Knit according to the diagram below. Step 3. Work the shoulder.
Left half (to your left when the piece lies with the right side facing you).
Short rows (note – the start of the row is where its number is written),
the turning stitch is shown as a needle with a circle:
Executing turning stitches in short rows.
Turning stitches in short rows.
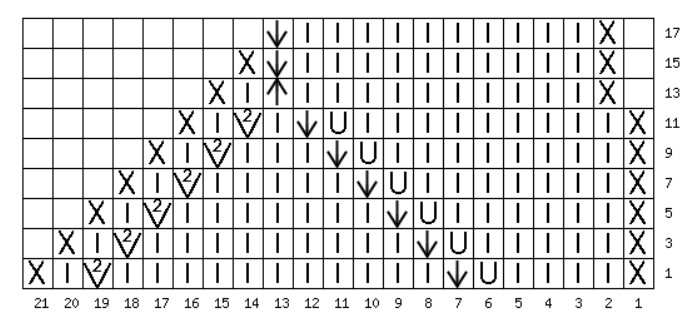
In the 6th row, knit to the end, incorporating the turning stitches. Next, knit according to the diagram:

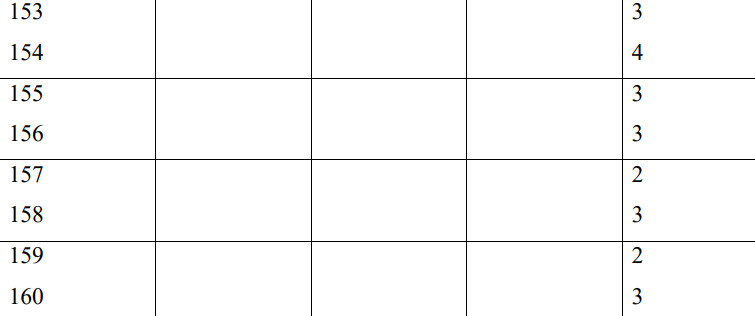
Then all stitches except the edge stitches are knitted in stockinette stitch. In rows 16, 18 and 20, bind off 4 stitches each,
forming the shoulder slope. Cut the working thread and pull through the remaining stitch. Tighten.
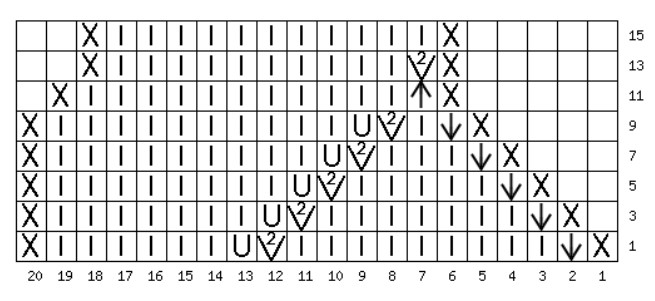
Right half (to your right, piece with right side facing up). Turn the piece so that the right side faces you
and secure the working thread on the right, near the armhole. We knit short rows according to the diagram:

We knit turning stitches in the 5th row. Next, we knit according to the diagram:

Then all stitches except the edge stitches are knitted in stockinette stitch.
In the 17th, 19th, and 21st rows, bind off 4 stitches each, forming the shoulder slope. Cut the working thread and pull
through the remaining stitch. Tighten.
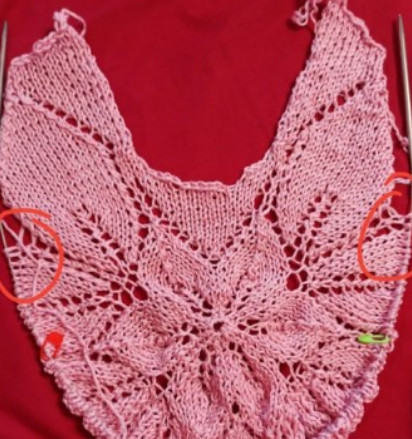
Here is what you should have:
We move on to knitting the lower half of the front.
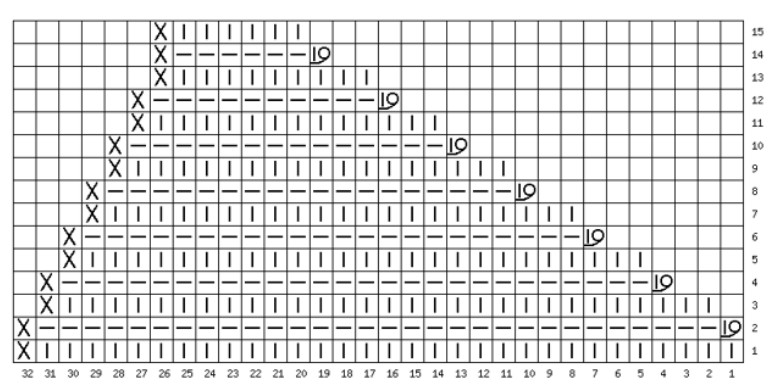
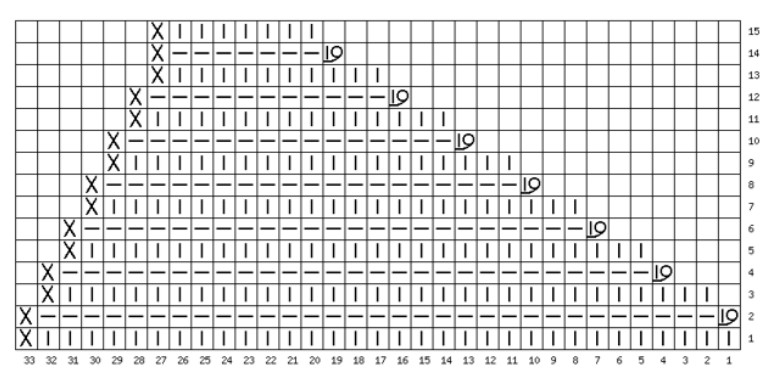
Stage 4. Armhole.
We knit with turning rows. From Diagram 1 there are no stitches left — we knitted the upper part from them.
Therefore, we only knit diagrams 2, 3, 4, 5 and 6.

Notes for the diagrams:
Row 1. Bind off 3 stitches at the beginning of the row.
Row 2. Bind off 3 stitches at the beginning of the row.
Row 3. Bind off 3 stitches at the beginning of the row.
Row 4. Bind off 3 stitches at the beginning of the row.
Row 5. Bind off 2 stitches at the beginning of the row.
Row 6. Bind off 2 stitches at the beginning of the row.
Row 7. Bind off 2 stitches at the beginning of the row.
Row 8. Bind off 2 stitches at the beginning of the row.
Row 9. Bind off 1 stitch at the beginning of the row.
Row 10. Bind off 1 stitch at the beginning of the row.
Row 11. Bind off 1 stitch at the beginning of the row.
Row 12. Bind off 1 stitch at the beginning of the row.
Row 13. Bind off 1 stitch at the beginning of the row.
Row 14. Bind off 1 stitch at the beginning of the row.
Row 15. Bind off 1 stitch at the beginning of the row.
Row 16. Bind off 1 stitch at the beginning of the row.
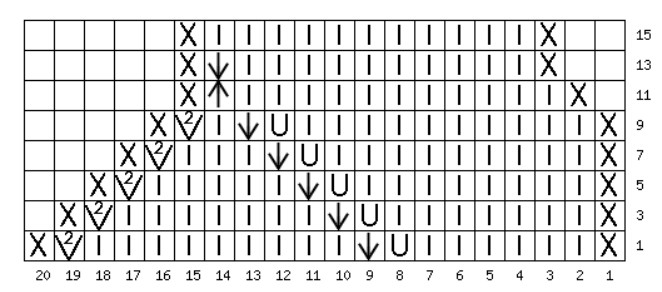
Diagram 2
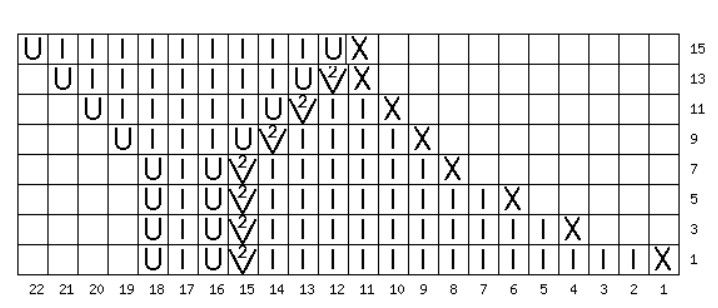
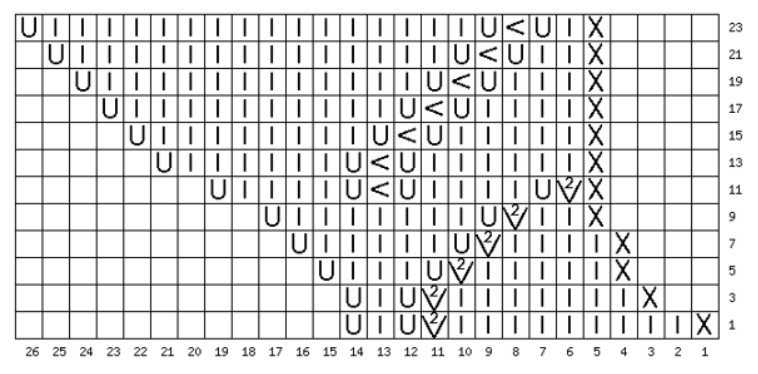
Diagram 3

Diagram 4
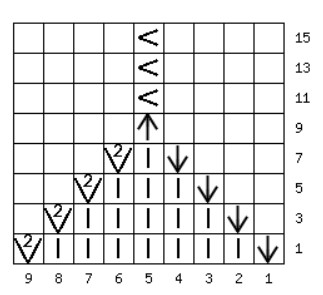
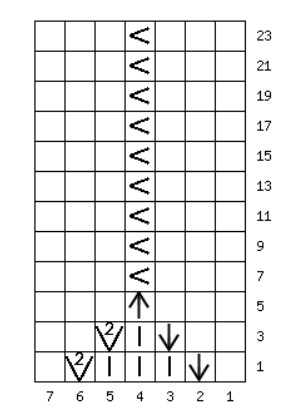
Diagram 5

Diagram 6

Armhole completed. Move on to the side seams.
Step 5. Side seams.
Notes for the diagrams:
Row 1. Bind off 5 stitches at the beginning of the row.
Row 2. Bind off 6 stitches at the beginning of the row.
Beginning from the 6th to the 19th row, at the beginning of each row, bind off 2 stitches.

Mark the central 21 stitches with markers. To the right and left of the markers you should have 26 stitches remaining on each side. Then, knit the knit rows in stockinette, purl rows in purl. From the side seam, bind off 1 stitch in each row. We knit turning short rows.
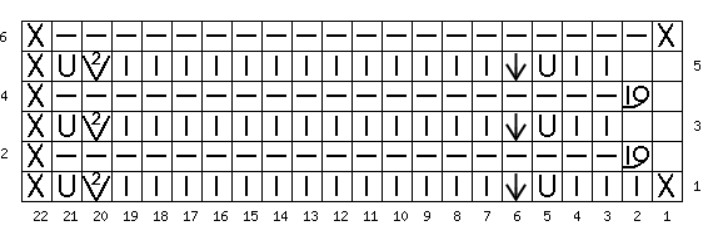
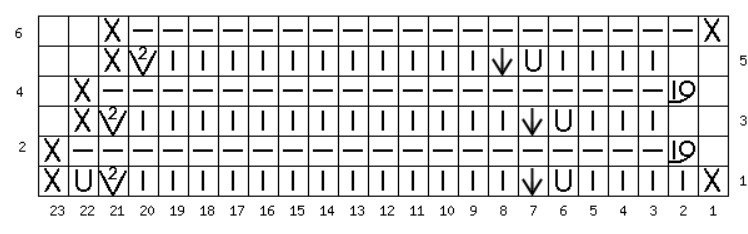
Diagram 1.
Note. Odd rows are read from right to left, Even rows
are read from left to right.
Row 13 is knitted in full, knitting all turning stitches.
We stop at the opposite side edge and begin to work the same short rows, but in purl rows.
(in the diagram row 13 of diagram 1 = row 1 of diagram 2, basically one is the continuation of the other).
Diagram 2

Note. Odd rows are read from right to left, Even rows
are read from left to right.
Row 14 after diagram 2 is knitted completely up to the opposite side edge,
knitting all turning stitches.
There are 63 stitches on the needles.
We begin knitting the 2x2 rib. Start with 2 purls. 31st and 32nd stitches
knit together.
Knit the 2x2 rib for 24 rows. In the 25th row, bind off all stitches.
The front piece is ready.
Size 46-48
Row №5 – bind off 5 stitches in the center of Diagram #1 (marked on the diagram with empty squares).
Row №6 – bind off 3 stitches at the beginning of the row.
Row №7 – bind off 3 stitches at the beginning of the row.
Diagram 1

Diagram 2, 6

Diagram 3

Diagram 4
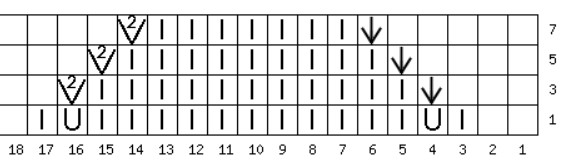
Diagram 5

On both sides of the neckline (the first and last stitches of the row) slip 21 stitches each. From the left side, to the left of the stitches (to the right, correspondingly on the right – between the slipped stitches and the remaining stitches) pick up one additional stitch from the chain. Next, we will work them separately according to the diagrams drawn below.
The split runs through the center of Diagram 2. The loop over the yarn over is assigned to the shoulder stitches, and the central stitch to the stitches of the lower part
The first 6 rows are short.
Step 3. Knitting the shoulder
Left half (to your left when the piece lies with the right side facing you).
Short rows (note - the start of the row is where its number is written), the turning stitch is shown by a needle with a circle:

In the 6th row, knit to the end, working the turning stitches.
Working the turning stitches in the short rows.
Next, we knit according to the chart:
Next, all stitches except the edge stitches are knitted in stockinette stitch.
In the 18th, 20th and 22nd rows, bind off 4 stitches each to form the shoulder slope.
Cut the working thread and thread it through the remaining stitch.
Tighten.

Dale, all stitches except edge stitches are knitted in stockinette stitch.
In the 18th, 20th and 22nd rows, bind off 4 stitches to form the shoulder slope.
Cut the working thread and thread it through the remaining stitch.
Tighten.
Right half (to the right of you, the piece with the right side facing up).
Turn the piece so the right side faces you and secure the working yarn on the right, from the armhole side.
Knit the short rows according to the chart:
Turn stitches are knitted in the 5th row.
Next, we knit according to the chart:

Dale, all stitches except the edge stitches are knitted in stockinette stitch.
In the 19th, 21st and 23rd rows, bind off 4 stitches to form the shoulder slope.
Cut the working thread and thread it through the remaining stitch.
Tighten.
Page 37
This is what you should get:
We move on to knitting the lower half of the front.
We knit using turning short rows. There are no stitches left from pattern 1 – from them
we knitted the upper part. Therefore, we knit only patterns 2, 3, 4, 5 and 6.
Notes for the patterns:
Row 1. Bind off 4 stitches at the beginning of the row
Row 2. Bind off 4 stitches at the beginning of the row
Row 3. Bind off 3 stitches at the beginning of the row
Row 4. Bind off 3 stitches at the beginning of the row
Row 5. Bind off 2 stitches at the beginning of the row
Row 6. Bind off 2 stitches at the beginning of the row
Row 7. Bind off 2 stitches at the beginning of the row
Row 8. Bind off 2 stitches at the beginning of the row
Row 9. Bind off 1 stitch at the beginning of the row
Row 10. Bind off 1 stitch at the beginning of the row
Row 11. Bind off 1 stitch at the beginning of the row
Row 12. Bind off 1 stitch at the beginning of the row
Pattern 2

Pattern 3

Pattern 4
Pattern 5
Pattern 6
The armhole is finished. Move on to the side seams.
Notes for the pattern steps:
Row 1. Bind off 5 stitches at the beginning of the row.
Row 2. Bind off 5 stitches at the beginning of the row.
Beginning with the 3rd and through the 23rd row, bind off 2 stitches at the beginning of each row.
Stage 5. Side seams.

(Continuation of the patterns)

Stage 6. Corners.
Mark the central 21 stitches with markers.
To the right and left of the markers you should have 32 stitches remaining.
Next, knit the knit stitches as knits, purl as purls.
On the side seam, bind off 1 stitch in each row.
Knit using short turning rows.
Pattern 1.
Note. Odd rows are read from right to left, Even rows
are read from left to right.
Row 15 is knitted in full, binding off all turning stitches.
Stop at the opposite side seam and begin to perform
the same short turning rows, but in the purl rows.
(on the chart, row 15 of pattern 1 equals row 1 of pattern 2; essentially one is
a continuation of the other).
Pattern 2

Note. Odd rows are read from right to left, Even rows
are read from left to right.
Row 16 after pattern 2 is knitted in full up to the opposite side seam,
binding off all turning stitches.
There are 73 stitches on the needles.
Begin knitting the 2x2 rib. Start with 2 purl stitches. Between the 36th and 37th
stitches, pick up one extra stitch from the strand.
Knit the 2x2 rib for 24 rows. In the 25th row, bind off all stitches.
The front piece is complete.
Size 50-52
Row #7 – bind off 7 stitches in the center of Diagram 1 (the diagram is marked with empty squares).
Row #8 – bind off 3 stitches at the beginning of the row.
Row #9 – bind off 3 stitches at the beginning of the row.
Diagram 1

Diagram 2, 6

Diagram 3

On the left and right sides of the neckline (the first and last stitches of the row) slip off 22 stitches each. On the left side, to the left of the stitches (to the right, respectively, on the right – between the slipped stitches and the remaining stitches) from the long tail, pick up one additional stitch. Next we will work them separately according to the diagrams drawn below.

The split runs through the center of Diagram 2. The stitch over the yarn over is attributed to the shoulder stitches, and the central stitch to the stitches of the lower part. The first 6 rows are short rows. Knit according to the diagram below.
Stage 3. Knitting the shoulder
Left half (to your left when the piece lies with the right side facing you).
Executing turning stitches in short rows.
Short rows (note - the start of the row is where its number is written), the turning stitch is shown as a stitch with a circle:

In the 6th row, knit to the end, working the turning stitches.
Then knit according to the diagram:
Then all stitches except the edge stitches are knitted in stockinette stitch.
In the 16th row, bind off 4 stitches; in the 18th, 20th and 22nd rows, bind off 3 stitches each, forming the shoulder slope.
Cut the working yarn and pull through the remaining stitch.
Tighten.
Right half (to your right, the piece with the right side facing up).
Turn the piece so that the right side faces you and secure the working yarn on the right, on the side of the armhole.
Knit short rows according to the diagram:

Turning stitches are worked in the 5th row.
Then knit according to the diagram:

Then all stitches except the edge stitches are knitted in stockinette stitch.
In the 17th row, bind off 4 stitches; in the 19th, 21st and 23rd rows, bind off 3 stitches each,
forming the shoulder slope.
Cut the working yarn and pull through the remaining stitch.
Tighten.
Scheme 3

Scheme 4
Scheme 5

Scheme 6

Armhole finished. Moving on to side seams.
Stage 5. Side seams.
Notes for the schemes:
Row 0. Bind off 12 stitches at the beginning of the row.
Row 1. Bind off 11 stitches at the beginning of the row.
Beginning from 2 and through 15 rows, at the beginning of each row, bind off 2 stitches.
Continuation of Scheme

Mark the central 21 stitches with markers.
To the right and left of the markers you should have 33 stitches remaining.
Then knit the front rows in knit stitches, the purl rows in purl stitches.
From the side seam, decrease 1 stitch in each row.
We knit using turning short rows.
Scheme 1.
Note: Odd rows are read from right to left; even rows are read from left to right.

Row 15 is knitted in full, knitting all turning stitches.
Stop at the opposite side seam and begin to perform
the same short rows, but in the purl rows.
(in the diagram row 15 of Scheme 1 equals row 1 of Scheme 2; essentially one is the continuation of the other).
Scheme 2
Note: Odd rows are read from right to left, even rows are read from left to right.
Row 16 after Scheme 2 is knitted completely up to the opposite side seam, knitting all turning stitches.
75 stitches on the needles.
Start knitting the 2x2 rib. Start with 2 purls.
36 and 37 stitches knit together.
Knit the 2x2 rib for 24 rows. On the 25th row bind off all stitches.
The front piece is ready.
Sleeves.
Note.
If you are knitting without sleeves, proceed directly to Blocking.
Cast on 40+1 / 44+1 / 48+1 / 52+1 stitches (1 stitch for joining in the round). Join in the round and knit 2x2 rib for 12 rows (4 cm).
After this, switch to stockinette stitch and knit 16 rows (6 cm).
Proceed to shaping the sleeve cap. Then knit using turning rows.
Right sleeve.
Left sleeve
Sleeves completed.
Hide all ends and perform Blocking of the details.
BLOCKING
After finishing, lay all pieces on a flat, hard surface.
Even out the side seams – they should be the same on the front and back. Also check their length in centimeters.
Make sure the width of the pieces is correct – measure with a tape and compare with the description.
Even out the bottom edge of the garments.
For the back and front, raise the bottom corners by 1 cm.
This is to prevent sagging side seams.
Give smooth lines to the armholes, sleeve caps, and necklines.
Fix all pieces with pins and leave to dry completely.
Neckline
Pick up stitches along the edge of the neckline and knit with needles one size smaller than those used for the jumper. For example, if the density matches with 4.5 mm needles, knit the ribbing with 3.5 mm needles.
The number of stitches must be a multiple of 4.
Then knit 6 rows of 2x2 rib.
Switch to needles 0.5 size smaller and knit the remaining 6 rows. Bind off, weave in the ends.
Armhole edging for a sleeveless top
After assembling the garment and the neckline, proceed to edging the sleeves.
Starting from the side seam, pick up stitches all around the armhole.
Pick up stitches from each edge stitch. The number of stitches must be a multiple of 4.
Next, take needles one size smaller than the ones you used before for the back and front, and knit 4 rows of 2x2 rib.
After that, switch to needles 0.5 size smaller and knit another 4 rows.
Bind off. Steam the side, shoulder seams, and the set-in sleeve seams. Let the garment cool completely.