Elegant jacket with lace trim
Added: 24.02.2014 в 05:43 Views: 225936
Elegant jacket with lace trimKlubokhttp://klubok.work/2/41/4520/Klubokhttps://klubok.work/css/image/top-logo-en.png
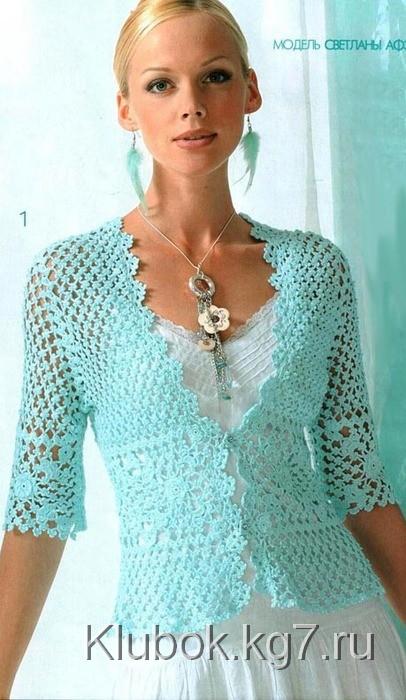
This jacket with lace detailing is knitted with several alternating patterns, and the delicate blue color and viscose yarn make its patterns even more striking.

Size: 46
You will need: 300 g of cotton with viscose (cotton 47%, viscose 53%, 400 m/100 g) in blue, hook No. 1.5, 6 buttons, needle.
Work description: Make a pattern of the jacket parts in full size, adjusting it to your size.
Using the diagram, knit a sample of the motif, measure it and check it against the size indicated in the picture. The flower at the base of the square should be knitted with a thinner yarn (otherwise the fabric will be too coarse), for which the main yarn should be divided into two parts. The edging of the central element is done with chains of 5 air stitches. The trefoil is made of a triple secured "picot," each "picot" consists of 5 air stitches (diagram a). The "crown" is knitted completely in the 2nd row of the edging.
Knit 7 squares according to the pattern, connecting them together during the last row. Then edge the decorative strip with a ribbon according to diagram b, attaching it to the "picot" of each square, as shown in diagram c.
Fill the resulting gaps between the adjacent motifs with flowers according to diagram d, made with a thinner yarn. Steam the decorative strip, lay it against the pattern and divide it into segments for the front and back pieces.
Knit the back with a background mesh and trefoils according to diagram e, securing it on the ribbon. After 10 cm, make decreases for the armholes, and after 7 cm for the neckline, regularly laying the fabric against the pattern during work. Then make the front pieces, shaping the outlines of the neckline and armholes according to the pattern and connecting the pieces in the process of knitting with the back.
Steam the finished fabric and connect the front pieces and back along the shoulder line using the ribbon at the "picot" (diagram f). The next step is to make the bottom of the jacket. For this, knit the background mesh down from the decorative strip. To achieve an expansion of the fabric, increase the number of air stitches (instead of 5 air stitches, knit 6 air stitches).
Determine the length of the jacket by trying it on. Complete the last row according to diagram g. For each sleeve, knit 2 motifs according to the pattern, connecting them together when knitting the last row. Then edge one side with ribbon (diagram b). Continue working with the background mesh according to diagram e, shaping the side slopes and cap lines while regularly laying the fabric against the pattern. When the sleeves are ready, attach them first along the armholes using the ribbon at the "picot," and then, using the same ribbon, along the side seams. Fill the resulting gaps between the adjacent motifs with flowers according to diagram d, made with a thinner yarn.
The next step is to knit the placket along the neckline and the edges of the front pieces according to diagram h. Sew buttons onto the left front piece. Use the lace holes of the lace placket as buttonholes.