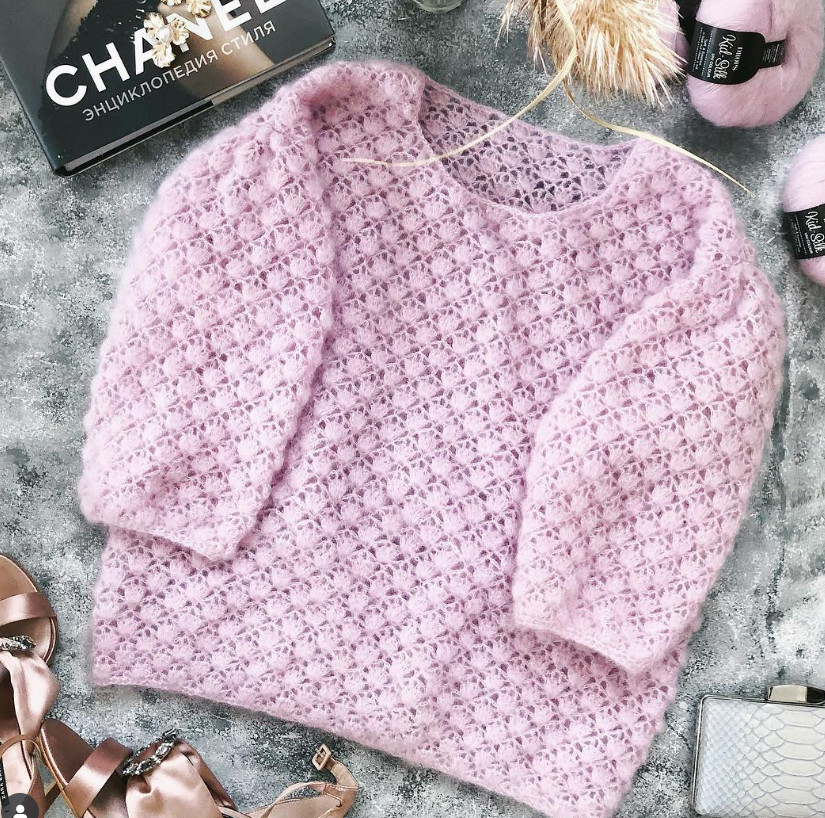
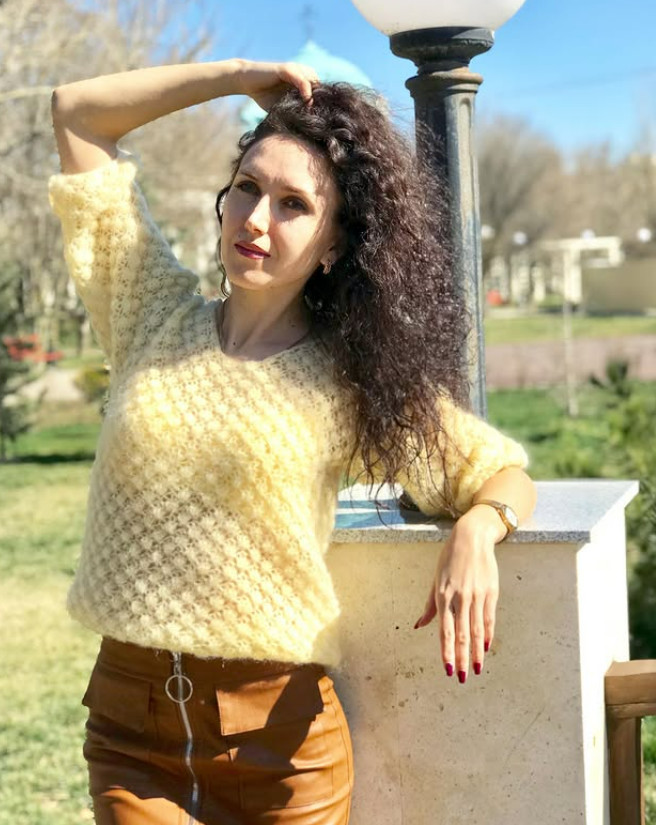
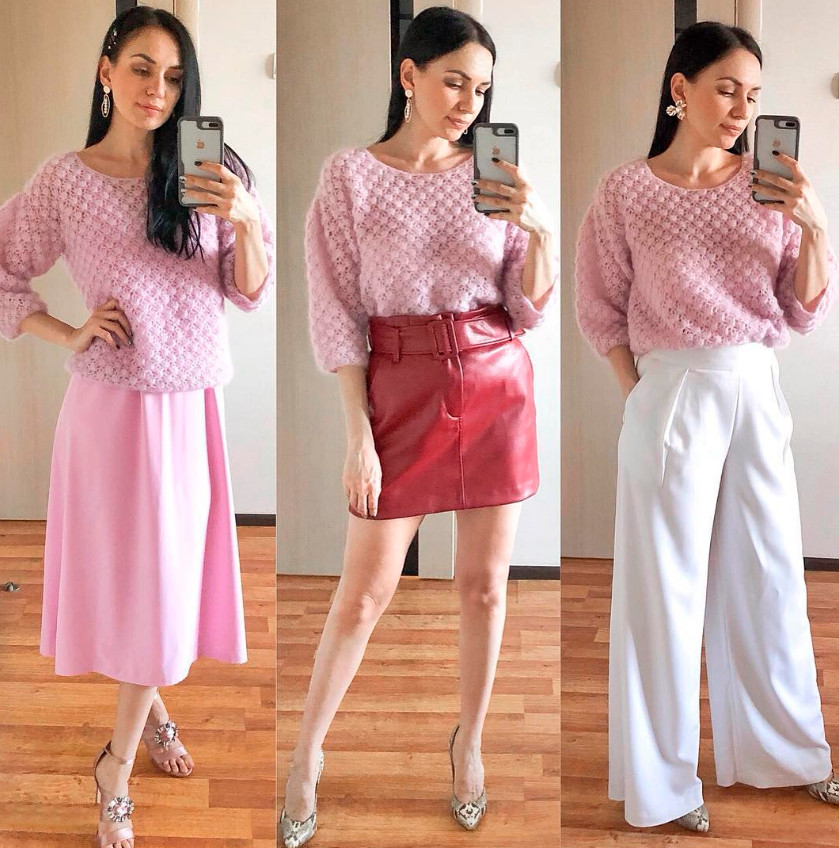
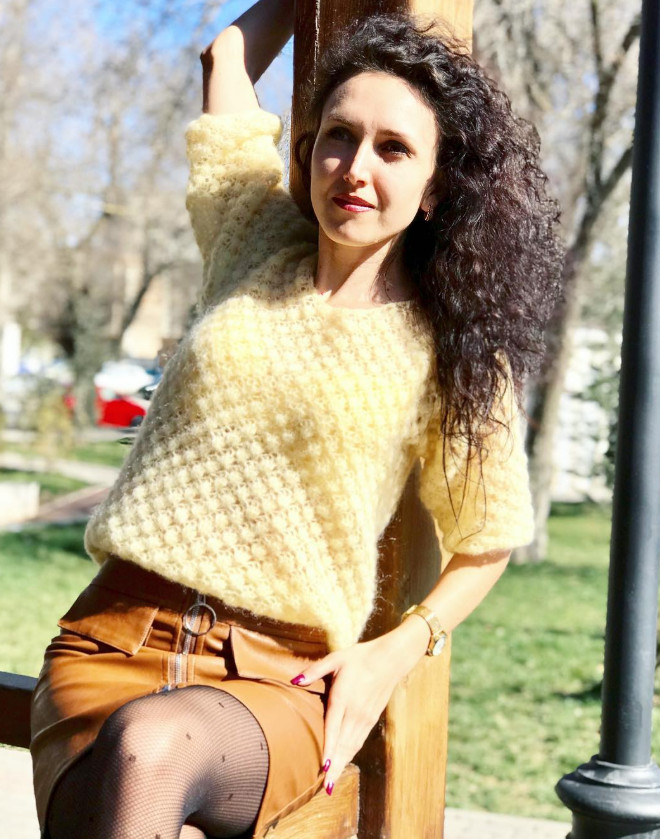
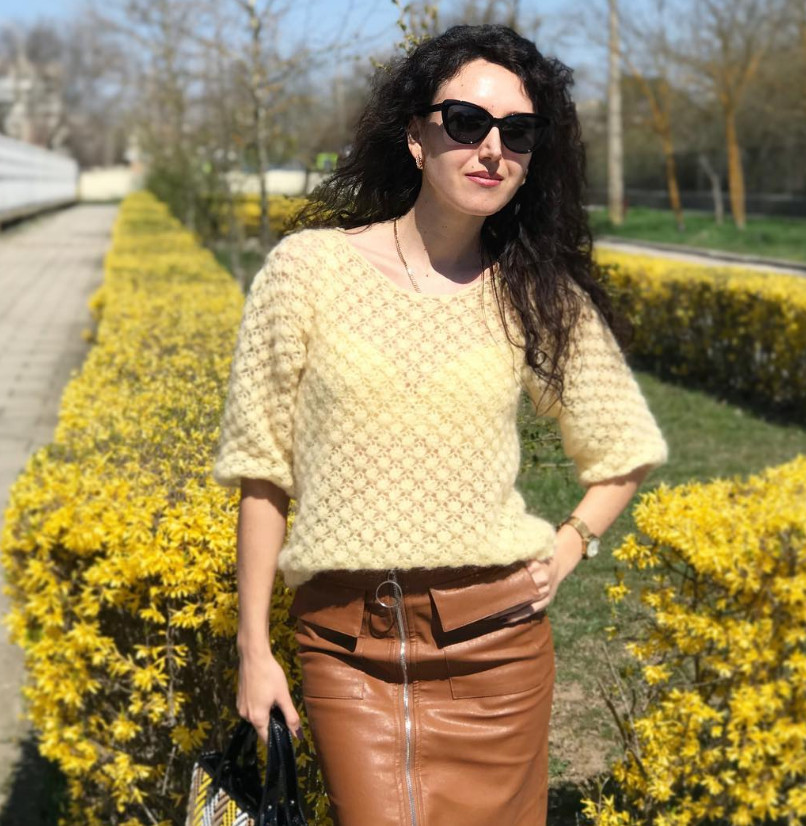
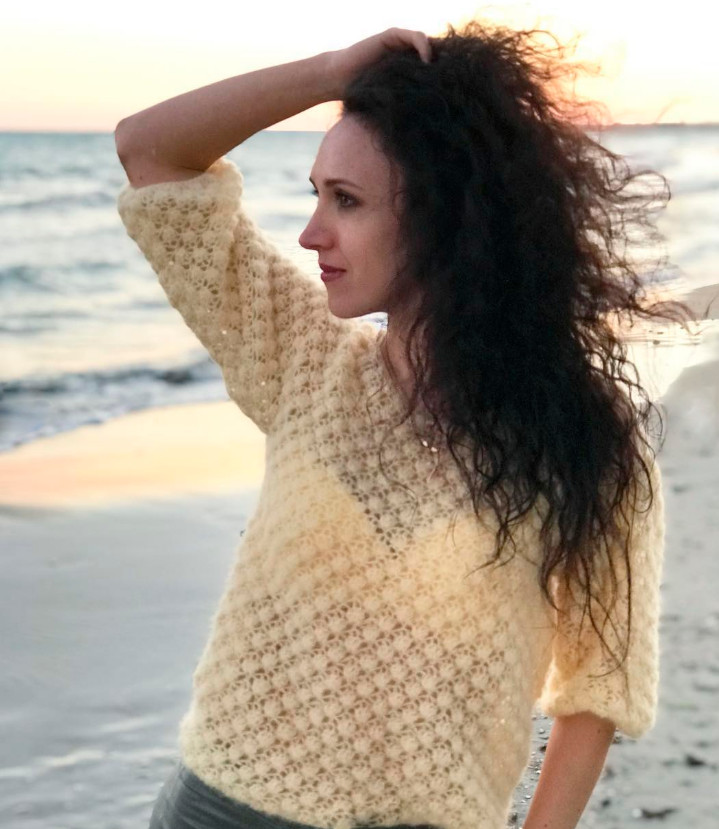
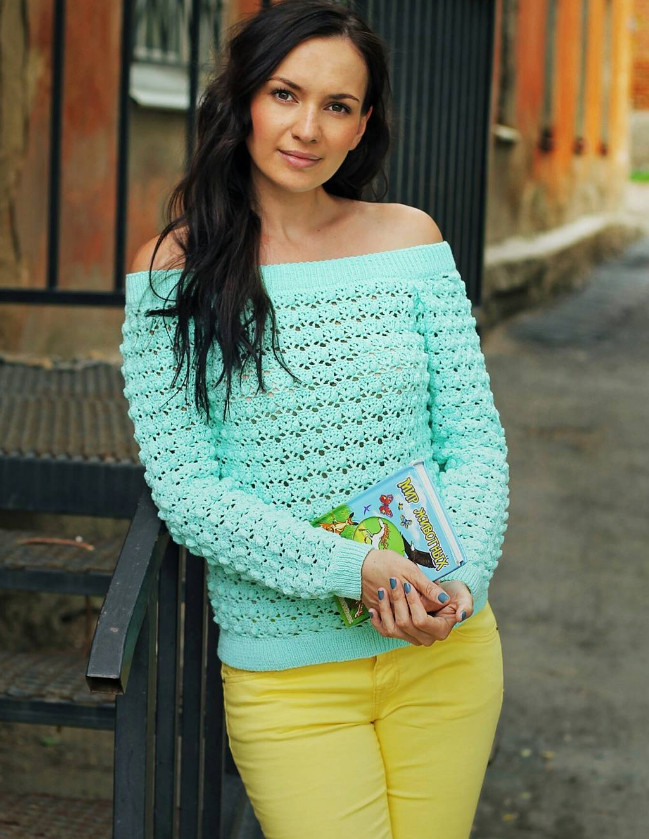
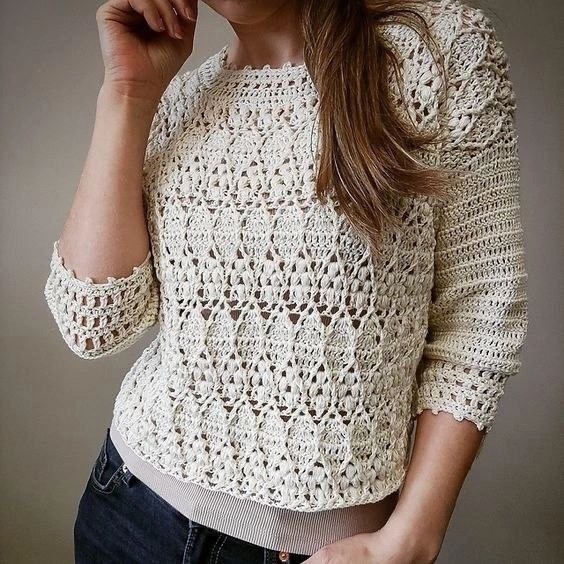
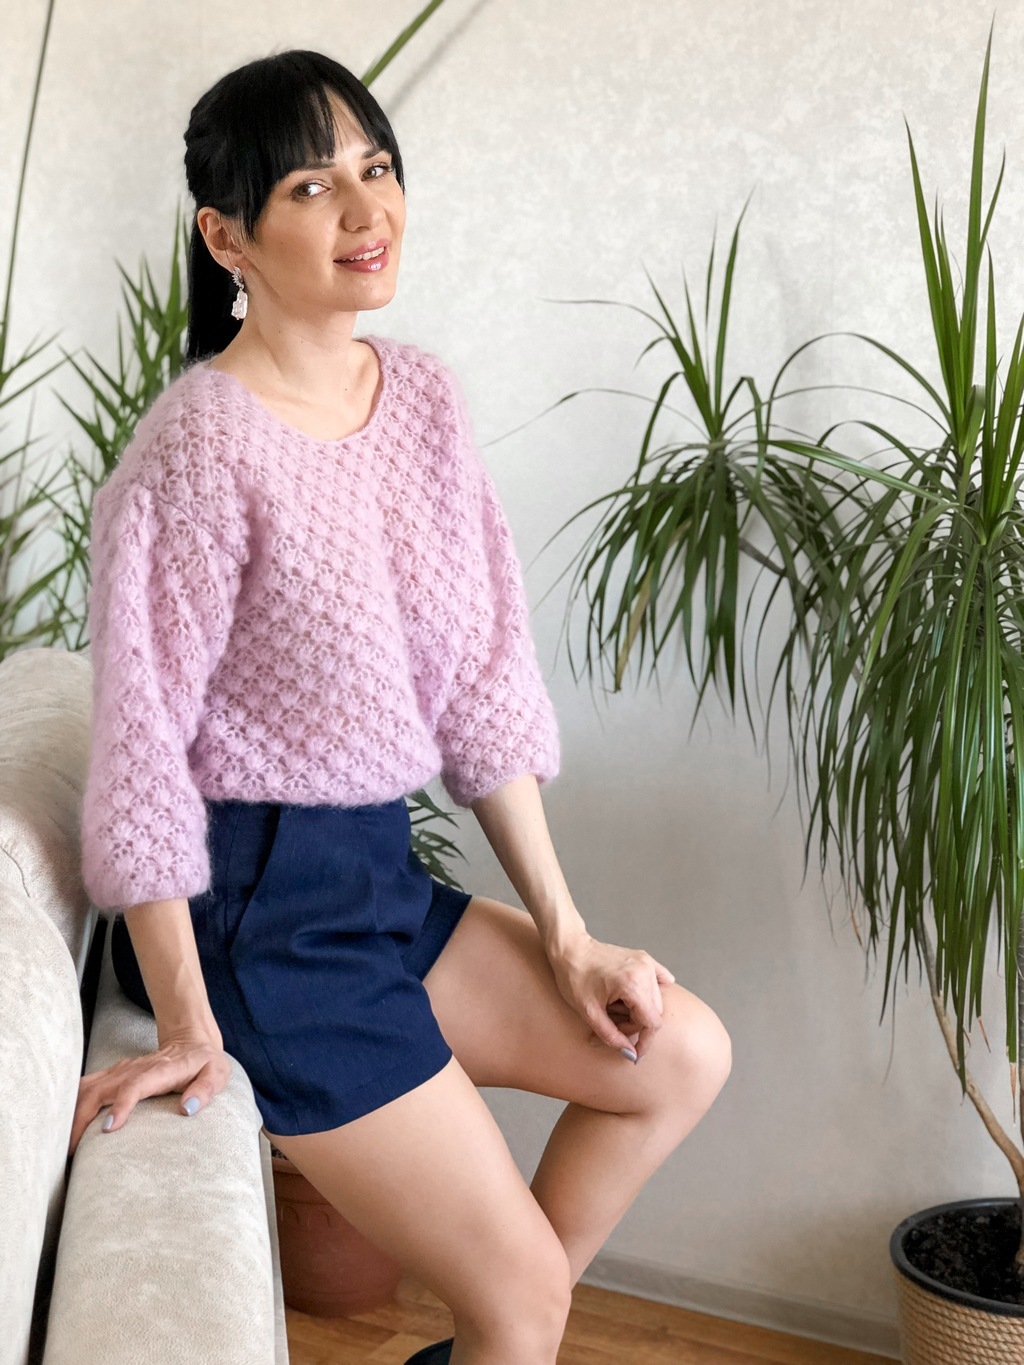
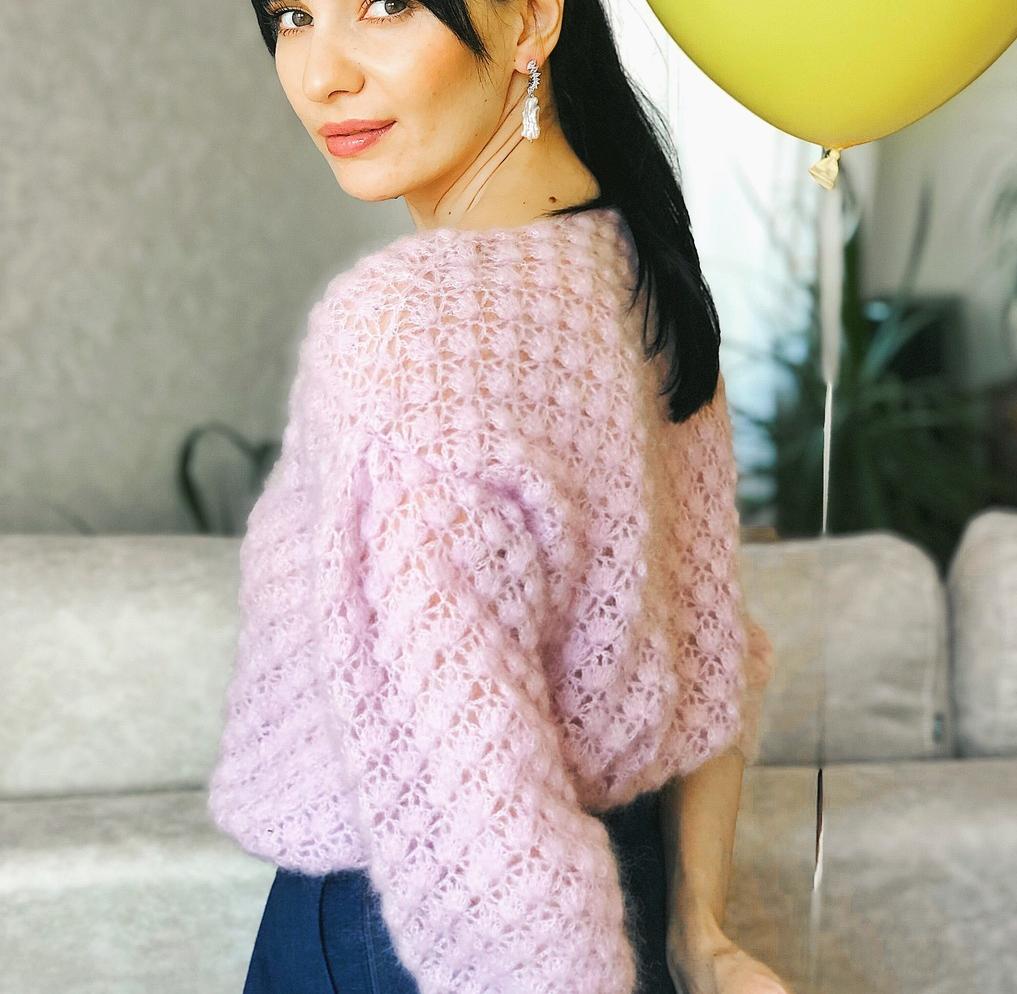
Crochet jumper
Added: 03.08.2025 в 17:29 Views: 2291
Crochet jumperKlubokhttp://klubok.work/2/41/8992/Klubokhttps://klubok.work/css/image/top-logo-en.png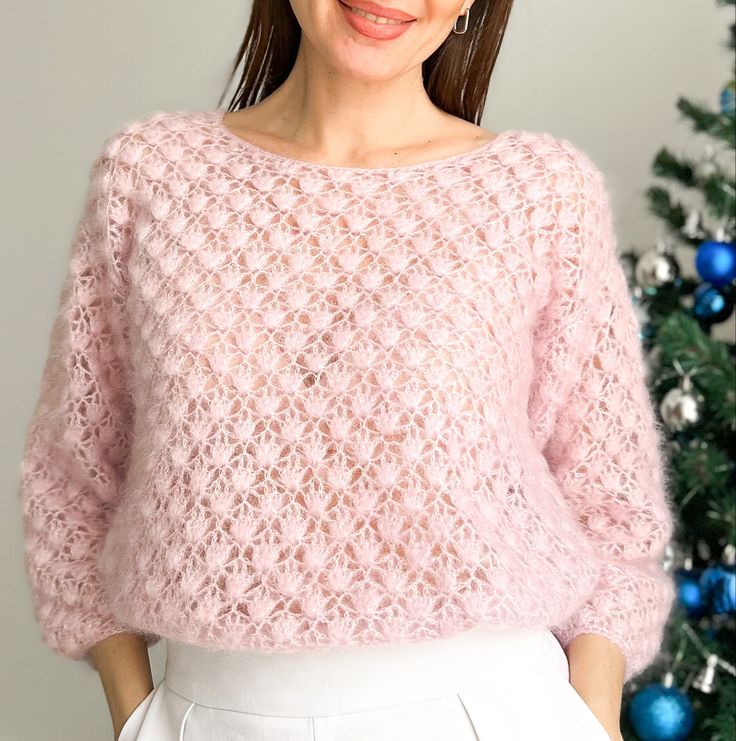
Sizes 42 44 46 48
Bust circumference 82-85 86-89 90-93 94-97
Yarn consumption
Drops Kid-Silk
7 8 8 9
When choosing a size, rely on the bust measurement, always selecting slightly smaller. For example, if your bust is 89-90, it’s better to choose size 44.
For the project you will need:
-
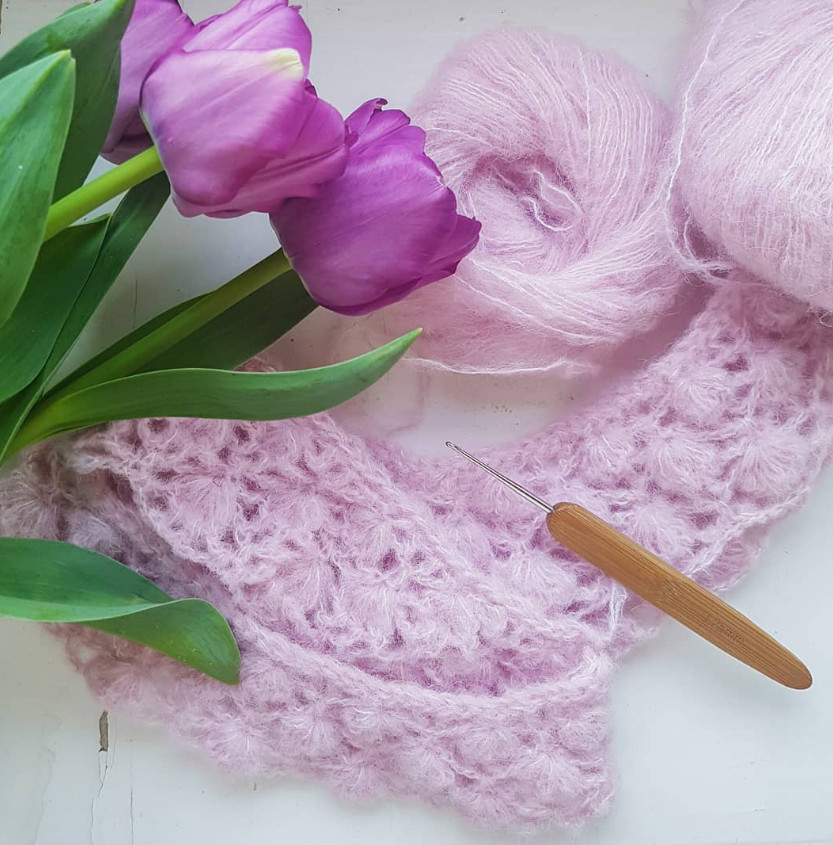
Yarn Drops Kid-Silk 200m / 25 g, 75% mohair 25% silk
-
Crochet hook No. 2, No. 4
-
Markers
-
Tapestry needle, scissors
-
Tailor's needles
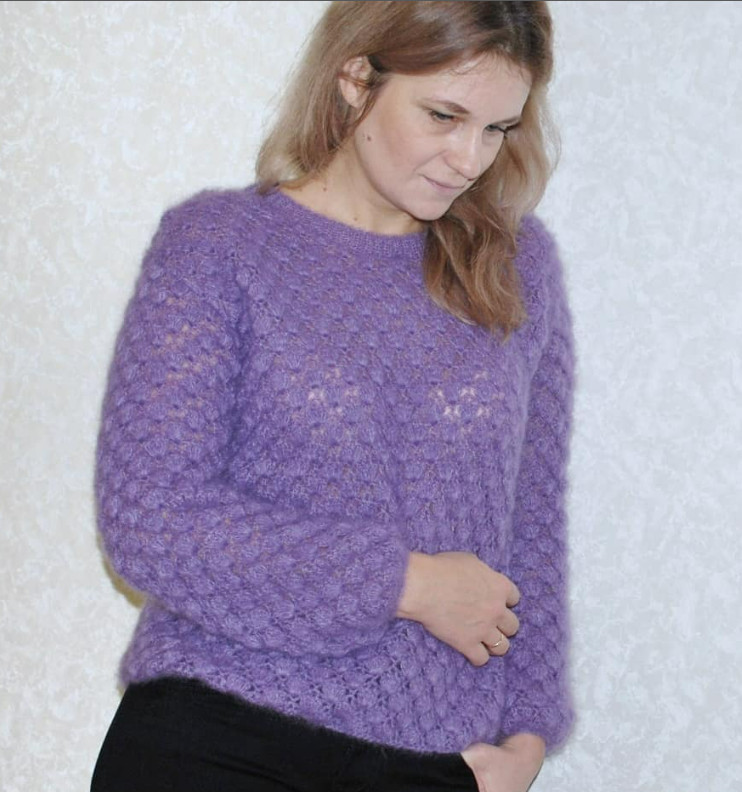
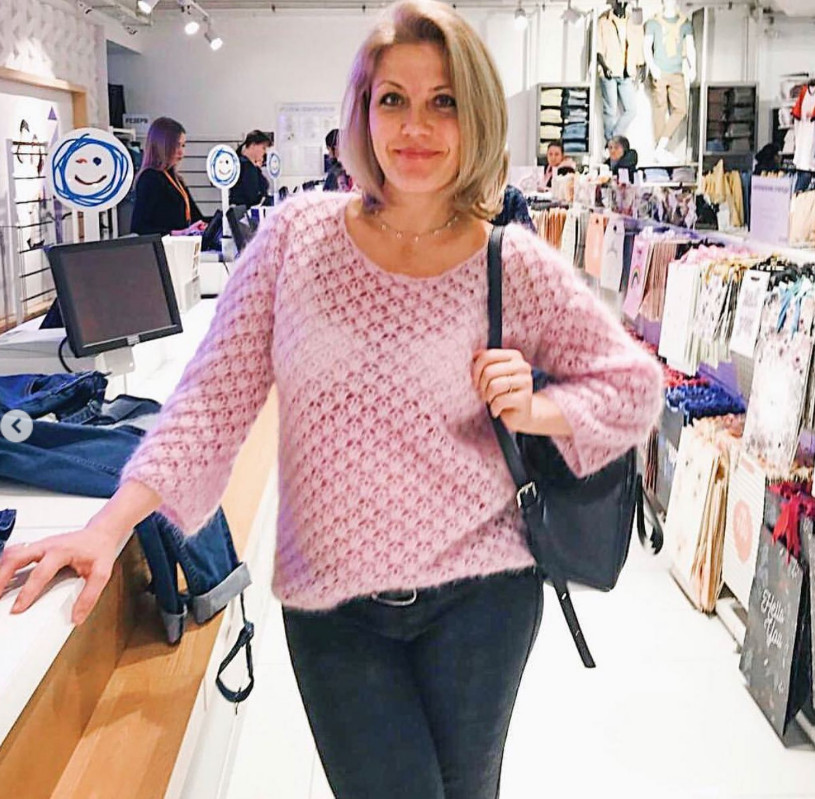
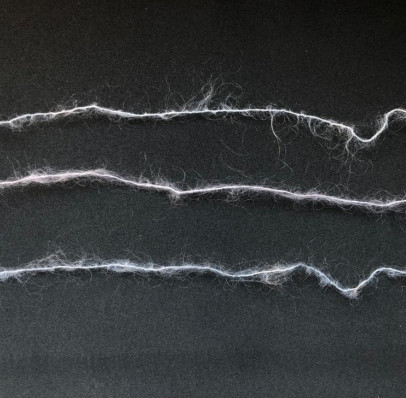
Choosing yarn.
When choosing yarn, base it on the mohair stitch in the main strand. If you have a full bust or you wear sizes 46, 48, then it’s better to choose a thread with less mohair.
In the photo there are 3 strands, from top to bottom:
-
Lana gato Silk Mohair. The yarn is not very heavily mohair-filled, an ideal option for a full bust,
-
Drops Kid Silk. The yarn is moderately mohair-filled. The stitch height is not as tall as in the first option. Suitable for all sizes.
-
BBB Soft Dream. The yarn is very mohair-filled. The pattern will be dense, which will give extra volume to the garment.
This is just a recommendation. You can also choose your own option.
Before you start, be sure to read all the description! This will make it easier to navigate in the work!
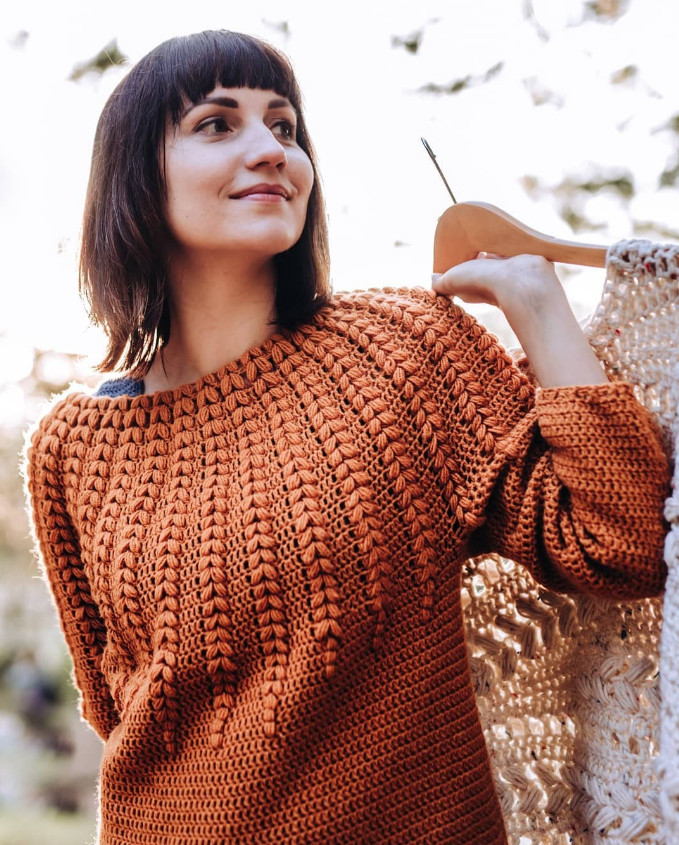
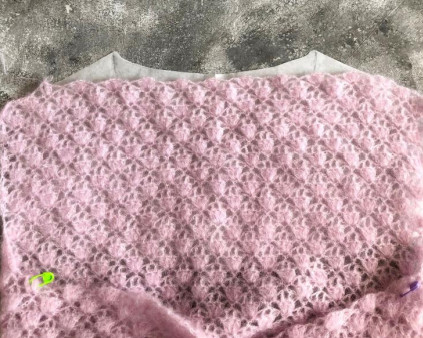
Main pattern of the jumper.
When you knit the pattern, do not pull the stitches tight. Let the mohair fill the gaps.
And in the “puffy stitch” element, stitches with one yarn over (dc) are worked tall, pulling the stitch as much as possible. See video for how to knit the pattern
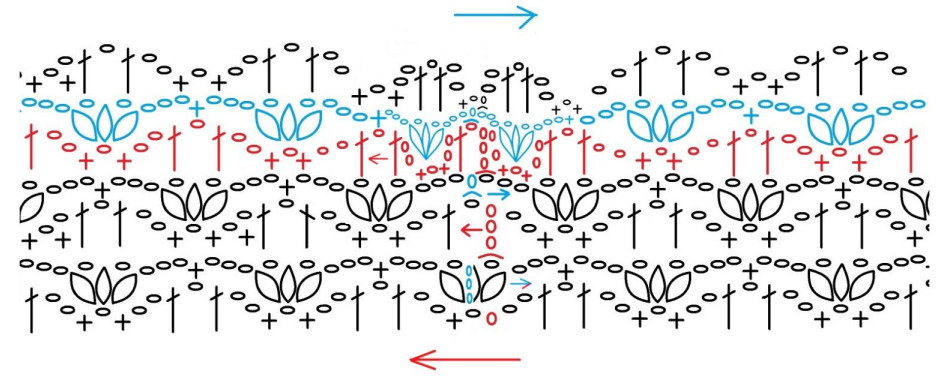
Diagram 1
![]() chain
chain
+ slip stitch
![]() double crochet
double crochet
 1 puff stitch ( 3 stitches worked together into 1 base stitch with a dc)
 3 puff stitches worked into 1 base stitch
Swatches and gauge
Before starting work, be sure to knit a swatch, wash it, dry it, and determine the gauge.
The gauge of the main pattern worked in crochet with No. 2 hook (N2) 30 stitches and 14 rows = 10 cm x 10 cm
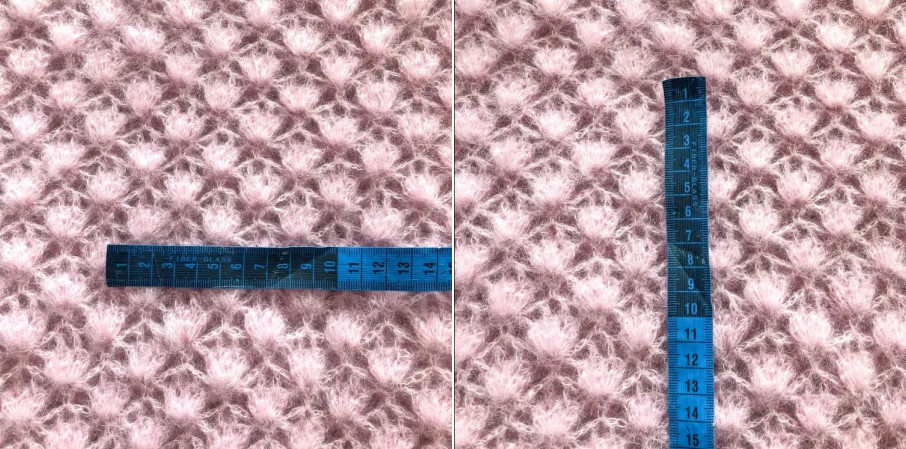
Crochet a swatch by chaining 43 chains. Then crochet 5 pattern stripes with a fan motif, as in Diagram 1. This will let you understand how tightly or loosely you crochet. The width of this swatch should be 14 cm, and the height 7.5 cm.
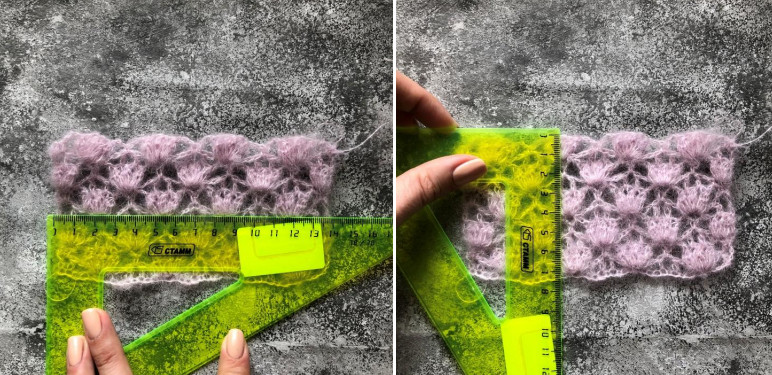
If you did not hit my gauge, change the hook size until the gauge matches. If the swatch turns out smaller than 14 cm, switch to a larger hook size. If larger than 14 cm, switch to a smaller hook size.
I hope you will succeed on the first try! ;-)
Description.
For each size, the required calculations are given as fractions. When knitting, be careful and choose exactly your size!
The jumper is knitted in pieces and consists of the body and 2 sleeves.
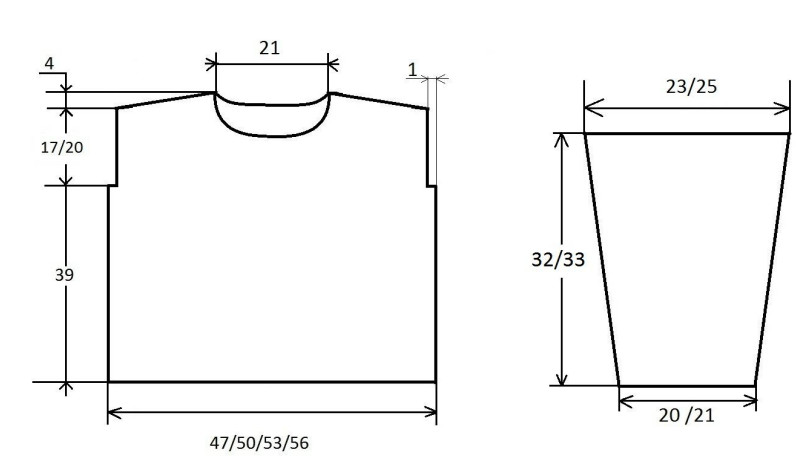
Schematic drawing of the parts
Drawing 1
Body of the jumper.
-
First row is worked in 2 strands. Take one strand from the start of the skein, the second from the middle. With a 4 mm hook, crochet an elastic cast-on using slip stitches to form 168 stitches / 180 stitches / 192 stitches / 204 stitches. See video for how to crochet the elastic cast-on.
Close the resulting chain into a ring, crocheting the last and first stitches together with a slip stitch or any method convenient for you.
Be careful not to twist the chain and that all stitches face the same direction. The number of stitches after joining did not change. See video for how to join into a ring.
Cut one strand and continue crocheting the pattern with the remaining single strand. -
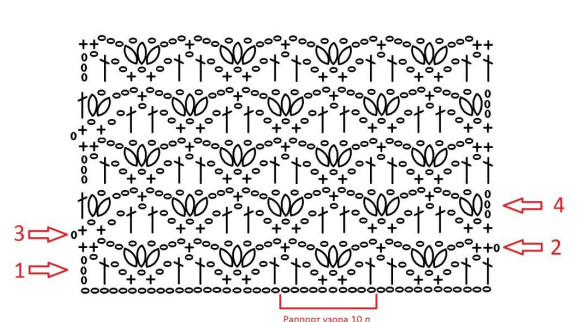
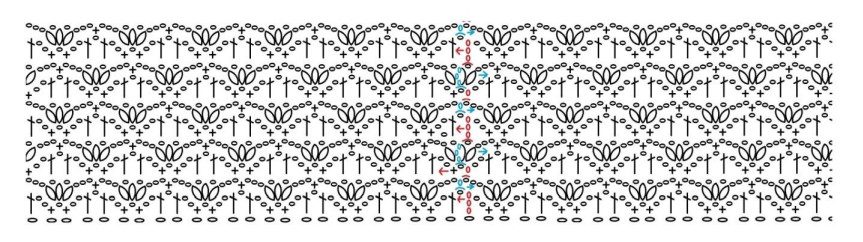
With hook No. 2, crochet the body of the jumper in the round using the main pattern from Diagram 2. Be careful: the pattern repeat is worked over 6 stitches of the chain, not 10 as in the sample!!!
-
We will crochet in turning rows. That is, when you finish the first row of the pattern, after you have crocheted the turning chain, turn the work and crochet in the opposite direction. And so for each subsequent row. How turning chains are worked and the direction of crochet are shown in Diagram 2.
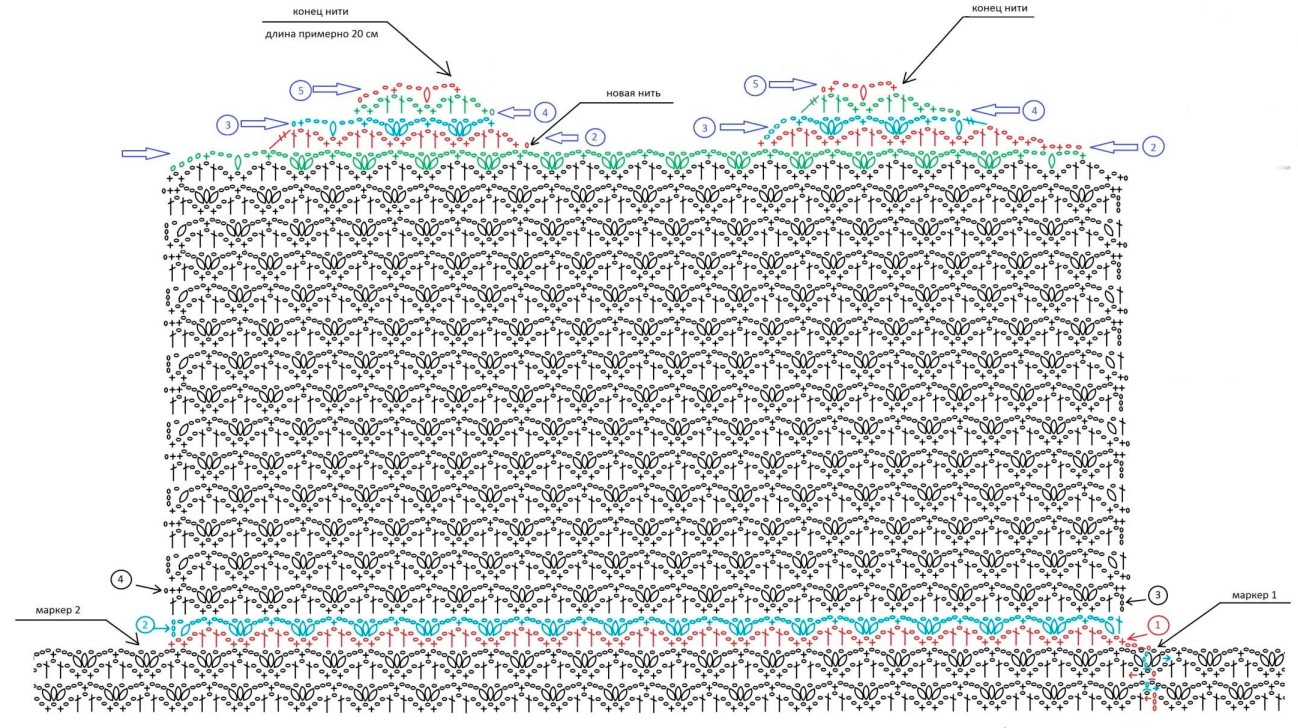
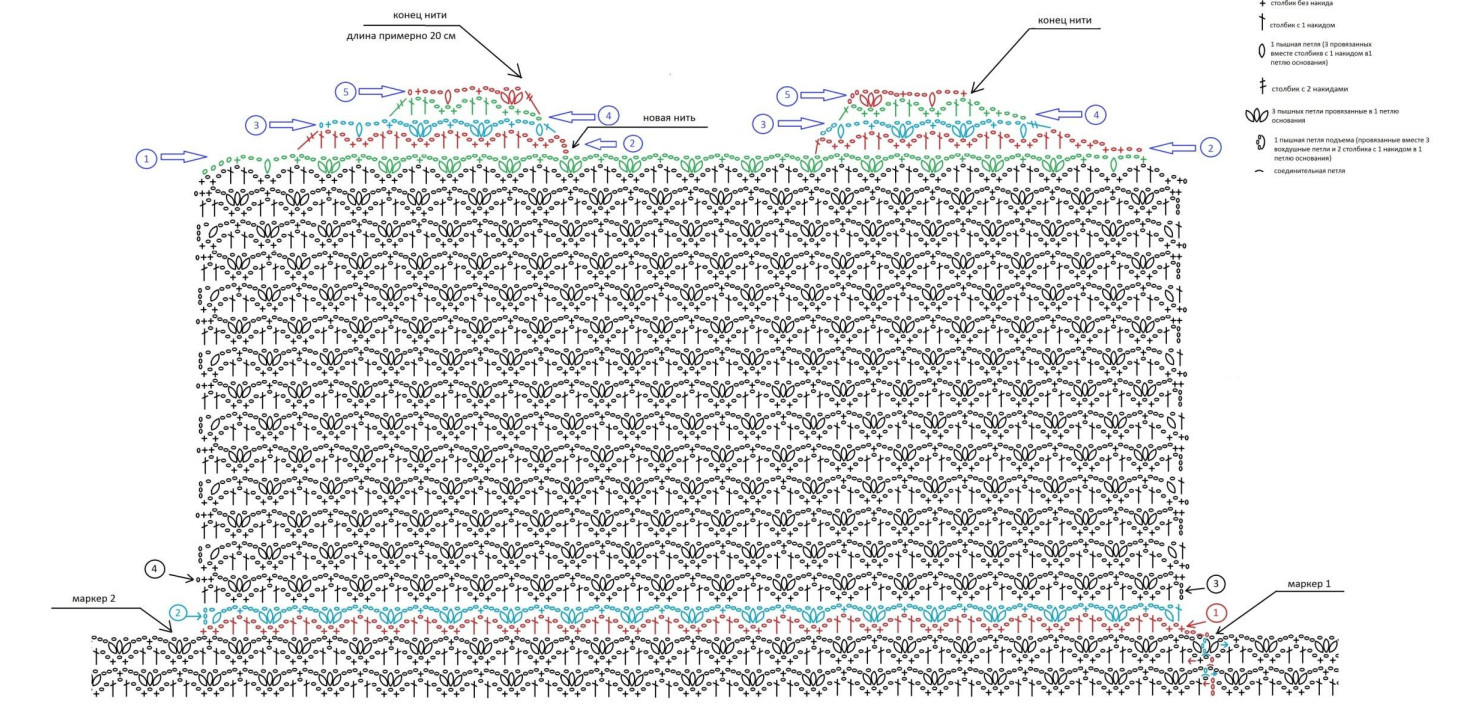
Diagram 2
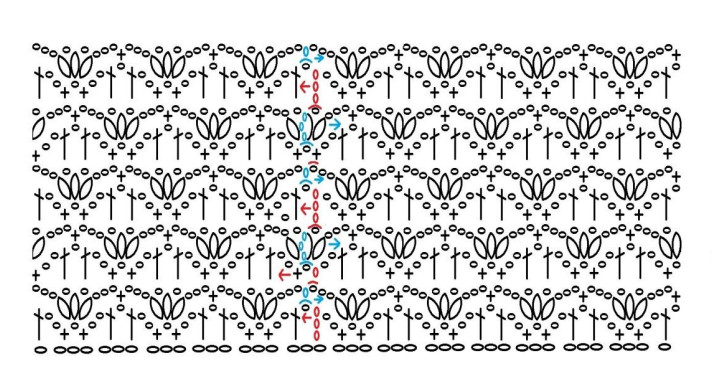
 1 puff stitch (raised) (slip stitches together 3 chains and a double crochet into 1 base stitch)
![]() slip stitch
slip stitch
-
After you have crocheted the second row of the pattern, the row with fans, check their number. It MUST be even! The number of fans for each size: 28/30/32/34.
-
Now determine the right (front) side of the jumper. If you look closely, the fan clusters have a more convex side. While knitting the fan clusters, they turn with the wrong side facing us. That is, in the next row we knit on the right side, and the fan clusters are always on the wrong side. Put the marker so that it hangs with the main part on the front side of the jumper.
-
Next, knit in height with the main pattern. The body length of the jumper in height is 52 rows (26 fan clusters) = 39 cm. You can adjust this length as you wish.
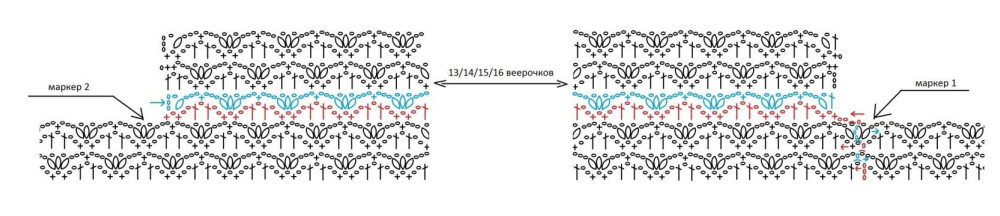
From row 53 we begin shaping the armholes for the sleeves. And divide the body into back and front. For this, we place the marker on the puff loop from the previous row. This will be the first section and 1 fan cluster. Count around and place the next marker on the 15th/16th/17th/18th fan clusters. This will be the second section. Between markers you should have the same number of fan clusters. This is how we split the body into two equal parts, front and back.
8. Next we will knit the back and the front separately, parallel to shaping the armholes for the sleeves.
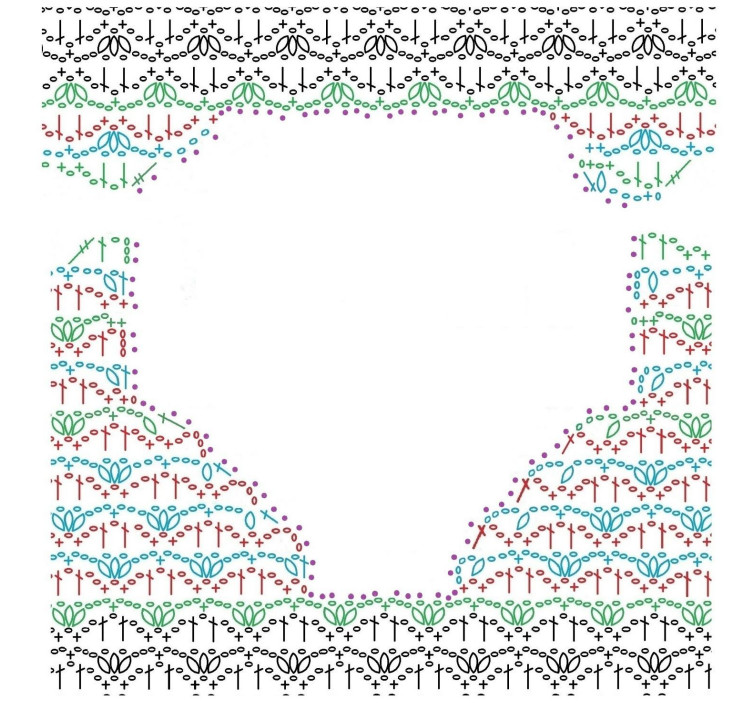
And to ensure the neckline opening is the right size, we draft the pattern according to drawing No. 2. And be sure to compare our knitting with the pattern.
On the drawing, straight lines are marked; draw the smooth semicircular lines yourself to make it as beautiful as possible.
Figure 2.
Back. Front.
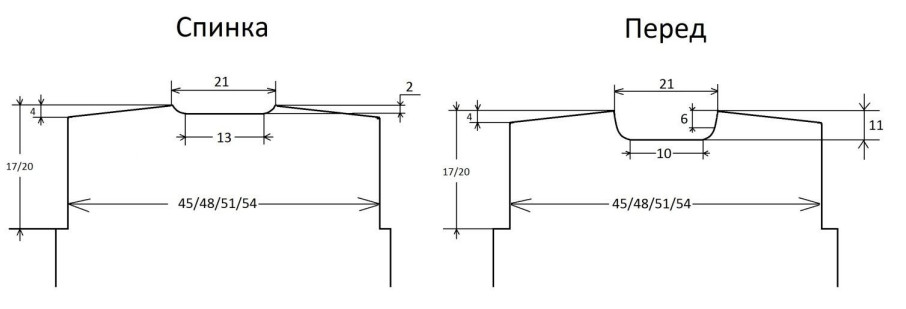
Back
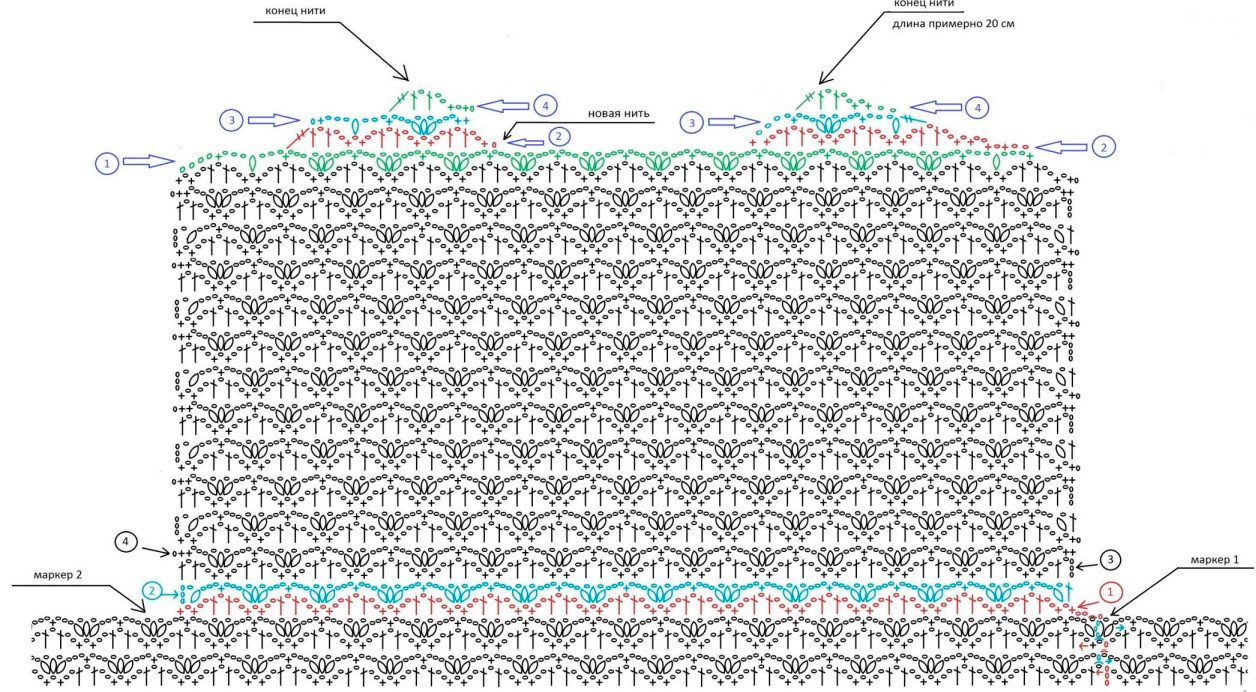
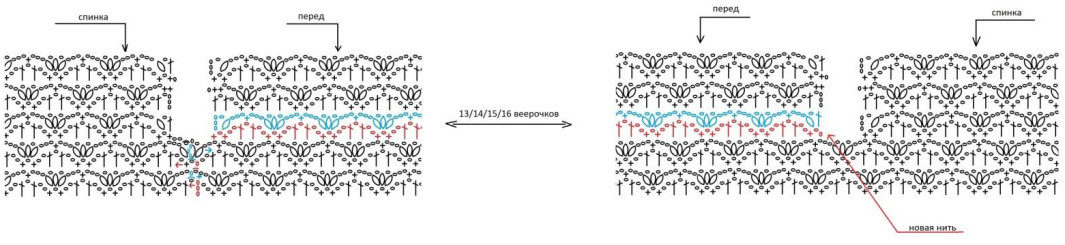
We begin the back with chart 3, leaving unworked one fan cluster for which we marked markers. The first 2 rows of the back will include decreases for the armholes. Then we knit in the main pattern without changes. We need to knit:
a) for sizes 42/44 24 rows (12 fan clusters) in height
b) for sizes 46/48 28 rows (14 fan clusters) in height
Armhole and the start of the back
Diagram 3
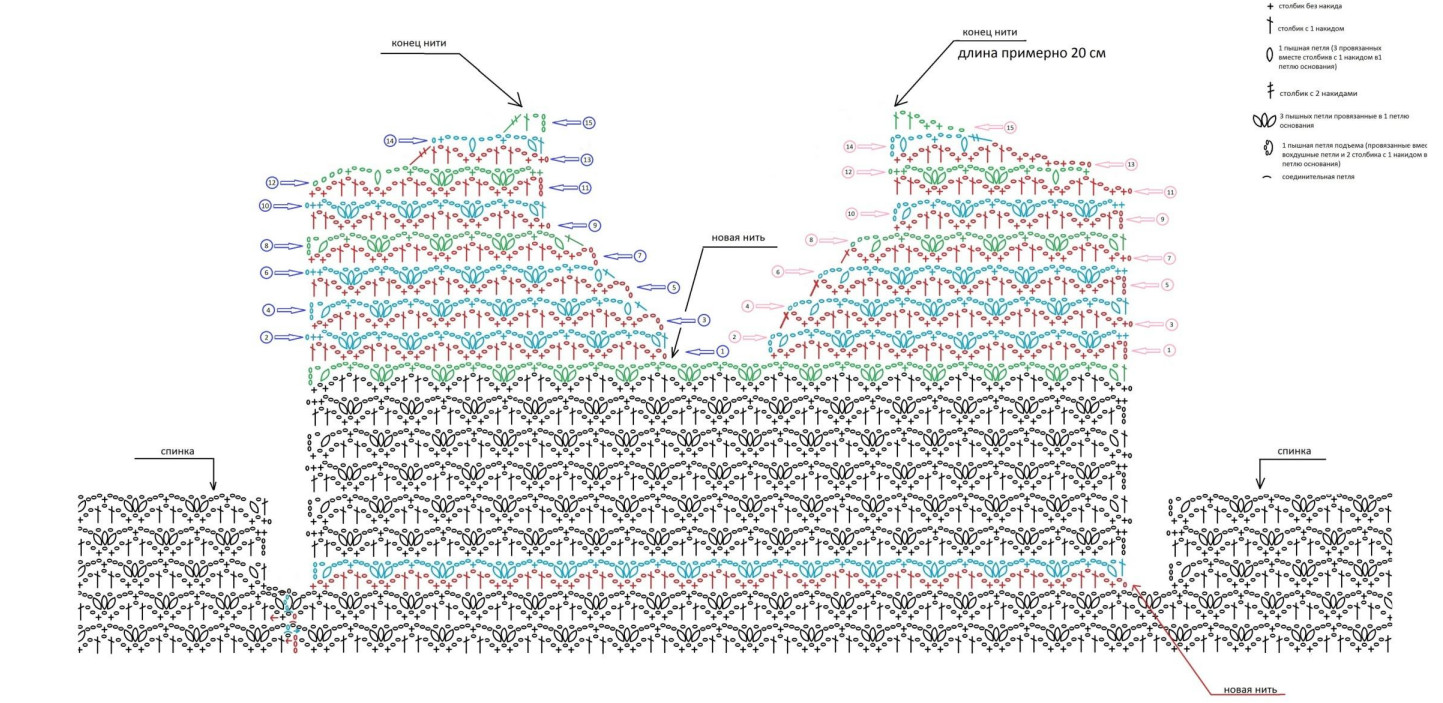
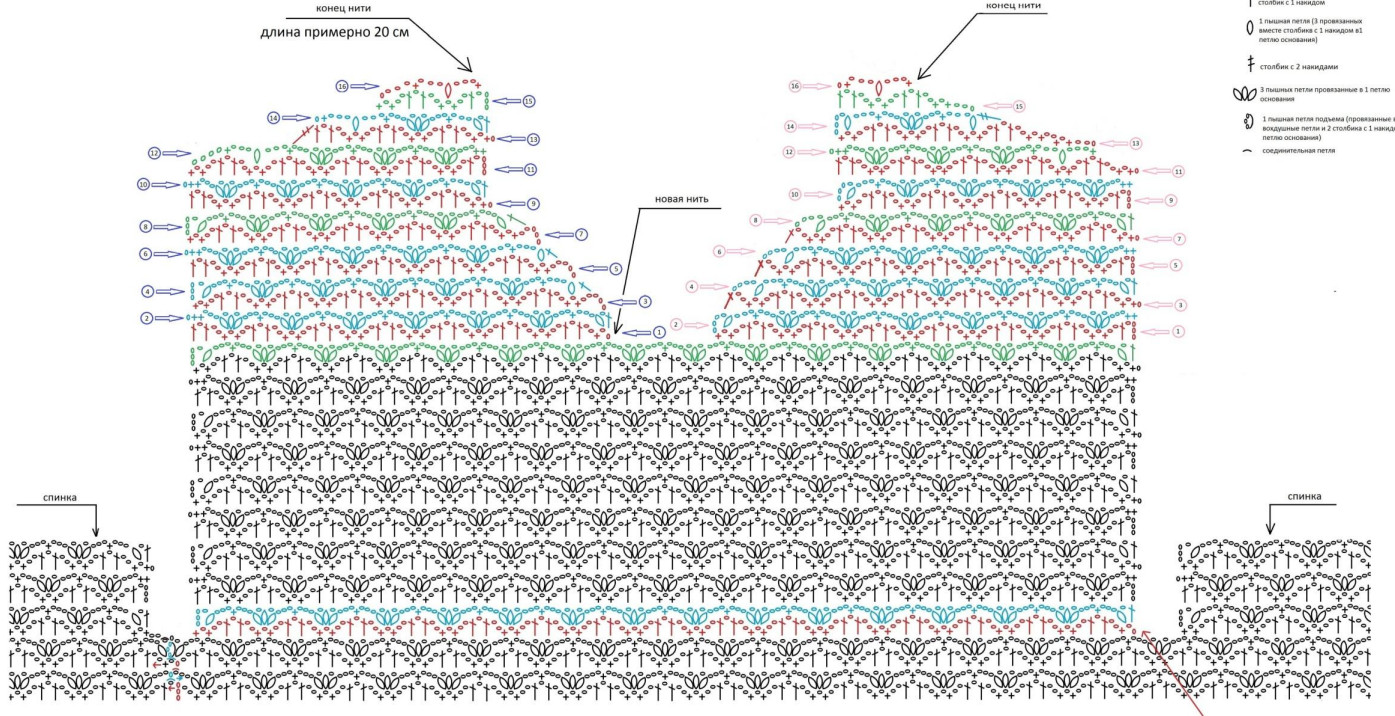
From 25/29 row we begin shaping the shoulder slopes and the neckline. All decreases are shown in the diagrams below; you only need to choose your size. The rows where changes occur are highlighted in color and numbered on the diagram for clarity.
Back size 42
Back size 44
Back size 46
Back size 48
-
Front
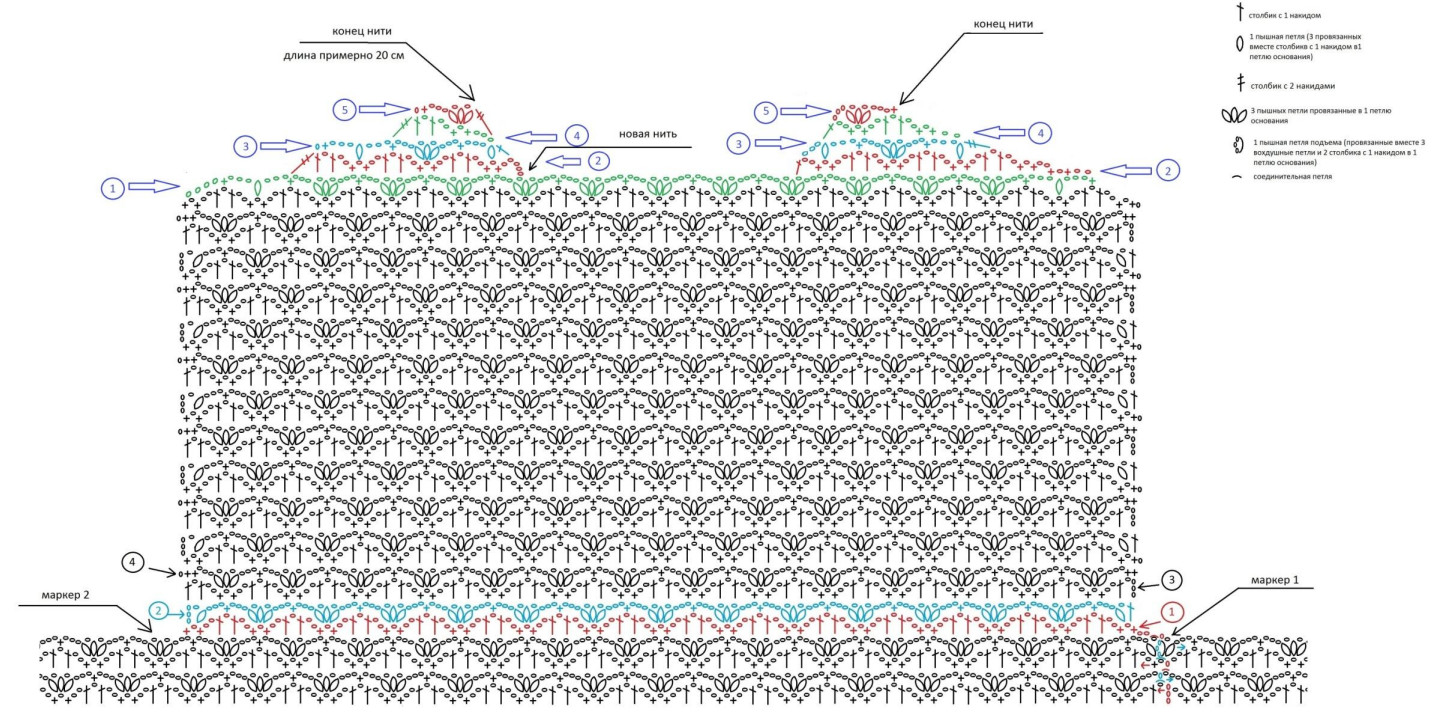
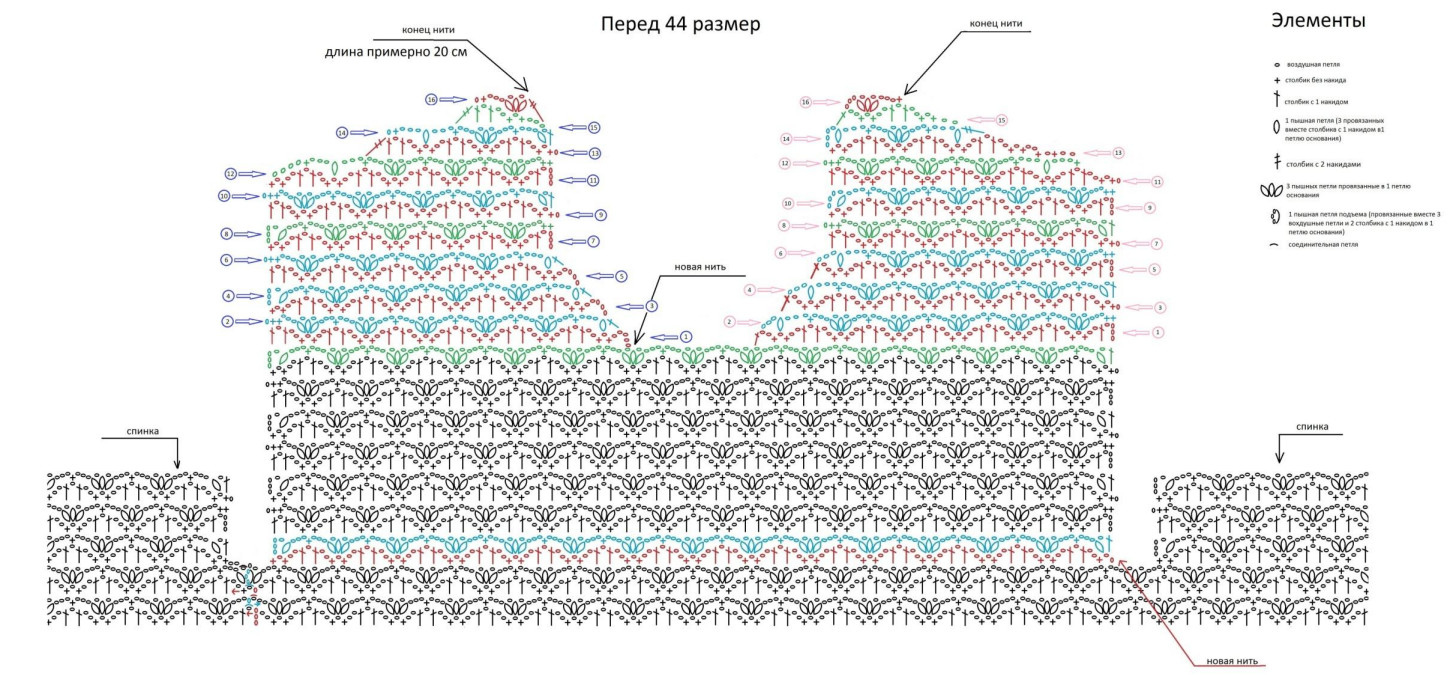
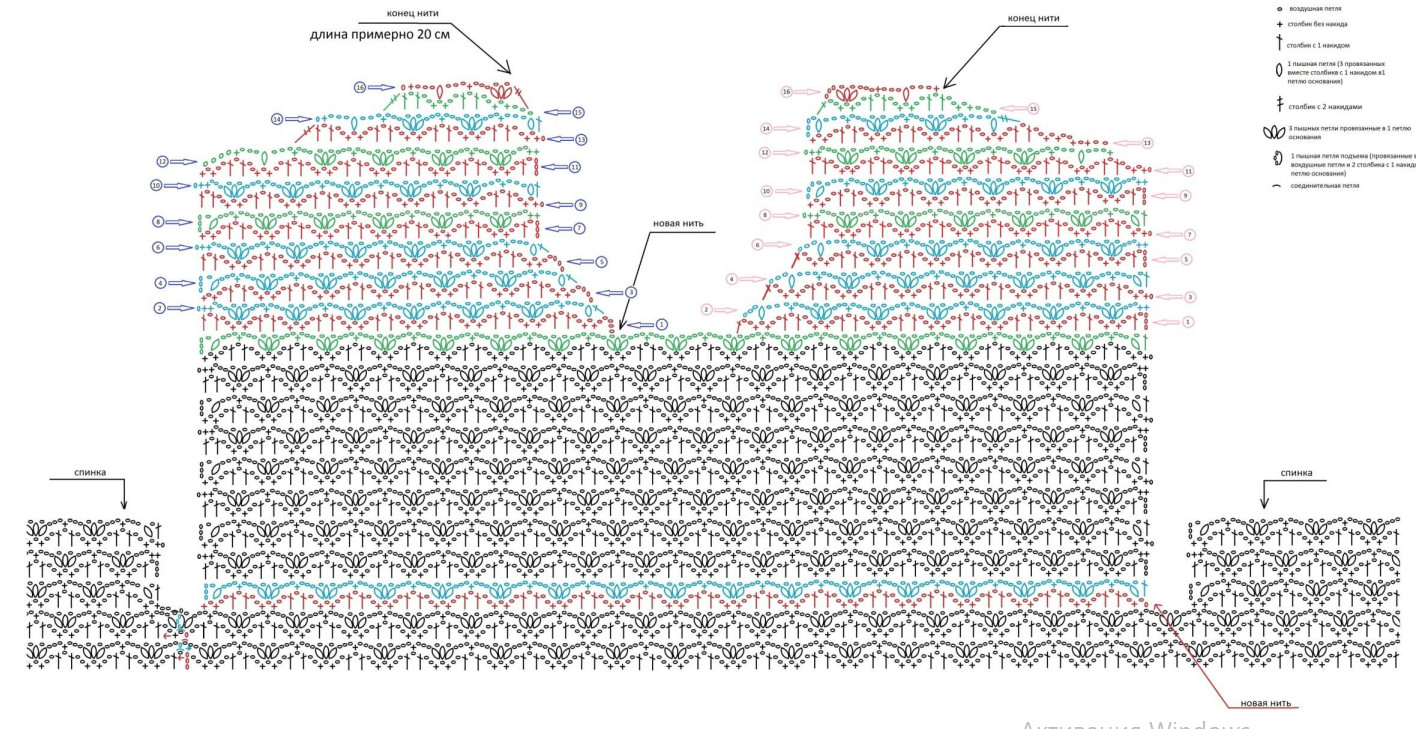
Front we begin knitting according to scheme 4, leaving unworked one fan cluster which we marked with markers. The first 2 rows of the front will also have decreases for the armholes. In the diagram these rows are highlighted in color. Next we knit in the main pattern without changes. We need to knit:
a) for sizes 42,44 14 rows (7 fan clusters) in height
b) for sizes 46,48 18 rows (9 fan clusters) in height
From rows 15/19 we begin forming the neckline. All decreases are shown in the diagrams below; you only need to choose your size. The rows where changes occur are highlighted in color and numbered for clarity.
Do not forget to check against our pattern so your neckline opening doesn't come out too large or too small. - Armhole and start of the front
- Diagram 4
- First drawing - Back and front. Second drawing - front and back.


Front 42 size
Front 44 size
Front 46 size
Front 48 size
Sleeves
The right and left sleeves are knitted the same.
The first row is also knitted in 2 strands. With a 4 mm crochet hook, cast on an elastic edge from slip stitches:
a) for size 42/44 - 44 chains (11 fan clusters)
b) for size 46/48 – 48 chains (12 fan clusters)
Join the resulting chain into a ring, cut one thread and continue knitting the pattern with a single strand. With crochet hook No. 2, knit the jumper sleeves in turning rounds using the main pattern. See Diagram 5 for how the stitches are distributed on the foundation chain. Be careful: the pattern repeat is worked over 4 stitches of the initial chain, not 10 as in the sample!!!
Diagram 5
Next, knit the sleeves as follows:
42/44 size:
-
knit 14 rows in the main pattern in height – 7 fan clusters (9.5 cm in height)
-
in rows 15 and 16, make an increase of 1 fan cluster according to diagram 6. Now we have 12 fan clusters in width.
-
from rows 17-32, knit in the main pattern. From the start 16 fan clusters in height (22.5 cm sleeve height).
-
in rows 33 and 34, make an increase of 1 fan cluster. Now we have 13 fan clusters in width.
-
from rows 35 – 44, knit in the main pattern. The entire sleeve length is 22 fan clusters (32 cm).
46/48 size: -
knit 10 rows in the main pattern in height – 5 fan clusters (7 cm in height)
-
in rows 11 and 12, make an increase of 1 fan cluster according to diagram 6. Now we have 13 fan clusters in width.
-
from rows 13 -20 knit in the main pattern. From the start 10 fan clusters in height (15.5 cm sleeve height).
-
in rows 21 and 22 make an increase of 1 fan cluster. Now we have 14 fan clusters in width.
-
from rows 23 -30 knit in the main pattern. From the start 15 fan clusters in height (22.5 cm sleeve height).
-
In rows 31 and 32 we increase by 1 fan. Now we have 15 fans across.
-
From rows 33–46 we knit in the main pattern. The full length of the sleeve is 23 fans (33 cm).
- Diagram 6
Jumper assembly
All jumper parts are sewn together with a size 2 crochet using half-double crochets without a chain. If you crochet tightly, take a hook half a size/lurther size.
-
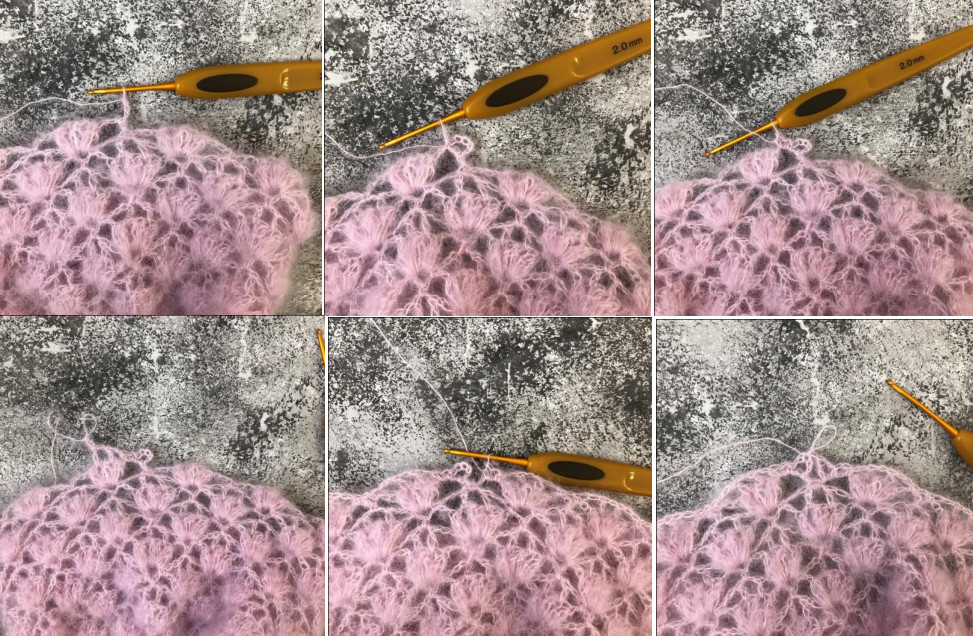
Fold the parts with the right sides facing inward. We will sew along the top loops of the pattern.
-
Pass the hook through them, catch the thread and pull out a loop.
-
Pull it through the loop that is on the hook.
-
Repeat this action until the end of the seam. Try to sew each stitch of the pieces.
We will sew in the following sequence:
-
Shoulder seams. Use the remaining 20 cm of thread for the seam.
-
Attach the finished sleeves to the jumper body.
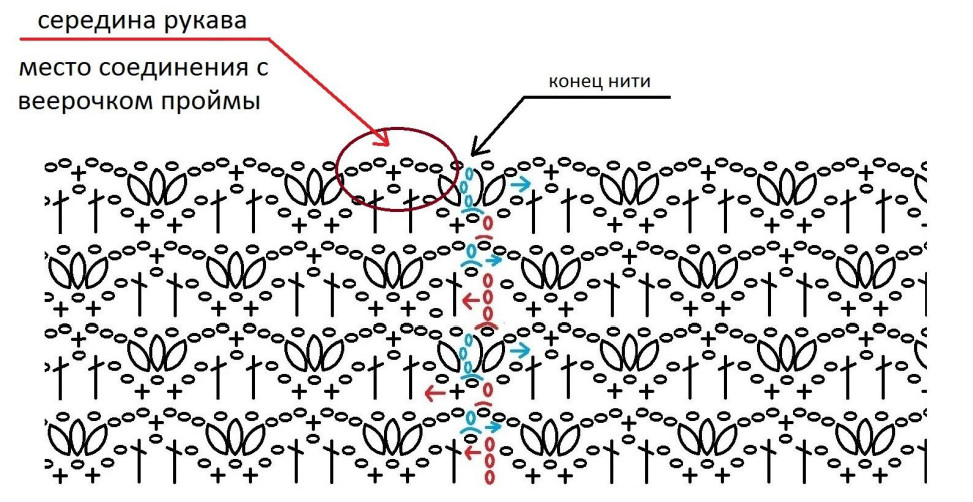
Diagram 7
- Red arrow - place where it connects with the armhole fan
- Black arrow - end of the thread
Diagram 7
-
First, we need to determine the middle of the sleeve. From the last fan, count 6/7 fans around to the side. And on the 7/8, place a marker. This fan is the middle of the sleeve and we will connect it to the shoulder seam.
-
The second middle will be the place marked on Diagram 7. This is where we will sew to the start of the armhole on the body of the jumper.
-
Now fold the sleeve with the jumper body, right sides facing each other, and insert first only into the lower part of the armhole. Align the fan on the body with the indentation in the pattern on the sleeve.
-
Further, evenly distributing the sleeve along the armhole, sew in the remaining part.
-
how to baste the pleats on the sleeve
Diagram 8
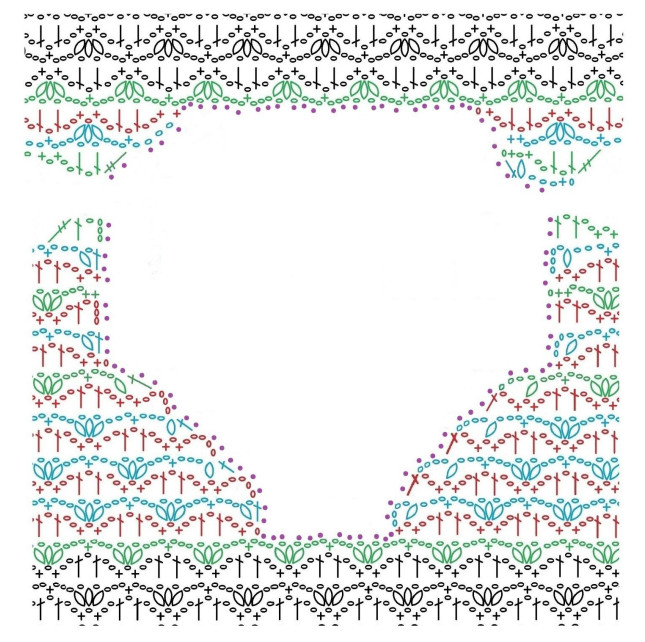
Diagram 9
-
The sleeve, like the shoulder seams, is sewn with a size 2 crochet using half-double crochets without a yarn over. It is best to start sewing from the shoulder seam.
-
Weave in and hide all ends. Trim the excess threads.
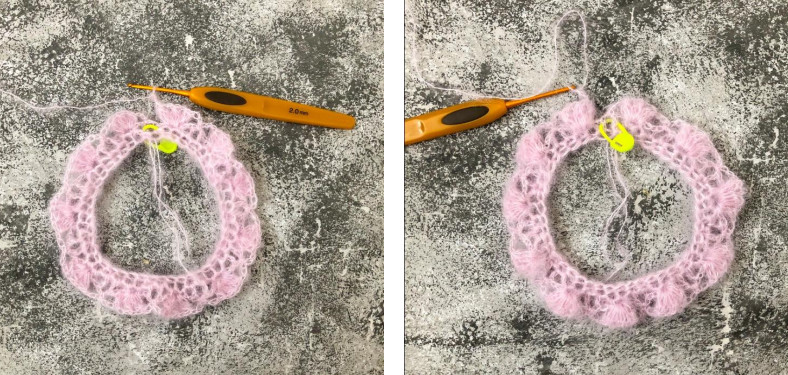
Neckline finishing.
We will crochet with a size 2 hook: take 2 strands and crochet them as one single crochet along the edge of the neckline, not pulling the loops tight.
The edging stitches for sizes 42/46 are shown in Diagram 8, for sizes 44/48 in Diagram 9.
CARE
• Mohair jumper should ideally be hand-washed in cool water.
• Detergent, ideally liquid, should dissolve well in water. Under no circumstances should you pour it directly onto the garment, as it may ruin its color.
• It is acceptable to use hair shampoo instead of powder.
• When washing by hand, do not rub the item vigorously or wring it.
• Rinse the jumper with gentle squeezing motions.
• Rinse in cool water until all soap is washed out.
• To make mohair softer, you can rinse in water with conditioner.
• Gently squeeze the item, better with a terry towel.
• Replace towels with dry ones until they absorb as much moisture as possible.
• Dry at room temperature, away from sun or a radiator.
• Lay the jumper on a terry towel on a horizontal hard surface or a rack. Occasionally turn it over and replace the towel with a dry one.
• To restore mohair fluff after washing, comb it with a wool brush or a soft-bristled clothing brush.
This description is for personal use only!
Copying and distributing this master class in any form and on any resource (in online sources or in print) is prohibited!
You may crochet to order based on this description, provided that when displayed on social networks, the author of the model is credited.