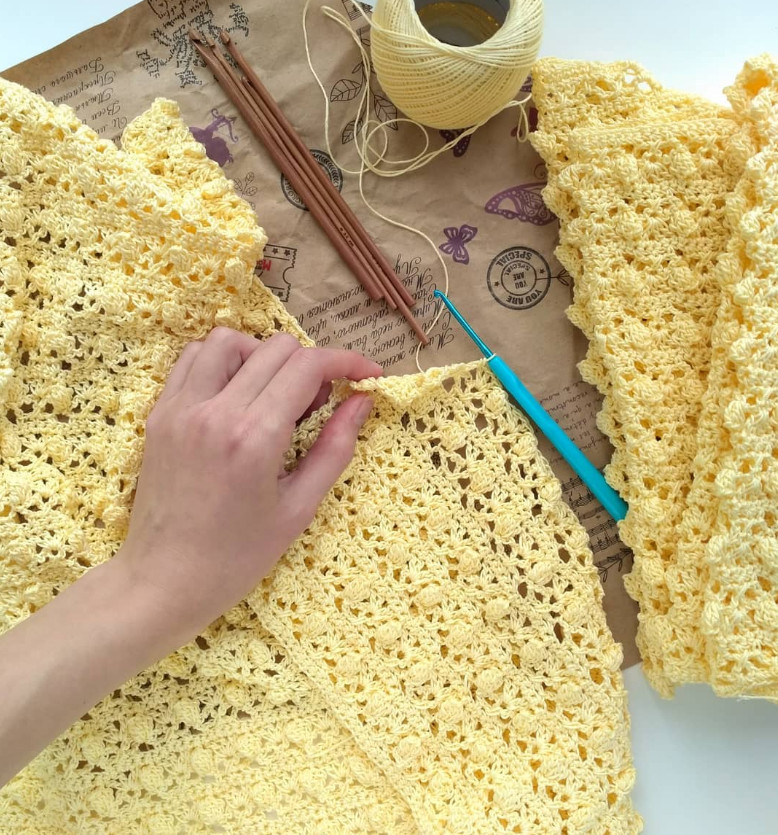
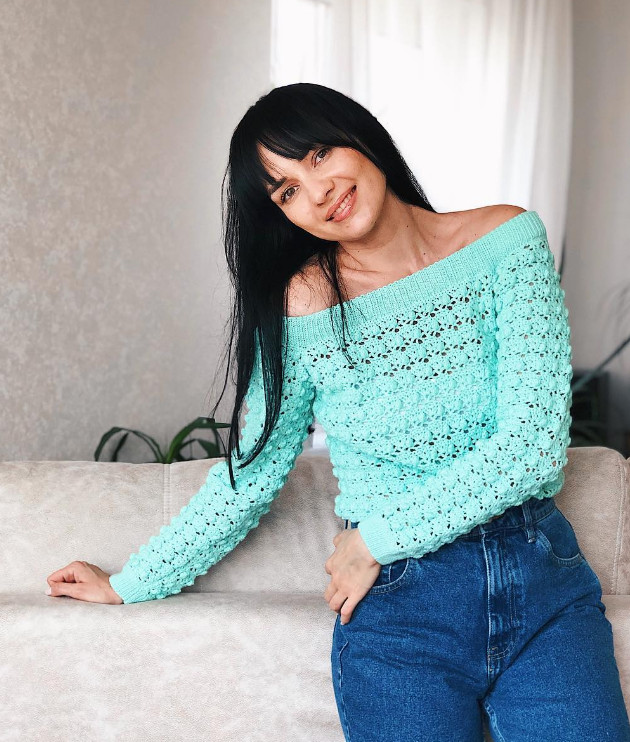
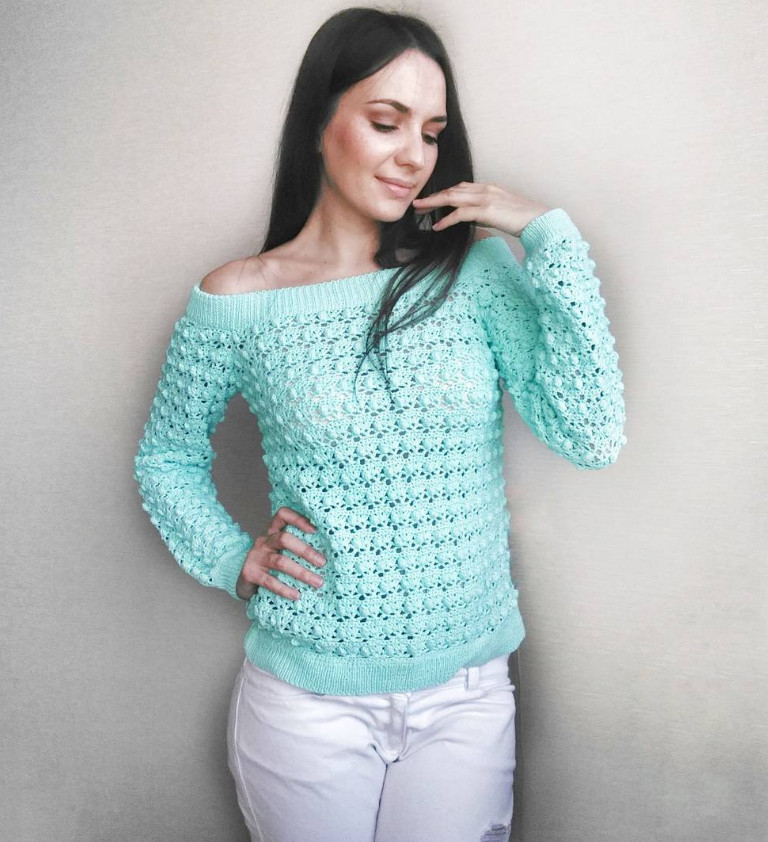
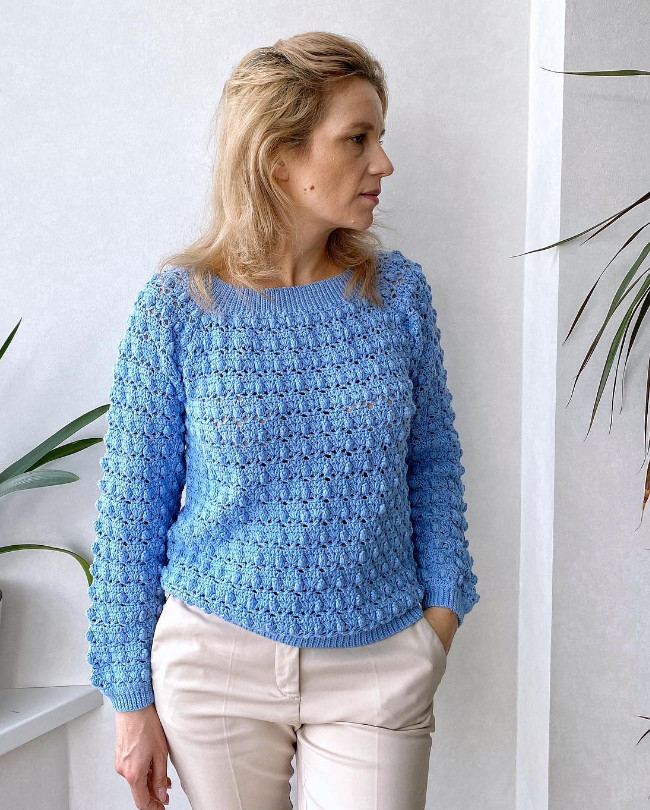
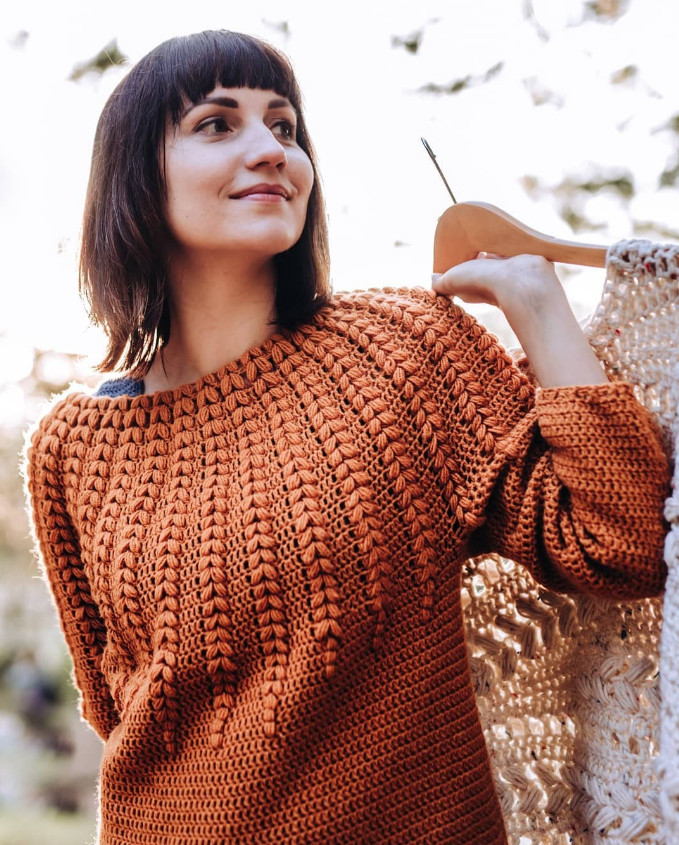
Crocheted cardigan
Added: 02.12.2025 в 17:19 Views: 184
Crocheted cardiganKlubokhttp://klubok.work/2/41/9326/Klubokhttps://klubok.work/css/image/top-logo-en.png
Sizes: 42/44/46/48
Bust circumference: 82-85/86-89/90-93/94-97
When choosing a size, base it on the bust measurement, always choosing slightly smaller. For example, if your bust is 89-90, it would be better to choose size 44.
For this project we will need:
Baby Cotton yarn from Seam 90m/25 g (100% cotton) 18/20/22/24 skeins
Hook No. 3.5
Circular needles No. 3 (for ribbing)
Elastic ribbon (elastic) 3 cm wide in the color of the yarn. Length 0.9-1.2 m
Tapestry needle, stitch marker ring, scissors
Choosing yarn:
I have always crocheted this jumper from Seam Baby Cotton. But you can replace it with any other yarn you prefer. The key is that it matches length and thickness - 180 m per 50 g. Do not take yarn that is too tightly spun; the jumper will be stiff. And fluffy yarn won't work either; the pattern will be hard to read.
Here are a few more yarn examples that would be suitable for this jumper:
Soft Cotton from Vita Cotton, Mandarin Petit from Sandnes Garn, Cotton Soft from Mondial, Baby Cotton from Kutnor, Bella from Alize.
This is only a recommendation. You can choose your own option.
Before starting work, be sure to read all descriptions! This will make it easier to navigate in the work!
Swatches and Gauge
Before starting work, crochet a swatch. Wash it. Dry it and measure the gauge.
-
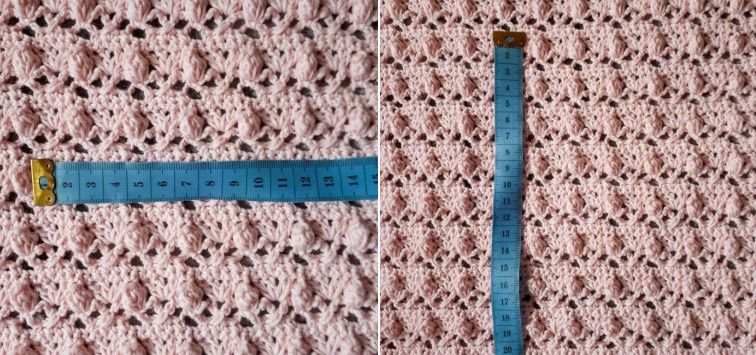
Gauge of the main pattern worked in crochet: 26 stitches and 16 rows = 10 cm x 10 cm.
Crochet a swatch by chaining 37 stitches. Then crochet 4 stripes of the main pattern as shown in diagram 1. This will give you an idea of how tightly or loosely you crochet.
If you did not hit my gauge, change the hook size until the gauge matches mine. If there are more than 25 pattern stitches in 10 cm, switch to a larger hook size. If fewer than 25 stitches, switch to a smaller hook size.
I hope you will succeed on the first try! ;-) -
For cuffs and the neckline, work on needles using the “1x1 rib” pattern.
First right-side row: edge stitch, 1 knit, 1 purl. 1 knit, 1 purl repeat from * to * to the edge.
Second purl row and all subsequent rows are worked as the first row.
Gauge: 32 stitches and 37 rows = 10 cm x 10 cm
Main pattern of the sweater
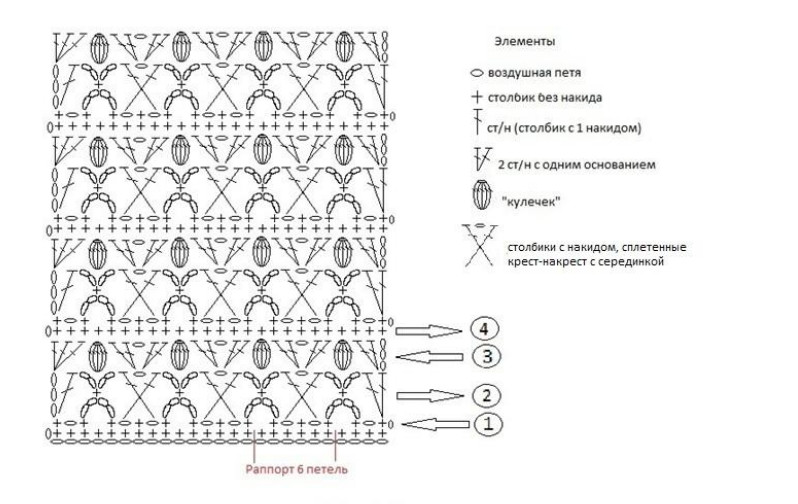
1. ![]() air loop
air loop
2. + single crochet
3. ![]() dc (double crochet)
dc (double crochet)
4. 2 dc with one base
5. "cup"
6. double crochets, cross-stitched over the center
How to crochet the element "cup"
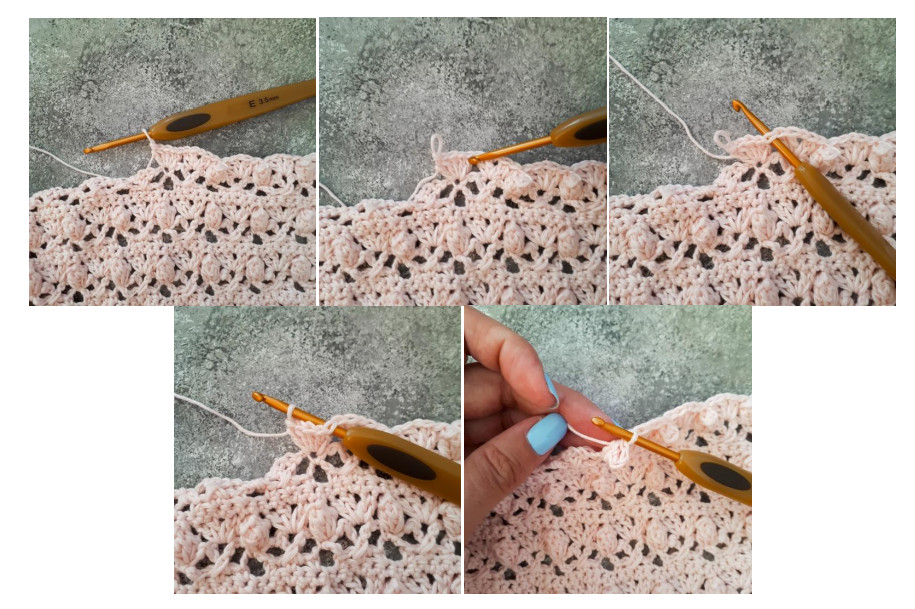
From one base stitch, crochet 5 DC (double crochets).
-
Slip the hook out of the working loop, leaving the working loop free. Insert the hook from front to back into the loop at the top of the first DC of our fan.
-
Next, insert the hook into the slipped working loop. Without catching the working yarn, pull the loop through the top of the first DC. The cup is ready!
Next, crochet following the chart.
Description.
For each size, the required calculations are given as a fraction. When crocheting, be careful and choose your own size!
The jumper is crocheted in pieces and consists of the front, back, 2 sleeves, 2 cuffs and the neckline. Each part will be crocheted separately.
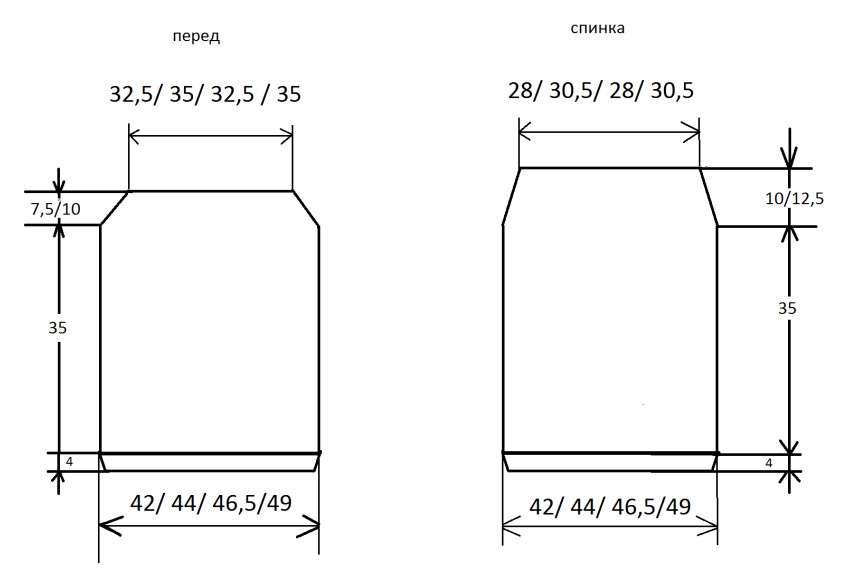
FRONT.
-
With a 3.5 mm crochet hook, chain 109/115/121/127 chains.
-
Make 1 turning chain, turn the chain and crochet a row of single crochet. One single crochet in each chain. Crochet the row to the end.
-
Make 1 turning chain, turn the work and crochet with the main pattern (Pattern 1), starting from the row marked with the number 1.
-
We need to crochet 56 rows in height (this is 14 stripes of the pattern with the cap). The last row will consist of single crochet in each stitch of the previous row.
-
From row 57, to shape the raglan, begin decreasing on both sides according to pattern 2. All decrease elements on the pattern are marked in red. For sizes:
a) 42/44, crochet 12 rows in height (3 stripes of the pattern with the cap)
b) 46/48, crochet 16 rows in height (4 stripes of the pattern with the cap)
Note that in the first stripe (the first 4 rows) the stitches are decreased not as in the following 2-5 rows. -
Finish the knitting with a row of single crochet. Draw up the stitch, pull out the hook, cut the yarn.
Diagram of decreases for the front and back
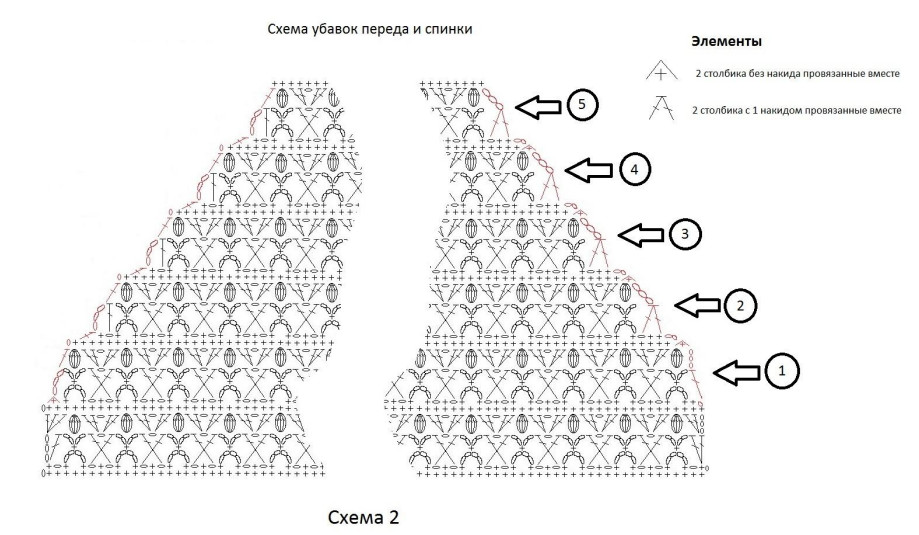
1. 2 single crochets together
2. 2 double crochets together
BACK.
We knit the back absolutely the same and with the same number of stitches as in the front of the sweater. Repeat from points 1 to 4.
5. From the 57th row for shaping the raglan, begin decreases on both sides according to scheme 2. All decrease elements in the chart are marked in red. For sizes:
a) 42/44 knit 16 rows in height (4 stripes of the pattern with a little bell motif)
b) 46/48 knit 18 rows in height (5 stripes of the pattern with a little bell motif)
6. Finish the knitting with a row of single crochet.
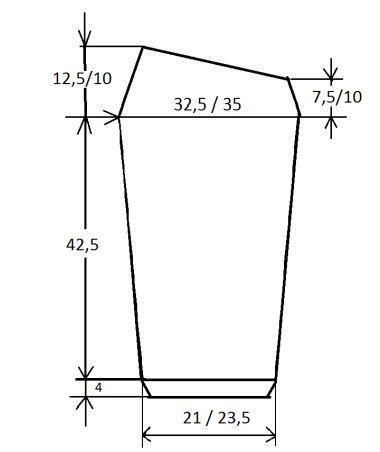
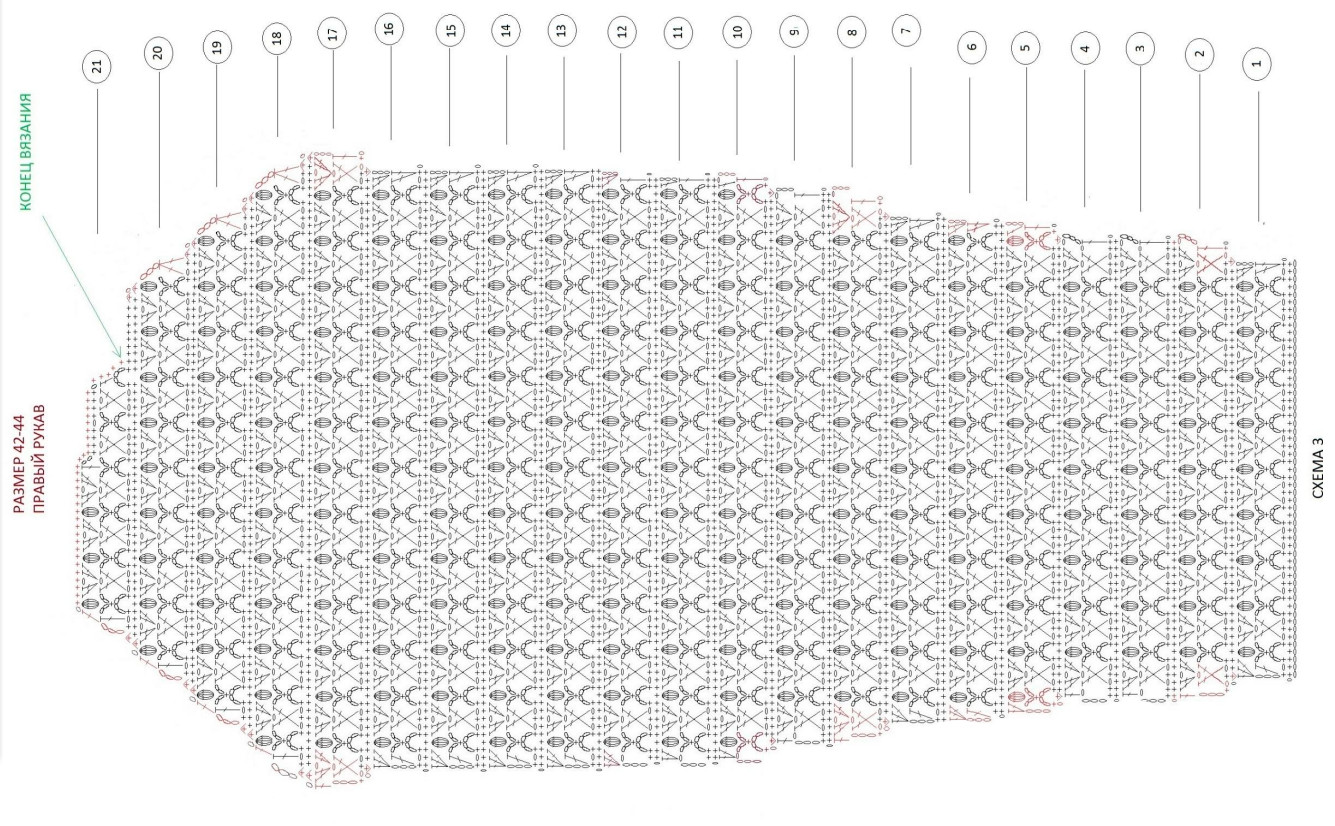
RIGHT SLEEVE.
For the sleeve, cast on a chain of:
a) for size 42/44 – 55 chain stitches
b) for size 46/48 – 61 chain stitches.
Then knit according to the chart:
a) for size 42-44 – chart 3
b) for size 46-48 – chart 4
SIZE 42–44 RIGHT SLEEVE
Size 46-48

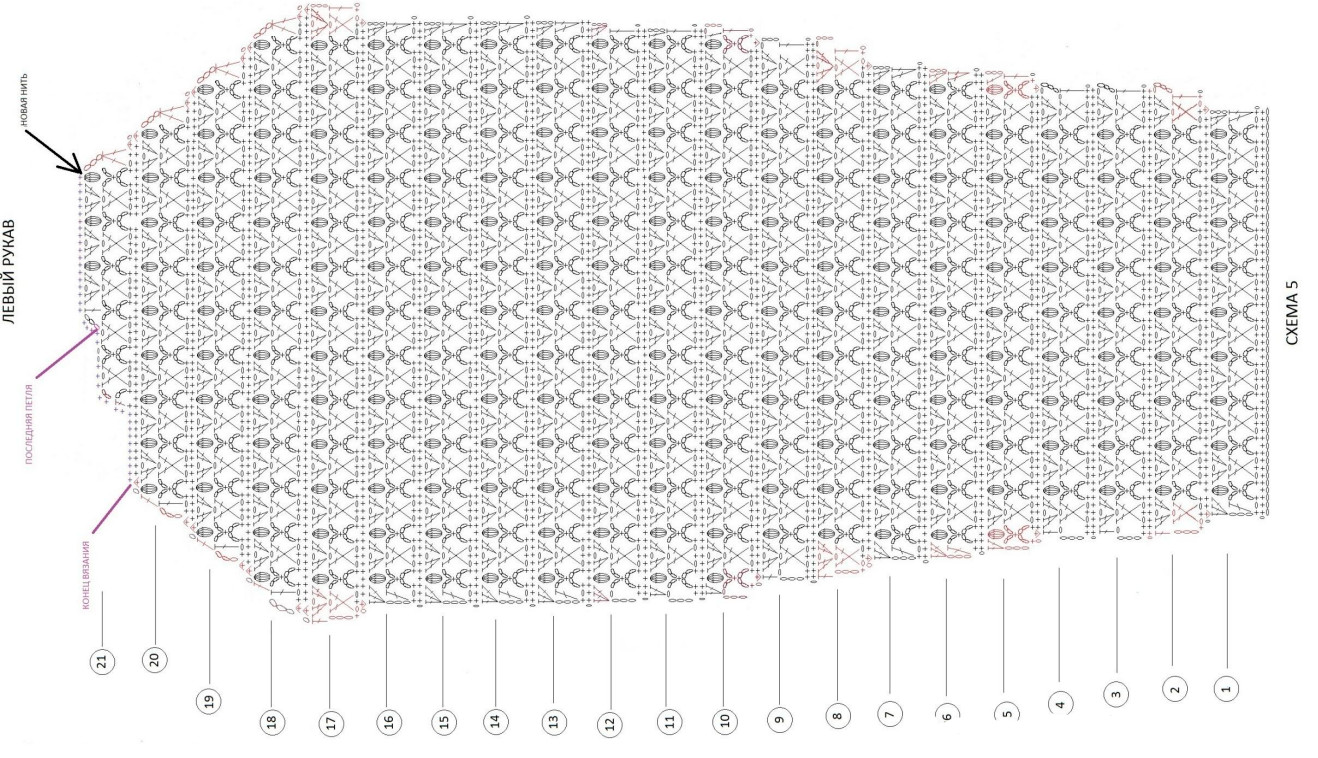
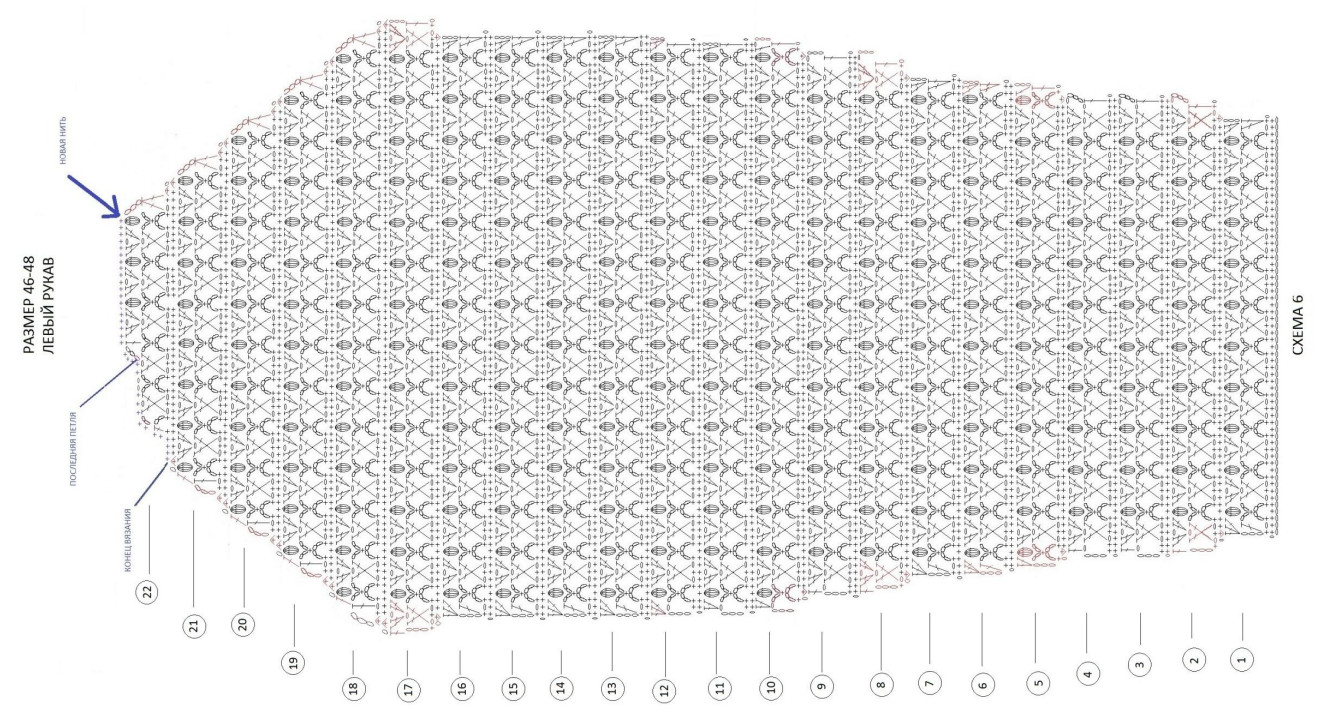
LEFT SLEEVE
For the sleeve, cast on a chain of:
a) for size 42/44 - 55 chain stitches
b) for size 46/48 – 61 chain stitches.
Then knit according to the chart:
a) for size 42-44 – chart 5
b) for size 46-48 – chart 6
But finish knitting near the pattern “bell” motif! Cut the yarn. And WITHOUT turning the knitting, attach the yarn to the start of the row (the diagram marks the place of yarn joining). And knit a row of single crochet according to charts 5–6. The end of this row is also marked on the diagram.
Pull out and cut the yarn.
All increases and decreases on the chart are marked in red.
SIZE 42–44 LEFT SLEEVE
SIZE 46-48 LEFT SLEEVE
CUFFS
-
On needles size 3, cast on 56/56/62/62 stitches. And knit in 1x1 ribbing for 12 rows in height.
-
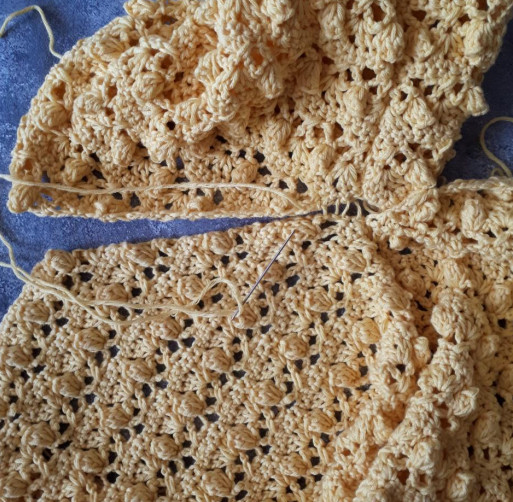
Cut the yarn to length = 3 cuff widths. Thread this yarn into a needle.
-
Lay the sleeve and the cuff in front of you so that the sleeve is on top and the cuff is on the bottom.
-
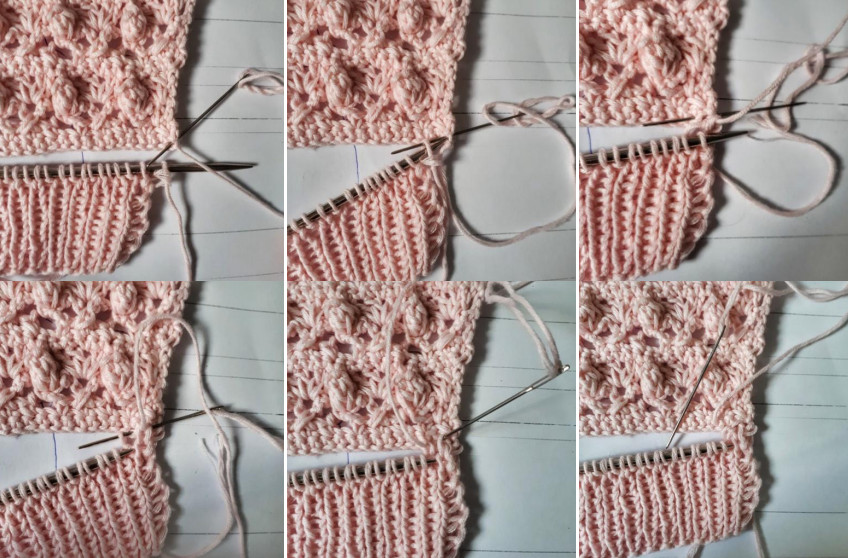
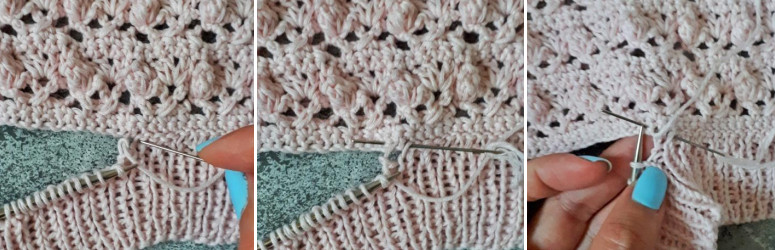
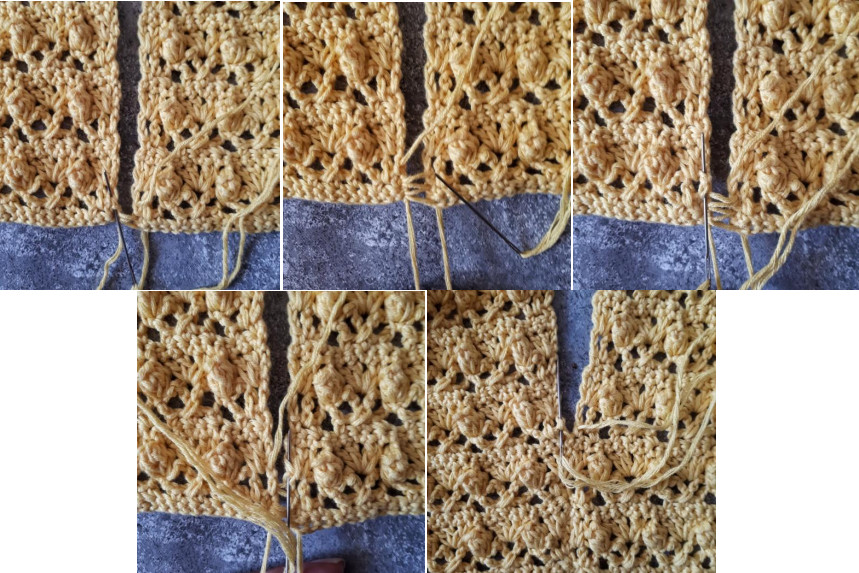
Begin sewing the cuff with a mattress stitch. For this, insert the needle from the wrong side into the first right chain stitch of the sleeve. Pull the yarn.
-
Then from the wrong side to the right side insert the needle into the first stitch (edge) of the cuff on the needles. Carefully ensure the stitch faces you and is not reversed. Slip the stitch off the needle, pull the yarn.
-
Next, again skipping the needle along the wrong side of the sleeve, pull it out from the second chain stitch. Pull the yarn.
-
Insert the needle from the wrong side to the right side through the first stitch of the ribbing (knit) on the sleeve. Drop the stitch, pull the yarn.
-
Insert the needle from the right side to the left side through the first, already sewn to the sleeve, cuff stitch and bring it out into the 3rd chain stitch of the sleeve. Pull the yarn.
-
Insert the needle from the wrong side to the right side through the edge stitch on the sleeve (purl stitch of the rib). Drop the stitch off the needle, pull the yarn.
-
insert the needle into the last sewn cuff stitch from the right side to the wrong side and pull it into the neighboring left chain stitch of the sleeve. Pull the yarn
-
Insert the needle from the wrong side to the right side through the edge stitch on the needle. Drop the stitch off the needle, pull the yarn.*
-
Thus, repeating the actions from to, we remove one stitch at a time from the needle and sew the cuff to the sleeve. Each stitch of the rib corresponds to a chain stitch of the sleeve.
FINISHING THE HEM OF THE FRONT AND BACK OF THE JUMPER.
-
To finish the hem of the front of the jumper, cast on on needles No. 3 – 110/116/122/128 stitches.
-
Knit in pattern “1x1 rib” for 12 rows in height.
-
Sew this ribbing to the bottom of the front of the jumper with a mattress stitch. In the same way as the cuffs.
-
Do the same for the back of the jumper.
ASSEMBLY OF THE JUMPER.
Well, here we are on the final stretch! Now sew all parts in the following order:
-
Sew the back to the front of the jumper.
-
Next, sew the side seams of the sleeves.
-
Attach the finished sleeves to the body of the jumper.
-
Tuck in and hide all yarn tails.
Sewing all the pieces can be done in 2 ways.
-
MATTRESS SEAM (also called joining seam).
The seam for this method runs along the edge stitches on the right side of the pieces.
At the height of the row made of double crochet stitches, two needle holes are made. When sewing a row of single crochet, you sew them one stitch at a time.
During the work, the stitches pull toward each other.
Backstitch.
The sleeve is turned right side out. The body is wrong side out.
The sleeve is inserted into the jumper body with right sides together.
Sew the pieces along the edge, carefully aligning the pattern.
Finishing the neckline.
-
To finish the neckline, attach a thread from a new skein to the top of the right sleeve seam of the jumper.
-
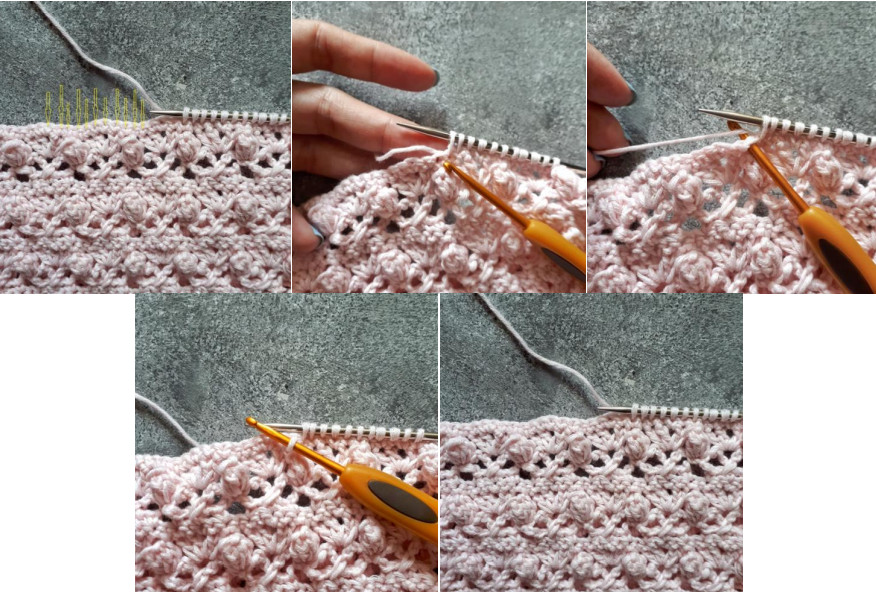
Take circular needles on a cable No. 3 and a crochet hook. Using the crochet hook, from each single crochet stitch of the top row of the jumper, pick up a loop onto the needle. The loops must be picked up from all stitches of the formed top row of the jumper. Count carefully to ensure the number of stitches is even.
-
At the end of the cast-on row, hang a marker on the needle or a contrasting thread to mark the start of the row.
-
Knit in the round in a 1x1 rib pattern for 10 rows in height.
-
Row 11 is worked entirely in purl stitches. Work another 12 rows.
-
Cast off 6 stitches at the beginning of the row to form a hole for inserting elastic tape.
-
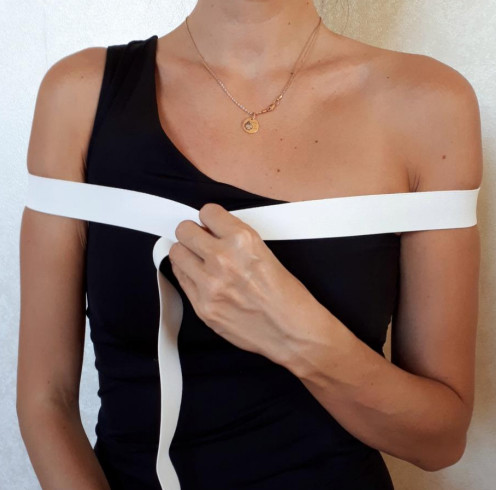
Cut a length of yarn equal to three times the length of the jumper's upper edge, cut and thread onto a needle.
-
Fold the ribbing in half. The remaining stitches on the needle are sewn with a mattress stitch on the wrong side of the jumper to the top part of the loops forming the braid. The seam should run over the raised stitches of the row of single crochet stitches. It should not be visible on the right side. Hide the remaining yarn tails in the seam.


This is how the seam looks on the right and wrong sides.
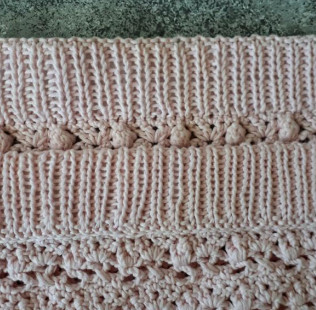
This is how the seam looks on the right and wrong sides.
Backstitch.
Place the pieces with the right sides facing inward. We will work from the wrong side of the pieces.
Make a backstitch, then pass the needle along the wrong side forward by two stitches.
Stitches should be of equal length, approximately equal to the height of a row.
Repeat these actions until the end of the pieces.

With this method of sewing, the seam on the wrong side may be quite thick. After sewing and blocking, steam it from the wrong side through gauze. This will make it softer and flatter. Just don't overdo it, or the puffed bobbles will turn into lumps.
This is how the seam looks on the right and wrong sides.
How to sew in the sleeve:
Knit seam.
The pieces lie with the right sides up, facing each other. Ensure pattern alignment.
-
Into the formed tube, insert an elastic band. Adjust the length of the band to fit your shoulders and body.
Blocking
All my knitted items I wash in the washing machine on the wool cycle.
The finished jumper should be turned inside out and put in the washing machine. The jumper should be washed by itself.
For washing I use a special detergent for cotton.
After washing, turn the damp jumper right side out and lay it flat on a horizontal drying rack covered with a terry towel.
Be sure to give the jumper an even shape.
As soon as the top dries, turn the jumper over. You can gently pat the bobbles with your hand to lift them a little.
Height adjustment
All measurements are for a height of approximately 166–170 cm. If you are shorter (taller) in height, when knitting the back and front, remove (add) the bottom 4 rows of the pattern (one stripe with the puff pattern).
The sleeve length can also be adjusted by adding or removing rows in the cuff.
Schematic drawing of jumper parts