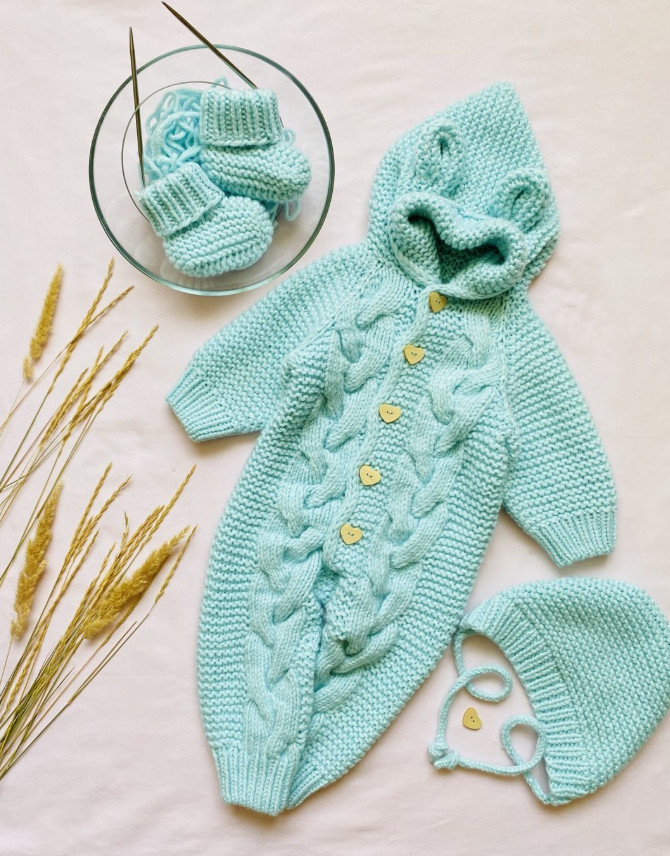
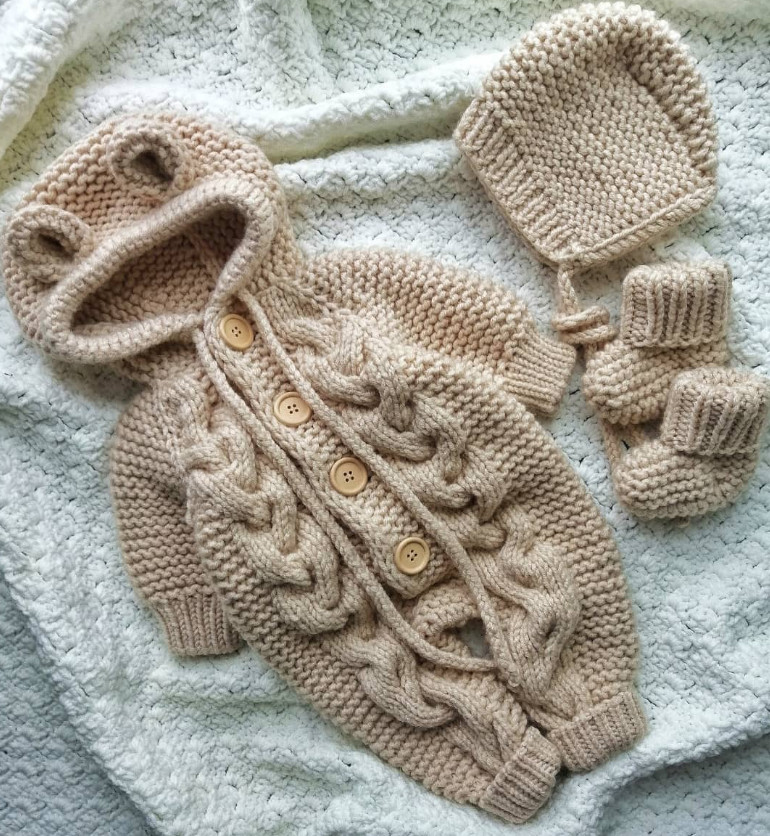
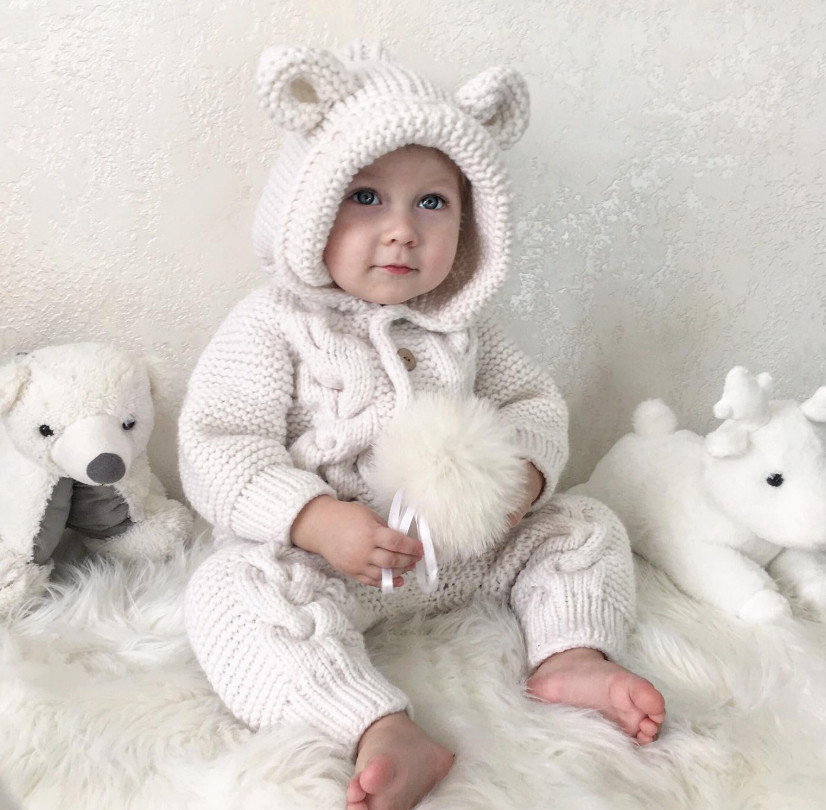
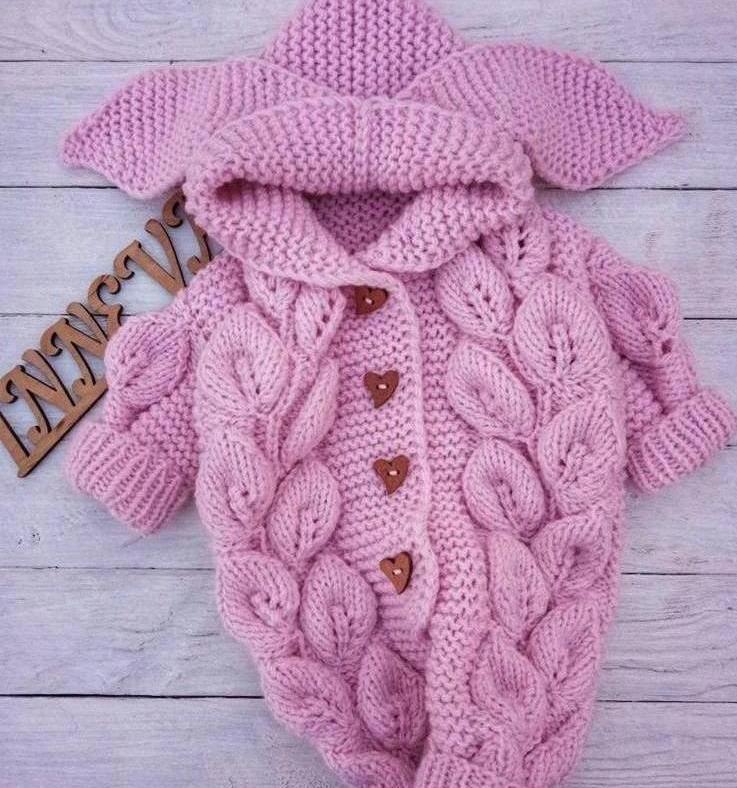
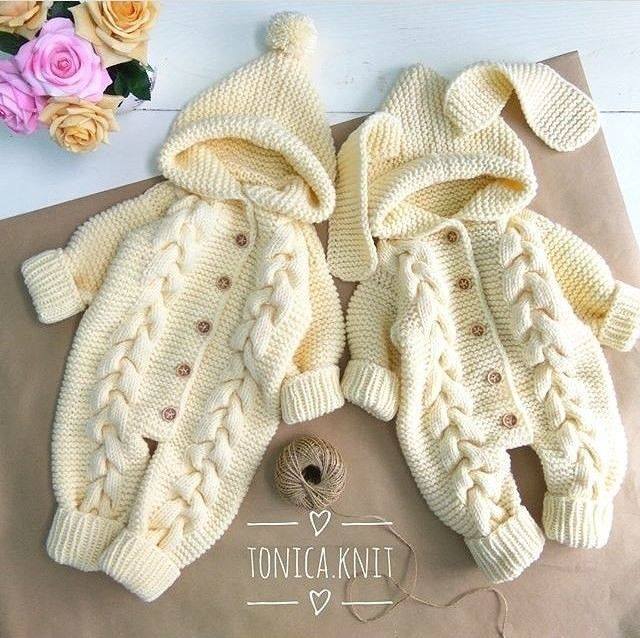
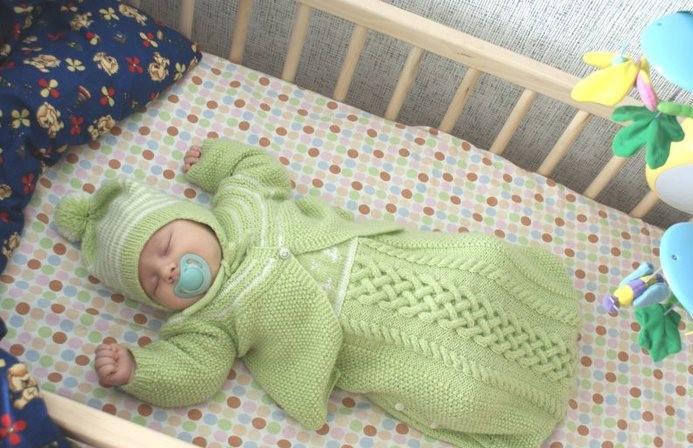
Baby romper with braids, sizes from 3 to 12 months.
Added: 15.10.2025 в 18:43 Views: 651
Baby romper with braids, sizes from 3 to 12 months.Klubokhttp://klubok.work/23/181/9228/Klubokhttps://klubok.work/css/image/top-logo-en.png

All the calculations are given as fractions for sizes 0-3 months / 3-6 months / 6-9 months / 9-12 months
For knitting the baby romper
You will need:
1. Yarn and circular needles Alize LanaGold Classic 240 m per 100 g, in one strand, needles size 4 – half-wool 3/4/5/6 skeins
Alize Baby Wool 175 m per 50 g, in two strands, needles size 5 – children's half-wool 6/8/10/12 skeins
BBB Full 90 m per 50 g, in one strand, needles size 5 – 100 % merino wool 7/9/12/14 skeins
2. Markers
3. Cable needle
4. Scissors
5. Needle or hook to weave in tails
6. 5-6 buttons size 25-30 mm.
7. Row counter if desired and necessary
8. Notebook/pencil (if you knit to your own measurements, it's crucial to clearly record the number of rows and stitches you have knitted when knitting the legs and arms. They must be the same). When using other sizes and other yarn, you must calculate the counts yourself (using the 'Stitch Count' section).
The yarn should be smooth, and hold cables well.
The garment is knitted seamless from bottom to top. In the round and in purl rounds. We will sew only the crotch and shoulder seams.
Used patterns: — 2x2 rib (2 knit stitches, 2 purl stitches; it knits the same in all rows), — garter stitch (when knitting on wrong side rows: all stitches knit on both front and back sides).
When knitting in the round – in one row knits, in the next purls) — shadow cable (30 stitches, cross every 10 rows) or 21-stitch braid (segment of 5 stitches, cross every 10 rows). You can use other cables, chains or aran textures; then you must calculate the stitch counts yourself using the 'Stitch Count' section.
My gauge with the specified yarn and needles: 16 stitches per 10 cm, cable 30 stitches – 9 cm, braid 21 stitches – 8 cm, 24 rows per 10 cm.
IMPORTANT: Never neglect the swatch, especially if you are knitting with this yarn, with this needle size or with this pattern for the first time. It's better to knit a swatch once than to unravel the garment several times.
IMPORTANT: For guaranteed results it is crucial that the gauge matches the one stated in the description. If the gauge is larger or smaller, you should choose needles of a size respectively larger or smaller. Or calculate your own stitch count based on your gauge, yarn, and sizes.
1. Garment construction and required measurements
The garment is worked as follows:
— two legs are knit in the round,
— then the legs are joined into one piece and the body of the romper is knit, working the pattern and the bands, buttonholes, in purl rounds
— then split the body into back and two fronts and knit the armholes, in purl rounds
— knit the sleeves, in the round
— knit the hood, in purl rounds — knit ears, in purl rounds
For calculations we will need the following measurements:
— leg length to the diaper
— leg circumference at its widest part (thigh) plus 5 cm
— sleeve length
— arm circumference at its widest part plus 5 cm
— chest circumference (belly), since in babies the chest is the widest part of the torso plus 10 cm
— back length to diaper plus 5 cm
— hood height (from shoulder to crown) plus 5 cm
Don't forget to leave space for a diaper, which needs to be left because a diaper tends to swell as it fills. That is why the legs of the romper are shorter than they would be, and the torso longer. For almost every size we add extra centimeters. This is done so that the child can move freely in the romper. Additionally, the romper is not worn directly on the skin; under it you put other clothing, so it should be loose.

However, if you have the possibility to take all measurements and you knit to your own sizes, base on your own measurements. Also, if the baby is "present," you can always try the romper on them right away.
2. Pattern and swatch.
It is extremely important to knit a swatch.
In this project, very bulky cables of 30 and 21 stitches are used, so we knit the swatch with cables, because cables significantly tighten the knitting. And here it's very bulky, so the tightness will be strong.
Additionally, on the swatch we will learn to knit the pattern.
We knit in reverse rows: — odd rows knit – all stitches knit, — even rows purl; here garter stitch – knit stitches, cable – purl stitches. For convenience, place markers at the start and end of the cable.
Cable pattern 30 stitches FOR THE RED ROMPER:

Cast on 50 stitches.
Pattern construction: 1 edge stitch – 9 garter stitches – 30 cable stitches – 9 garter stitches – 1 edge stitch.
Row 1 – first stitch edge, slip it, do not knit, all stitches knit, last edge stitch knit.
Row 2 – edge stitch, 9 knit stitches, 30 purl stitches, 9 knit stitches, edge stitch
Row 3 – first edge stitch, all stitches knit, last edge stitch
Row 4 – edge stitch, 9 knit stitches, 30 purl stitches, 9 knit stitches, edge stitch
Row 5 – edge stitch, all stitches knit, last edge stitch
Row 6 – edge stitch, 9 knit stitches, 30 purl stitches, 9 knit stitches, edge stitch
Row 7 – edge stitch, all stitches knit, last edge stitch
Row 8 – edge stitch, 9 knit stitches, 30 purl stitches, 9 knit stitches, edge stitch
Row 9 – 1 edge stitch, 9 knit stitches, 10 stitches slip onto an auxiliary needle and hold in front of the work, knit 10 stitches, return the 10 stitches from the auxiliary needle to the left needle and knit them, then 10 more stitches from the cable in knit, 9 garter stitches knit, edge stitch

Row 10 — edge stitch, 9 knit stitches, 30 purl stitches, 9 knit stitches, edge stitch
Rows 11–18 – repeat from row 1 to row 8.
Row 19 – 1 edge stitch, 9 knit stitches, 10 stitches of the braid are knitted, the next 10 stitches are slipped onto an auxiliary needle and held at the back of the work, knit 10 stitches, return the 10 stitches from the auxiliary needle and knit them, 9 garter stitches, edge stitch.

Row 20 — edge stitch, 9 knit stitches, 30 purl stitches, 9 knit stitches, edge stitch
For the swatch, knit 50 rows, 5 crossovers.
After that, measure the swatch — how wide the braid is, and how many stitches in garter stitch in 5 cm. (for 10 cm we will multiply by 2 later)

In the sample, the braid (30 stitches) is 9 cm and 8 stitches in 5 cm garter stitch, which means a gauge of 16 stitches per 10 cm.
These braids can be replaced with any others, or knit other patterns, for example leaves. Garter stitch can also be replaced with seed stitch, stockinette, or reverse stockinette and create your own unique model.