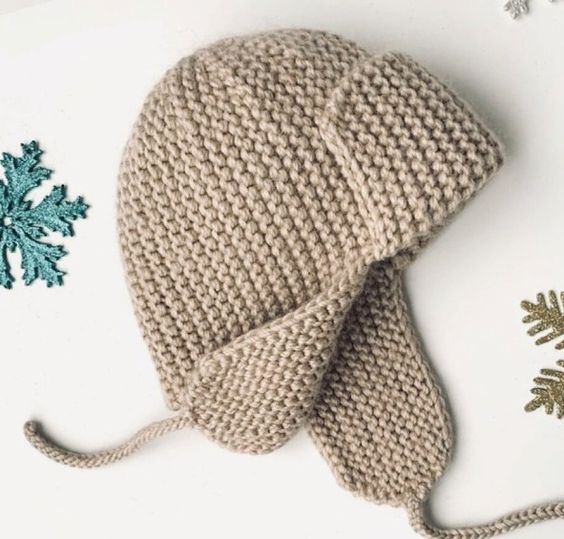
Tender cap “Lullaby” from Drops Design knitted with needles.
Added: 16.10.2016 в 04:31 Views: 66505
Tender cap “Lullaby” from Drops Design knitted with needles.Klubokhttp://klubok.work/23/189/6573/Klubokhttps://klubok.work/css/image/top-logo-en.png
Delicate hat «Lullaby» from Drops Design knitted with needles.

AUTHOR ADELE GROSSMAN IN KNITTING WITH NEEDLES FOR CHILDREN — 31 JULY, 2014
Presented for your consideration is a refined piece, handmade with knitting needles. This cute item for children will be indispensable in hot summer weather, or in cooler conditions. The item itself is done using garter stitch and has advantages: quality, attractive appearance, as the pattern is two-sided. The knitting is performed with knit stitches, except for the circular portion, in which one row is knit and the next is purl. We offer you the simplest chart describing garter stitch (back and forth on the needles).
The item is intended for children from one year old up to 4 years old. The knitting is done with two needles, which forms a single piece, and with increases and decreases you can shape the hat's ears.
All rows of garter stitch are worked in knit stitches.
Components of the hat:
Drops Karisma yarn, which consists of 100% wool (100 m about 50 g) – 50-50-100-100 (this is 100-100) grams
You will also need needles size 4 mm. The gauge should be sturdy for the quality of the item.
Edge «picot»:
Row 1: knit
Row 2: all stitches are knit up to the last four, and then they are worked as follows: 2 stitches together with the knit stitch, make 1 yarn over, then work from 1 stitch into the remaining 2 stitches (resulting in an additional 2 stitches)
Row 4: knit stitches (repeat rows 1-4)
Knitting of the Lullaby hat itself from Drops Design:
First, cast on 27-31-35-37 (41-43) stitches, then after the first four edge knit stitches place a marker (it will move upward each time during your work). Then you begin garter stitching while creating the edge with picots over the 4 edge stitches you marked with the marker. Don’t forget to add one more stitch on the knit side after the marker (the picot edge), and decrease one stitch on the left side. If you look in more detail, the following scheme should be used:
Row 1: 4 edge stitches with picots, 1 knit stitch, 1 yarn over (adding a stitch). Knit until there are 3 stitches left, knit 2 together with the left, 1 knit stitch.
Rows 2-1: knit to the marker, knit the yarn over twisted (through the back loop). This is done to avoid a hole in the product. Now finish the 4 edge stitches with picots. Repeat these 2 rows until the length reaches 5-5 1/2 -6-6 1/2 (7-8) cm. Then decrease 1 stitch on the knit side and add 1 stitch on the left. More detail:
Row 1: 4 edge picot stitches, slip 1 knit stitch, knit the next stitch, then slip the knitted stitch over it. Knit until only 1 stitch remains, 1 yarn over, 1 knit stitch
Row 2: knit to the marker with knit stitches, knit the yarn over twisted, finish all 4 edge picot stitches. Repeat these 2 rows until the length is 10-11-12-13 (14-16) cm, and finish all with knit stitches
Now proceed to the purl row for the holes: purl 2 stitches together with the knit side, 1 yarn over, repeat from the start until there remains 1 stitch before the marker, 1 knit stitch, finish the picot edge (on the next row the yarn over is knitted on twisted stitches). After that, add 1 stitch at the beginning of the row, and on every 4th row of the knit side, then decrease 1 stitch at the end until the length reaches 14 1/2 -15 1/2 -16 1/2 -17 1/2 (18-19) cm. Then decrease 1 stitch at the beginning of the row on the knit side every 2nd row, and add 1 stitch at the end of the knit side every 2nd row until the length becomes 19-20-21-22 (22-22) cm, and then finish all with knit stitches as usual.
Purl side (row with holes):
Knit 2 stitches together with the knit side, make 1 yarn over, repeat from the start until 1 stitch before the marker, 1 knit stitch, finish the picot edge (in the knitting of the next row the yarn over is knitted on twisted stitches). After that, add 1 stitch at the beginning of the row, and from the knit side on every 2nd row, and then decrease 1 stitch at the end of the row and until the length reaches 24-25 1/2 -27-28 1/2 (29-30) cm.
And finally decrease 1 stitch at the start of the knit side on the 2nd row and add 1 stitch at the end of every 2nd row until the length reaches 29-31-33-35 (36-38) cm. Bind off all stitches.
After knitting, finish the garment. Sew the hat neatly edge to edge. To create lovely ties, cut two strands about 150 cm long, then twist them and thread through the holes on the hat’s ear flaps. Fold the finished item and twist again, tying a knot at the end.
Source: http://www.stranamam.ru/post/8741605/
Delicate hat «Lullaby» from Drops Design knitted with needles.
AUTHOR ADELE GROSSMAN IN KNITTING WITH NEEDLES FOR CHILDREN — 31 JULY, 2014
Presented for your consideration is a refined piece, handmade with knitting needles. This cute item for children will be indispensable in hot summer weather, or in cooler conditions. The item itself is done using garter stitch and has advantages: quality, attractive appearance, as the pattern is two-sided. The knitting is performed with knit stitches, except for the circular portion, in which one row is knit and the next is purl. We offer you the simplest chart describing garter stitch (back and forth on the needles).
The item is intended for children from one year old up to 4 years old. The knitting is done with two needles, which forms a single piece, and with increases and decreases you can shape the hat's ears.
All rows of garter stitch are worked in knit stitches.
Components of the hat:
Drops Karisma yarn, which consists of 100% wool (100 m about 50 g) – 50-50-100-100 (this is 100-100) grams
You will also need needles size 4 mm. The gauge should be sturdy for the quality of the item.
Edge «picot»:
Row 1: knit
Row 2: all stitches are knit up to the last four, and then they are worked as follows: 2 stitches together with the knit stitch, make 1 yarn over, then work from 1 stitch into the remaining 2 stitches (resulting in an additional 2 stitches)
4th row: knit stitches (repeat rows 1–4)
The knitting of the Lullaby hat itself from Drops Design:
First, cast on 27-31-35-37 (41-43) stitches, then after the first 4 edge stitches place a marker (it will move upward each time during your work). Next you begin garter stitch while forming the edge with the pico over the 4 edge stitches you marked with the marker. Do not forget to add one more stitch on the right side after the marker (edge of the pico), and decrease 1 stitch on the left side. If you look in more detail, the following scheme should be used:
1st row: 4 edge stitches with pico, 1 knit stitch, 1 yarn over (adding a stitch). Knit until there are 3 stitches left, 2 stitches together along the left, 1 knit stitch.
2-1 row: knit up to the marker, the yarn over knit through a crossed stitch (behind the back wall). This is done to avoid a hole in the product. Now finish the 4 edge stitches with pico. Repeat these 2 rows until the length becomes 5-5 1/2 -6-6 1/2 (7-8) cm. Then decrease 1 stitch on the right side and add 1 stitch on the left. Details:
1st row: 4 edge pico stitches, slip 1 knit stitch, knit the next stitch to it, and then pass the worked stitch over. Knit until there remains 1 stitch, 1 yarn over, 1 knit stitch.
2nd row: knit to the mark, the yarn over knit through a crossed stitch, finish all 4 edge pico stitches. Repeat these 2 rows until the length reaches 10-11-12-13 (14-16) cm, and finish all in knit
Now we proceed to the wrong-side row for making holes: knit 2 stitches together with the left, make 1 yarn over, repeat from the start until there remains 1 stitch before the marker, 1 knit stitch, finish the pico edge.
After this, increase 1 stitch, and at the beginning of every 4th row on the right side, and then decrease 1 stitch at the end, on every 2nd row until the length reaches 14 1/2 -15 1/2 -16 1/2 -17 1/2 (18-19) cm from the cast-on edge.
Then decrease 1 stitch at the beginning of the row on the right side every 2nd row, and increase 1 stitch at the end of the right side every 2nd row until the length becomes 19-20-21-22 (22-22) cm, and then as usual finish everything in knit.
Wrong side (row with holes):
Knit 2 stitches together with the left, make 1 yarn over, repeat from the start until there remains 1 stitch before the marker, 1 knit stitch, finish the pico edge (in the next row the yarn over is knitted on the crossed stitches). After that, add 1 stitch at the beginning of the row, and on the knit side every 2nd row, and then decrease 1 stitch at the end of the row and until reaching a length of 24-25 1/2 -27-28 1/2 (29-30) cm.
And finally decrease 1 stitch from the beginning of the knit side in the 2nd row and add 1 stitch at the end of every 2nd row until the length becomes 29-31-33-35 (36-38) cm. Bind off all stitches.
After knitting, finish the design of the product. Sew the hat with neat stitches edge to edge. To create lovely ties, cut 2 strands about 150 cm long, then twist them and thread through the holes on the hat’s ear flaps. Fold the finished item and twist again, tying a knot at the end.
Source: http://www.stranamam.ru/post/8741605/
Delicate hat “Lullaby” from Drops Design knitted with needles.
AUTHOR ADEL GROSSMAN IN KNITTING WITH NEEDLES FOR CHILDREN — 31 JULY, 2014
Your attention is offered a refined piece, handmade by knitting. This cute item for children will become indispensable in hot summer heat, or in cool weather. The item itself is made in garter stitch and has advantages: quality, an attractive appearance, since the pattern is two-sided. The knitting is done with knit stitches, except in the circular, where one row is knit and the second is purl. We offer you the simplest scheme describing garter knitting (back and forth on the needles).
The piece is intended for children from one year old to 4 years old. It is knitted with two needles, which forms a single piece, and using increases and decreases you can form the hat’s ears.
All rows of garter stitch are worked in knit stitches.
Hat components:
Drops Karisma yarn, consisting of 100% wool (100 m approximately 50 g) – 50-50-100-100 (this is 100-100) grams
You will also need needles size 4 mm. The fabric density should be sturdy for the quality of the product.
Edge “pico”:
1st row: knit stitches
2nd row: all stitches knit until the last 4, then work as follows: 2 stitches together with the knit, make 1 yarn over, then work from 1 stitch into the remaining 2 stitches (resulting in adding 2 more stitches)
4th row: knit stitches (repeat rows 1–4)
The knitting of the Lullaby hat itself from Drops Design:
First, cast on 27-31-35-37 (41-43) stitches, then after the first 4 edge stitches place a marker (it will move upward each time during your work). Next you begin garter stitch while forming the edge with the pico over the 4 edge stitches you marked with the marker. Do not forget to add one more stitch on the right side after the marker (edge of the pico), and decrease 1 stitch on the left side. If you look in more detail, the following scheme should be used:
1st row: 4 edge stitches with pico, 1 knit stitch, 1 yarn over (adding a stitch). Knit until there are 3 stitches left, 2 stitches together along the left, 1 knit stitch.
2-1 row: knit up to the marker, the yarn over knit through a crossed stitch (behind the back wall). This is done to prevent a hole in the product. Now finish the 4 edge stitches with pico. Repeat these 2 rows until the length becomes 5-5 1/2 -6-6 1/2 (7-8) cm. Then decrease 1 stitch on the right side and add 1 stitch on the left. Details:
1st row: 4 edge pico stitches, slip 1 knit stitch, knit the next stitch to it, and then pass the worked stitch over it. Knit until there remains 1 stitch, 1 yarn over, 1 knit stitch
2nd row: knit to the mark, the yarn over knit through a crossed stitch, finish all 4 edge pico stitches. Repeat these 2 rows until the length reaches 10-11-12-13 (14-16) cm, and finish all in knit
Now proceed to the wrong side row of hole knitting: knit 2 stitches together, with 1 yarn over, repeat from the start until there remains 1 stitch before the mark, 1 knit stitch, finish the pico edge (in the next row, the yarn over is knitted on crossed stitches). After that, add 1 stitch at the beginning of the row, and on the knit side every 2nd row, and then decrease 1 stitch at the end until reaching the length 24-25 1/2 -27-28 1/2 (29-30) cm.
And finally decrease 1 stitch from the beginning of the knit side in the 2nd row and add 1 stitch at the end of every 2nd row until the length reaches 29-31-33-35 (36-38) cm. Bind off all stitches.
After knitting, finish the product’s finish. Sew the hat with neat stitches edge to edge. To create wonderful ties, cut 2 strands about 150 cm long, then twist them and thread through the holes on the hat’s ear flaps. Fold the finished item and twist again, tying a knot at the end.
Source: http://www.stranamam.ru/post/8741605/
Delicate hat “Lullaby” from Drops Design knitted with needles.
AUTHOR ADELE GROSSMANIN KNITTING WITH NEEDLES FOR CHILDREN — JULY 31, 2014
We present to your attention a refined piece, handmade by knitting. This cute item for children will become indispensable in hot summer heat, or in cool weather. The item itself is made using the garter stitch and has advantages: quality, an attractive appearance, since the pattern is two-sided. The knitting is done with knit stitches, except for circular knitting, in which one row is knit and the next is purl. We offer you the simplest scheme describing garter knitting (back and forth on the needles).
The item itself is intended for children from one year old to four years old. The knitting is performed with two needles, which forms a single piece, and with increases and decreases of stitches you can shape the hat's ears.
All rows of the garter stitch are worked in knit stitches.
Components of the hat:
Drops Karisma yarn, which consists of 100% wool (about 100 m per 50 g) – 50-50-100-100 (this is 100-100) grams
You will also need needles size 4 mm. The gauge should be tight for the quality of the finished item.
Edge "picot":
1st row: knit
2nd row: all stitches knit to the last four, and they are worked as follows: 2 stitches together with knit, make 1 yarn over, then work from 1 stitch into the remaining 2 stitches (this results in an additional 2 stitches gained)
4th row: knit (repeat rows 1–4)
Knit of the Lullaby hat by Drops Design:
To begin, cast on 27-31-35-37 (41-43) stitches, then after the first 4 edge stitches place a marker (it will move upward each time as you work). Then you begin garter knitting while forming the picot edge over the 4 edge stitches you marked with the marker. Don’t forget to add 1 more stitch on the right side after the marker (picot edge), and decrease 1 stitch on the left side. If we look more closely, the following scheme should be:
1st row: 4 edge stitches with picot, 1 knit stitch, 1 yarn over (increase). Knit until 3 stitches remain, 2 stitches together with knit, 1 knit stitch.
2nd row: knit up to the marker, knit the yarn over through a twisted stitch (behind the back wall). This is done to avoid a hole in the fabric. Now finish the 4 edge picot stitches. Repeat these 2 rows until the length reaches 5-5 1/2 -6-6 1/2 (7-8) cm. Then decrease 1 stitch on the right side and add 1 stitch on the left. More detail:
1st row: 4 edge picot stitches, slip 1 knit stitch, knit the next stitch, then pass the knitted stitch over it. Knit until only 1 stitch remains, 1 yarn over, 1 knit stitch
2nd row: knit to the marker, the yarn over knit through a twisted stitch, finishing all 4 edge picot stitches. Repeat these 2 rows until length reaches 10-11-12-13 (14-16) cm, and finish all stitches in knit
Now proceed to the purl row for the holes: purl 2 stitches together with the knit, 1 yarn over, repeat from the start until 1 stitch remains before the marker, 1 knit stitch, finish the picot edge (when knitting the next row, the yarn over is knit on twisted stitches). After that, increase 1 stitch at the start of the row, and on the right side in every 4th row, and then decrease 1 stitch at the end on every 2nd row until the length reaches 14 1/2 -15 1/2 -16 1/2 -17 1/2 (18-19) cm from the already cast-on edge.
Then decrease 1 stitch at the start of the right side in every 2nd row, and increase 1 stitch at the end of the knit side in every 2nd row until the length becomes 19-20-21-22 (22-22) cm, and then finish all stitches as usual in knit.
Wrong side (row with holes):
Knit 2 stitches together with the knit, make 1 yarn over, repeat from the start until there remains 1 stitch before the marker, 1 knit stitch, finish the picot edge (on the next row, the yarn over is worked in knit on twisted stitches). After that, add 1 stitch at the start of the row, and on the knit side every 2nd row, then decrease 1 stitch at the end of the row and until the length reaches 24-25 1/2 -27-28 1/2 (29-30) cm.
And finally decrease 1 stitch at the start of the knit side in the 2nd row and add 1 stitch at the end of every 2nd row until the length reaches 29-31-33-35 (36-38) cm. Bind off all stitches.
After finishing the knitting, complete the finish of the item. Sew the hat neatly edge to edge. To create lovely ties, cut 2 strands about 150 cm long, then twist them and thread through the holes on the hat’s ears. Fold the finished piece and twist again, tying a knot at the end.
Source: http://www.stranamam.ru/post/8741605/

We present to your attention a refined piece, handmade by knitting. This cute item for children will become indispensable in hot summer heat, or in cool weather. The item itself is made using garter stitch and has advantages: quality, an attractive appearance, since the pattern turns out to be two-sided. The knitting is performed with knit stitches, except for circular knitting, in which one row is knit and the next is purl. We offer you the simplest scheme describing garter knitting (back and forth on the needles).
The item itself is intended for children from one year old to four years old. The knitting is performed with two needles, which forms a single piece, and with increases and decreases of stitches you can shape the hat's ears.
All rows of the garter stitch are worked in knit stitches.
Components of the hat:
Drops Karisma yarn, which consists of 100% wool (about 100 m per 50 g) – 50-50-100-100 (this is 100-100) grams
You will also need needles size 4 mm. The gauge should be tight for the quality of the finished item.
Edge “picot”:
1st row: knit
2nd row: all stitches knit to the last four, and they are worked as follows: 2 stitches together with knit, make 1 yarn over, then knit from 1 stitch into the remaining 2 stitches (this yields an additional 2 stitches)
4-й ряд: knits (repeat rows from 1st to 4th)
The knitting of the Lullaby hat itself from Drops Design:
To begin, cast on 27-31-35-37 (41-43) stitches, then after the first 4 edge stitches place a marker (it will move upward each time during your work). Next you begin garter stitch while performing the edge with picots over the 4 edge stitches that you marked with the marker. Do not forget to add 1 more stitch on the right side after the marker (the picot edge), and decrease 1 stitch on the left side. If you look at it more closely, the following scheme should be used:
Row 1: 4 edge stitches with picots, 1 knit stitch, 1 yarn over (adding a stitch). Knit until only 3 stitches remain, 2 stitches worked together on the left, 1 knit stitch.
Row 2-1: knit to just before the marker, knit the yarn over through a crossed stitch (behind the back loop). This is done to avoid a hole in the product. Now finish the 4 edge stitches with picots. Repeat these 2 rows until the length becomes 5-5 1/2 -6-6 1/2 (7-8) cm. Then decrease 1 stitch on the right side and add 1 stitch on the left. More details:
Row 1: 4 picot-edge stitches, slip 1 knit stitch, knit the next stitch, then pass the knitted stitch over it. Knit until only 1 stitch remains, 1 yarn over, 1 knit stitch
Row 2: to the marker, knit with knit stitches, the yarn over knit through a crossed stitch, finishes all 4 picot-edge stitches. Repeat these 2 rows until the length reaches 10-11-12-13 (14-16) cm, and finish all with knits
Now proceed to the wrong side row for making holes: knit 2 stitches together with the left, 1 yarn over, repeat from the start until there remains 1 stitch before the marker, 1 knit stitch, finish the picot edge.
After this, increase 1 stitch at the beginning of every 4th row on the right side, and then decrease 1 stitch at the end, on every 2nd row until the length reaches 14 1/2 -15 1/2 -16 1/2 -17 1/2 (18-19) cm from the already cast-on edge.
Then decrease 1 stitch at the beginning of the right side on every 2nd row, and increase 1 stitch at the end of the right side on every 2nd row until the length becomes 19-20-21-22 (22-22) cm, and then as usual finish all in knits.
Wrong side (row with holes):
Knit 2 stitches together with the left, make 1 yarn over, repeat from the start to the 1 stitch before the marker, 1 knit stitch, finish the picot edge (when knitting the next row, the yarn over is knitted on crossed stitches). After that, add 1 stitch at the beginning of the row, and on the knit side every 2nd row, and then decrease 1 stitch at the end of the row until the length reaches 24-25 1/2 -27-28 1/2 (29-30) cm.
And finally decrease 1 stitch at the beginning of the knit side in the 2nd row and add 1 stitch at the end of every 2nd row until the length reaches 29-31-33-35 (36-38) cm. Bind off all stitches.
After knitting, complete the finish of the product. Sew the hat neatly edge to edge. To create lovely ties, cut 2 strands about 150 cm long, then twist them and thread through the holes on the hat’s ear tabs. Fold the finished item and twist again, tying a knot at the end.
Source: http://www.stranamam.ru/post/8741605/
We present to your attention a refined work, handmade with knitting needles. This cute item for children will become indispensable in hot summer heat, or in cool weather. The item itself is done in garter stitch and has advantages: quality, attractive appearance, since the pattern is reversible. The knitting is performed with knit stitches, except circular, where one row is knit and the other is purl. We offer you the simplest scheme describing garter stitch (back and forth on the needles).
The garment is intended for children from one year old to 4 years old. The knitting is done with two needles, which forms a single piece, and with increases and decreases you can shape the ears of the hat.
All rows of the garter stitch are knitted with knit stitches.
Hat components:
Drops Karisma yarn, which consists of 100% wool (about 100 m per 50 g) – 50-50-100-100 (that’s 100-100) grams
You will also need needles size 4 mm. The gauge should be firm for the quality of the item.
Edge "picot":
Row 1: knit stitches
Row 2: all stitches knit until the last 4, and then they are worked as follows: knit 2 together with a knit stitch, make 1 yarn over, then work out of 1 stitch into the remaining 2 stitches (resulting in adding 2 stitches)
4-й ряд: лицевые (повторяйте ряды с 1-го по 4-й)
The knitting of the Lullaby hat itself from Drops Design:
To begin, cast on 27-31-35-37 (41-43) stitches, then after the first 4 edge stitches set a marker (it will move upward each time during your work). Next you begin garter stitch while performing the edge with picots over the 4 edge stitches that you marked with the marker. Do not forget to add another stitch on the knit side after the marker (the edge picot), and decrease 1 stitch on the left side. If we look at it in more detail, the following scheme should be used:
Row 1: 4 edge stitches with picots, 1 knit stitch, 1 yarn over (adding a stitch). Knit until there are 3 stitches left, 2 stitches together on the left, 1 knit stitch.
Row 2-1: knit to the marker, knit the yarn over through a crossed stitch (behind the back wall). This is done to avoid a hole in the product. Now finish the 4 edge stitches with picots. Repeat these 2 rows until the length becomes 5-5 1/2 -6-6 1/2 (7-8) cm. Then decrease 1 stitch on the knit side and add 1 stitch on the left. Details:
Row 1: 4 picot edge stitches, slip 1 knit stitch, knit into the next stitch, then pass the knitted stitch over it. Knit until 1 stitch remains, 1 yarn over, 1 knit stitch.
Row 2: to the marker, knit with knit stitches, the yarn over knit through a crossed stitch, finishes all 4 picot edge stitches. Repeat these 2 rows until the length reaches 10-11-12-13 (14-16) cm, and finish all with knits.
Now proceed to the wrong-side row of making holes: knit 2 stitches together with the left, 1 yarn over, repeat from the start until there remains 1 stitch before the marker, 1 knit stitch, finish the picot edge. After that, increase 1 stitch at the beginning of the row, and on the knit side every 2nd row, and then decrease 1 stitch at the end until the length reaches 14 1/2 -15 1/2 -16 1/2 -17 1/2 (18-19) cm from the already cast-on edge.
Then decrease 1 stitch at the beginning of the row on the knit side every 2nd row, and increase 1 stitch at the end of the knit side every 2nd row until the length becomes 19-20-21-22 (22-22) cm, and then as usual finish all in knits.
Wrong side (row with holes):
Knit 2 stitches together with the left, make 1 yarn over, repeat from the start until there remains 1 stitch before the marker, 1 knit stitch, finish the picot edge (on the next row the yarn over is knitted on crossed stitches). After that, add 1 stitch at the beginning of the row, and on the knit side every 2nd row, and then decrease 1 stitch at the end of the row and until reaching length 24-25 1/2 -27-28 1/2 (29-30) cm.
And finally decrease 1 stitch at the beginning of the knit side in the 2nd row and add 1 stitch at the end of every 2nd row until the length reaches 29-31-33-35 (36-38) cm. Bind off all stitches.
After knitting finish the garment. Sew the hat neatly edge-to-edge. To create wonderful ties, cut 2 threads about 150 cm long, then twist them and thread through the holes on the hat’s ears. Fold the finished item and twist again, tying a knot at the end.
Source: http://www.stranamam.ru/post/8741605/
AUTHOR ADELE GROSSMANIN KNITTING FOR CHILDREN — JULY 31, 2014
Here is a refined handmade knit item. This cute piece for children will be indispensable in hot summer heat, or in cooler weather. The item itself is worked in garter stitch and has advantages: quality, attractive appearance, since the pattern is two-sided. The knitting is performed in knit stitches, except in circular work, where one round is knit and the next is purl. We offer you the simplest scheme describing garter knitting (back and forth on needles).
The item is intended for children from one year old to four years old. The knitting is done with two needles, which forms a single piece, and with increases and decreases you can shape the hat’s ears.
All rows of garter stitch are knitted in knit stitches.
Hat components:
Drops Karisma yarn, which consists of 100% wool (about 100 m per 50 g) – 50-50-100-100 (this is 100-100) grams
You will also need needles sized 4 mm. The gauge should be tight to ensure the quality of the piece.
Edge “picot”:
Row 1: knit stitches
Row 2: all stitches knit until the last four, then they are worked as follows: 2 stitches together with knit, make 1 yarn over, then knit into 2 of the remaining stitches from the single stitch (this results in an extra 2 stitches)
Row 3: slip the 1st stitch as if to knit, the 1st knit stitch, slip the previously slipped stitch onto the already knitted one, then knit 1 knit stitch and slip the stitch from the right needle (you decrease by 2 stitches), then finish the row with knit stitches
Row 4: knit stitches (repeat rows 1-4)
Knitting of the hat itself Lullaby by Drops Design:
First, cast on 27-31-35-37 (41-43) stitches, then after the first 4 edge stitches place a marker (it will move upward each time during your work). Then you begin garter knitting while performing the edge with picot over the 4 edge stitches you marked with the marker. Don’t forget to add one more stitch on the right side after the marker (the edge picot), and decrease 1 stitch on the left side. If you consider in more detail, the following scheme should be used:
1st row: 4 edge picot stitches, 1 knit stitch, 1 yarn over (increase). Knit until there are 3 stitches left, 2 stitches along the left, 1 knit stitch.
2-1 row: knit to the marker, the yarn over knit as a twisted stitch (through the back loop). This is done to avoid a hole in the product. Now finish the 4 edge picot stitches. Repeat these 2 rows until the length becomes 5-5 1/2 -6-6 1/2 (7-8) cm. Then decrease 1 stitch on the front side and add 1 stitch on the left. More detail:
1st row: 4 edge picot stitches, slip 1 knit stitch, knit the next stitch, and then slip the knitted stitch over it. Knit until there remains 1 stitch, 1 yarn over, 1 knit stitch
2nd row: knit to the marker with knit stitches, the yarn over knit twisted, finish all 4 edge picot stitches. Repeat 2 rows until the length reaches 10-11-12-13 (14-16) cm, and finish all with knit
Now proceed to the wrong-side row for making holes: knit 2 stitches together with the left, 1 yarn over, repeat from the start until only 1 stitch remains before the marker, knit 1, finish the edge picot (in the next row the yarn over is knitted as knit on twisted stitches). After that, add 1 stitch at the start of the row, and on the right side in every 2nd row, and then decrease 1 stitch at the end, until the length reaches 14 1/2 -15 1/2 -16 1/2 -17 1/2 (18-19) cm from the edge cast-on.
Then decrease 1 stitch at the start of the right-side row every 2nd row, and add 1 stitch at the end of every 2nd row until the length reaches 19-20-21-22 (22-22) cm, and then finish all with knit as usual.
Wrong side (row with holes):
Knit 2 stitches together with the left, make 1 yarn over, repeat from the start until 1 stitch remains before the marker, knit 1, finish the edge picot (in the next row the yarn over is knitted as knit on twisted stitches). After that, add 1 stitch at the start of the row, and from the right side in every 2nd row, and then decrease 1 stitch at the end until length reaches 24-25 1/2 -27-28 1/2 (29-30) cm.
And finally decrease 1 stitch at the start of the right side in the 2nd row and add 1 stitch at the end of every 2nd row until length reaches 29-31-33-35 (36-38) cm. Bind off all stitches.
After knitting, finish the garment. Sew the hat neatly edge-to-edge. To create lovely ties, cut two strands about 150 cm long, then twist them and thread them through the holes on the hat’s ears. Fold the finished item and twist again, tying a knot at the end.