BEAUTIFUL KNITTED SKIRT
Added: 09.02.2014 в 00:43 Views: 65635
BEAUTIFUL KNITTED SKIRTKlubokhttp://klubok.work/1/152/4191/Klubokhttps://klubok.work/css/image/top-logo-en.png

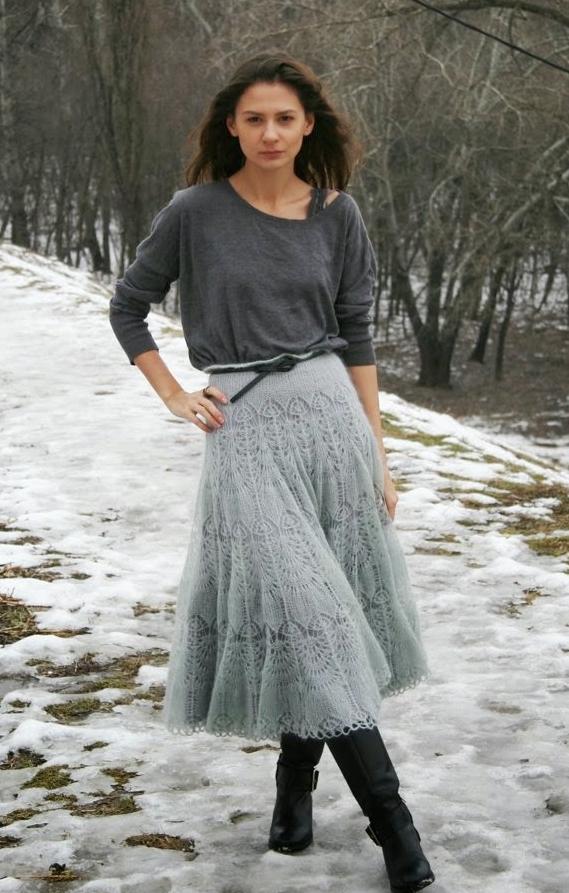
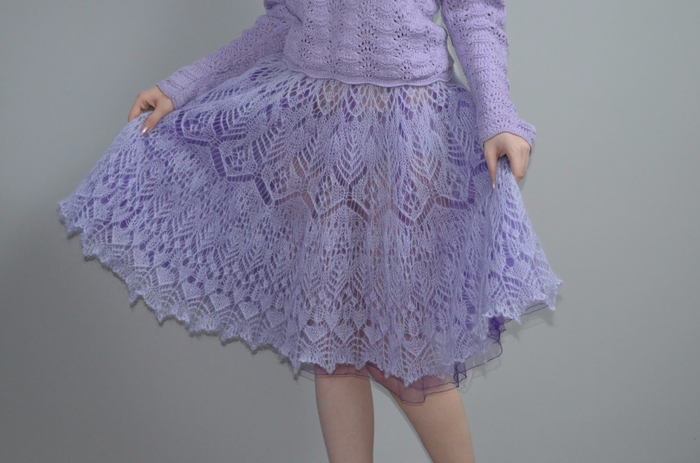
Elegant and romantic knitted skirt for bold and self-confident women. In this skirt, you will easily attract the attention of the man you like; it perfectly hugs and emphasizes all the undeniable advantages of your figure. Its design resembles a flared skirt.
Sizes of the skirt in finished form: waist circumference – 66 (76, 86, 96.5, 112, 122) cm
Hip circumference — 84 (94, 104, 1 14, 129.5, 140) cm
Length — 59.5 (63.5, 67,71,73,75) cm
Yarn and needles for knitting this skirt: 100% corn fiber yarn in red color (130 m per 50 g) – 550 g (600 g, 600 g, 650 g, 700 g, 700 g), circular needles 5 mm long 61 cm and circular needles 6 mm also 61 cm long, a spare needle, stitch markers — 2 red and several contrasting colors, elastic or elastic tape in the waistband width of 2.5 cm and length according to waist size + 2.5 cm for sewing, darning needle, sewing needle, and sewing threads to match.
Regarding the yarn: the yarn Amaizing from South West Trading Co. was used for knitting the model. I do not know if such corn fiber yarn can be purchased somewhere in Russia (I have only encountered Portuguese Rozarios 4, but it is thicker – 110 m per 50 g), but generally, it can be replaced with polyester or viscose. These fibers are most similar in properties to corn yarn.
Knitting gauge: 4 sts and 5 rows = 2.5 cm by 2.5 cm (knitted in stockinette stitch with double yarn on 6 mm needles)
Abbreviations in the skirt knitting description:
st. – stitches
LP – knit stitches
IP – purl stitches
Used patterns and stitches:
4 sts, crossed left (4PPL) – slip 2 sts onto a spare needle and place them in front of the work, knit 2 sts as knit, knit the sts from the spare needle
4 sts, crossed right (4 PPP) – slip 2 sts onto a spare needle and place them behind the work, knit 2 LP, knit the sts from the spare needle as knit.
2 LP together with a left tilt (2 LPVL) — slip 1 st as knit onto the right needle, then slip another st as knit onto the right needle, then insert the left needle into the two slipped sts and slip them, knit these 2 sts together as knit through the back loops.
2 LP together with a right tilt(2 LPVP) – simply knit 2 sts together as knit.
Knitting the skirt, description and diagrams:
Knitting the waistband:
On 5 mm needles with single yarn, cast on 112 sts (128 sts, 144 sts, 160 sts, 176 sts, 192 sts). Knit 8 rows in Garter Stitch, ending on the purl side.
The next row (right side): 7 LP (8 LP, 9 LP, 10 LP, 0, 0), (14 LP [16 LP, 18 LP, 20 LP, 0, 0], 2 sts together as knit) repeat the stitches in parentheses 8 times, then continue knitting knit to the end of the row — 104 (120,136, 152, 176, 192) sts.
Note: knit the last 2 larger sizes without decreases.
Change to larger needles and add a second strand of yarn.
Remember that the entire skirt is knitted with double yarn.
The next 2 rows: knit LP (this forms the waistband edge)
The next row (wrong side): knit IP
Knitting the yoke of the skirt:
The next row (right side): 4 LP (8 LP, 8 LP, 8 LP, 14 LP, 14 LP) [back panel], place marker, 1 IP, 4 LP, 1 IP [braid], place red marker, 1 IP, *2 LP, 2 IP* – repeat the sts between ** 7 (7,9, 11, 11, 13) times, 2 LP, 1 IP [side panel], place marker, 1 IP, 4 LP, 1 IP [front left braid], place marker, 8 LP (16 LP, 16 LP, 16 LP, 28 LP, 28 LP) [front panel], place marker, 1 IP, 4 LP, 1 IP [front right braid], place red marker, 1 IP, *2 LP, 2 IP*, repeat the sts between ** 7 (7, 9, 11, 11, 13) times, 2 LP, 1 IP [side panel], place marker, 1 IP, 4 LP, 1 IP [braid], place marker, knit the remaining 4 (8, 8, 8, 14, 14) sts. [back panel] -104 (120, 136, 152, 176, 192) sts.
Continue knitting, placing a contrasting marker to mark the center back.
From this point, knit in round rows. Knit ribbing on the sides and stockinette stitch for the front and back panels. On the sides of the front and back panels, knit 4 braids according to pattern A. Knit the yoke in parts as described above until its length reaches 13.5 [14.5, 16, 17, 18, 18.5] cm. Finish with the 4th row of pattern A.
Beginning to form the side panel:
The next row: begin knitting according to pattern B along the side panels of the skirt. Knit the braids every 4 rows in the same rows as for the yoke of the skirt as follows:
Knit to the 1st red marker, marker, 1 IP, 4 PPL, *2 LP, 2 IP*, repeat the sts between ** 5 (5, 7, 9,9, 11) times, 4 PPP, 1 IP, knit to the 2nd red marker, 1 IP, 4 PPL, *2 LP, 2 IP*, repeat the sts in ** 5 (5, 7, 9, 9, 11) times, 4 PPP, 1 IP, knit to the end of the row.
Knit as specified above, making 4 PPP and 4 PPL between the side panels every 4th row. This will shift the braids 2 sts closer to the center of the side panels every 4th row, allow for the addition of sts in the stockinette stitch panels, and decrease the number of sts in the ribbed sections of the side panels.
Knit until there are 2 IPs left between the braids and the side panels. The number of stitches in each part of the skirt will look like this:
4 LP (8 LP, 8 LP, 8 LP, 14 LP, 14 LP) [central back panel of the skirt], stitch marker, 1 IP, 4 PPL, 1 IP, stitch marker, 1 IP, l4 LP (14 LP, 18 LP, 22 LP, 22 LP, 26 LP) [back side panel], 2 IP, 14 LP (14 LP, 18 LP, 22 LP, 22 LP, 26 LP), 1 IP [front side panel], marker, 1 IP, 4 PPL [left front braid], 1 IP, marker, 8 LP (16 LP, 16 LP, 16 LP, 28 LP, 28 LP) [central front panel of the skirt], marker, 1 IP, 4 PPL, 1 IP [right front braid], marker, 1 IP, 14 LP (14 LP, 18 LP, 22 LP, 22 LP, 26 LP) [front side panel], 2 IP, l4 LP (14 LP, 18 LP, 22 LP, 22 LP, 26 LP), 1 IP, [back side panel], marker, 1 IP, 4 PPL, 1 IP, marker, remaining 4 LP (8 LP, 8 LP, 8 LP, 14 LP, 14 LP) [central back panel]-104 (120, 136, 152, 176, 192) sts.
Knitting lace inserts, beginning:
Continuing to knit the front and back panels and braids as described earlier, begin knitting the lace panels as follows:
1st round: knit to the 1st red marker, 1 IP, 1 LP, 1 yarn over, 2 LPVL, 1 yarn over, 11 LP (11 LP, 15 LP, 19 LP, 19 LP, 23 LP), 2 IP, 11 LP (11, 15, 19, 19, 23) LP, 1 yarn over, 2 LPVP, 1 yarn over, 1 LP, 1 IP, knit to the 2nd red marker, 1 IP, 1 LP, 1 yarn over, 2 LPVL, 1 yarn over, 11 LP (11, 15, 19, 19, 23) LP, 2 IP, 11 LP (11, 15, 19, 19, 23) LP, 1 yarn over, 2 LPVP, 1 yarn over, 1 LP, 1 IP, continue to the end of the row -108 (124, 140, 156, 180, 196) sts.
2nd round and other even rounds: knit according to the pattern, all stitches of the lace inserts knit as knit.
3rd round: knit to the 1st red marker, 1 IP, 1 LP, 1 yarn over, * 2 LPVL, 1 yarn over*, repeat 2 times the sts between ** , 10 LP (10, 14, 18, 18, 22) LP, 2 IP , 10 LP (10, 14, 18, 18, 22) LP, *1 yarn over, 2 LPVP * repeat 2 times, yarn over, 1 LP, 1 IP, knit to the 2nd red marker, 1 IP, 1 LP, yarn over, * 2 LPVL, yarn over* repeat 2 times, 10 LP (10, 14, 18, 18, 22) LP, 2 IP, 10 LP (10, 14, 18, 18, 22) LP, *yarn over, 2 LPVP * repeat sts between ** 2 times, yarn over, 1 LP, 1 IP, knit to the end of the row -112 (128, 144, 160, 184, 200) sts.
5th round: knit to the 1st red marker, 1 IP, 1 LP, yarn over, *2 LPVL, yarn over*, repeat the sts between ** 3 times, 9 LP (9, 13, 17, 17, 21) LP, 2 IP , 9 LP (9, 13, 17, 17, 21) LP, *yarn over, 2 LPVP * repeat the sts between ** 3 times, yarn over, 1 LP, 1 IP, knit to the 2nd red marker, 1 IP, 1 LP, yarn over, *2 LPVL, yarn over* repeat the sts between stars 3 times, 9 LP (9, 13, 17, 17,21) LP, 2 IP, 9 LP (9, 13, 17, 17,21) LP, *yarn over, 2 LPVP *, repeat the sts between ** 3 times, yarn over, 1 LP, 1 IP, knit in this way to the end of the row -116 (132, 148, 164, 188, 204) sts.
Knit as specified above, making additional yarn overs/decreases from each edge of the side panel until only 2 central IPs remain in each side panel – on the needles 156 (172, 204, 236, 252,284) sts.
The next odd round: knit to the 1st red marker, 1 IP, 1 LP, *yarn over, 2 LPVL * repeat the sts between ** 13 (13, 17, 21, 21, 25) times, 2 IP, * 2 LPVP, yarn over *, repeat the sts between stars 13(13, 17, 21, 21, 25) times, 1 LP, 1 IP, knit to the 2nd red marker, 1 IP, 1 LP, * yarn over, 2 LPVL *, repeat the sts between ** 13(13, 17, 21, 21, 25) times, 2 IP, * 2 LPVP, yarn over*, repeat from * to * 13(13, 17, 21, 21, 25) times, 1 LP, 1 IP, knit to the end of the row -156 (172, 204, 236, 252, 284) sts.
Then continue knitting straight until the length of the skirt to the waistband edge reaches (61, 65, 68.5, 70.5, 72) cm. Then knit 4 rows of Garter Stitch (1st row - all LP, next row – all IP, alternate these 2 rows) and loosely bind off the stitches.
Soak the skirt and let it dry. Fold the waistband inside and hem, leaving a small space for the elastic. Insert the elastic into the waistband and sew its ends.
Knitting diagrams and pattern of the skirt:
Braid knitting diagram:

Side panels knitting diagram:

Pattern:
All sizes in the pattern are given in inches. To convert to cm, multiply by 2.54.