Cap
Added: 21.02.2019 в 08:39 Views: 20701
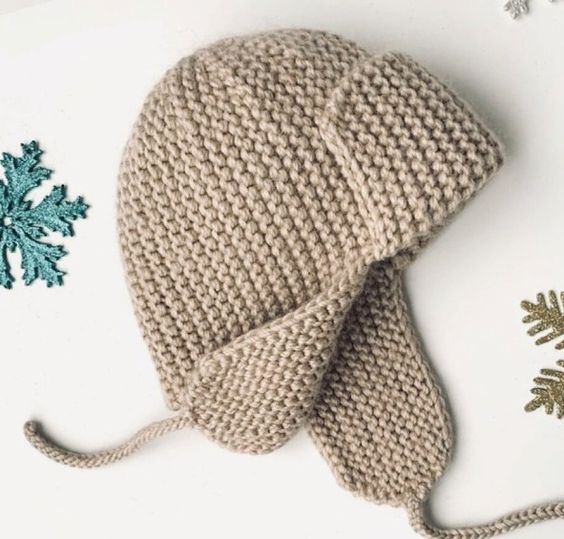
Cap Klubokhttp://klubok.work/23/189/7677/Klubokhttps://klubok.work/css/image/top-logo-en.pngThe cap is knitted for a head circumference of 36 cm. Needles #2. Yarn is 100% wool, 50 g – 135 m. The stitch I chose (“fluffy ribbing”) stretches very well. At the beginning of the knitting, it seemed that the bonnet was turning out very small. I kept applying a ruler and was surprised, could my grandson's head really be that small? But when the work was finished, it turned out that the cap, stretching, fits even on the head of a 2-year-old toddler. 2 Here is the cap laid out. 3 I found on the internet that the length from the forehead to the nape of a newborn is 20 cm. But I decided that the cap should not fit tightly on the head and added another 4 cm. As a result, I got a pattern with braids (width 8 cm, length 24 cm). I cast on 37 stitches, plus 2 edge stitches. 1st row.
All stitches are purl. 2nd row: - slip the edge stitch, 2 purl, - “braid of 6 stitches”: slip 3 stitches onto a spare needle in front of the work, knit the next 3 stitches as knit, then knit the 3 stitches from the spare needle, - “ribbing”: 2 purl, 2 knit, 2 purl, - “braid of 9 stitches”: 9 knit, - “ribbing”: 2 purl, 2 knit, 2 purl, - “braid of 6 stitches”: slip 3 stitches onto a spare needle behind the work, knit the next 3 stitches as knit, then knit the 3 stitches from the spare needle, - 3 purl. 3rd row as pattern. 4th row: - slip the edge stitch, 2 purl, - “braid of 6 stitches”: 6 knit, - “ribbing”: 2 purl, 2 knit, 2 purl, - “braid of 9 stitches”: slip 3 stitches onto a spare needle in front of the work, knit the next 3 stitches as knit, then knit the 3 stitches from the spare needle, 3 knit, - “ribbing”: 2 purl, 2 knit, 2 purl, - “braid of 6 stitches”: 6 knit, - 3 purl. 5th row as pattern. 6th row, as the second row. 7th row as pattern. 8th row: - slip the edge stitch, 2 purl, - “braid of 6 stitches”: 6 knit, - “ribbing”: 2 purl, 2 knit, 2 purl, - “braid of 9 stitches”: 3 knit, slip 3 stitches onto a spare needle behind the work, knit the next 3 stitches as knit, then knit the 3 stitches from the spare needle, - “ribbing”: 2 purl, 2 knit, 2 purl, - “braid of 6 stitches”: 6 knit, - 3 purl. 9th row as pattern. And so on, repeat from the second row. It turns out that you need to alternate the braids: two at the edges or one in the middle. The side parts are knitted with the “Fluffy ribbing” pattern. We cast on 2 stitches at each edge of the “braid pattern” up to the middle of the stripe. To make the “ears on the top” fluffy and stand up, you can cast on 3 stitches in each of the last 5 edge stitches at the top of the cap. Then we knit ribbing 2×2. Next, we knit the “Fluffy ribbing”: purl stitches as purl, and when knitting knit stitches, insert the needle into the stitch below and pull out a new stitch, dropping the upper one. To cover the baby’s ears, I added 4 cm using the scheme. Let the author forgive me, as I do not remember which website I found it on. 4 I added 1 stitch in each knit row, and then decreased the number of stitches by 1 for the same number of rows. I think the ears could have been made longer (increasing and decreasing not by one, but by two stitches). But I didn’t want to redo it. I finished off the cap with a “Crab stitch.” I twisted the ties for the strings and sewed them on. From the leftover yarn, I made tassels and sewed them onto the “ears on the top.” They drooped under the weight of the tassels, and the cap started to look like an owl. Although it is based on what is called a cat cap.

Category: Hats, gloves, scarves