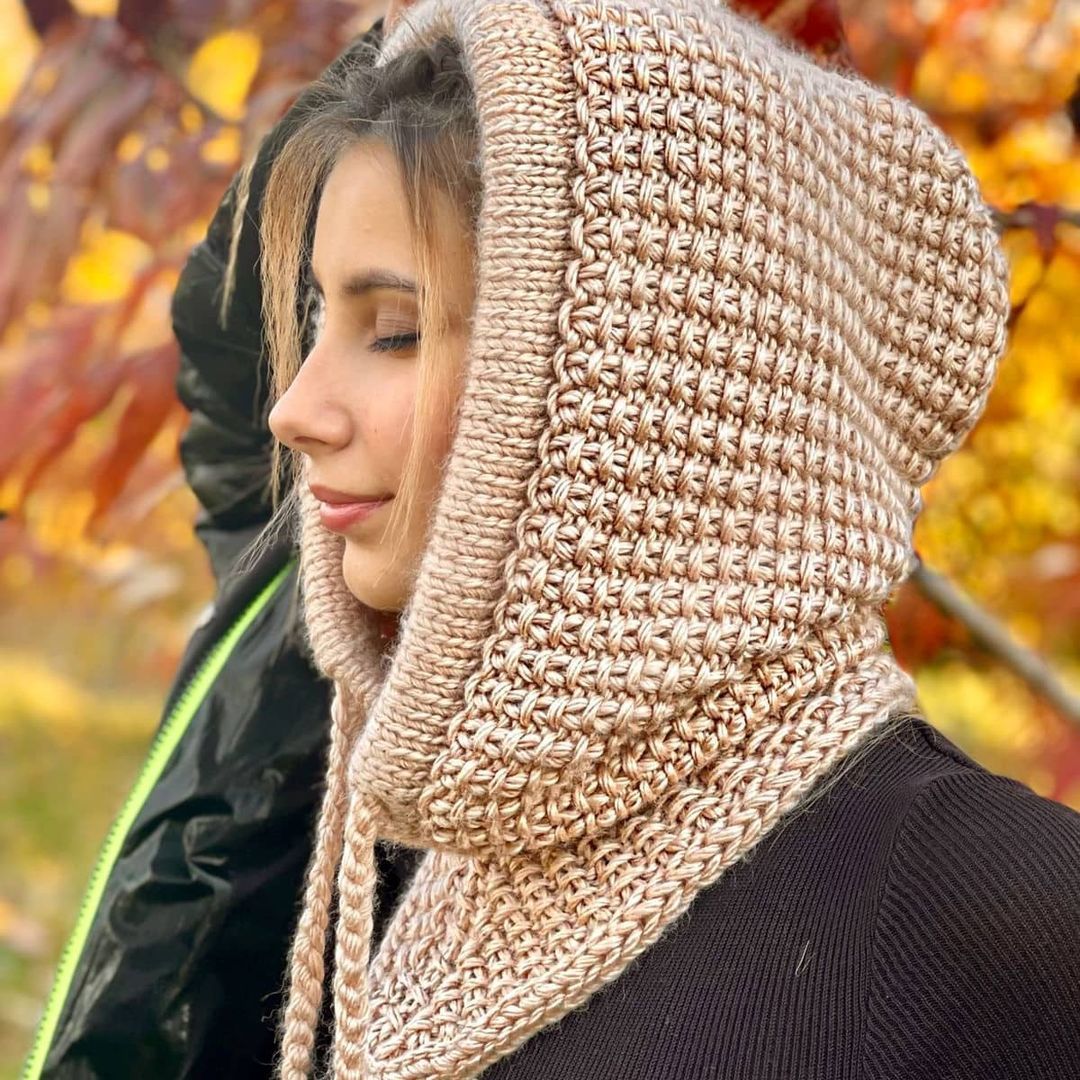
Hood Knitting
Added: 23.10.2020 в 10:29 Views: 25936
Hood KnittingKlubokhttp://klubok.work/1/1/8591/Klubokhttps://klubok.work/css/image/top-logo-en.png
We will need:
Yarn with a meterage of about 200-300 meters per 100 grams, 150-200 grams.
Suitable size circular needles. It is convenient to use needles with a cable of 80 cm; the lower part of the hood should be knitted using the magic loop method.
A tapestry needle.
The hood is knitted from the bottom up, starting with knitting the lower part in the round.
The width of the lower part should be approximately equal to half the circumference of the head or 3-4 cm less. This measurement depends on how wide you want the lower part to be.
In my case, the width is 29 cm, which is half the circumference of my head. And the hood sits quite loosely, accommodating all my fabulous curls 
.
So, having determined the width of the lower part, you need to calculate the number of stitches to cast on to start knitting. For this, you need to measure the pre-knitted and washed swatch and calculate how many stitches are in 1 cm of your fabric.
For example, there are 2 stitches in 1 cm.
Therefore, to achieve a width of 29 cm, you need to cast on 58x2=116 stitches.
The resulting number of stitches is cast on in any convenient way on circular needles, join them in a circle, and knit in the round to a height of 15-17 cm.
You can start knitting with a seed stitch, ribbing, or you can make a hem. The choice is yours.
After the lower part is knitted to the desired height, we move on to forming the neckline under the chin and simultaneously making increases at the back of the head.
For this, you need to set aside the number of stitches that corresponds to 8 cm in the middle of the knitting, on a scrap yarn.
With our knitting density, this will be 16 stitches. If you use a row marker, that will be 8 stitches before the marker and 8 stitches after.
The remaining stitches need to be divided in half, mark 3-4 stitches in the middle (depending on whether you have an even or odd number of stitches in work). In the vicinity of these stitches, increases will be made.
The rhythm of increases in my hood is as follows:
3 increases every 4th row and 6 increases every 2nd row.
If your lower part is narrower than mine, you can make increases every 2nd row right away.
And we continue.
Let's set aside the stitches under the chin, make a few decreases there, and make increases at the back of the head.
To start, all stitches need to be divided in half and mark with markers 3-4 stitches on the back of the hood. We will make increases near them.
Then mark with markers the stitches that will correspond to 7-8 cm under the chin.
Next, knit as follows:
Start of the row, half of the chin stitches, slip the marker,
1 knit stitch,
2 together knit with a left-leaning decrease,
knit to the back marker,
1 increase,
slip the marker,
knit to the next marker,
slip the marker,
1 increase,
knit to the last 3 stitches before the second chin marker,
2 knit together with a right-leaning decrease,
1 knit stitch.
Slip the chin stitches onto a scrap yarn.
Turn the knitting, knit all stitches purl.
Knit the next 2 knit rows similarly to the described method.
Make a total of 3 decreases (4 decreases for thin yarn), after which continue to make only increases at the back of the head until the expansion reaches 5-6 cm.
After that, knit a straight section with a height of 7-10 cm, depending on the size of the hood.
We will make decreases at the crown and sew the top of the hood.
So, we make decreases of 2 stitches in every 2nd row, before the first marker and after the second. The first decrease is made with a right-leaning decrease, the second - with a left-leaning decrease.
Make 6-7 decreases, then in the last row, reduce the stitches between the markers. To do this, knit two together with a left-leaning decrease, then two together with a right-leaning decrease. In the next purl row, make the last decrease by knitting two stitches together purl in the middle.
If you had an odd number of stitches between the markers, you can decrease them in one last knit row by knitting three stitches together knit.
After this, the top of the hood needs to be sewn with a mattress stitch.
Well, that's practically it, you just need to finish the edge of the hood with a tubular cord, perform the blocking, and you can wear it.
To finish the edge of the hood, you need to pick up the stitches set aside under the chin and the stitches of the selvedge. It is better to pick them up on separate circular needles of a smaller size. Next to the chin stitches, I picked up an extra stitch that did not belong to the selvedge to avoid a hole.
Next, on the working right needle, you need to cast on 3 stitches, transfer them to the left needle, knit two knit stitches, and knit the third stitch from the newly cast on and the adjacent chin stitch together knit. Then transfer three stitches back to the left needle, knit 2 knit and 2 together.
Repeat this until all stitches are closed.
Note that when transitioning to finishing the lifted selvedge stitches, you need to knit quite loosely to avoid tightening the edge.
After the edges are finished, you need to sew the end and the beginning of the tubular cord.