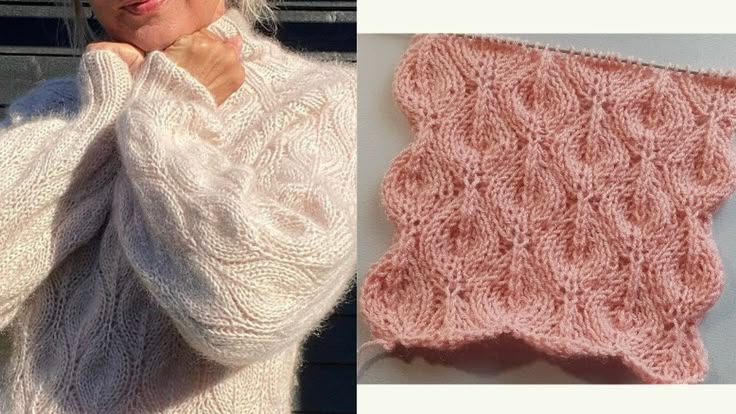
Knitted cardigan
Added: 19.11.2025 в 18:59 Views: 11797
Knitted cardiganKlubokhttp://klubok.work/1/2/9312/Klubokhttps://klubok.work/css/image/top-logo-en.png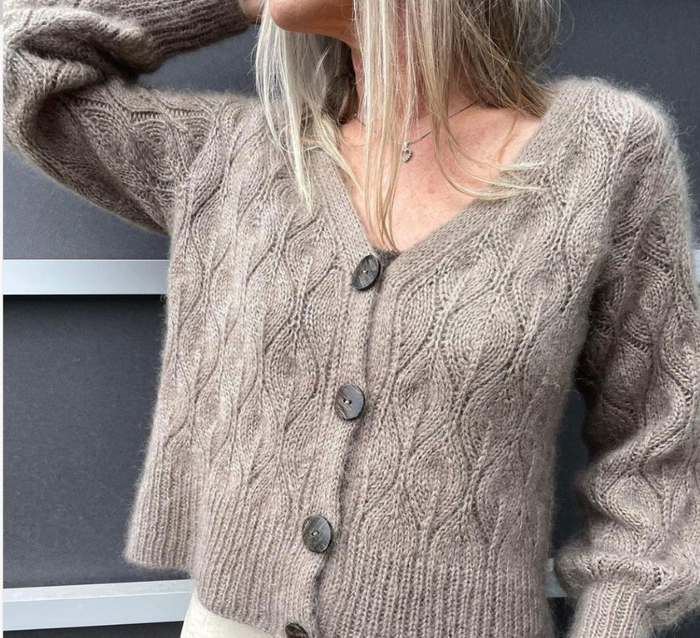
Sizes: XS (S, M, L, XL, 2XL, 3XL, 4XL)
Finished cardigan measurements: bust circumference: approx. 96 (101, 108, 115, 123, 130, 138, 144) cm; suitable bust circumference: 76-83 (84-91, 92-99, 100-107, 108-116, 117-127, 128-139, 140-149) cm;
Length from shoulder to lower edge: approx. 52 (54, 55, 56, 60, 64, 65, 66) cm;
Sleeve length from armhole to cuff: approx. 42 (44, 50, 47, 49, 47, 46, 45) cm
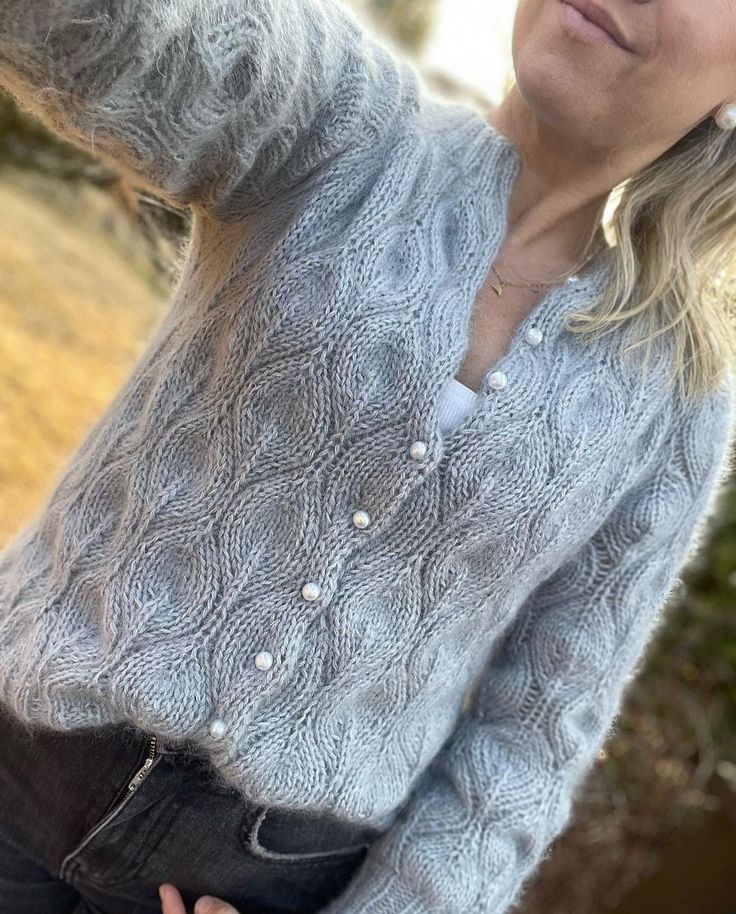
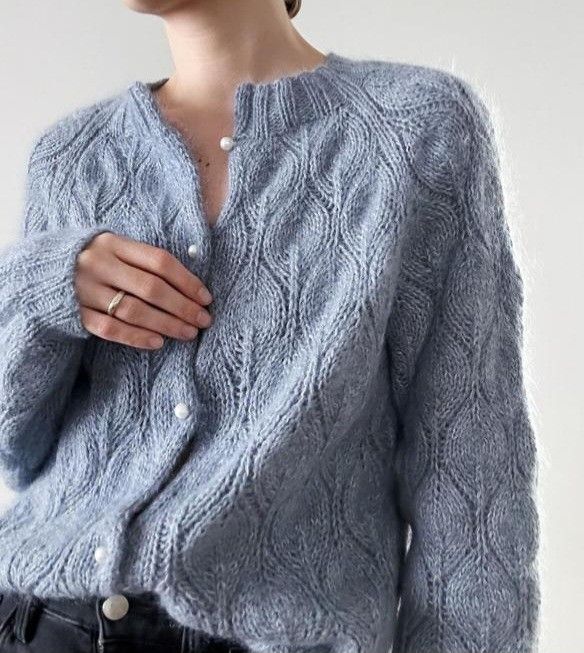
Yarn: 1 skein Knitting for Olive Merino (250 m/ 50 g), fingering-weight yarn, 4 (5, 5, 5, 5, 6, 6, 6) skeins + 2 skeins Knitting for Olive Soft Silk Mohair (225 m/ 25 g), lace-weight yarn, 9 (9, 10, 10, 11, 11, 12, 12) skeins. Sample knit from Merino yarn, Pearl Grey + Soft Silk Mohair, Soft Blue
Needles: circular and double-pointed needles 4.5 mm, 5 mm and 5.5 (6, 6.5, 6, 6.5, 6, 6.5, 6) mm, or size to achieve the stated gauge
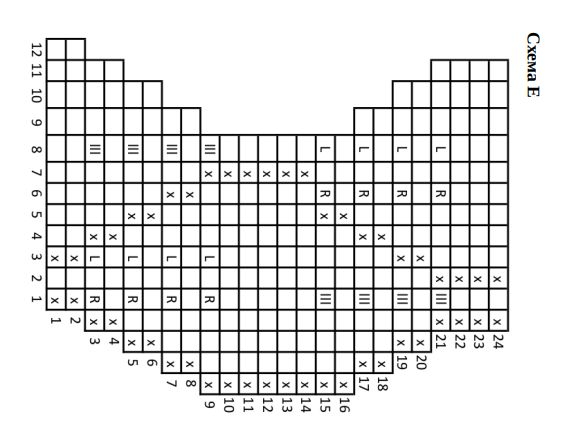
Gauge: (Olive stitch pattern (Diagram E) after blocking):
Only size XS: 18 sts and 26 rows = 10 cm, with needles 5.5 mm
Only sizes S, L, 2XL and 4XL: 17 sts and 24 rows = 10 cm, with 6 mm needles
Only sizes M, XL and 3XL: 16 sts and 22 rows = 10 cm, with 6.5 mm needles
Other: Markers (4 removable), scrap yarn or stitch holder, tapestry needle, 4 buttons (diameter: approx. 20 mm)
Special techniques:
Our knitting video tutorials for Knitting for Olive demonstrate the special techniques used in the Olive V-neck cardigan (in Danish):
• P1P and P1L increases on the RS:
• P1Pi and P1Li increases on the WS:
• P1Pi and P1Li increases on the RS:
German Short Rows: In knit rows: knit the number of stitches specified in the pattern, turn the work, bring the yarn forward, slip the first stitch as if to purl, bring the yarn over the needle and pull (this creates a double stitch = DP). In purl rows: purl the number of stitches specified in the pattern, turn the work, bring the yarn forward, slip the first stitch as if to purl, bring the yarn over the needle and pull (this creates a double stitch = DP). Working double stitches: when working double stitches, treat it as one stitch, knitting it over both legs of the DP on the knit row (lDP) or purl row (iDP).
Abbreviations:
K2tog – knit 2 stitches together as knit [1 stitch decreased]
K2togtbl – knit 2 stitches together through the back loops [1 stitch decreased]
DP – double stitch (in German Short Rows technique, see above)
purl – purl stitch
WS – wrong side
RS – right side
BOR – beginning of round
npr – yarn in front of work
nsp – slip the slipped stitch over the knitted stitch
st. – stitch
P1L – increase knitwise with a left lean: lift the strand between stitches, inserting the needle from the front, and knit it through the back loop of the stitch [1 stitch increased]
P1Li– increase purlwise with a left lean: lift the strand between stitches, inserting the needle from the back, and purl it through the front loop of the stitch [1 stitch increased]
P1P– increase knitwise with a right lean: lift the strand between stitches, inserting the needle from the back, and knit it through the front loop of the stitch [1 stitch increased]
P1Pi– increase purlwise with a right lean: lift the strand between stitches, inserting the needle from the front, and purl it through the back loop of the stitch [1 stitch increased]
pM– place a marker on the right needle
c1i– slip 1 stitch as purl
c1l– slip 1 stitch as knit
c2l– slip 2 stitches together as knit
uM– remove marker
UR– short row
M– marker
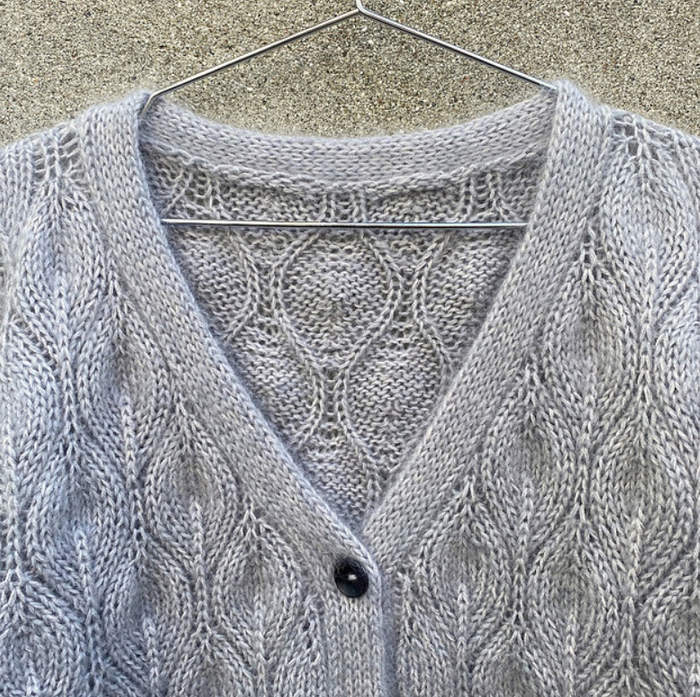
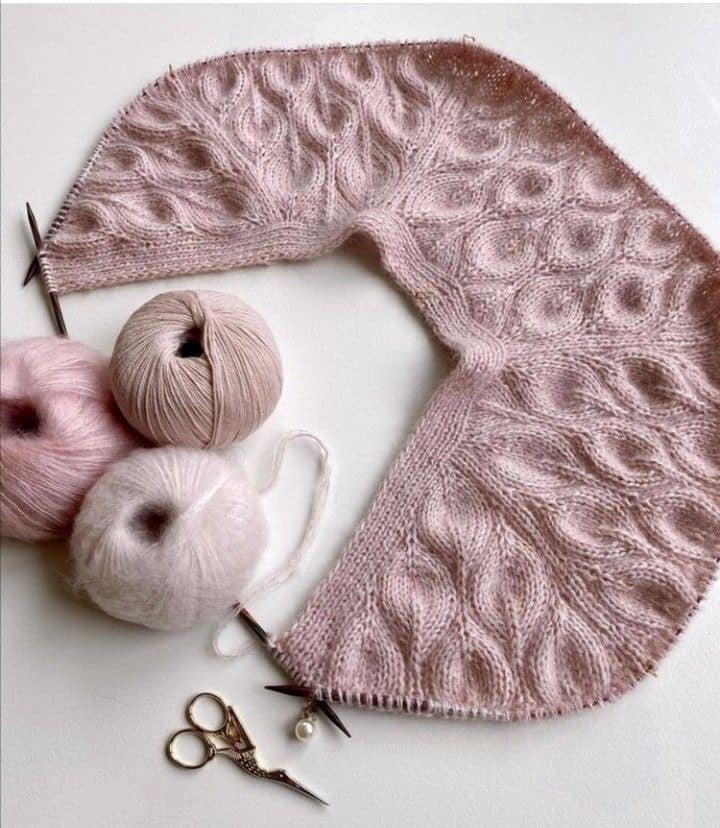
Construction notes
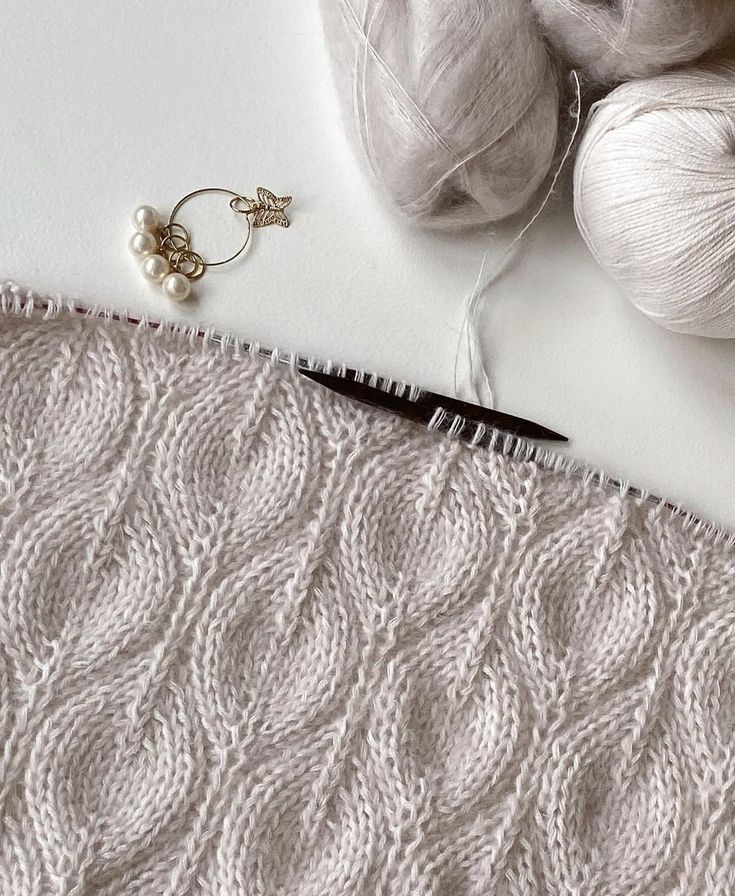
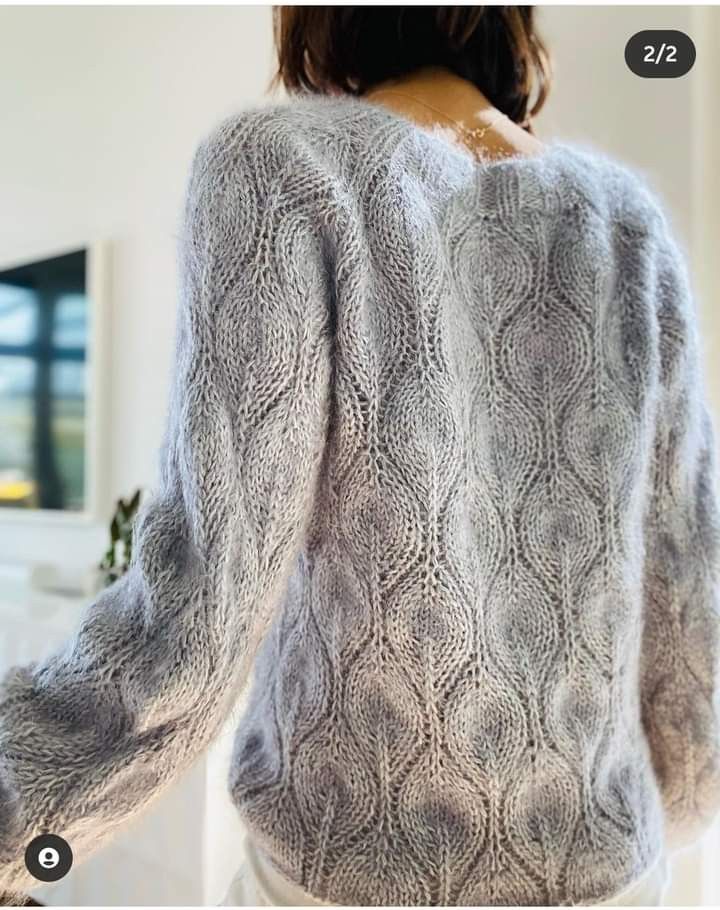
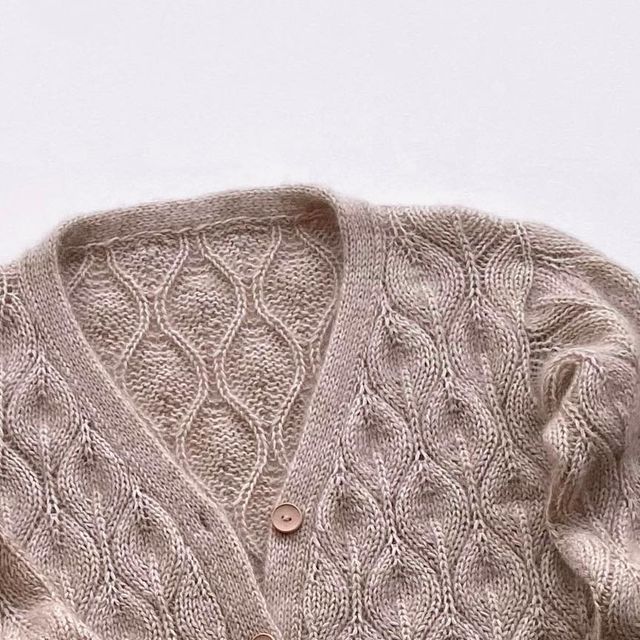
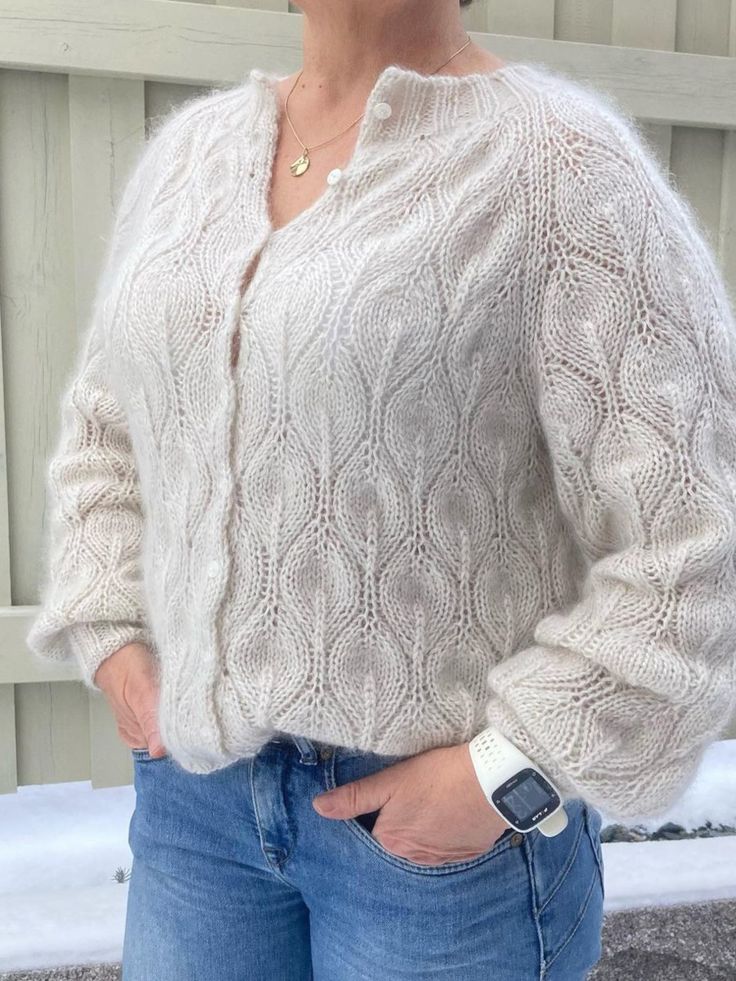
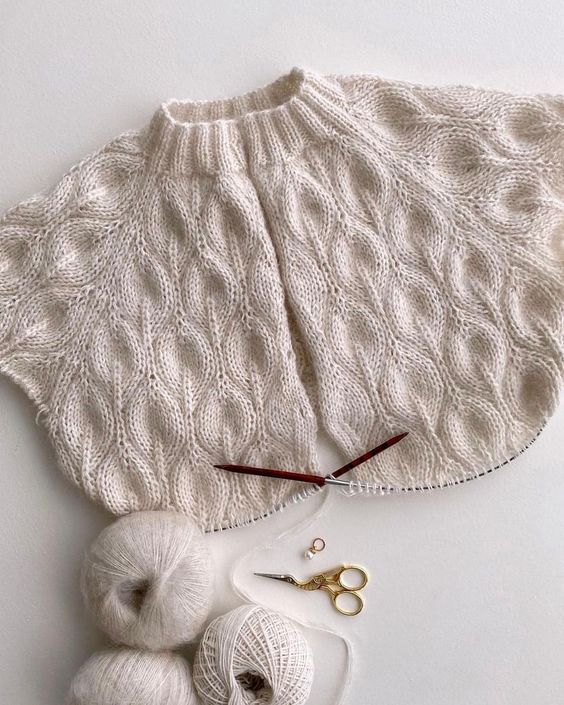
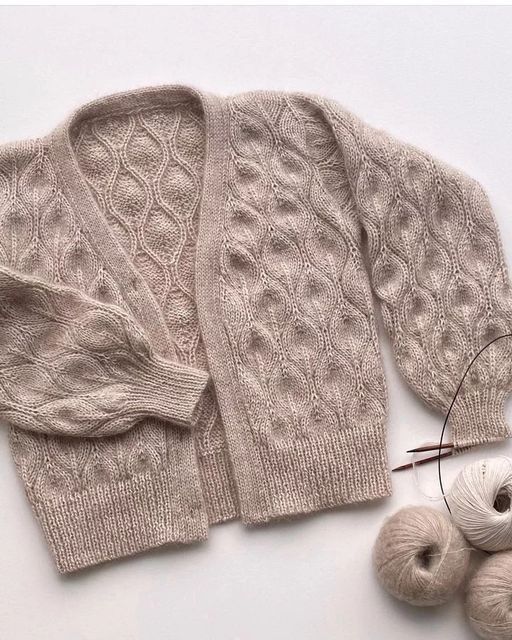
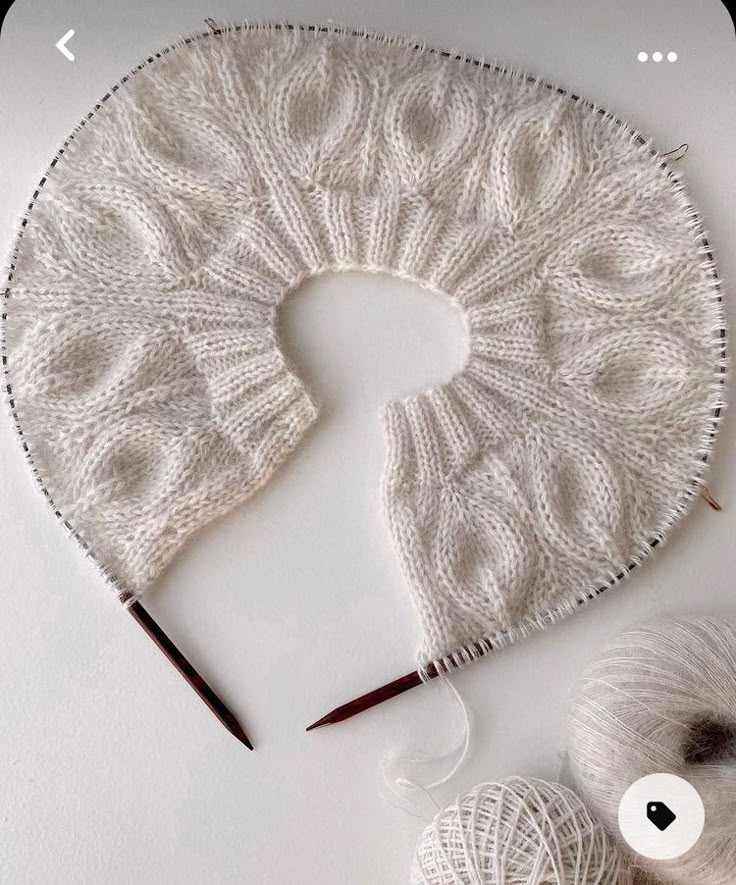
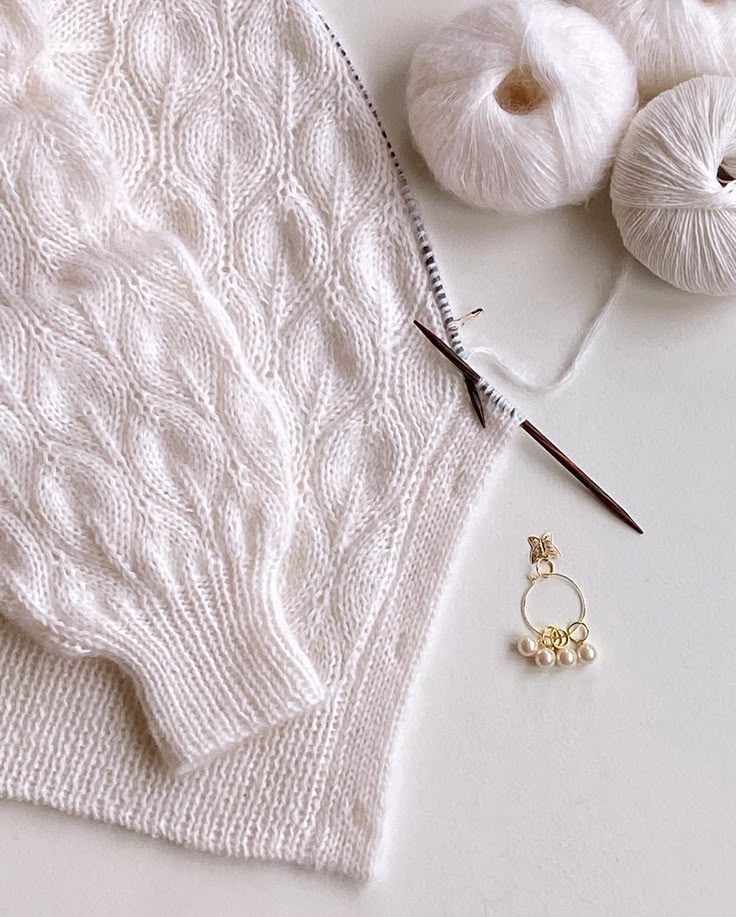
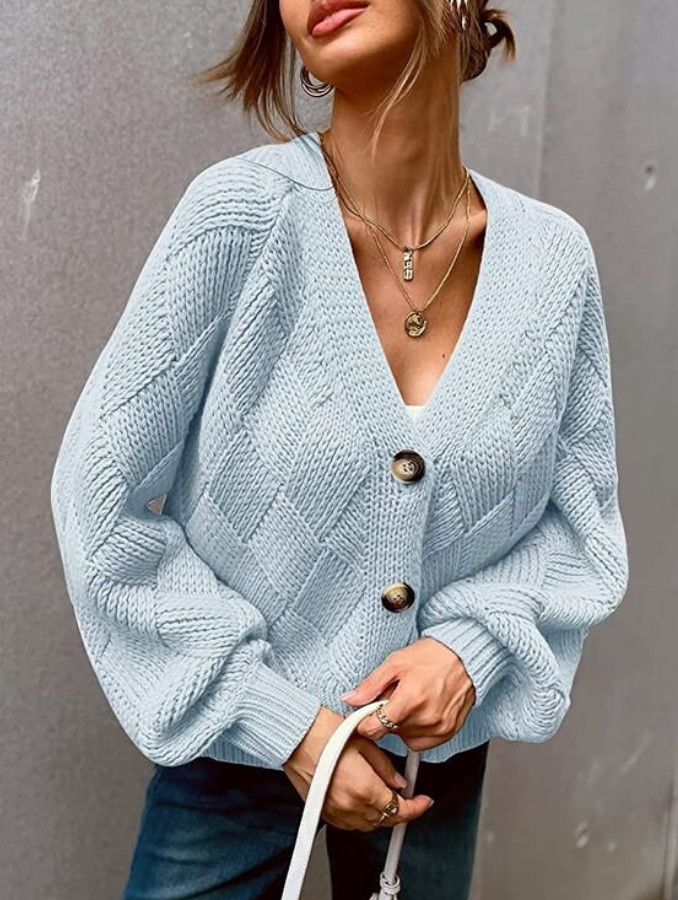
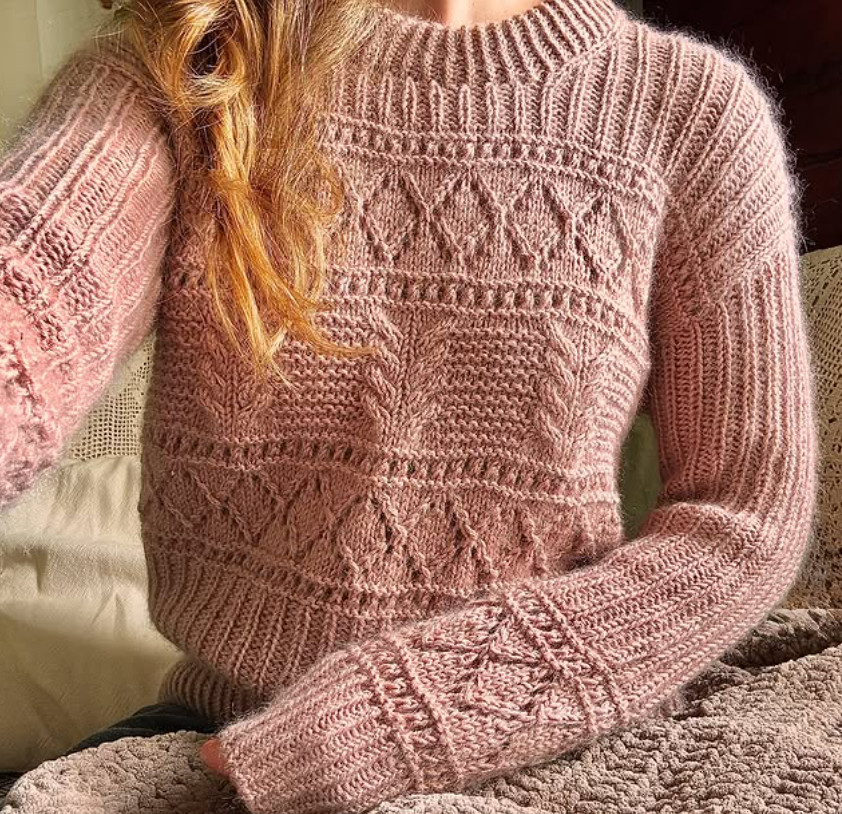
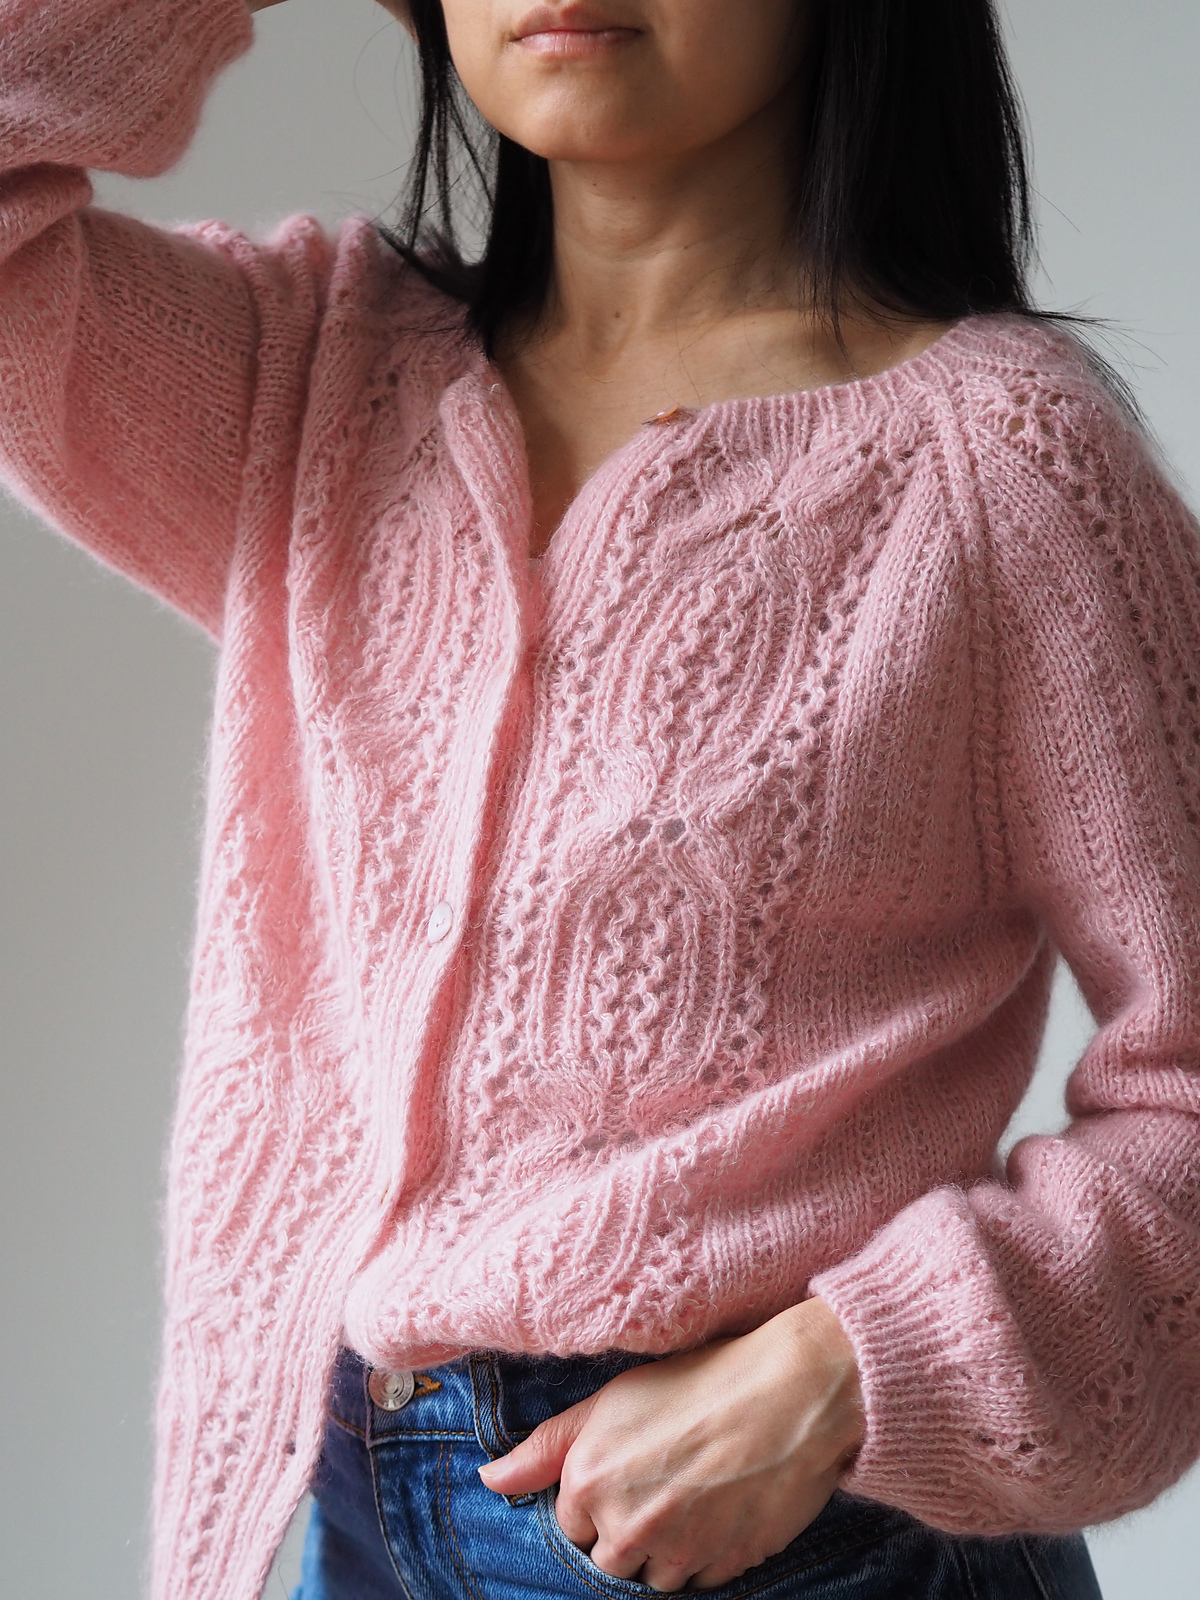
The Olive cardigan with a V-neckline belongs to the Olive pattern collection, which features a continuous lace pattern with ribbing. Knit top-down, seamless, from 1 strand of merino held together with 2 strands of delicate mohair on silk, it is soft, light, and airy — just like a cloud. This cardigan, as the name suggests, has a deep V-neckline and an Olive lace pattern with leaves. A double placket completes the elegant lace pattern along the entire length.
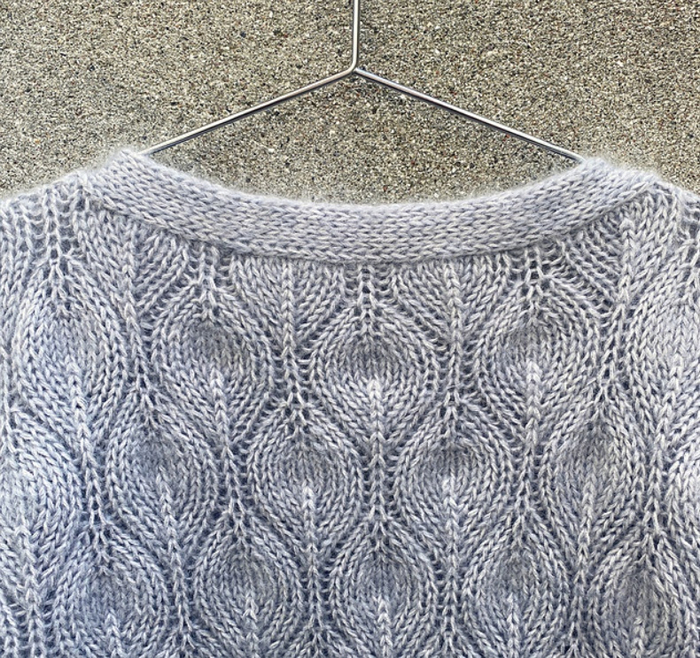
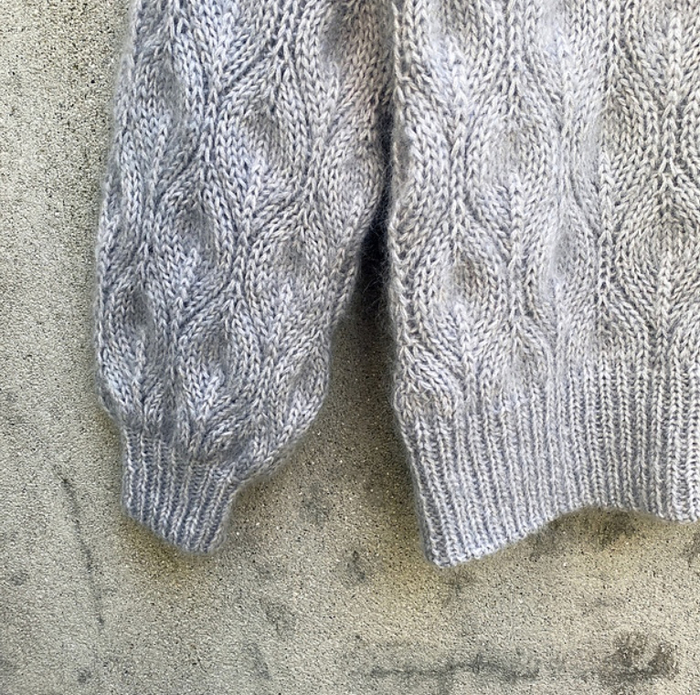
You start with two fronts and proceed from the back down to the armholes. Here, the two fronts and back are joined on one needle and worked in turning rounds. The sleeve stitches are picked up along the armholes, the sleeves are knitted in the round, with additional short-row shaping. The body and sleeves are finished with wide ribbed edges. In the end, the edges of the fronts are finished with a double rack of knitting.
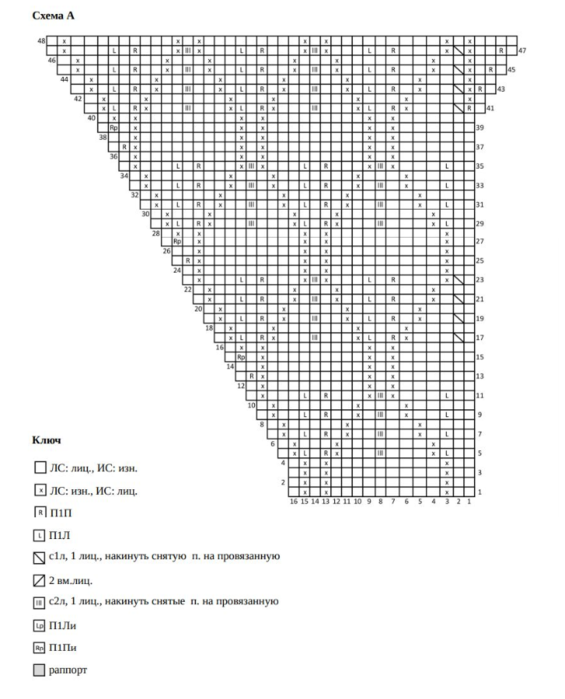
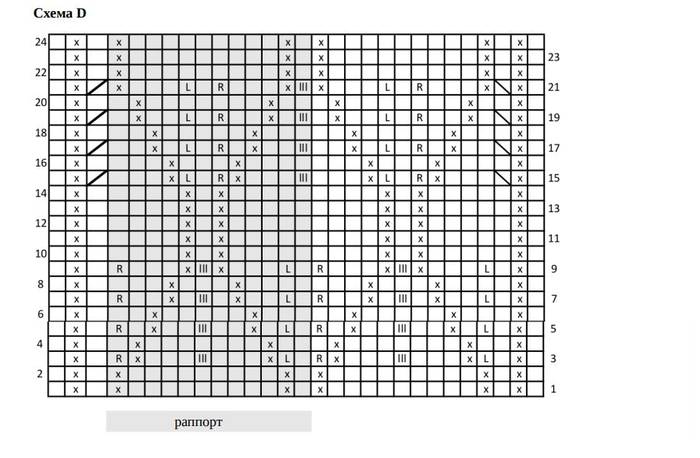
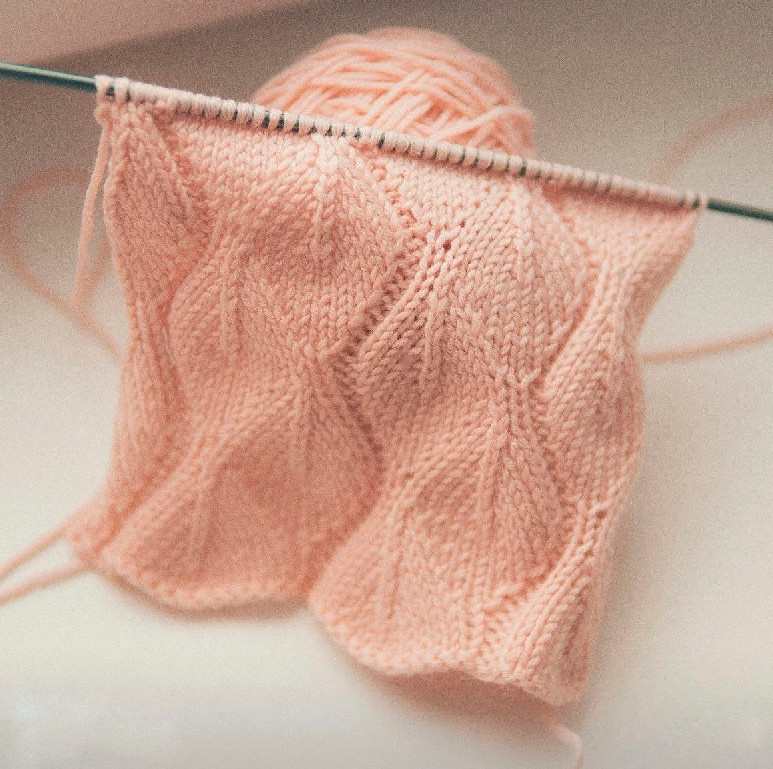
The Olive pattern is presented only as charts.
Please note that your main needles (corresponding to gauge) are size 5.5, 6 or 6.5 mm, depending on which size you are knitting.
Notes on charts
When working with charts, always start at the lower right corner with the first stitch of the 1st row (unless the pattern states otherwise) and work the chart from bottom to top. If you are working in rounds, work the chart from right to left in all rounds. If you are knitting in turning rows, read the chart from right to left in odd rows (RS) and from left to right in even rows (WS). If there is a gray section on the chart indicating a repeat, start with the stitches of the white section on the right-hand side of the chart and perform them once. Then you knit and repeat the gray section as many times as possible, finishing by knitting the last white section on the left-hand side of the chart once. As the number of stitches increases, you gradually perform additional repeats as needed.
Right Front
Using circular needles 5.5 (6, 6.5, 6, 6.5, 6, 6.5, 6) mm and 1 strand Merino + 2 strands Soft Silk Mohair, held together, cast on 16 (16, 16, 16, 16, 22, 22, 22) stitches, using the classic long-tail cast-on.
Note: Be sure to read the Notes to the Charts carefully before continuing.
Only sizes XS, S, M, L and XL:
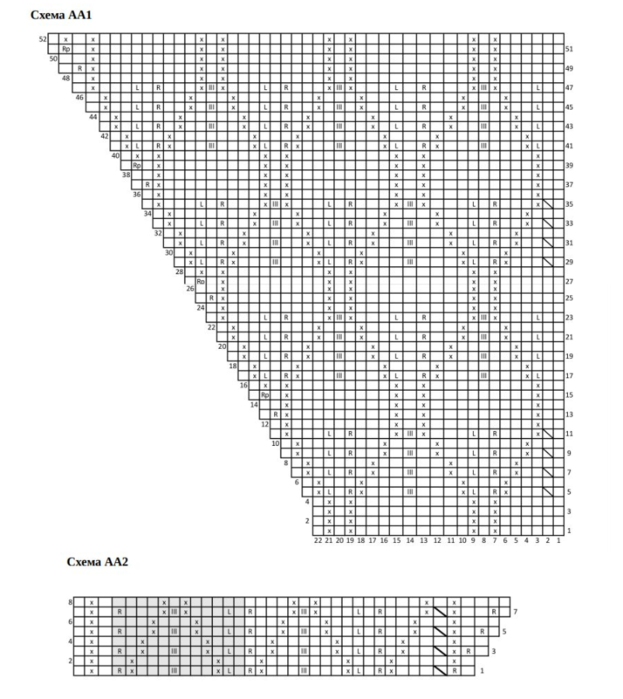
Starting from Row 1 and finishing Row 48, knit Chart A on all stitches, 1 time [26 stitches increased].
Only sizes 2XL, 3XL and 4XL:
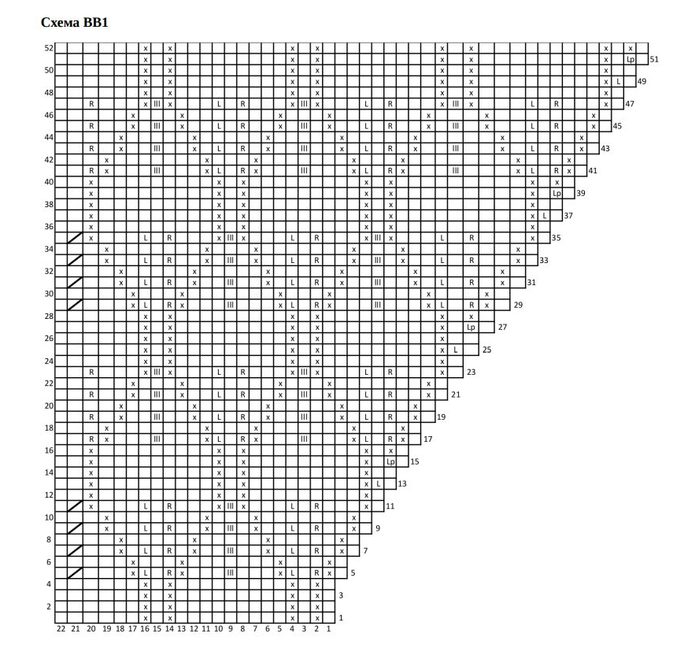
Starting from Row 1 and finishing Row 52, knit Chart AA1 on all stitches, 1 time [24 stitches increased]. Starting from Row 1 and finishing Row 8, knit Chart AA2 on all stitches, 1 time [4 stitches increased].
After finishing this section you should have 42 (42, 42, 42, 42, 50, 50, 50) stitches.
Cut the yarn, slip the stitches onto a holder.
Left Front
Using circular needles 5.5 (6, 6.5, 6, 6.5, 6, 6.5, 6) mm and 1 strand Merino + 2 strands Soft Silk Mohair, held together, cast on 16 (16, 16, 16, 16, 22, 22, 22) stitches, using the classic long-tail cast-on.
Only sizes XS, S, M, L and XL:
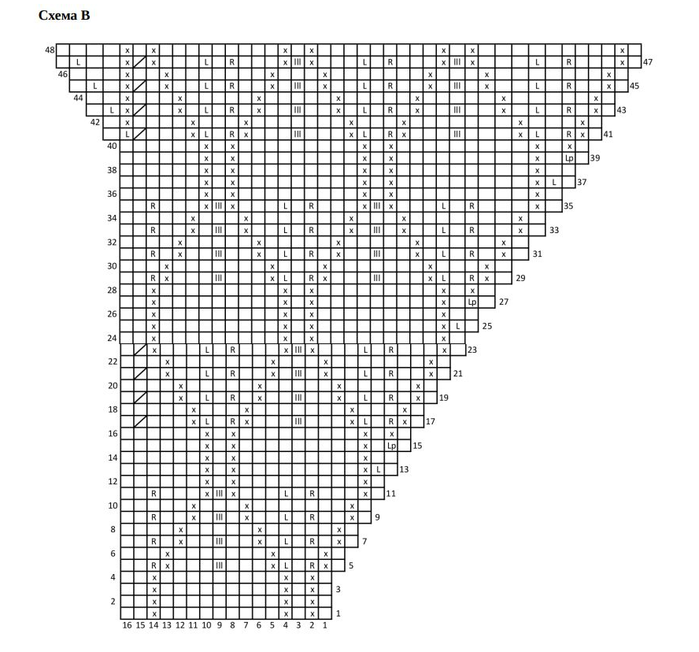
Starting from Row 1 and finishing Row 48, knit Chart B on all stitches, 1 time [26 stitches increased].
Only sizes 2XL, 3XL and 4XL:
Starting from Row 1 and finishing Row 52, knit Chart BB1 on all stitches, 1 time [24 stitches increased].
Starting from Row 1 and finishing Row 8, knit Chart BB2 on all stitches, 1 time [4 stitches increased].
After completing this section you should have 42 (42, 42, 42, 42, 50, 50, 50) sts.
Cut the yarn.
Back
Note: Next you will pick up stitches along the upper edge of the shoulder on the left front, pick up new stitches for the back neckline, and then pick up a few more stitches along the right shoulder. The pick-up rate is 1 stitch per stitch of the cast-on edge.
Starting from the left shoulder and RS, pick up and knit 16 (16, 16, 16, 16, 22, 22, 22) stitches along the edge of the initial stitches on the left shoulder, pick up 27 (27, 27, 27, 27, 35, 35, 35) new stitches, pick up and knit 16 (16, 16, 16, 16, 22, 22, 22) stitches along the edge of the initial stitches on the right shoulder = 59 (59, 59, 59, 59, 79, 79, 79) stitches.
Only sizes XS, S, M, L and XL:
Foundation Row (IS): 2 purl, 1 knit, 9 purl, 1 knit, 1 purl, 1 knit, pM, *5 purl, 1 knit, 1 purl, 1 knit.; repeat from * another 2 times, 5 purl, pM, 1 knit, 1 purl, 1 knit, 9 purl, 1 knit, 2 purl.
Next row (RS): Knit in pattern to end of row.
Increase Row (IS): Knit in pattern to the 1st M, uM, *(1 purl, P1Pi) 4 times, (1 purl, 1 knit) 2 times; repeat from * another 2 times, (1 purl, P1Pi) 4 times, 1 purl, uM, knit in pattern to end of row [16 stitches increased] = 75 (75, 75, 75, 75, -, -, -) stitches.
Only sizes 2XL, 3XL, and 4XL:
Foundation Row (IS): 6 purl, 1 knit, 1 purl, 1 knit, *9 purl, 1 knit, 1 purl, 1 knit; repeat from * another 1 time, pM, 5 purl, 1 knit, 1 purl, 1 knit, 5 purl, pM, *1 knit, 1 purl, 1 knit, 9 purl.; repeat from * another 1 time, 1 knit, 1 purl, 1 knit, 6 purl.
Next row (RS): Knit in pattern to end of row.
Increase Row (IS): Knit in pattern to 1st M, uM, (1 purl, P1Pi) 4 times, (1 purl, 1 knit) 2 times, (1 purl, P1Pi) 4 times, 1 purl, uM, knit in pattern to end of row [8 stitches increased] = - (-, -, -, -, 87, 87, 87) stitches.
All sizes:
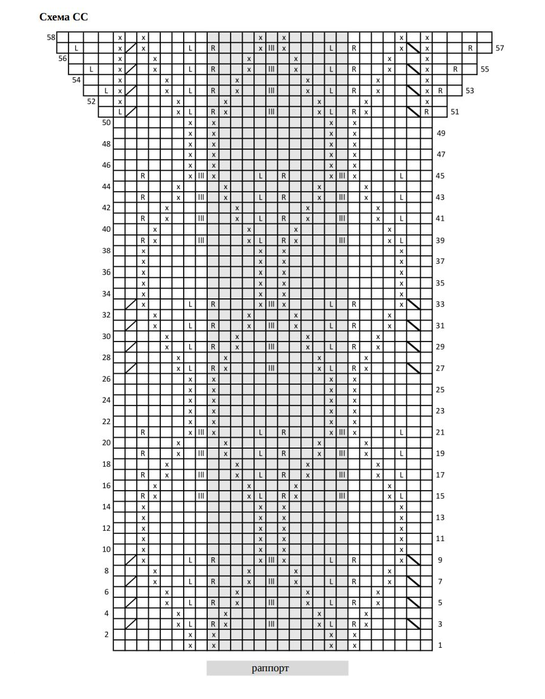
Starting from Round 1 and finishing Round 46 (46, 46, 46, 46, 58, 58, 58), work Chart C (C, C, C, C, CC, CC, CC) on all stitches 1 time [8 stitches increased] = 83 (83, 83, 83, 83, 95, 95, 95) stitches.
Cut the yarn.
Body
Note: Next you will join the fronts and back on one set of circular needles. You will continue knitting in rows.
Only sizes XS, S, M, L, and XL:,/u>
Joining Row (RS): Starting from the left front and RS, 1 knit, 1 purl, P1L, knit the remaining stitches of the left front in pattern, pick up 1 (1, 1, 13, 13, -, -, -) new stitches, knit the back stitches in pattern, pick up 1 (1, 1, 13, 13, -, -, -) new stitches, knit the right front stitches in pattern to the last 2 stitches, P1Pi, 1 purl, 1 knit = 171 (171, 171, 195, 195, -, -, -) stitches.
Next row (IS): Knit in pattern to end of row (knitting the new stitches as purl). Increase Row (RS): 1 knit, 1 purl, P1L, knit in pattern to the last 2 stitches, P1P, 1 purl, 1 knit [2 stitches increased] = 173 (173, 173, 197, 197, -, -, -) stitches.
Next row (IS): Knit in pattern to end of row.
Starting from Round 3 and finishing Round 24, knit Chart D on all stitches, 1 time.
Only sizes 2XL, 3XL, and 4XL:
Joining Row (RS): Starting from the left front and RS, knit left-front stitches in pattern, pick up - (-, -, -, -, 13, 13, 25) new stitches, knit back in pattern, pick up - (-, -, -, -, 13, 13, 25) new stitches, knit right-front stitches in pattern = - (-, -, -, -, 221, 221, 245) stitches.
Next row (IS): Knit in pattern to end of row (knitting the new stitches as purl).
Starting from Round 13 and finishing Round 24, knit Chart D on all stitches, 1 time.
All sizes:
Starting from Round 1 and finishing Round 24, knit Chart D on all stitches, 1 (1, 1, 1, 1, 2, 2, 2) time(s).
Only sizes XS, S, 3XL and 4XL:
Starting from Round 1 and finishing Round 12, knit Chart D on all stitches, one more time
Hem
Switch to circular needles 5 mm.
Next row (RS): knit to end of row.
Foundation Round (IS): (1 knit, 1 purl) to the last stitch, 1 knit.
Next row (RS): Knit in pattern to end of row.
Knit about 10 (8, 10, 10, 10, 8, 10, 10) cm in 1x1 rib, as established.
Cast off stitches using Italian bind-off.
Thus knit the second sleeve in the same way.
Double Placket
Note: You will not pick up stitches for the placket. Along the edges of your work there will be a vertical column / line of purl stitches every other stitch from the edge. From these purl stitches you will pick up stitches for the placket.
With circular needles 4.5 mm, RS, and starting from the lower edge of the right front, pick up and knit 1 stitch from every purl stitch along the edges of the fronts and the back neck, up to the lower edge of the left front. Cut yarn.
Markers for buttonholes
To mark the placement of your buttonholes, place 4 removable markers along the right front at even intervals. The top marker about 2 cm below the V-neck, and the bottom marker about 2 cm above the lower edge. The other two markers are evenly spaced between the top and bottom markers.
Placket
Note: The placket is knitted on circular and double-pointed needles 4.5 mm. First you will cast on 11 new stitches, then you will knit them, joining to the cardigan, from the lower edge of the right front piece, around, to the lower edge of the left front piece, including 1 of the picked-up stitches in each RS row. Then you will pick up stitches from the WS side of the work, ensuring that the first and last of the new stitches are purl.
From the WS side of the work and in addition to the first picked-up stitch on the right front, cast on 11 new stitches onto circular needles using the Italian cast-on method (= 1 purl stitch, 9 knit stitches, 1 purl stitch). Turn the work again so that you knit the next row from the RS.
Note: After you turn your work again, you will now have the RS of the work and the newly picked-up stitches at the beginning of your circular needles. Now you will knit the placket in turning rounds on these 11 stitches, knitting 1 picked-up stitch together with 1 placket stitch in each RS row. The placket stitches are knitted with a double-pointed needle on all RS rows and with circular needles on all WS rows.
Row 1 (RS): With a double-pointed needle, (1 knit, slip 1, knit) 5 times, 2 together, knitwise, turn the work.
Row 2 (WS):With a circular needle, slip 1, knit, (1 knit, slip 1) 5 times, turn the work.
Repeat Rows 1 and 2 until the first buttonhole.
Buttonhole
Note: The first 6 stitches of the placket are worked in Rows of the Buttonhole 1 and 2, and the last 5 stitches are worked in Rows of the Buttonhole 3 and 4.
Row of Buttonhole 1 (RS): (1 knit, slip 1, knit) 3 times, turn the work.
Row of Buttonhole 2 (WS): (1 knit, slip 1, knit) 3 times, turn the work.
Repeat Rows of the Buttonhole 1 and 2 one more time, then knit only Row of Buttonhole 1 one more time.
Cut the yarn.
Note: Now work the last 5 stitches.
Row of Buttonhole 3 (RS): (1 knit, slip 1, knit) 2 times, 2 together, turn the work
Row of Buttonhole 4 (WS): slip 1, knit, (1 knit, slip 1) 2 times, turn the work
Repeat Rows of Buttonhole 3 and 4 one more time, then knit only Row of Buttonhole 3 one more time.
Note: Next row is WS and again knit on all stitches.
Next row (WS): slip 1, knit, (1 knit, slip 1) 5 times, turn the work
Continue knitting the placket, repeating Rows 1 and 2, and performing Rows of Buttonhole 1-4 on the marked positions, until there remains only one unknit picked-up stitch at the bottom of the left front.
Note: Now you will divide all remaining stitches onto 2 double-pointed needles (knit stitches on one needle, purl stitches on the other) and bind off the placket stitches.
Slip the first placket stitch onto the first double-pointed needle, slip the second placket stitch onto the second double-pointed needle, *slip the next stitch onto the first double-pointed needle, slip the next stitch onto the second double-pointed needle; repeat from * until each needle has 5 stitches, then slip the last placket stitch onto the first needle, slip the last picked-up stitch onto the second needle.
Note: Now you will have 6 knit stitches on the first needle and 5 purl stitches plus the picked-up stitch on the second needle.
Place the two needles parallel and join the stitches together using a tapestry needle and the mattress stitch “loop to loop” seam.
Finishing
Weave in all ends.
Sew on 4 buttons along the placket of the left front piece so that they align with the buttonholes.
Block the cardigan.