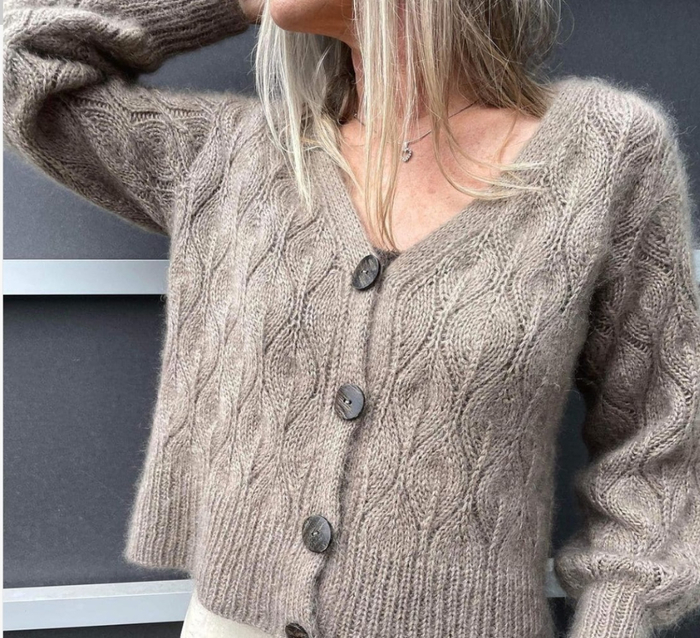
White cardigan knitted with pockets
Added: 09.04.2021 в 06:02 Views: 10551
White cardigan knitted with pocketsKlubokhttp://klubok.work/1/2/8765/Klubokhttps://klubok.work/css/image/top-logo-en.png
A magnificent loose cardigan with pockets, trimmed with a wide ribbing, is indispensable in any season.
SIZES
S (M) L (XL)
YOU WILL NEED
Yarn (100% cotton; 100 g/140 m) — 12 (13) 14 (15) balls of white; straight needles size 4 and 5; circular needles size 4, 120 cm long; additional needles size 6.
PATTERNS
DOUBLE STITCH
Insert the needle into the underlying stitch of the previous row and pull the thread = a stitch before the stitch on the left needle, knit both stitches together and drop from the needle.
MAIN PATTERN
Row 1 (= wrong side): knit all stitches knitwise.
Row 2: *1 knit, 1 double stitch*, repeat from * to *, finish the row with 1 knit.
Row 3: knit all stitches knitwise.
Row 4: 1 knit, *1 knit, 1 double stitch*, repeat from * to *, finish the row with 2 knits.
Row 5: knit all stitches knitwise.
Repeat from Row 2 to Row 5 (inclusive) for height.
In the wrong side rows, knit all stitches knitwise; in the right side rows alternate between 1 knit stitch and 1 double stitch, starting and ending the right side rows alternately with 1 knit and 2 knits = as a result, the double stitches will shift relative to each other. Keep an eye on the rhythm of the pattern!
PATENT RIBBING
Row 1: * yarn over and slip 1 st, 1 knit*, repeat from * to * to the end of the row.
Row 2: * yarn over and slip 1 st, knit the stitch together with the yarn over knitwise *, repeat from * to * to the end of the row.
Repeat Row 2 for height.
GAUGE
14 sts x approximately 28 rows = 10 x 10 cm, knitted in the main pattern on needles size 5.
ATTENTION!
The gauge must match the specified one, so before starting work, you must knit a sample. For this, cast on 25 sts and knit 14 cm with the specified pattern on the corresponding needles. Then count the stitches in the middle section of 10 cm and compare with the given gauge data. If there are more than 14 sts, switch to thicker needles; if there are less, switch to thinner ones. The gauge must primarily match the specified width.
If only one number is indicated in the instructions, it applies to all sizes.
Knit 2 sts together knitwise with a left-leaning decrease: slip 1 st as if knitting, knit the next stitch knitwise and pull the slipped stitch over the knitted one.
Close the stitches (except for the neckline and ribbed edges) with the additional needle size 6, so that the edge is not tight.
WORK EXECUTION
BACK
On needles size 5, cast on 75 (81) 87 (93) sts and knit the main pattern as described above (Row 1 = wrong side). When the length of the piece is 69 (70) 71 (72) cm, close the middle 11 (13) 13 (15) sts for the neckline and finish both sides separately.
To round the neckline, close 3, 2, 1 sts from the inner edge at the beginning of each row.
At the same time, close for the shoulder slope from the outer edge at the beginning of each row 6, 6, 7, 7 (7, 7, 7, 7) 7, 8, 8, 8 (8, 8, 8, 9) sts and in one row the remaining stitches.
RIGHT FRONT
On needles size 5, cast on 37 (39) 43 (45) sts and knit the main pattern (Row 1 = wrong side). When the length of the piece is approximately 40 cm (finish at Row 3), start decreasing for the V-neck slope: 1 knit, 2 sts knit together knitwise (= stitch after the edge and double stitch), finish the row.
ATTENTION!
Watch for the shift of double stitches in the pattern!
Repeat this decrease every 8th row until there are 26 (28) 31 (33) sts left on the needles. After reaching the first closure of the shoulder slope (= perform the same number of rows as on the back), shape the slope as on the back.
LEFT FRONT
Knit as the right front, but in a mirrored fashion. Decrease for the V-neck slope: knit until the last 3 sts on the needle, knit 2 sts together knitwise with a left-leaning decrease (= double stitch and the next stitch), then 1 knit.
ASSEMBLY
Sew the shoulder seams (the seam should not stretch).
SLEEVES
From both sides of the shoulder seam count 82 (84) 86 (88) sts and make a mark. In the section between the marks (= 82 (84) 86 (88) sts), cast on 1 st from every 2nd row on needles size 5 from the right side of the piece and knit Row 1 (= wrong side) knitwise = Row 1 of the main pattern, during this row decrease 13 sts (= approximately knit every 5th and 6th st together knitwise) = 69 (71) 73 (75) sts on the needles.
Continue working in the main pattern, making decreases on both sides every 8th row, as described for the V-neck slopes = a total of 9 rows with decreases. When the length of the sleeve is approximately 31 (32) 33 (34) cm, finish the main pattern with a knit row.
Switch to needles size 4 and continue working in patent ribbing, decreasing 1 st in Row 1. After 12 cm from the change of pattern, close the stitches in the wrong side row according to the pattern.
POCKETS
On needles size 5, cast on 29 sts and knit the main pattern (Row 1 = wrong side). When the pocket length is 16 cm (finish with a wrong side row), switch to needles size 4 and knit in patent ribbing, decreasing 1 st in Row 1.
After 1 cm from the pattern change in the right side row, close the stitches according to the pattern.
ASSEMBLY (CONTINUED)
Sew the pieces with mattress and knit stitches = mattress stitch for the longitudinal edges of the pieces (= 1 row x 1 row), knit stitch for the edges with closed stitches.
Finish the side seams and the seams of the sleeves, ensuring that the lower parts of the sleeves are ribbed (= cuffs) — from the right side.
BAND
Knit on circular needles size 4 in rows in both directions.
Cast on from the right side of the piece, starting from the lower edge of the right front, by taking 1 st from every 2nd row, then along the edge of the back neckline, take 1 st from each closed stitch + 2 additional stitches on the rounded sections.
On the left front, cast on the stitches in the same way, finishing at the cast-on row (the number of stitches must be even). Knit in patent ribbing. After 14 cm, tightly close the stitches in the right side row according to the pattern.
Sew the pockets to the fronts as shown in the photo.