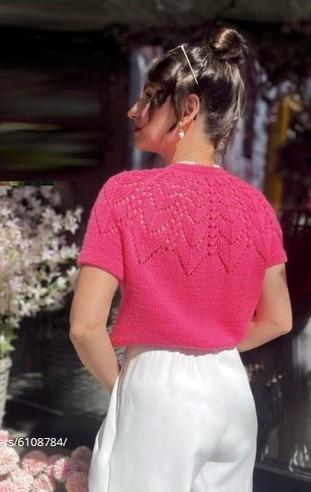
Knitted blouse
Added: 15.08.2025 в 13:35 Views: 2985
Knitted blouseKlubokhttp://klubok.work/1/2/9029/Klubokhttps://klubok.work/css/image/top-logo-en.png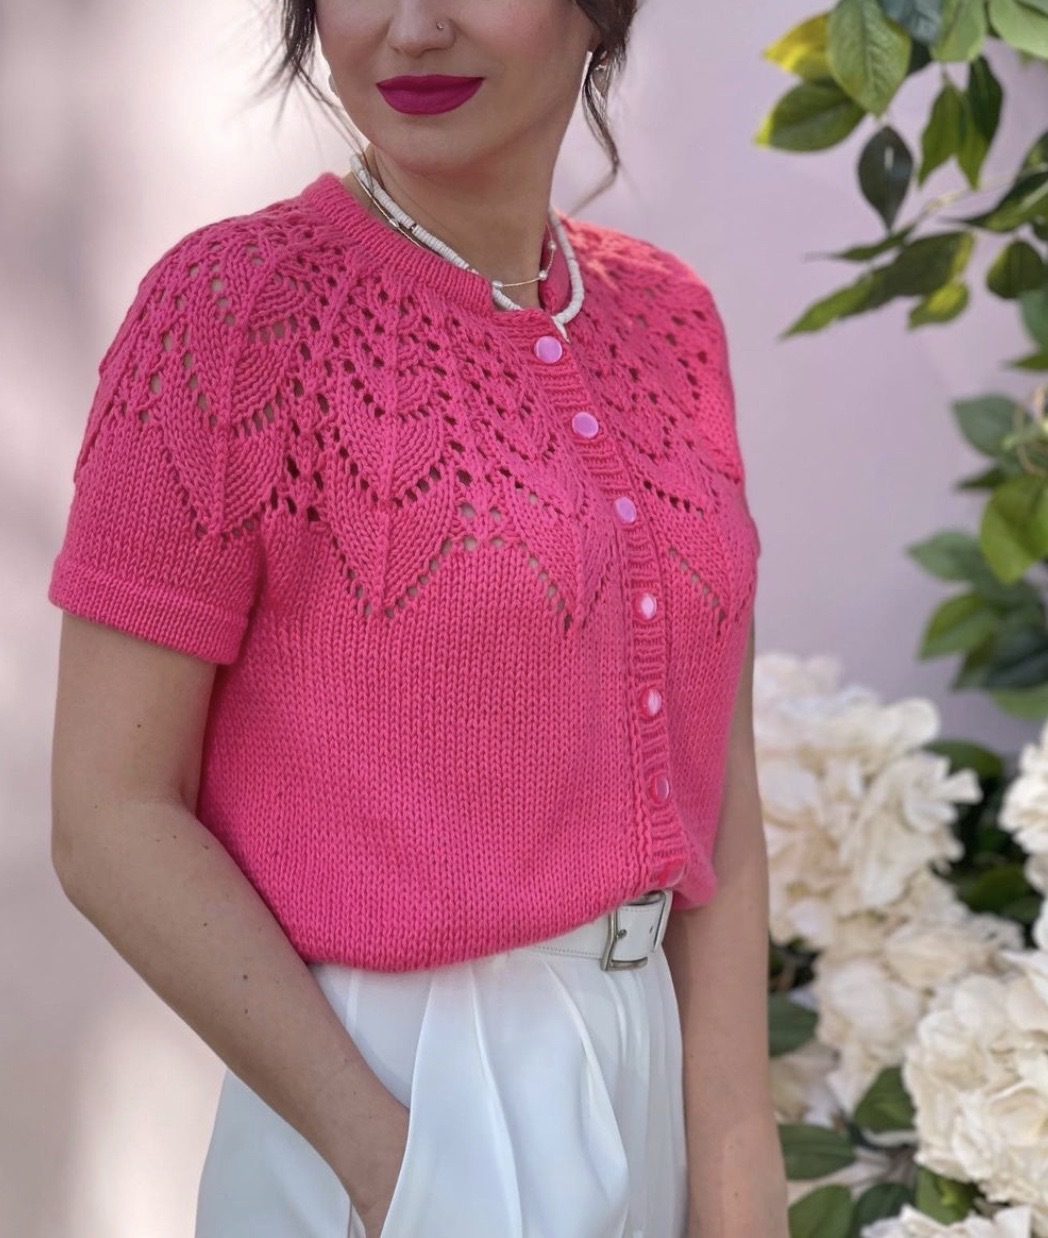
SIZE CHART:
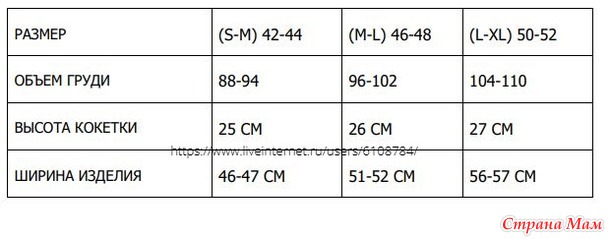
The step between sizes is 10 cm (20 stitches) in the width of the top body.
In the description, the numbers for different sizes will be indicated as (S-M) 42-44 / (M-L) 46-48 / (L-XL) 50-52. If one number is given, it means it is the same for all sizes.
WE WILL NEED:
Main yarn (see below), contrasting waste yarn, needles (see below), markers (preferably removable), row counter (if necessary), scissors, measuring tape, darning needle.
GAUGE: 17 sts x 24 rows in a square of 10x10 cm – gauge strictly after blocking.
It is important to adhere to the specified gauge to achieve the desired size and fit of the item.
To correctly select needles for the chosen yarn, I recommend knitting a swatch with stockinette stitch measuring 30 stitches by 30 rows. BEFORE blocking, be sure to take measurements and record the results. The swatch should be washed and dried like any knitted item. Based on the finished swatch AFTER blocking, the needle size can be adjusted. Changes in the swatch BEFORE and AFTER blocking will help reveal changes in the fabric (shrinkage/stretching).
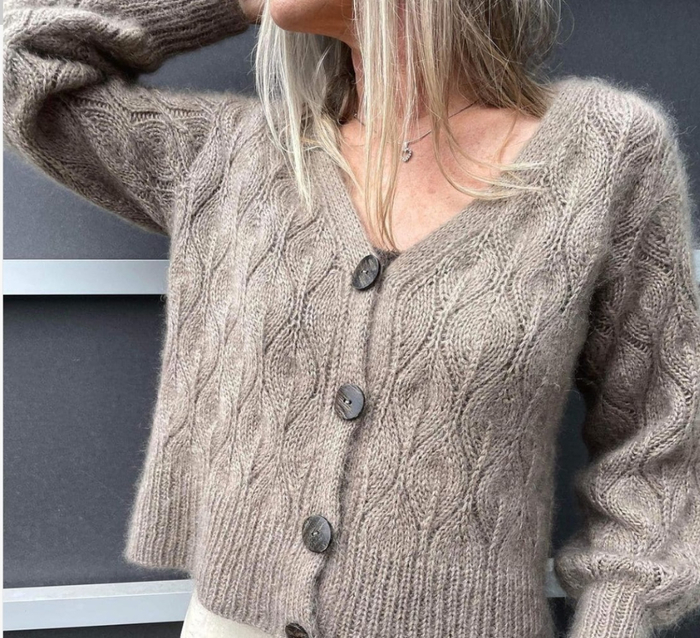
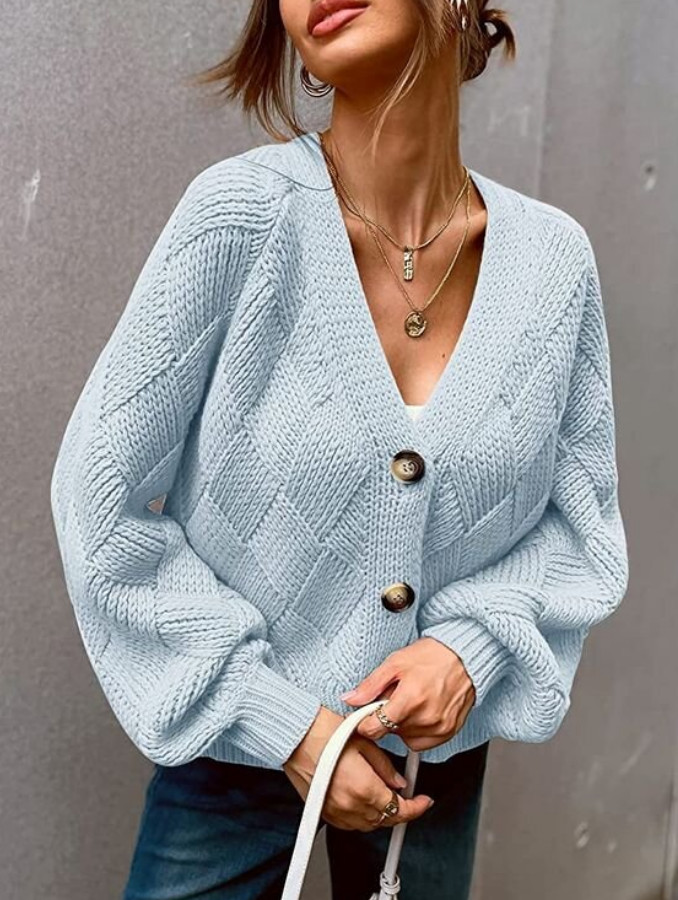
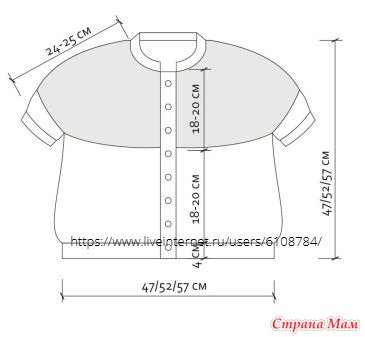
CONSTRUCTION AND MODEL:
The top is knit from the top down in one piece without seams. The construction
is seamless – a round yoke with an eastern short row.
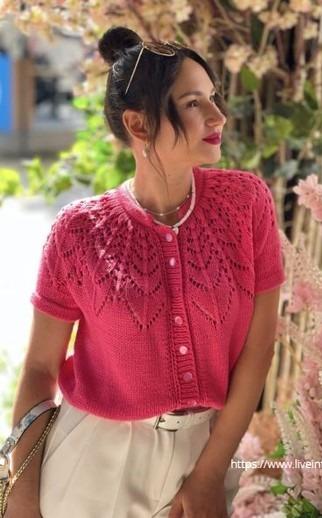
The model of the top implies a semi-fitted silhouette, gently hugging
the figure. The model of the top is cropped (estimated length to the waist +5-7 cm). The round yoke with an impressive lace pattern, as well as a neckline with decorative tape, create an individual look for the model.
YARN AND CONSUMPTION:
Consumption is given for short sleeves (long sleeves)
Yarn in skeins:
Gazzal Organic Baby Cotton 5/5/6/7 (6/7/8/9) skeins.
Gazzal Baby Cotton XL 5/5/6/7 (6/7/8/9) skeins.
Lanes du Nord Pima Cotton 5/5/6/7 (6/7/8/9) skeins.
Yarn Art Jeans 5/5/6/7 (6/7/8/9) skeins.
Yarn in cones:
blends with cotton, merino, viscose, linen, silk in the composition, estimated yardage 230-250m/100g, consumption for size S height 160 is 200 g.
NEEDLES:
I achieved the necessary gauge when knitting stockinette stitch on needles No5 (5.5) and when knitting the bottom rib on needles No4 (4.5), for finishing the neckline and sleeves - needles No3.5. For knitting the round yoke, we will need needles No4, No4.5, No5, No5.5. Depending on the yarn you choose and your individual knitting technique, you may have larger or smaller needle sizes.
ABBREVIATIONS IN THE TEXT:
лиц – knit stitch,
изн – purl stitch,
к – edge stitch,
2к – double edge stitch ,
н – yarn over,
М – marker,
ЦМ – central marker,
ПП – increase knitwise to the right ,
ПИ – increase purlwise to the right .
DESCRIPTION OF THE KNITTING PROCESS
We start knitting from the top down.
We will knit the neckline with a "hollow rib". We cast on 75/78/81 stitches using the long tail method on needles No4 with a 40cm cable (We cast on with waste yarn of a contrasting color, which we will remove later). On needles No3.5, we knit the collar back and forth in stockinette stitch with double edge stitches at the edges (see below).
IMPORTANT! We knit the edges as double edge stitches: at the beginning of the knit row, slip the first stitch as an edge, slip the second stitch, leaving the yarn at the back, at the end of the knit row the second to last stitch is knit, the last is purl; at the beginning of the purl row, slip the first stitch as an edge, slip the second stitch, leaving the yarn at the front, at the end of the purl row the last 2 stitches are purl.
We knit the collar in stockinette stitch to a height of 5-6 cm; finish with a purl row.
We unravel the waste yarn from the cast on edge, freeing the stitches, and immediately transfer them to the main needle (there should be 1 stitch less on the cast on edge than on the working side). We fold the work in half with the purl side inside. We align the needles so that they are parallel. We knit 2 stitches together knitwise (1 stitch from each needle), aligning the first and last row and forming a double collar
We knit 1 row (purl with purl stitches.
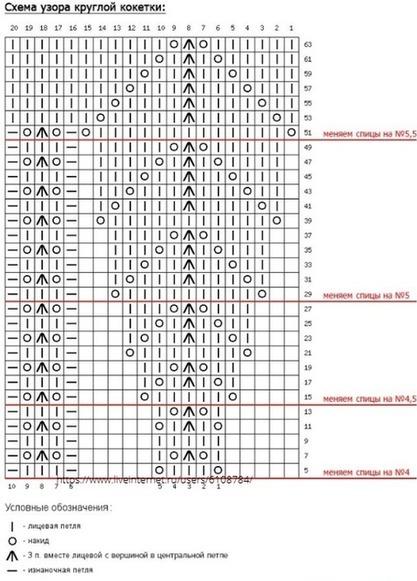
ROUND YOKE
We will knit the round yoke in back and forth rows according to the pattern chart. The chart shows 1 pattern repeat. The number of repeats, as well as the stitches at the beginning and end of the row, will be knitted according to the row-by-row description. The row numbering on the chart corresponds to the row numbering in the test description.
We switch to needles No4. As we progress in knitting the lace part of the yoke, we will change to larger needle sizes (No4.5, No5, No5.5). The rows after which we will change needles are marked on the chart.
The setup rows are described for each size separately.
FOR SIZE S-M
1 setup row (no increases) (k): 2k, 72 knit, k.
2 (and) and all subsequent even rows: according to the pattern (with double edge stitches).
3 setup row (k): 2k, Pİ, 1 knit, (3 knit, Pİ) - repeat 22 times, 4 knit, Pİ, 1 knit, k.
FOR SIZE M-L
1 setup row (k): 2k, 18 knit, PП, (19 knit, PП) – repeat 2 times, 19 knit, k.
2 (and) and all subsequent even rows: according to the pattern (with double edge stitches).
3 setup row (k): 2k, Pİ, 1 knit, (3 knit, Pİ) - repeat 24 times, 4 knit, Pİ, 1 knit, k.
FOR SIZE L-XL
1 setup row: 2k, (11 knit, PП) – repeat 6 times, 12 knit, k.
2 and all subsequent even rows: according to the pattern (with double edge stitches).
3 setup row: 2k, Pİ, 1 knit, (3 knit, Pİ) - repeat 26 times, 4 knit, Pİ, 1 knit, k.
On the needles, there are 99/107/115 stitches.
In the next row (purl), we need to place markers, distributing the pattern on the wedges.
We place the markers as follows:
4 row (and): 2k, 1 knit, 1 purl, M, 3 purl, M, (1 knit, 3 purl, 1 knit, 3 purl, M) – repeat 11/12/13 times, 1 purl, 1 knit, 1 purl, k.
IMPORTANT! The last fragment of the pattern will be incomplete. Note that for the symmetry of the item, in the last segment of the pattern we will only knit that part of the pattern on the chart where the symmetrical expansion of the wedge occurs, and the path will not be included in the pattern.
row: 2k, 1 purl, 1 knit, (M, n, 3 knit, n, 1 purl, 3 knit, 1 purl) – repeat 11/12/13 times, M, n, 3 knit, n, M, 1 knit, 1 purl, 1 knit, k.
7 row: 2k, 1 purl, 1 knit, (M, 1 knit, n, 3 together knit with the central stitch at the top video, n, 1 knit, 1 purl, n, 3 together knit with the central stitch at the top, n, 1 purl) – repeat 11/12/13 times, M, 1 knit, n, 3 together knit with the central stitch at the top, n, 1 knit, M, 1 knit, 1 purl, 1 knit, k.
9 row: 2k, 1 purl, 1 knit, (M, 5 knit, 1 purl, 3 knit, 1 purl) – repeat 11/12/13 times, M, 5 knit, M, 1 knit, 1 purl, 1 knit, k.
We continue knitting according to the pattern chart.
When the whole chart is fully knitted (the entire yoke is ready), we transfer all stitches to a long waste yarn and do a fitting. During the fitting, it is important to determine if the volume and depth of the yoke suit you.
If during the fitting you realize that the depth of the yoke is too small - continue knitting stockinette stitch for another 2-4 rows (knit the first 4 and last 4 stitches according to the pattern).
On the needles, there are 243/263/283 stitches.
DIVIDING FOR BODY AND SLEEVES
The division is done in a knit row.
Dividing row: 2k, 1 purl, 38/43/48 knit (left front), knit the next 39/41/43 stitches (left sleeve) and immediately place them on a spare yarn, tying the ends in a knot. Knit 83/89/95 knit stitches (back) and turn the work to the purl side.
At the same time, on the knit side, we will divide the remaining unfinished stitches into the right sleeve and right front. 39/41/43 stitches (right sleeve) are placed on a spare yarn and tied in a knot, while the remaining 38/43/48 stitches (right front), 1 purl, 1 knit, and edge are left on the cable for now and secured with stoppers (you can also place them on a separate spare yarn).
EASTERN SHORT ROW
To elongate the back relative to the front (so that a deeper neckline is formed at the front), we will knit the eastern short row. For this, we will knit only the 83/89/95 stitches of the back, from sleeve to sleeve (the sleeves have already been placed on spare yarn). We do not knit all other stitches (the fronts) for now.
The height of the short row is 6/8/10 rows of stockinette stitch (classic edges: always slip the first stitch, always knit the last as purl). Count the rows starting from the dividing row, ending with a purl row.
BODY OF THE TOP
Continuing to knit with the main yarn, on the purl side of the fabric, we attach the left front. To do this, using a piece of spare yarn, we cast on 7/8/9 stitches for the underarm video and immediately knit the stitches of the left front (in the purl row).
We turn the work and knit 2k, 1 purl, and then all knit stitches of the left front, underarm, and back. When reaching the sleeve, we cast on 7/8/9 stitches for the underarm using a piece of spare yarn and then immediately knit all stitches of the right front: first all knit stitches, at the end of the row 1 purl, 1 knit, k.
Now, the sleeves placed on spare yarn are left aside – we will return to them later. We knit the body in stockinette stitch, keeping 2k and 1 purl at the edges. On the needles, there are 179/197/215 stitches.
The length of the body from the underarm to the rib for height 160 cm is approximately 18 cm.
RIBBING
In the last row of the body (purl), we switch to needles No4.5 – we knit the row according to the pattern.
From the next row, we switch to knitting 1x1 ribbing (alternating 1 knit, 1 purl). At the beginning and end of the row, we maintain the principle with double edge stitches and 1 purl. The height of the ribbing is 4-4.5 cm.
When the height of the ribbing is fully ready, we change the needles to No4 and knit 2 more rows as follows:
1 row (k): 2k, 1 purl, (1 knit slip, yarn in back, 1 purl) – repeat to the end of the row, at the end 1 knit, k.
2 row (and): 2k, (1 knit slip, yarn in front, 1 purl) – repeat to the end of the row, k.
After this, we proceed to closing the stitches.
We will close the ribbing with a needle in this way: video .
PLACKET
We will process the fronts with ribbing to form plackets for button closures and buttonholes. Using needles No4 (if you knit tightly, it is better to take No4.5), we cast on stitches along the outer edge of the left front starting from the lower line of the neck to the bottom of the ribbing: video . We pick up stitches with a step of 3 out of 4 (we pick up 3 stitches, 1 skip).
IMPORTANT! Count the number of stitches. It should correspond to the fact that at the edges we will knit double edge stitches, and after them purl stitches and then according to the pattern of 1x1 ribbing. That is, the number of placket stitches should be a multiple of 2 +5 stitches.
It is better to determine the locations of the buttons and mark them with markers right away.
1 row of the placket (purl) I recommend knitting with twisted stitches video, so the placket will look neater and will not stretch.
We knit according to the pattern for another 2 rows. In the next row (knit), we make stitches for the buttons in the designated places: video 1, video 2, video 3.
The total height of the placket is 8 rows. We close the placket in the knit row with needles in this way: non-elastic closure.
We will knit the placket on the right front similarly. We similarly cast on the placket stitches along the outer edge from the bottom of the ribbing to the lower line of the neck.
We knit the matching placket similarly and close the stitches in the same way in the knit row.
SLEEVE
We transfer the stitches of the sleeve and underarm onto the main needles.
Video .
The beginning of the round will be in the middle of the underarm - mark it with a central marker.
We knit the stitches from the central marker to the section where the edge stitches of the short row are. In this section, we need to pick up stitches along the edge. We pick up stitches not from the edges but from the stitches following them with a step of 3 out of 4. In total, we pick up 6-10 stitches (see the video above).
In total, there are 52/56/60 stitches on the needles.
We mark the central marker in the middle of the underarm (and the beginning of the round).
We attach the yarn and knit the sleeve in stockinette stitch.
SHORT SLEEVE
On circular needles with a 40 cm cable, knit 5-10 rounds.
Switch to needles No4 and knit the cuff in stockinette stitch, approximately equal in height to the neckline or slightly more.
Finish the short sleeve by joining the edge of the cuff with a slip stitch from the inside. Use a needle to seam the open stitches, forming the cuff as a hollow; ribbing video .
The second sleeve is knitted similarly.
LONG SLEEVE
On circular needles with a 40 cm cable, knit stockinette stitch for 15 cm.
Make a decrease by knitting 2 stitches together knitwise to the left from the central marker. After another 15 cm, make a similar decrease again.
Knit the sleeve to the desired length considering that at the end there will be ribbing of height 4-4.5 cm.
Switch to needles No4 and knit stockinette stitch ribbing of height 4-4.5 cm.
Close the ribbing with a needle, just as you did with the bottom of the item.
The second sleeve is knitted similarly, but decreases are made symmetrically: to the left of the central marker, knit 2 stitches together knitwise to the right.
BLOCKING
After our item is fully knitted, I recommend immediately weaving in the ends of the yarn. During the blocking process, they will felt a little and become completely inconspicuous.
Now it is necessary to perform blocking or wet-heat treatment. I recommend for all items only hand washing at a temperature of 30°C using liquid detergent and, optionally, conditioner. After washing, dry the item in a horizontal position laid out on a drying rack on a towel (so that no creases remain from the rack). During drying, I recommend periodically shaking the wet item and gently laying it out again - this way the yarn opens better. Once the item is completely dry, it will be ready to delight you. It does not need to be ironed.
Category: Sweatshirts, jacket, cardigan