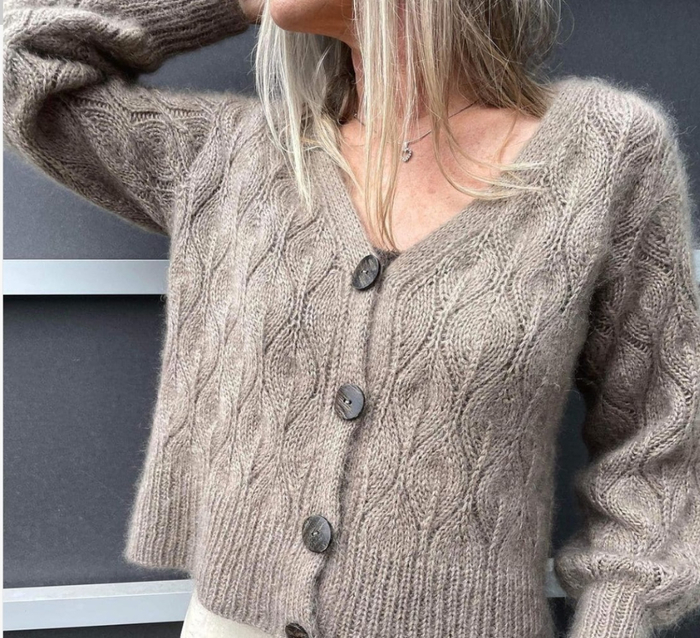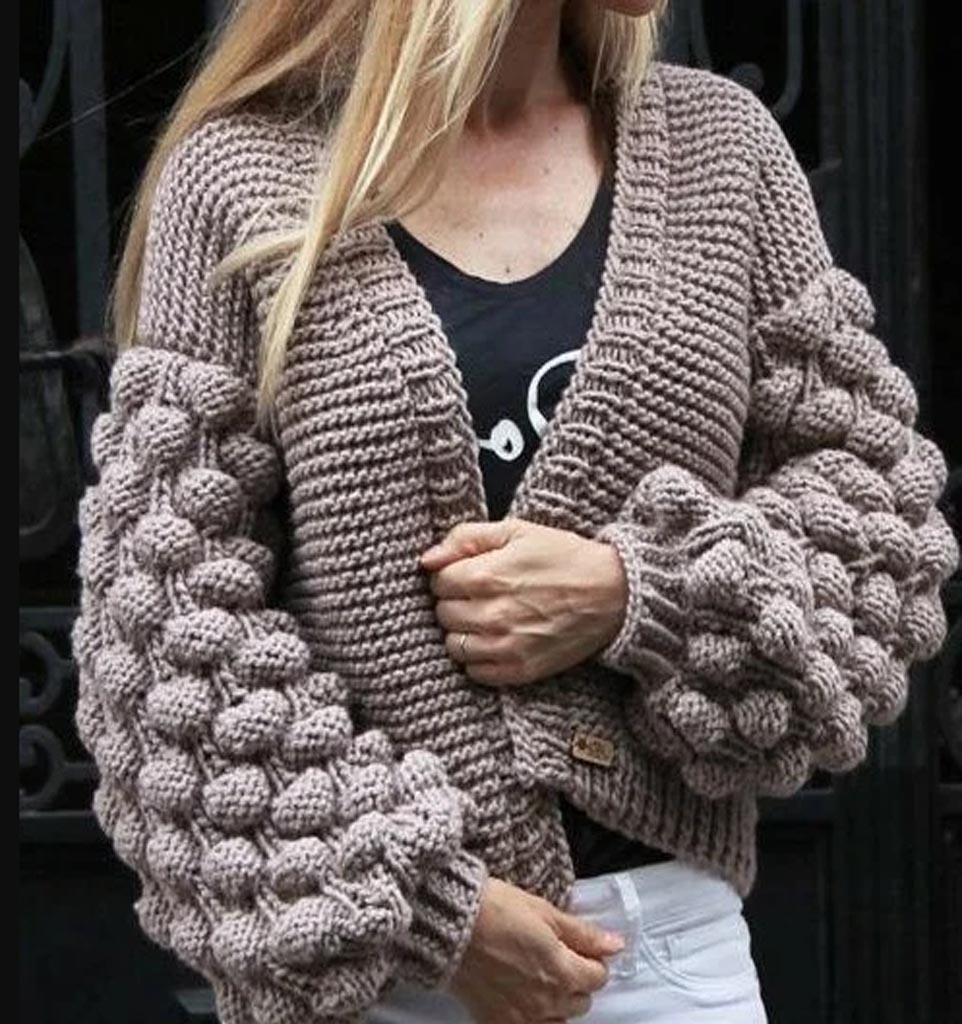

The cardigan is knitted in garter stitch, with a voluminous pattern of «raspberries» on the sleeves.
The model can be waist-length or mid-thigh. In our case, the model is waist-length, measuring 50cm.
The cardigan does not have a fastening and is knitted as a single piece from top to bottom to the sleeves. Then the fabric is divided into three parts and the front and back are knitted separately.
After joining the shoulder seams, stitches are picked up from the armhole for the sleeves.
Then we finish with a border and our cardigan is ready!
My example is calculated for size SM.
Yarn – any wool, blends with wool, meterage 300m/100g, in two strands, usage 600g.
Needles No.7.5.
I didn't have needles of that size, so I combined two different needles on a circular cable - one needle No.7 and one needle No.8.
Ribbing - needles No.5.
My gauge is 1.4 stitches/1cm.
Swatch!
Knitting a swatch is mandatory! Girls, every knitter has their own knitting density, which is individual, so knitting a swatch is necessary.
The swatch should be sized at least 10cm. I usually cast on no less than 20 stitches. If a complex pattern with a large repeat is being knitted, the swatch may need to be half the size of the sweater!
We knitted a swatch and check if we are satisfied with the result! If the fabric seems too loose, there is a possibility that the finished product will stretch significantly. We take needles one size or half a size smaller and knit another swatch.
If the swatch is too tightly knitted, there is a chance that the future product will simply «stand still». Therefore, we take needles one size larger!
Our swatch should be flexible enough, but not «holey», dense enough, but not tight. Girls, there can be many swatches!
Both the swatch and the finished product must undergo wet blocking! Now we will only discuss washing.
Processing temperature, ironing requires a strictly individual approach to each type of yarn, so it will be covered in a separate section!
Washing.
In a container with cool water, specifically cool for your hands, add a wool detergent (I use Laska) and immerse our swatch in it. It should be well soaked!
Italian cone yarn requires special attention at this stage, as it is usually stock yarn intended for machine knitting. To facilitate its sliding in the machine, the yarn is treated with a special composition. Our task is to free it from this composition. Sometimes this is not easy. If the seller promised you fluffiness, but what you received is a rope, you will likely have to struggle to see that fluffiness! The worse the Italian yarn looks upon arrival, the more interesting it should become after washing. If delicate handling hasn't helped your swatch open up, you may need to wash it several times, or perhaps even soak it in dish soap!
Ball yarn generally doesn’t require such efforts. We simply soak the swatch well, trying to adjust and straighten our stitches in the water, gently pulling it with our hands along and across! Then we lay the swatch on a towel, smoothing it out with our hands. After drying, it is ready for measurements!
We measure the knitting density! Girls, this moment is very important!
Place a ruler or measuring tape against the swatch and take (mandatory) several measurements. We count the number of stitches in one centimeter, in two centimeters, in five centimeters, and overall in the swatch!
Never rely on just one measurement, otherwise the data will be inaccurate!
The most accurate data is taken from a larger number of stitches, meaning that in 10cm the data will be more correct, but there is a possibility that the fabric has stretched and the numbers will be distorted.
That is why we take several values, both small and large.
Then we find the average value - this will be your individual density, knitted by your hands, for this yarn and these needles!
Explanation - if you change the yarn, or the needles, or even your mood, the procedure is repeated. The same applies to rows, following the same scheme!
Be sure to note all the data in your notebook: the name of the yarn, meterage, the needles used, and the resulting density. It will be useful in the future!
Example.
We calculate our density: stitches divided by centimeters!
My yarn is 100% wool, meterage 300m/100g.
I will knit with two strands on needles No.7.5.
My density came out to 1.4 stitches in 1cm.
All numbers are given as an example, they cannot be used for calculations!
You should only use your own data for calculations.
I recommend that after all calculations are made, and you have knitted some part of the front or back, you should definitely take control measurements of the entire fabric during the process.
The ribbing distorts these data, so after the ribbing, knit 10-20cm after it and make sure to take control measurements.
Measure the entire fabric, divide by the number of stitches.
This will be the most accurate density. If it differs from your initial calculations, it needs to be corrected.
How to calculate the meterage of the yarn in 100 grams with several strands.
Suppose you have yarn with a meterage of 500 meters in 100 grams. You need to get a thick yarn of 100 meters in 100 grams.
This means you need to divide 500 meters by 100 meters. It turns out that to have a meterage of 100 meters in 100 grams, you need to knit with 5 strands.
Suppose you have Italian yarn in a cone. Meterage 1500 meters in 100 grams. We want to knit with 3 strands – the question is what meterage will we get?
1500/3 = 500 meters in 100 grams.
And if in four strands 1500/4 = 375 meters in 100 grams.
Accordingly, five strands 1500/5 = 300 meters in 100 grams.
The principle is – available meterage / number of strands = meterage in 100 grams.
If the skein is 50 grams? For example, 175 meters in 50 grams. And our task is to get a meterage close to 120m in 100 grams. We calculate two strands 175/2 = 87.5m. Since we have 50g, and our targets are for 100g, we multiply by 2, 87.5*2 = 175m (a bit lacking). We calculate three strands 175/3=58.3*2 = 116.6.
We got the desired result, the closest to the task set!
TAKING MEASUREMENTS.
If you are knitting for a child and do not have their measurements, you can use the data from the table below.
If you are knitting for an adult, I strongly advise taking measurements, as our figures are not always standard.
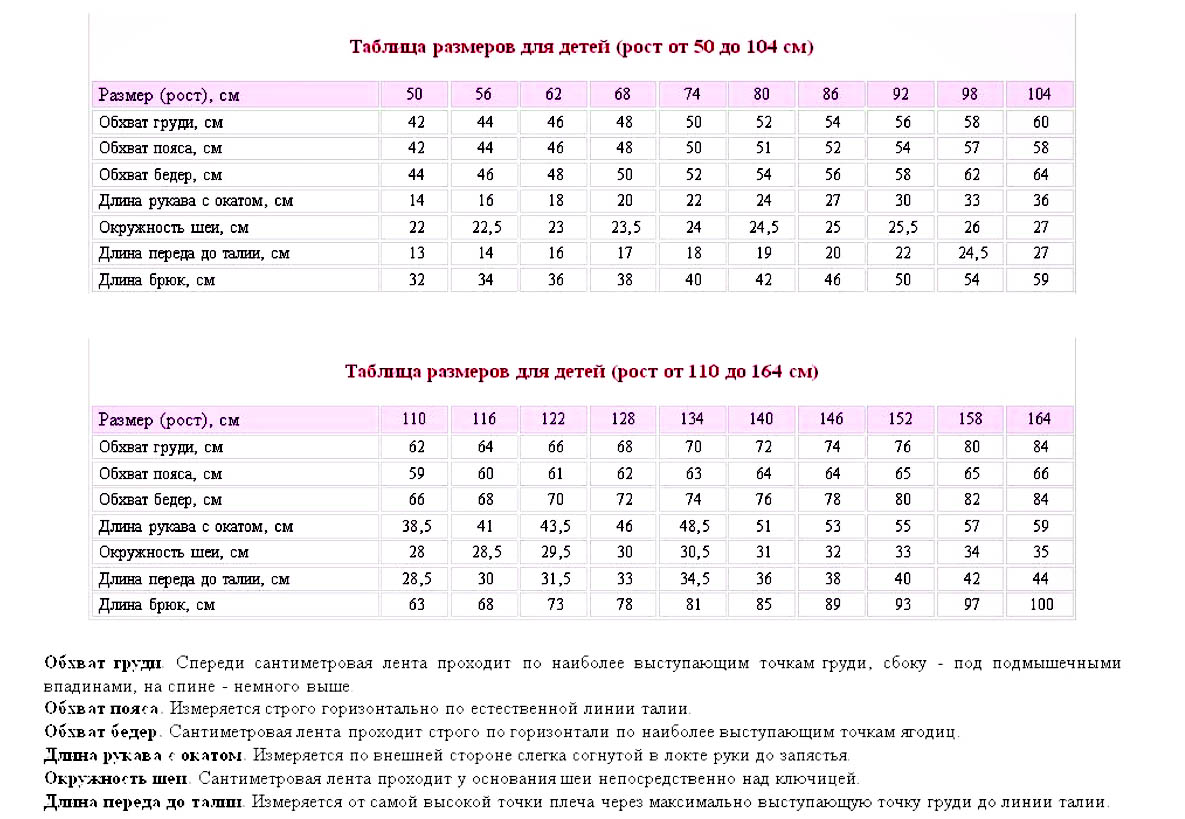
Figure 1
1 For shoulder garments, the main measurement is the bust circumference (BC). The measurement is taken with a measuring tape (in extreme cases, with a husband’s tape measure) under the armpits, strictly horizontally, i.e. parallel to the floor, at the protruding points of the bust. If the cardigan is below the hips, measure the hips in the same way, at the most protruding points. And determine which measurement in our case is larger, that is the one we will use in future calculations.
2 The next measurement is the desired length of our future bomber (taken from the junction of the neck and shoulder to the desired length) at the protruding points of the bust. Additionally, take the desired length from the armpit to the bottom of the cardigan.
3 The last necessary measurement is the sleeve length. In our case, it is better to take it from the base of the neck, through the slightly bent elbow to the desired sleeve length.
Ease of fit.
Ease of fit can be zero, that is absent altogether. For example, when knitting a summer viscose tank top, a fitted top! In other cases, ease of fit is added from 2 cm to infinity.
Example.
BC - bust circumference - 94cm. In our cardigan or bomber model, there is no fastening. The border that we will use to finish the front should not overlap as planned. It will be «butt joint».
The width of one border will be about 5cm, meaning the total width of the border in the finished product will be about 10cm, which will be added to the overall width of the cardigan after finishing with the border.
This means I will add a little for ease of fit – for example, 3cm. If you plan to knit a fastening, then the border will overlap, meaning the width of the border in the overall width of the cardigan will be only 5cm, and the ease of fit of the cardigan should be increased.
I have 94cm. (BC) + 3cm. (ease of fit) = 97cm. But my cardigan has no fastening, and the border will be butt joint, so I must subtract the width of the border from the width of the cardigan. 97cm - 10cm (border width of 5cm on both fronts 5 * 2 = 10) = 87cm.
There is another option. You can take an existing item, the width of which fully satisfies you, measure it, and determine the width of your future cardigan!
We count the required number of stitches. Data for example (not used for calculation) 87cm (width of the cardigan) *1.4 (density) = 122 stitches.
I plan to knit the cardigan in garter stitch. I know from experience that this type of knitting, when transitioning from ribbing to the main fabric, gives a large expansion.
Moreover, my ribbing is knitted with needles No.5. Therefore, considering all these factors, I decided to add 22 stitches when casting on for the ribbing. 122 + 22 = 144 stitches.
Technology for knitting the cardigan-bomber «raspberries».

Figure 2
Cast on the required number of stitches on the needles!
Edge stitches are knitted in the classical way - the first is slipped, the last is purl!
I cast on 144 stitches on needles No. 5. If you do not plan to change the needle size for the ribbing, the number of stitches added for the ribbing will be much less.
But I always add at least 4 stitches to eliminate the skew of the ribbing at the bottom when finishing the border.
My numbers are as a guide; you should have your own data.
I knit the ribbing 2/2 approximately 5cm. After 5cm, I change to needles No.7.5 and switch to garter stitch (all stitches are knitted knitwise).
In my case, when transitioning, in the very first row I need to evenly decrease 22 stitches.
Four stitches are decreased at the beginning and at the end of the fabric simultaneously, knitting two stitches together twice.
That is, in the first row of garter stitch, I slip the edge stitch, then knit two stitches together twice, and do the same at the end of the fabric. This is necessary to ensure that the border of our cardigan is not pulled in by the ribbing at the bottom.
The remaining stitches are evenly decreased across the entire fabric. After transitioning to garter stitch, I have 122 stitches left on the needles.
Next, we knit straight up to the first decrease for the neckline.
Now we need to make the first decrease on the front for the neckline (i.e., shape the slopes on the fronts).
This decrease should be made before shaping the armholes and should be located under the bust (for me, this is 16 cm from the start of the ribbing).
Your first decrease might be slightly higher or lower at your discretion.
The decrease is made by knitting two stitches together after the edge stitches, at the beginning and at the end of the fabric.
I knit the fabric up, making decreases on the fronts from both sides every 3cm.
The total length of the bomber is about 50cm.
I started making decreases after knitting 16cm.
50-16=34 cm I knit, decreasing every 2.5-3 centimeters by 1 stitch from both sides of the fabric.
In total, I made 12 decreases of 2 stitches each. 12*2=24 decreased.
122-24=98 stitches remain on my needles when the length of my future bomber is 50cm.
But... We also need to knit the armhole.
2 DIVIDING THE FABRIC.
The overall theory is simple: divide into two parts and further divide the front half into two. If knitting without a border and fastening, these numbers can be left as is.
In our case, we will finish the edges with a border.
We need to leave a distance of 10cm between the fronts. I will not have a fastening, the edges of the front will be joined, so I allocated 10cm (5cm for the border on both sides).
If a fastening is anticipated, leave a distance between the fronts equal to the width of the future border, as later the fastening will overlap each other (I allocated two widths, as I will do a butt joint).
I divided my stitches as follows.
25 stitches - 1st front.
62 stitches - back.
25 stitches - 2nd front.
Now knit three separate pieces from different skeins.
Calculating the width of the sleeve.
The height of an adult person's sleeve is usually 16-16.5cm (this is the height of the sleeve, or ½ width of the sleeve at its widest point).
How to calculate?
1st method - The simplest way is to measure the height of the sleeve from an existing item and use this measurement.
2nd method - We can calculate it. Measure the circumference of the arm at its widest point. In my case, that is 25cm.
We have a loose cardigan, so the ease should be substantial; for me, it’s 10-12cm for the entire sleeve.
So, we have: OC 25cm + 11cm ease = 36cm sleeve width.
½ of the measurement is 18cm (see the figure above).
This means that after dividing, I knit three pieces from separate skeins (two fronts and the back) with a length of 18cm.
Without forgetting to make decreases for the neckline.
Now we should shape the shoulder seams.
I sew 19 stitches of the front and back together with open stitches using a hook or needles, then close 22 middle stitches of the back in the classical way, and sew the remaining 19 stitches of the back and the front together again. The body of the cardigan is ready.
You can close the stitches and sew them in whatever way you are used to doing it.
Sleeves.
Along the edge of the front and back, using circular needles (which should be one size smaller than the needles used for the main fabric), we cast on stitches for the sleeves. We cast on into each edge stitch. In my example, it turned out to be 54 stitches.
Do not join the stitches into a circle. The «raspberries» pattern is only knitted in flat fabric.
After casting on, switch back to the needles used for the main fabric and knit 4 rows of garter stitch in both directions (all rows knit knitwise).
The first rows after casting on will be a bit uncomfortable to knit, but after a few rows, it will get easier. After about 4 rows from the right side, we start to knit the «raspberries» pattern.
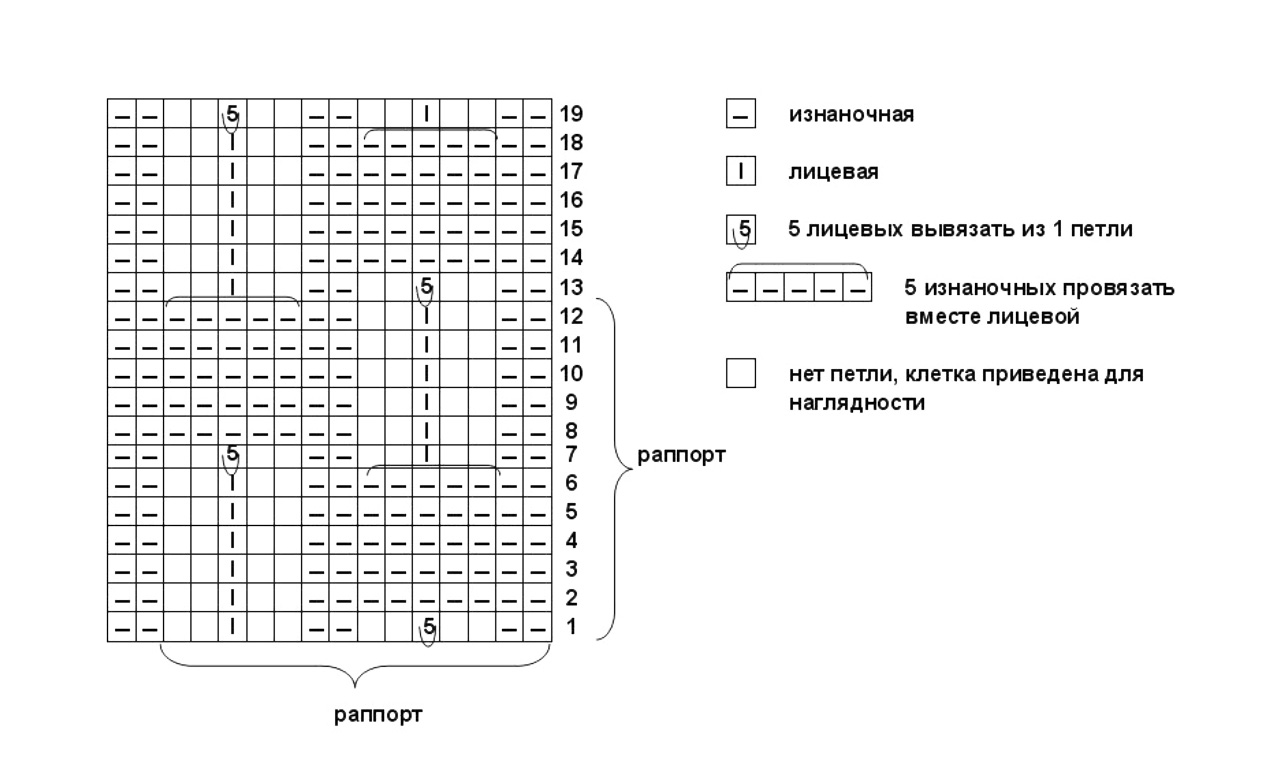
Figure 3
The scheme is always read from bottom to top, from right to left (there is usually the number one).
Some schemes only describe the right side rows, which implies that the wrong side rows are knitted according to the pattern.
This scheme contains both right and wrong side rows.
Here is the scheme of the standard «raspberries».
I knit my raspberries not 5 rows high as in the scheme, but 9 rows.
They seem cuter that way to me. You can knit according to the scheme or increase the number of rows of the bobble in height, just like I do.
After knitting the first row of «raspberries» in my example, there are 8 bobbles on the needles.
In the height of the sleeve in my example, there are 6 rows of raspberries.
In width, in the first row, I had 8 raspberries.
1 row - I knitted with 8 raspberries in width.
3 rows – 7 raspberries in width.
2 rows - 6 raspberries in width.
How do we decrease the bobbles?
Simply, when transitioning from one row of bobbles to another, we do not knit one of the braids from the edge of our sleeve (do not knit 5 stitches from one braid).
In the 6th and last row of bobbles, before knitting the ribbing, I change the scheme. I knit according to the scheme 5 stitches together, but do not knit 5 stitches from one; I just knit it according to the pattern.
That is, in the row where we close one bobble and start knitting another row of bobbles, I make the closure, but do not knit the new bobbles.
In the end, 42 stitches remain for the ribbing.
I switch to needles No.6 and knit the desired length of the sleeve cuff in ribbing 2/2.
I close the stitches in an elastic way, through a yarn over.
Border.
In each edge stitch, using circular needles one size smaller, we cast on stitches for the border.
Then, using needles No. 6, we knit the border in ribbing 2/2 with a width of 5cm.
In my cardigan, I closed the border stitches using the classical method through yarn overs.
We just need to sew the sleeves, and our cardigan is ready! Don’t forget to do wet blocking.