Knitted cardigan
Added: 18.09.2025 в 19:02 Views: 523
Knitted cardiganKlubokhttp://klubok.work/1/2/9125/Klubokhttps://klubok.work/css/image/top-logo-en.png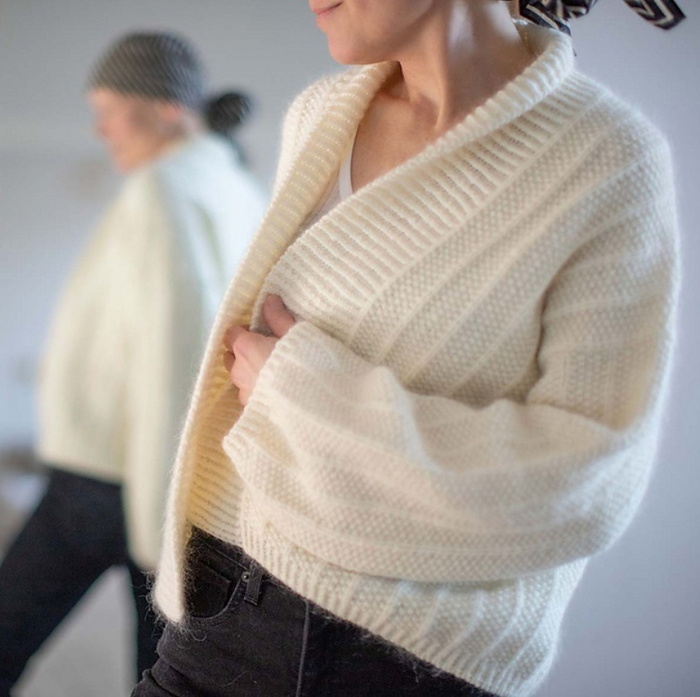
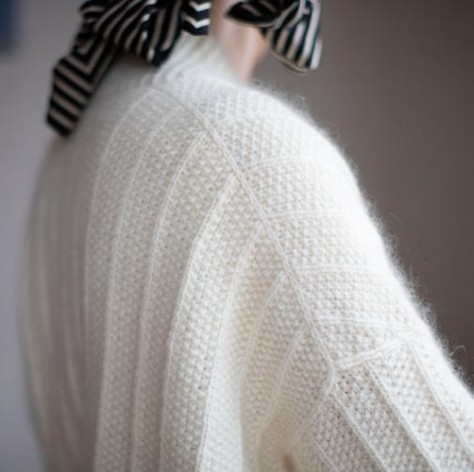
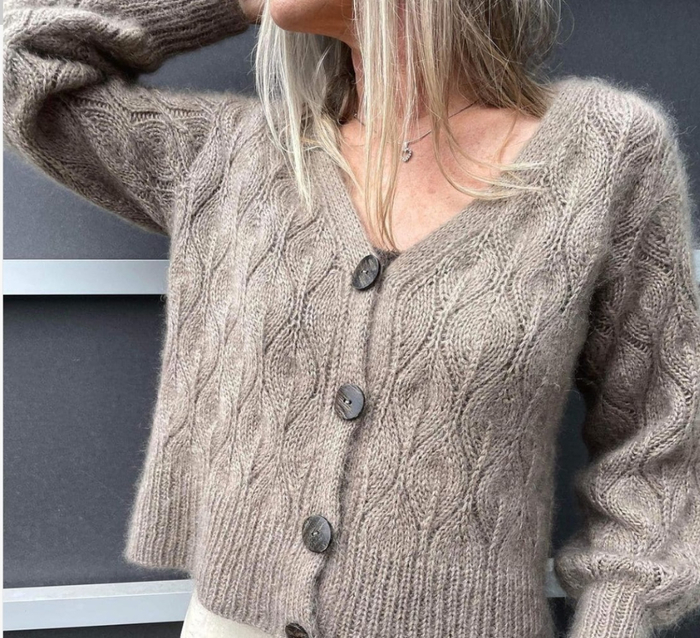
VILLA WRAP – a buttoned cardigan, knitted from soft yarn with a textured “Rice” pattern featuring columns of knit stitches.
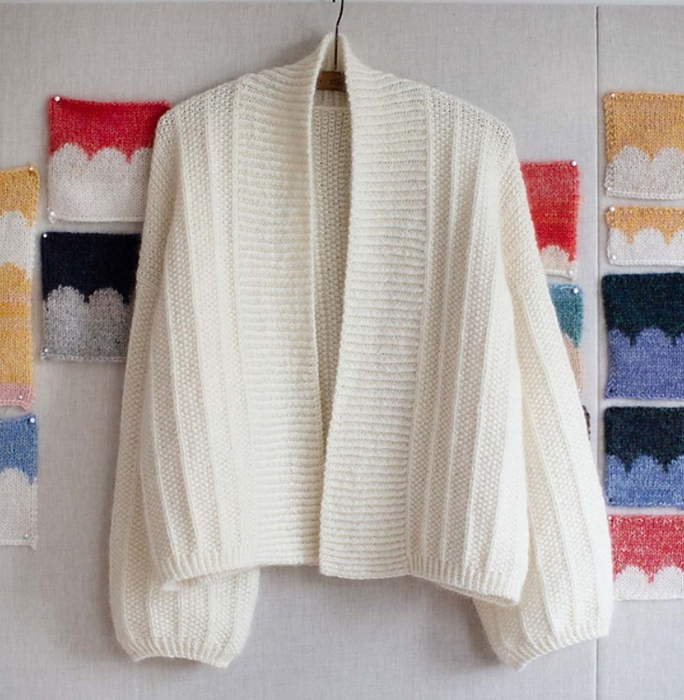
The cardigan is knitted seamlessly from top to bottom. First, the back yoke is created, then stitches for the front panels are picked up, which are knitted just like the back – to the armhole height. Next, the front panels and the back are joined, and the body of the cardigan is knitted in one piece down to the hem. After that, stitches for the button bands are picked up, and the bands are knitted in twisted ribbing to a sufficient height to form a beautiful folding collar. At the end of the work, stitches for the sleeves are picked up. The sleeves are knitted in the round until the hem. The body and sleeve hem stitches, as well as the button band stitches, are closed using the Italian bind-off method.
Sizes: 1 (2) 3 (4).
Final circumference of the cardigan at the bust line: 120 (127) 140 (147) cm
Length of the cardigan: 53 (55) 57 (59) cm
Length of the sleeve: 43 (43) 43 (43) cm.
When choosing a size, decide how loose you would like this cardigan to be knitted.
You can measure comfortable cardigans of a similar silhouette and refer to those measurements.
The cardigan in the photo, demonstrated by the designer, is knitted with a 37 cm ease for a loose fit. However, you can choose a size considering the usual ease for oversized items (approximately 20 cm).
You can also choose a length recommended for a different size. In this case, knit the band according to the instructions for the size corresponding to the chosen length. For example, if you chose Size 2 but would like a length of 59 cm, knit the cardigan to this length, but then, when knitting the band, follow the instructions for Size 4.
Needles. Circular needles 4.5 mm and 5 mm with a cable length of 40 cm and 80-120 cm.
A set of double-pointed needles 4.5 mm.
Knitting gauge: 18 sts x 33 rows = 10 cm x 10 cm in textured pattern, using 5 mm needles.
Yarn.
1 strand of Gepard Garn (100% organic merino wool; 132 m in 50 g), 500 (600) 650 (750) g
TOGETHER WITH
1 strand of Kid Seta, Gepard Garn (70% super kid mohair, 30% silk; 210 m in 25 g), 150 (175) 200 (225) g.
Abbreviations:
LS / RS = right side / wrong side
st. = stitch knit / purl = knit st. / purl st. tbl / purl tbl = knit the stitch knitwise through the back loop / purlwise through the back loop.
2 tog k = knit 2 sts together as knit (1 st decreased with a right-leaning decrease)
sl = (slip 1 st as knit) x 2 times, return both sts to the left needle, reoriented, and knit them together as knit through the back loop. (1 st decreased with a left-leaning decrease) sl-purl = slip the stitch as purl with the yarn held at the back
sl-knit = slip the stitch as purl with the yarn held at the front
Inc1L = increase 1 st left-leaning: lift the strand between the stitches with the left needle, inserting the needle from the front, and knit it as knit through the back loop.
Inc1R = increase 1 st right-leaning: lift the strand between the stitches with the left needle, inserting the needle from the back, and knit it as knit through the front loop.
Inc1Li = increase 1 st purl left-leaning: lift the strand between the stitches with the left needle, inserting the needle from the front, and knit it as purl through the back loop.
Inc1Ri = increase 1 st purl right-leaning: lift the strand between the stitches with the left needle, inserting the needle from the back, and knit it as purl through the front loop.
Place marker = place a marker for the beginning of the round
Special techniques and methods.
Italian bind-off method in a flat row for the BODY.
Cut the yarn, leaving a tail about 4 times longer than the length of the piece.
Thread the yarn through a tapestry needle.
The working principle will be as follows:
Each open stitch will be processed twice: insert the tip of the needle into the knit stitches first as if you were going to knit the stitch purlwise, then – as if you were going to knit it knitwise, and then slip the stitch off the needle.
When processing purl stitches, insert the tip of the needle into the purl stitch first as if you were going to knit it knitwise, then – as if you were going to knit it purlwise, and then slip the stitch off the needle.
Initial Step.
Insert the end of the needle into the first stitch on the needle, as if you were going to knit it knitwise, pull the yarn through the stitch, and leave the stitch on the needle for now. Insert the needle into the second stitch, as if you were going to knit it purlwise, pull the yarn through it, and leave the stitch on the needle. Insert the needle into the first stitch, as if you were going to knit it purlwise, pull the yarn through it, and slip the stitch off the needle. From the WS of the work, insert the needle into the gap between the first and second stitches on the left needle, pull the yarn through this gap on the RS of the work. Insert the end of the needle into the second stitch, as if you were going to knit it knitwise, pull the yarn through the second stitch on the WS of the work.
Steps 1-5.
1. Insert the needle into the first stitch, as if you were going to knit it knitwise, pull the yarn through it, and slip the stitch off the needle.
2. Insert the needle into the stitch that is currently the second on the needle, as if you were going to knit it purlwise, pull the yarn through it, and leave the stitch on the needle (in the next repeat, this will be the first stitch).
3. Insert the needle into the first stitch on the needle, as if you were going to knit it purlwise, pull the yarn through it, and slip the stitch off the needle.
4. From the WS of the work, insert the needle into the gap between the first and second stitches and pull the yarn through to the RS of the work.
5. Insert the needle into the second stitch on the needle, as if you were going to knit it knitwise, pull the yarn through the second stitch on the WS of the work, and leave the stitch on the needle.
Repeat Steps 1-5 until there are 2 sts left on the needle.
Final Step (2 sts left on the needle)
Insert the needle into the first stitch, as if you were going to knit it knitwise, pull the yarn through, and slip the stitch off the needle. Insert the needle into the last stitch, as if you were going to knit it purlwise, pull the yarn through it, and slip the stitch off the needle.
Italian bind-off method in a flat row for the BUTTON BANDS.
Cut the yarn, leaving a tail about 4 times longer than the length of the piece.
Thread the yarn through a tapestry needle.
Initial Step.
1. Insert the end of the needle into the first two stitches on the needle, as if you were going to knit them together purlwise, pull the yarn through the stitches, and leave the stitches on the needle for now.
2. From the WS of the work, insert the needle into the gap between the second and third stitches on the left needle, pull the yarn through this gap on the RS of the work.
3. Insert the end of the needle into the third stitch, as if you were going to knit it knitwise, pull the yarn through to the WS of the work, and leave the stitch on the needle for now.
4. Insert the needle into the second and first stitches, as if you were going to knit them together knitwise, pull the yarn through them, and slip them off the needle.
5. Insert the needle into the second stitch on the needle, as if you were going to knit it purlwise, pull the yarn through it.
6. Insert the needle into the first stitch on the needle, as if you were going to knit it purlwise, pull the yarn through it, and slip the stitch off the needle.
7. From the WS of the work, insert the needle into the gap between the first and second stitches on the needle, pull the yarn through this gap on the RS of the work.
8. Insert the needle into the second stitch, as if you were going to knit it knitwise, pull the yarn through it on the WS of the work.
Steps 1-5.
1. Insert the needle into the first stitch, as if you were going to knit it knitwise, pull the yarn through it, and slip the stitch off the needle.
2. Insert the needle into the stitch that is currently the second on the needle, as if you were going to knit it purlwise, pull the yarn through it, and leave the stitch on the needle (in the next repeat, this will be the first stitch).
3. Insert the needle into the first stitch on the needle, as if you were going to knit it purlwise, pull the yarn through it, and slip the stitch off the needle.
4. From the WS of the work, insert the needle into the gap between the first and second stitches and pull the yarn through to the RS of the work.
5. Insert the needle into the second stitch on the needle, as if you were going to knit it knitwise, pull the yarn through the second stitch on the WS of the work, and leave the stitch on the needle.
Repeat Steps 1-5 until there are 4 sts left on the needle.
Final Step (4 sts left on the needle)
1. Insert the needle into the first stitch, as if you were going to knit it knitwise, pull the yarn through, and slip the stitch off the needle.
2. Insert the needle into the last 2 stitches (which are currently the second and third stitches), as if you were going to knit them together purlwise, pull the yarn through them, and slip them off the needle.
Italian bind-off method in the round for the SLEEVE.
The principle of binding off stitches using the Italian method in the round will be the same as in a flat row for the BODY, except for the initial and final steps.
Cut the yarn, leaving a tail about 4 times longer than the circumference of the piece.
Thread the yarn through a tapestry needle.
Initial Step. Insert the end of the needle into the first stitch on the needle, as if you were going to knit it purlwise, pull the yarn through the stitch, and slip the stitch off the needle. From the WS of the work, insert the end of the needle between the first and second stitches on the left needle, pull the yarn through this gap on the RS of the work. Insert the end of the needle into the second stitch, as if you were going to knit it knitwise, pull the yarn through the second stitch on the WS of the work.
Then repeat Steps 1-5 until there is 1 st left on the needle.
Final Step (when there is 1 stitch left on the needle): Insert the needle into the last stitch, as if you were going to knit it purlwise, pull the yarn through it, and slip the last stitch off the needle.
The video shows a different pullover (DIAMOND JUMPER), but the principle is the same.
WORK DESCRIPTION.
Back yoke.
Cast on 5 mm using the long tail cast-on method 19 (19) 19 (19) sts.
Work as follows:
Row 1 (WS): 1 knit, 1 purl, *1 purl, 1 knit*, repeat from * to * to the last 3 sts, 2 purl, 1 knit.
Row 2 (RS): 2 knit, Inc1L, *1 purl, 1 knit, 1 purl, 3 knit*, repeat from * to * to the last 5 sts, 1 purl, 1 knit, 1 purl, Inc1R, 2 knit (make the increase looser than usual).
Row 3: 1 knit, 1 purl, Inc1Ri, *1 knit, 1 purl*, repeat from * to * to the last 3 sts, 1 knit, Inc1Li, 1 purl, 1 knit (make the increase looser than usual).
= 23 (23) 23 (23) sts.
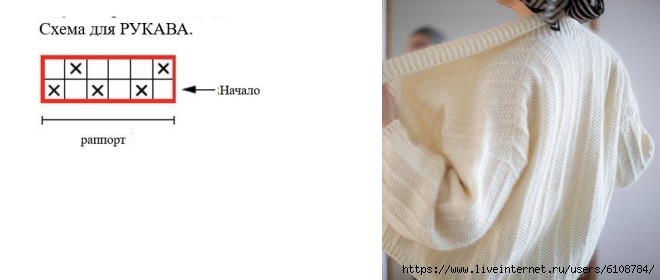
Continue knitting according to the YOKE CHART as follows (make the increases looser than usual):
Row 1 (RS): 2 knit, Inc1L, knit in textured pattern according to the YOKE CHART to the last 2 sts, Inc1R, 2 knit.
Row 2 (WS): 1 knit, 1 purl, Inc1Ri, knit in textured pattern according to the YOKE CHART to the last 2 sts, Inc1Li, 1 purl, 1 knit.
Repeat Rows 1-2 a total of 20 (20) 23 (23) times.
Then perform Row 1 (RS Row) one more time (= Row 5 of the YOKE CHART).
= 105 (105) 117 (117) sts.
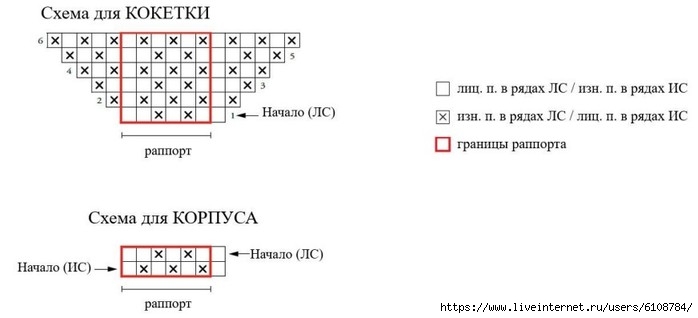
Next, knit according to the BODY CHART. Work as follows:
Row 1 (WS): 1 knit, knit in textured pattern according to the BODY CHART to the last st., 1 knit.
Row 2 (RS): 1 knit, knit in textured pattern according to the BODY CHART to the last st., 1 knit.
Repeat Rows 1-2 a total of 17 (15) 14 (14) times.
Then perform Row 1 one more time.
Next, knit several rows with increases to form the armholes. Continue knitting according to the BODY CHART.
Row 1 (RS): 1 knit, Inc1L, knit in textured pattern according to the BODY CHART to the last st., Inc1R, 1 knit.
Row 2 (WS): 1 knit, knit in textured pattern according to the BODY CHART to the last st., 1 knit. (the stitches increased in the previous row should be incorporated into the textured pattern).
Repeat Rows 1-2 a total of 1 (3) 3 (4) times.
= 107 (111) 123 (125) sts.
Cut the yarn. Set the stitches aside. Next, you will knit the front panels.
Right front panel.
From the RS of the work, pick up and knit 1 knit stitch along the right shoulder of the back (with 5 mm needles) as follows: Pick up and knit 1 st from the edge stitch of the armhole, then pick up and knit 44 (44) 50 (50) sts along the right shoulder.
= 45 (45) 51 (51) sts.
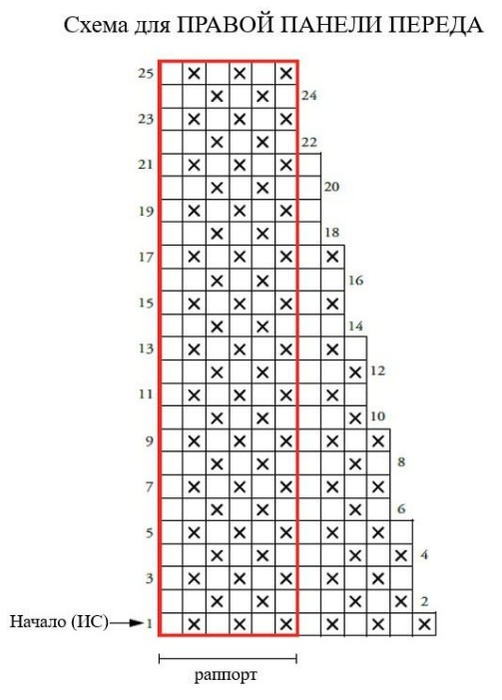
Knit in textured pattern according to the RIGHT FRONT PANEL CHART, while simultaneously making decreases on the armhole side:
Row 1 (WS): 1 knit, knit in textured pattern according to the RIGHT FRONT PANEL CHART to the last 2 sts, 1 purl, 1 knit.
Row 2 (RS): 1 knit, sl, knit in textured pattern according to the RIGHT FRONT PANEL CHART to the last st., 1 knit.
Row 3: 1 knit, knit in textured pattern according to the RIGHT FRONT PANEL CHART to the last 2 sts, 1 purl, 1 knit.
Row 4: 2 knit, knit in textured pattern according to the RIGHT FRONT PANEL CHART to the last st., 1 knit.
Row 5: knit as Row 3.
Repeat Rows 2-5 a total of 5 times.
All 25 rows of the RIGHT FRONT PANEL CHART are completed.
= 39 (39) 45 (45) sts.
Next, knit in textured pattern according to the BODY CHART. Work as follows:
Row 1 (RS): 1 knit, knit in textured pattern according to the BODY CHART to the last st., 1 knit.
Row 2 (WS): 1 knit, knit in textured pattern according to the BODY CHART to the last st., 1 knit.
Repeat Rows 1-2 a total of 31 (29) 31 (31) times.
Next, knit in textured pattern according to the BODY CHART, while simultaneously making increases for the armhole. Work as follows:
Row 1 (RS): 1 knit, Inc1L, knit in textured pattern according to the BODY CHART to the last st., 1 knit.
Row 2 (WS): 1 knit, knit in textured pattern according to the BODY CHART to the last st., 1 knit. (the stitch increased in the previous row should be incorporated into the textured pattern).
Repeat Rows 1-2 a total of 1 (3) 3 (4) times.
= 40 (42) 48 (49) sts.
Cut the yarn. Set the stitches aside. Next, you will knit the left front panel.
Left front panel.
From the RS of the work, pick up and knit knit stitches along the left shoulder of the back (with 5 mm needles) as follows:
Pick up and knit 44 (44) 50 (50) sts along the left shoulder of the back, then pick up and knit 1 st from the edge stitch of the armhole.
= 45 (45) 51 (51) sts.
Knit in textured pattern according to the LEFT FRONT PANEL CHART (see p. 9), while simultaneously making decreases on the armhole side:
Row 1 (WS): 1 knit, 1 purl, knit in textured pattern according to the LEFT FRONT PANEL CHART to the last st., 1 knit.
Row 2 (RS): 1 knit, knit in textured pattern according to the LEFT FRONT PANEL CHART to the last 3 sts, 2 tog knit, 1 knit.
Row 3: 1 knit, 1 purl, knit in textured pattern according to the LEFT FRONT PANEL CHART to the last st., 1 knit.
Row 4: 1 knit, knit in textured pattern according to the LEFT FRONT PANEL CHART to the last 2 sts, 2 knit.
Row 5: knit as Row 3.
Repeat Rows 2-5 a total of 5 times.
All 25 rows of the LEFT FRONT PANEL CHART are completed.
= 39 (39) 45 (45) sts.

Next, knit in textured pattern for the BODY. Work as follows:
Row 1 (RS): 1 knit, knit in textured pattern according to the BODY CHART to the last st., 1 knit.
Row 2 (WS): 1 knit, knit in textured pattern according to the BODY CHART to the last st., 1 knit.
Repeat Rows 1-2 a total of 31 (29) 31 (31) times.
Next, knit in textured pattern according to the BODY CHART, while simultaneously making increases for the armhole. Work as follows:
Row 1 (RS): 1 knit, knit in textured pattern according to the BODY CHART to the last st., Inc1R, 1 knit.
Row 2 (WS): 1 knit, knit in textured pattern according to the BODY CHART to the last st., 1 knit. (the stitch increased in the previous row should be incorporated into the textured pattern).
Repeat Rows 1-2 a total of 1 (3) 3 (4) times.
= 40 (42) 48 (49) sts.
Do not cut the yarn.
Joining the front and back panels>
Now you will need to join the front panels and the back, picking up new stitches for the underarm.
Work as follows:
Left panel: 1 knit, knit in textured pattern according to the JOINING ROW CHART.
Underarm: cast on 1 (3) 3 (7) sts using the Backwards Loop Cast On method.
Back: knit in textured pattern according to the JOINING ROW CHART.
Underarm: cast on 1 (3) 3 (7) sts using the Backwards Loop Cast On method.
Right panel: knit in textured pattern according to the JOINING ROW CHART to the last st., 1 knit.
= 189 (201) 225 (237) sts.

Body of the cardigan.
Knit the body of the cardigan in textured pattern according to the BODY CHART, in flat rows.
Work as follows:
Row 1 (WS): 1 knit, knit in textured pattern according to the BODY CHART to the last st., 1 knit.
Row 2 (RS): 1 knit, knit in textured pattern according to the BODY CHART to the last st., 1 knit.
Repeat Rows 1-2 until the length of the cardigan reaches approximately 50 (52) 54 (56) cm, measuring from the center of the back. Finish with a WS row.
Change to 4.5 mm needles.
Knit the hem of the cardigan in twisted ribbing 1 x 1 as follows:
Row 1 (RS): 1 knit, *1 tbl knit, 1 purl*; repeat from * to * to the last 2 sts, 1 tbl knit, 1 knit.
Row 2 (WS): 1 knit, *1 purl, 1 tbl knit*; repeat from * to * to the last 2 sts, 2 tbl knit, 1 knit.
Repeat Rows 1-2 a total of 2 times.
Next Row: 1 knit, *1 tbl knit, 1 sl-knit*; repeat from * to * to the last 2 sts, 1 tbl knit, 1 knit. (Do not pull the yarn too tightly when slipping the stitches).
Final Row: 1 knit, *1 sl-knit, 1 tbl knit*; repeat from * to * to the last 2 sts, 1 sl-knit, 1 knit. (Do not pull the yarn too tightly when slipping the stitches).
Bind off the stitches using the Italian method (see the section Special techniques and methods – Bind off for the BODY, p. 2).
Button bands and collar.
You will need to pick up and knit knit stitches along the edges of the button bands and the neckline of the back.
Work with 4.5 mm needles.
From the RS of the work, pick up and knit 121 (127) 131 (137) sts from the bottom of the right front panel to the right shoulder line. Then pick up and knit 1 st from the shoulder line, then 19 sts along the neckline of the back (to the shoulder line), then another 1 st from the left shoulder line. Next, pick up and knit 121 (127) 131 (137) sts from the left shoulder line to the bottom of the left front panel.
= 263 (275) 283 (295) sts.
Knit the band in flat rows in twisted ribbing as follows:
Row 1 (WS): 1 sl-knit, *1 purl, 1 tbl knit*; repeat from * to * to the last 2 sts, 1 purl, 1 knit.
Row 2 (RS): 1 sl-knit, *1 tbl knit, 1 purl*; repeat from * to * to the last 2 sts, 1 tbl knit, 1 knit.
Repeat Rows 1-2 to a height of 11 cm for the band. Then perform Row 1 one more time.
Next Row (RS): 1 sl-knit, *1 tbl knit, 1 sl-knit*; repeat from * to * to the last 2 sts, 1 tbl knit, 1 knit. (Do not pull the yarn too tightly when slipping the stitches)
Final Row (WS): 1 sl-knit, *1 sl-knit, 1 tbl knit*; repeat from * to * to the last 2 sts, 1 sl-knit, 1 knit. (Do not pull the yarn too tightly when slipping the stitches)
Bind off the stitches using the Italian method (see the section Special techniques and methods – Bind off for the BUTTON BANDS, p. above).
Sleeves.
You will need to pick up and knit knit stitches along the armholes from the WS of the work.
Work with 5 mm needles.
Right sleeve:
Pick up and knit 1 (3) 3 (7) sts from the stitches cast on for the underarm, pick up and knit 22 (21) 21 (22) sts along the armhole of the back, pick up and knit 49 (48) 54 (55) sts along the armhole of the front.
= 72 (72) 78 (84) sts.
Left sleeve:
Pick up and knit 1 (3) 3 (7) sts from the stitches cast on for the underarm, pick up and knit 49 (48) 54 (55) sts along the armhole of the front, and pick up and knit 22 (21) 21 (22) sts along the armhole of the back.
= 72 (72) 78 (84) sts. For both sleeves:
Join the stitches in the round. Knit 1 (2) 2 (4) knit. Place marker.
Knit the sleeve in the round, in textured pattern according to the SLEEVE CHART until the length of the sleeve reaches 40 (40) 40 (40) cm. Or knit 3 cm shorter than the desired total length of the sleeve.
Change to 4.5 mm needles.
Work the cuff of the sleeve in twisted ribbing: *1 tbl knit, 1 purl*; repeat from * to * to the end of the round.
Complete a total of 4 rounds in twisted ribbing.
Next Round: *1 tbl knit, 1 sl-knit*; repeat from * to * to the end of the round. (Do not pull the yarn too tightly when slipping the stitches).
Final Round: *1 sl-purl, 1 purl*; repeat from * to * to the end of the round. (Do not pull the yarn too tightly when slipping the stitches).
Bind off the stitches using the Italian method (see the section Special techniques and methods – Bind off using the Italian method for the SLEEVE).