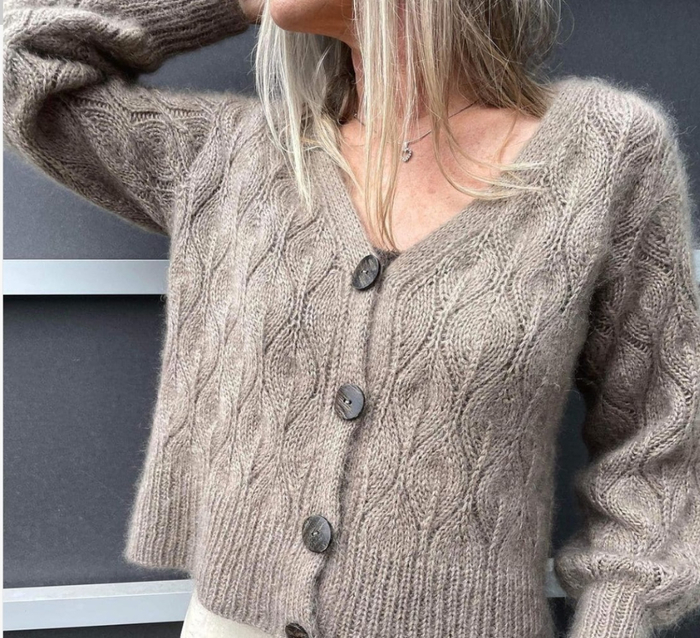
Light blue jacket with a beautiful voluminous tulip pattern
Added: 22.02.2014 в 09:55 Views: 90773
Light blue jacket with a beautiful voluminous tulip patternKlubokhttp://klubok.work/1/2/4485/Klubokhttps://klubok.work/css/image/top-logo-en.png


You will need: 200 g of yarn "Boheme" (50% goat down, 50% wool, 225 m/50 g) light blue color (0300); 3 glass buttons 0.8 x 0.8 mm; circular needles size 3.5; hook size 2; knitting needle.
Knitting technique:
Stockinette stitch: knit on the right side, purl on the wrong side.
"Tulips" pattern: knit according to charts 1 and 2.
Knitting density.
Stockinette stitch with size 3.5 needles: 20 st. x 30 rows = 10 x 10 cm;
Sample knitted with the pattern according to chart 1:
1 repeat at the beginning of knitting: 17 st. x 14 rows = 8.5 x 5.5 cm,
1 repeat at the end of knitting: 14 st. x 12 rows = 6.5 x 5 cm.
Attention! The front and back of the jacket are knitted as a single piece in stockinette stitch. The bands that transition into the peplum, the lower part of the sleeves, and the collar are knitted with a decorative "tulips" pattern.
WORK DESCRIPTION
Decorative detail. Start with the decorative detail. Cast on 393 st. (23 repeats of 17 st. + 2 edge st.) and knit 37 rows according to chart 1 (23 repeats of 14 st. + 2 edge st. = 324 st.). In the next row, purl all stitches, then in the right side row make decreases for rounding the detail at the bottom of the band: after the 4th repeat (57 st.) knit *2 st. together knitwise, knit 1 st.*, repeat 16 more times, 159 st. knit, then *2 st. together knitwise, knit 1 st.*, repeat 16 more times, 56 knit st., 1 edge st. Then knit 2 rows in stockinette stitch, set the work aside.
Front and back, knitted as a single piece. Cast on 94 st. (80 st. for the back and 7 st. for each front) and knit, making increases for rounding the fronts at each edge: 4 times 2 st. in every 2nd row and 6 times 1 st. in every 2nd row (122 st.). Then mark the conditional boundaries of the side seams with a colored thread (21st st. from each edge) and start making decreases, knitting 3 st. together knitwise with the central st. in the middle: in the 20th row, then 2 times in every 6th row. Then make increases only for the fronts by 1 st. on each side from the side boundary: 3 times in every 6th row (128 st.). After 18 cm from the lower edge, divide the fabric into 3 parts: 21 st. for the left front, 86 st. for the back, 21 st. for the right front and finish knitting these parts separately.
Right front. Shape the armhole of the right front: close 5 st. on the left side, then 1 time 2 st. and 2 times 1 st. in every 2nd row (12 st.). At a height of 11 cm from the beginning of the armhole, make decreases for the neckline on the right side: knit 2 st. together knitwise next to the edge st., then 2 times knit 2 st. together every 4th row (9 st.). At a height of 17 cm from the beginning of the armhole, close 9 st. for the shoulder.
Left front. Knit symmetrically to the right front.
Back. Shape the armholes for the back: close 5 st. on each side, then 1 time 2 st. and 2 times 1 st. in every 2nd row (68 st.). After 14 cm from the beginning of the armhole, make decreases for the neckline: close the middle 30 st., finish both parts of the back separately, continuing to make decreases for the neckline: close 1 time 5 st., 1 time 4 st. and 1 time 1 st. on each side. Close the remaining 9 st. for the shoulder at a height of 17 cm from the beginning of the armhole.
Sleeves. Cast on 87 st. (5 repeats of 17 st. + 2 edge st.) and knit 37 rows with the pattern according to chart 1 (72 st.). Continue working in stockinette stitch, making decreases in the next right side row: knit 2 st. together knitwise every 13th and 14th st. (67 st.). After 31 cm from the lower edge, make decreases for the armholes: close 5 st. on each side, then 1 time 2 st. and 2 times 1 st. in every 2nd row (49 st.). Then knit straight. After 12 cm from the beginning of the armholes, shape the cap: close 1 st. on each side, then 1 time 1 st., 1 time 2 st., 1 time 3 st., 1 time 4 st. and 1 time 5 st. in every 2nd row. Close the remaining 17 st.
Assembly and finishing. Join the shoulder seams. The open stitches of the decorative band are to be attached to the single piece of the back and fronts, making a slight gathering of the band along the curve of the fronts. Join the sleeves at the side seam, setting them into the armholes.
Collar. Cast on 155 st. (9 repeats of 17 st. + 2 edge st.) and knit according to chart 2 for 35 rows (128 st.). Knit 2 more rows in stockinette stitch. Attach the open stitches along the neckline, starting under the band of the right decorative front, retreating 10 cm down from the shoulder seam and ending under the band of the left front at a distance of 10 cm from the shoulder.
Finish the edges of the band, sleeves, and collar with a crochet edge: crochet 1 single crochet in each st., making 2 chain stitches between them.
Sew buttons to the left front, placing them at the peaks of the 3rd, 4th, and 5th repeats. Use the decorative band's lace holes as buttonholes.


with a hook
The "Tulips" pattern. An airy, light, yet voluminous pattern that resembles tulip buds. It looks impressive and allows for interesting silhouette lines that give the item elegance and charm. However, the only inconvenience is that knitting a sufficiently large group of stitches with needles – a whole 16!!! at once turned out to be very uncomfortable, and after knitting, the stitches become too stretched, loose, and create extra holes that disrupt the overall appearance of the pattern.
A light and technically convenient way to knit a large number of stitches together - using a hook. In this case, the stitches at the top are tightly gathered, and the pattern is neat.
Knit the specified number of stitches together knitwise: insert the hook into the stitches on the left needle from right to left, grab the working yarn, pull out 1 stitch. Again grab the yarn, pull it through this stitch, tighten it, and transfer it to the right needle.